2009 JAGUAR XF child seat
[x] Cancel search: child seatPage 61 of 391
61
Child safety
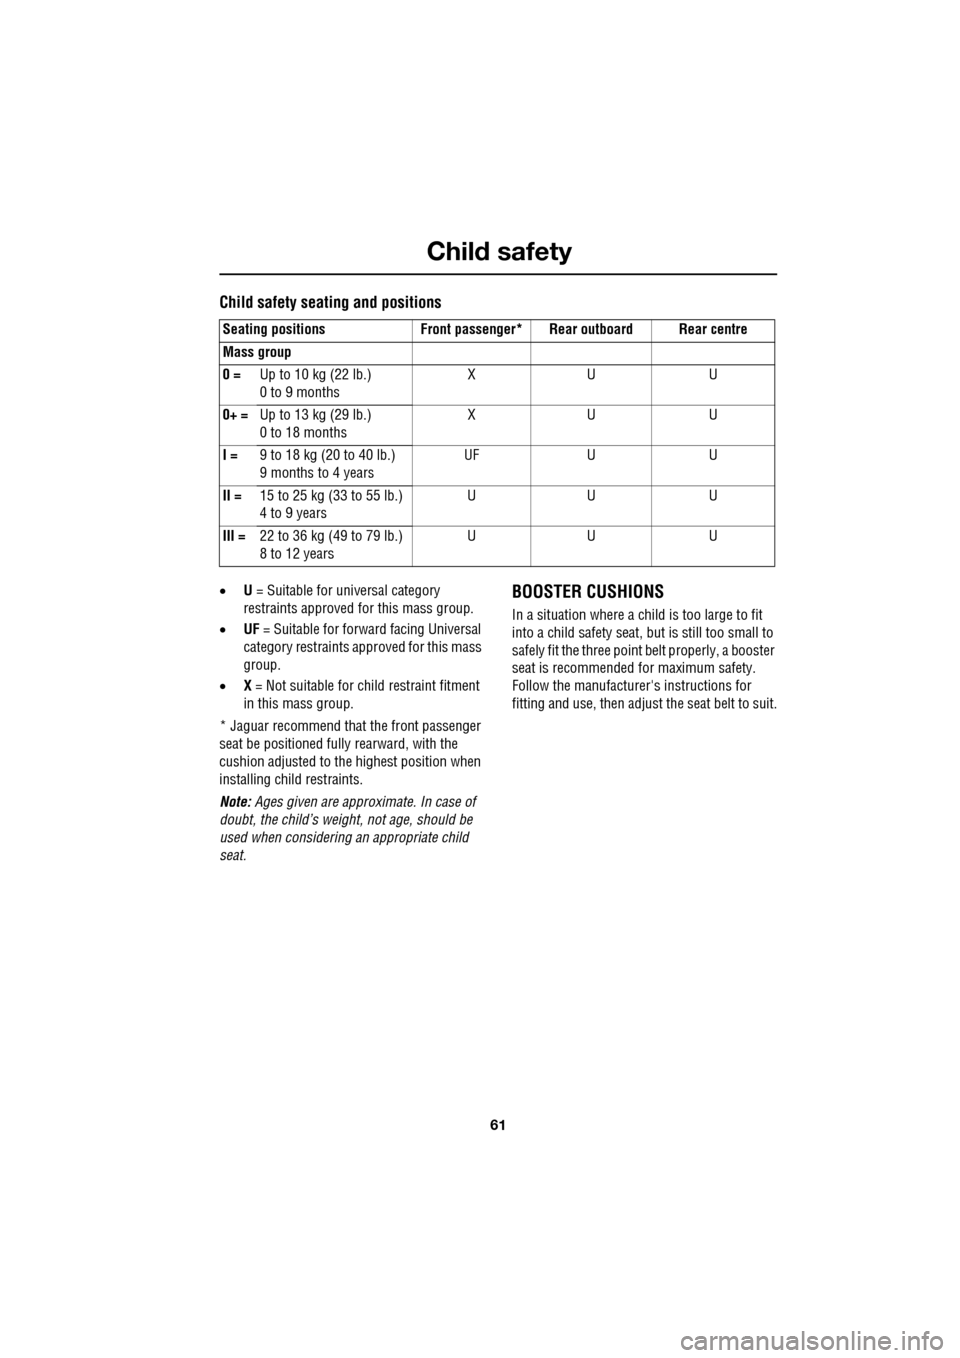
Child safety seating and positions
•U = Suitable for universal category
restraints approved for this mass group.
• UF = Suitable for forward facing Universal
category restraints approved for this mass
group.
• X = Not suitable for child restraint fitment
in this mass group.
* Jaguar recommend that the front passenger
seat be positioned fully rearward, with the
cushion adjusted to the highest position when
installing child restraints.
Note: Ages given are approximate. In case of
doubt, the child’s weight, not age, should be
used when considering an appropriate child
seat.BOOSTER CUSHIONS
In a situation where a child is too large to fit
into a child safety seat, but is still too small to
safely fit the three point belt properly, a booster
seat is recommended for maximum safety.
Follow the manufacturer's instructions for
fitting and use, then adjust the seat belt to suit.
Seating positions Front passen
ger* Rear outboard Rear centre
Mass group
0 = Up to 10 kg (22 lb.)
0 to 9 months XU U
0+ = Up to 13 kg (29 lb.)
0 to 18 months XU U
I = 9 to 18 kg (20 to 40 lb.)
9 months to 4 years UF
UU
II = 15 to 25 kg (33 to 55 lb.)
4 to 9 years UU U
III = 22 to 36 kg (49 to 79 lb.)
8 to 12 years UU U
Page 62 of 391
Child safety
62
CHILD SEAT ANCHOR POINTS
ISOFIX anchor points (not Australia)
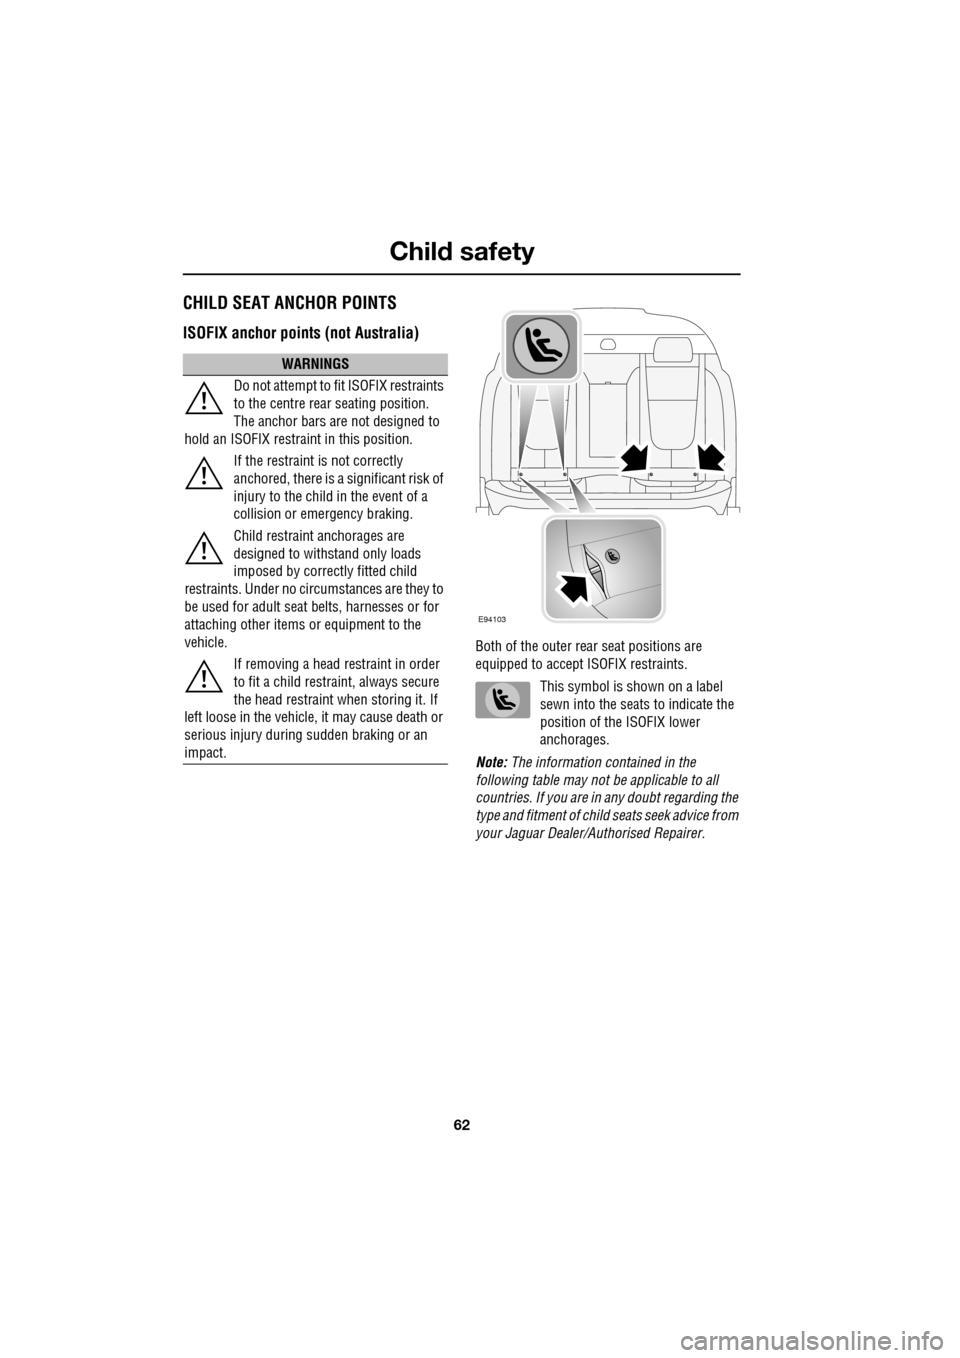
Both of the outer rear seat positions are
equipped to accept ISOFIX restraints.
This symbol is shown on a label
sewn into the seats to indicate the
position of the ISOFIX lower
anchorages.
Note: The information contained in the
following table may not be applicable to all
countries. If you are in any doubt regarding the
type and fitment of child seats seek advice from
your Jaguar Dealer/A uthorised Repairer.
WARNINGS
Do not attempt to fit ISOFIX restraints
to the centre rear seating position.
The anchor bars are not designed to
hold an ISOFIX restraint in this position.
If the restraint is not correctly
anchored, there is a significant risk of
injury to the child in the event of a
collision or emergency braking.
Child restraint anchorages are
designed to withstand only loads
imposed by correctly fitted child
restraints. Under no circumstances are they to
be used for adult seat belts, harnesses or for
attaching other items or equipment to the
vehicle.
If removing a head restraint in order
to fit a child restraint, always secure
the head restraint when storing it. If
left loose in the vehicle, it may cause death or
serious injury during sudden braking or an
impact.
E94103
Page 63 of 391
63
Child safety
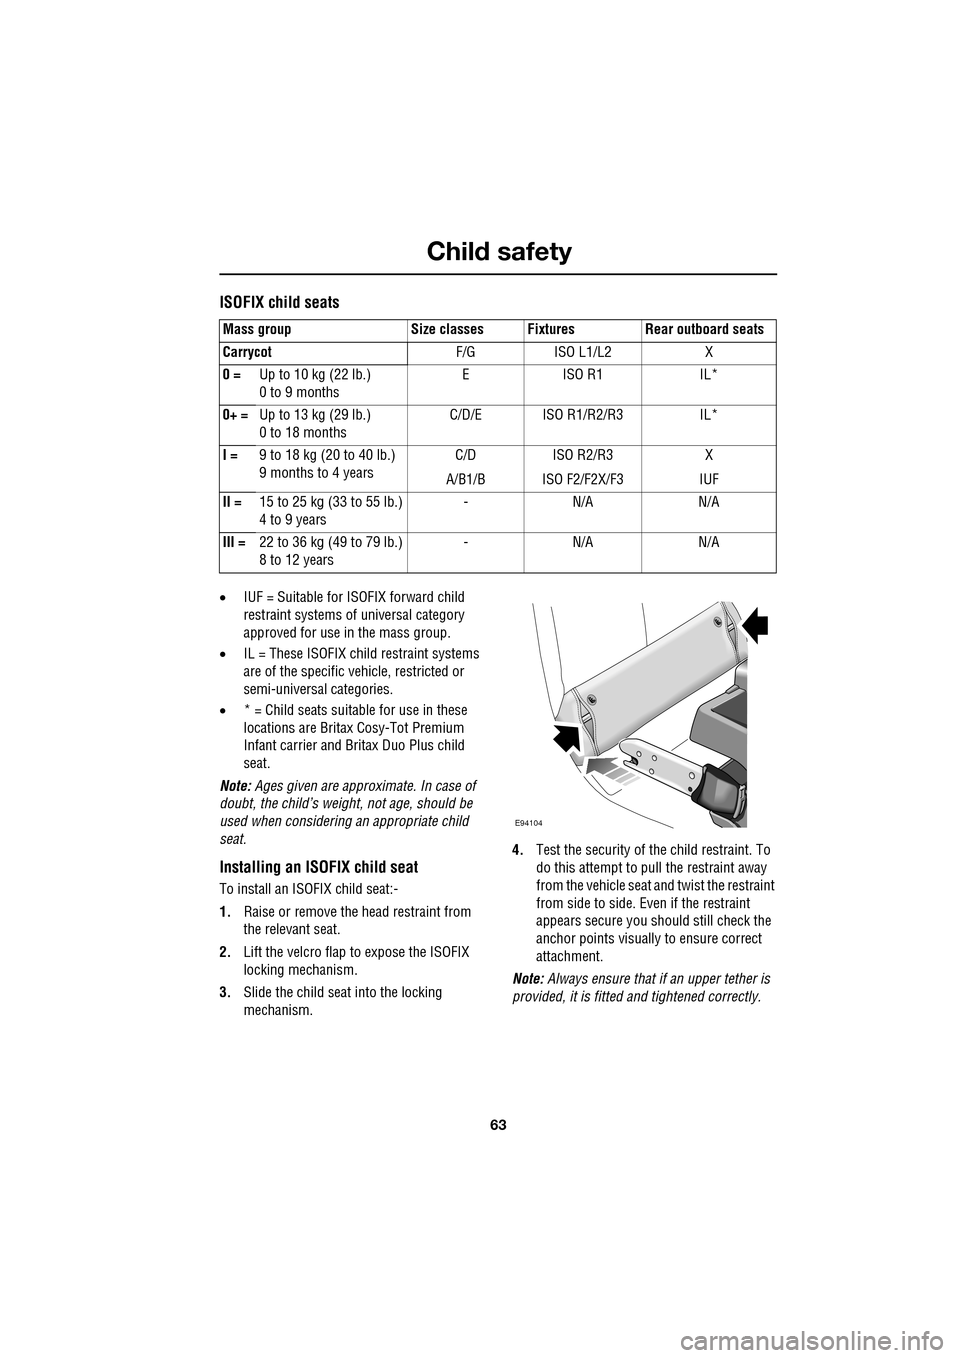
ISOFIX child seats
•IUF = Suitable for ISOFIX forward child
restraint systems of universal category
approved for use in the mass group.
• IL = These ISOFIX child restraint systems
are of the specific vehicle, restricted or
semi-universal categories.
• * = Child seats suitable for use in these
locations are Britax Cosy-Tot Premium
Infant carrier and Br itax Duo Plus child
seat.
Note: Ages given are approximate. In case of
doubt, the child’s weight, not age, should be
used when considering an appropriate child
seat.
Installing an ISOFIX child seat
To install an ISOFIX child seat:-
1. Raise or remove the head restraint from
the relevant seat.
2. Lift the velcro flap to expose the ISOFIX
locking mechanism.
3. Slide the child seat into the locking
mechanism. 4.
Test the security of the child restraint. To
do this attempt to pull the restraint away
from the vehicle seat and twist the restraint
from side to side. Even if the restraint
appears secure you s hould still check the
anchor points visually to ensure correct
attachment.
Note: Always ensure that if an upper tether is
provided, it is fitted and tightened correctly.
Mass group Size classes Fixtures Rear outboard seats
Carrycot
F/G ISO L1/L2 X
0 = Up to 10 kg (22 lb.)
0 to 9 months EISO R1 IL*
0+ = Up to 13 kg (29 lb.)
0 to 18 months C/D/E ISO R1/R2/R3 IL*
I = 9 to 18 kg (20 to 40 lb.)
9 months to 4 years C/D
A/B1/B ISO R2/R3
ISO F2/F2X/F3 X
IUF
II = 15 to 25 kg (33 to 55 lb.)
4 to 9 years -N/A N/A
III = 22 to 36 kg (49 to 79 lb.)
8 to 12 years -N/A N/A
E94104
Page 64 of 391

Child safety
64
Tether anchorage points (Australia only)
Note: A tether anchorage is provided for the
centre seat position. Do not use this anchor
position with an ISOFIX child seat.
Attaching tether straps
1. Install the child restrain t securely in one of
the rear seating positions.
2. Pass the tether strap over the seat back
and beneath the head restraint.
3. Attach the tether strap hook to the tether
anchor point on the back of the seat.
Ensure that the tether strap hook is facing
the correct way. See illustration.
4. Tighten the tether strap according to the
manufacturer's instructions.
WARNING
Child restraint anchorages are
designed to withstand only those
loads imposed by correctly fitted
child restraints. Under no circumstances are
they to be used for adult seat belts, harnesses
or for attaching other items or equipment to
the vehicle.
If a child seat or restraint system is to
be fitted to the centre seating
position, the centre armrest must be
in the stowed position (folded into the seat).
E94105
Page 65 of 391
65
Child safety
CHILD SAFETY LOCKS
Child safety locks are fitted to the rear doors to
allow you to prevent accidental opening of the
doors when the vehicle is in motion.
If children are to be carried in the rear seat
positions, it is recommended that the rear door
interior handles are disabled.
Note: For convenience, the rear door interior
handles should be re-e nabled when carrying
adult passengers in th e rear seat positions.
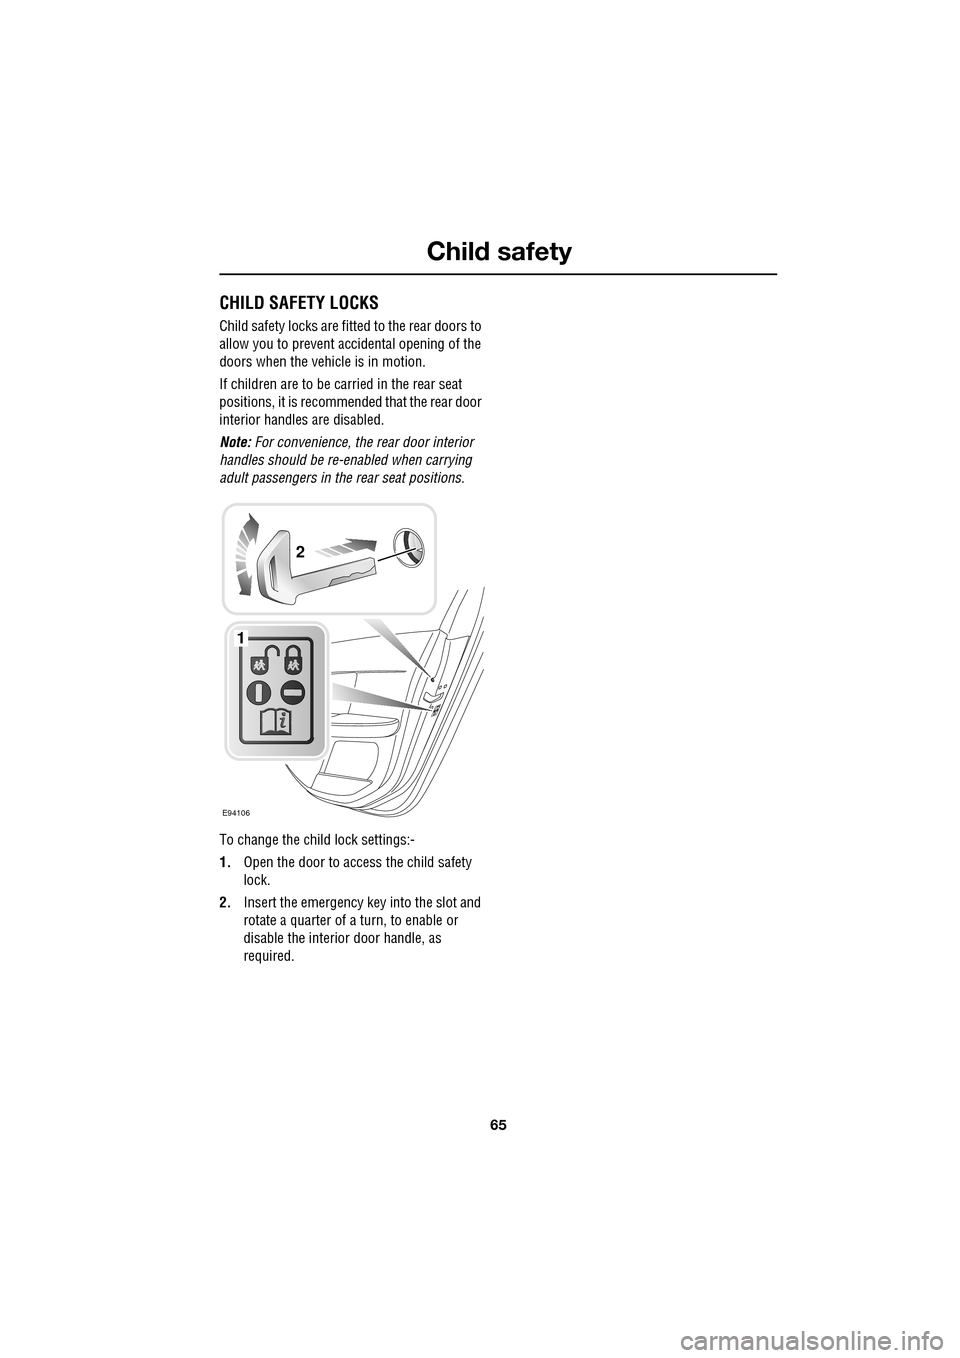
To change the child lock settings:-
1. Open the door to access the child safety
lock.
2. Insert the emergency key into the slot and
rotate a quarter of a turn, to enable or
disable the interior door handle, as
required.
E94106
1
2
Page 94 of 391
Windows and mirrors
94
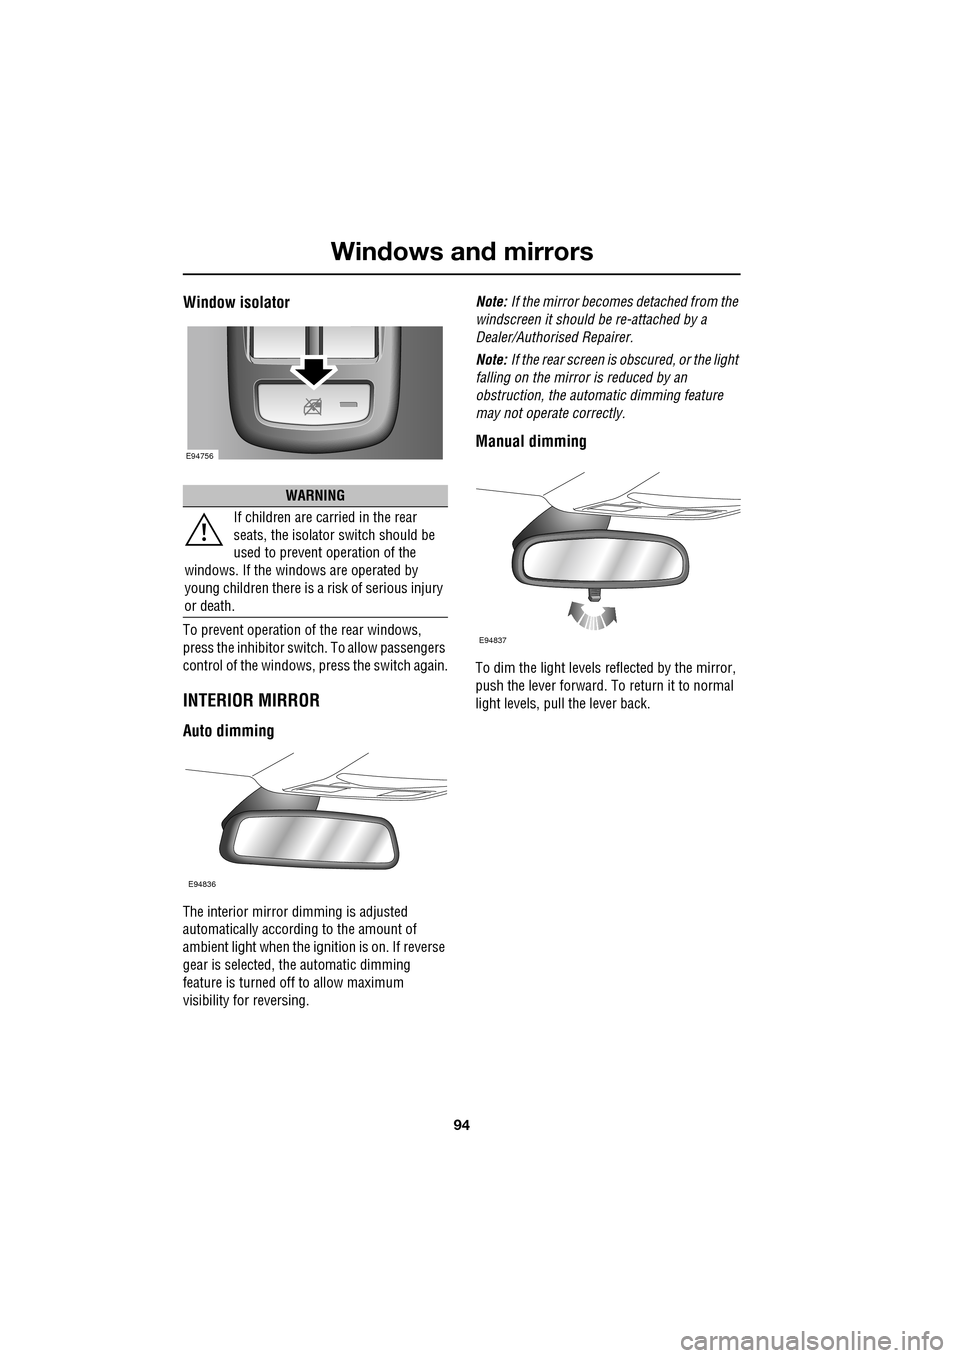
Window isolator
To prevent operation of the rear windows,
press the inhibitor switch. To allow passengers
control of the windows, press the switch again.
INTERIOR MIRROR
Auto dimming
The interior mirror dimming is adjusted
automatically according to the amount of
ambient light when the i gnition is on. If reverse
gear is selected, the automatic dimming
feature is turned off to allow maximum
visibility for reversing. Note:
If the mirror becomes detached from the
windscreen it should be re-attached by a
Dealer/Authorised Repairer.
Note: If the rear screen is obscured, or the light
falling on the mirror is reduced by an
obstruction, the automa tic dimming feature
may not operate correctly.
Manual dimming
To dim the light levels re flected by the mirror,
push the lever forward. To return it to normal
light levels, pull the lever back.
WARNING
If children are carried in the rear
seats, the is olator switch should be
used to prevent operation of the
windows. If the windows are operated by
young children there is a risk of serious injury
or death.
E94756
E94836
E94837
Page 252 of 391
Status after a collision
252
When driving
When driving a vehicle which has been
involved in a collision use caution and pay extra
attention to the operation of the vehicle. If any
changes in vehicle operation after the collision
are noted when compared to it's operation
before the collision, do not continue to drive
the vehicle. Stop the vehi cle as soon as it is
safe to do so, and have the vehicle recovered.
Pay particular attent ion to changes in:-
• Steering.
• Braking.
• Unusual noises.
• Warning lights or messages displayed.
• Problems with electrical systems.
INSPECTING SAFETY SYSTEM
COMPONENTS
Following a collision the seat belt and
Supplementary Restrain t System components
should be inspected for damage and/or
deformity. The inspection and any subsequent
repair work should only be carried out by a
Dealer/Authorised Repair er, or other suitably
qualified personnel.
Components which require inspection
include:-
• Seat belt webbing and mechanisms.
• Seat belt pre-tensioners.
• Airbag covers and modules.
• Seat frames a nd mounting points.
• Child seats.
• Child seat anchor points.
• Pedestrian prot ection system.
Note: This list is not exhaustive.
In addition to the physical items checked, the
electronic control system and its associated
wiring should also be checked thoroughly. This
process will include a diagnostic check which
can only be carried out by a Dealer/Authorised
repairer or suitably qualified and equipped
persons.
WARNING
It is not recommended that the
vehicle be driven or used until all of
the occupant protection systems
have been checked.
Page 382 of 391

Index
382
Bulb changing . . . . . . . . . . . . . . . . . . . . . . 83direction indicator bulb (front) . . . . . . . 84
headlamp unit bulbs . . . . . . . . . . . . . . . 83
high level brake lamp . . . . . . . . . . . . . . 86
number plate lamp bulb . . . . . . . . . . . . 86
rear lamp bulbs . . . . . . . . . . . . . . . . . . . 85
side lamp bulb . . . . . . . . . . . . . . . . . . . 85
side repeater lamp . . . . . . . . . . . . . . . . 85
Bulb specification chart . . . . . . . . . . . . . . . 87
C
Cancel guidance . . . . . . . . . . . . . . . . . . . 350
Car wash . . . . . . . . . . . . . . . . . . . . . . . . . 187
Cautions . . . . . . . . . . . . . . . . . . . . . . . . . . . 9
Changing a bulb . . . . . . . . . . . . . . . . . . . . 83 general information . . . . . . . . . . . . . . . . 83
Changing a fuse. . . . . . . . . . . . . . . . . . . . 241 checking or renewing a blown fuse . . . 241
Changing a road wheel . . . . . . . . . . . . . . 225
locking wheel nuts . . . . . . . . . . . . . . . 226
spare wheel location . . . . . . . . . . . . . . 226
temporary use spare wheel . . . . . . . . . 225
tightening the wheel nuts . . . . . . . . . . 229
wheel changing procedure . . . . . . . . . 228
wheel changing safety. . . . . . . . . . . . . 227
Changing the remote cont rol battery . . . . . 24
Changing the vehicle battery . . . . . . . . . . 215
battery disposal. . . . . . . . . . . . . . . . . . 215
Changing the wiper blades . . . . . . . . . . . . 91 changing the wiper blades . . . . . . . . . . 92
service position . . . . . . . . . . . . . . . . . . . 91
Channel automatic tuning . . . . . . . . . . . . 284
Channel options. . . . . . . . . . . . . . . . . . . . 284 DAB search . . . . . . . . . . . . . . . . . . . . . 286
finding a channel. . . . . . . . . . . . . . . . . 285
finding a subchannel . . . . . . . . . . . . . . 285
finding an ensemble . . . . . . . . . . . . . . 286
Charging the vehicle battery . . . . . . . . . . 215
Checking the wiper blades . . . . . . . . . . . . . 90
Child safety locks . . . . . . . . . . . . . . . . . . . 65
Child seat anchor points . . . . . . . . . . . . . . 62 installing an ISOFIX child seat. . . . . . . . 63
ISOFIX anchor points . . . . . . . . . . . . . . 62
tether anchorage points . . . . . . . . . . . . 64
Child seat positioning . . . . . . . . . . . . . . . . 60 Child seats . . . . . . . . . . . . . . . . . . . . . . . . . 59
child restraint check list . . . . . . . . . . . . . 60
Cleaning the alloy wheels . . . . . . . . . . . . . 187
Cleaning the exterior . . . . . . . . . . . . . . . . . 187
bird droppings . . . . . . . . . . . . . . . . . . . 189
cleaning the rear screen . . . . . . . . . . . . 189
glass surfaces . . . . . . . . . . . . . . . . . . . 189
polishing . . . . . . . . . . . . . . . . . . . . . . . 189
removing grease and tar. . . . . . . . . . . . 189
underbonnet cleaning . . . . . . . . . . . . . . 188
using an automatic wash . . . . . . . . . . . 188
washing the vehicle paintwork . . . . . . . 187
Cleaning the interior . . . . . . . . . . . . . . . . . 189 airbag module covers . . . . . . . . . . . . . . 191
carpet and mats . . . . . . . . . . . . . . . . . . 191
cloth and fabric . . . . . . . . . . . . . . . . . . 190
instrument pack, clock, and audio equipment . . . . . . . . . . . . . . . . . . . . 190
leather . . . . . . . . . . . . . . . . . . . . . . . . . 190
removing stains . . . . . . . . . . . . . . . . . . 190
seat belts . . . . . . . . . . . . . . . . . . . . . . . 191
Climate seats . . . . . . . . . . . . . . . . . . . . . . . 48 backrest ventilation only. . . . . . . . . . . . . 48
cooled ventilation . . . . . . . . . . . . . . . . . . 48
heated ventilation . . . . . . . . . . . . . . . . . . 48
Clock. . . . . . . . . . . . . . . . . . . . . . . . . . . . . 124 setting the clock as the screensaver . . . 124
Compact disc display options . . . . . . . . . . 296
Compact disc pause . . . . . . . . . . . . . . . . . 295
Compact disc player CD compatibility . . . . . . . . . . . . . . . . . . 292
loading CDs . . . . . . . . . . . . . . . . . . . . . 292
Compact disc selection . . . . . . . . . . . . . . . 294
Compass view. . . . . . . . . . . . . . . . . . . . . . 360
Condensation - lamps . . . . . . . . . . . . . . . . . 76
Controls overview . . . . . . . . . . . . . . . . . . . . 12
Coolant check . . . . . . . . . . . . . . . . . . . . . . 204
Cornering lamps . . . . . . . . . . . . . . . . . . . . . 79
Cruise control . . . . . . . . . . . . . . . . . . . 74, 156
principle of operation . . . . . . . . . . . . . . 156
Cup holders . . . . . . . . . . . . . . . . . . . . . . . 126 twin cup holder . . . . . . . . . . . . . . . . . . 127