2009 JAGUAR XF Tyre pressure
[x] Cancel search: Tyre pressurePage 217 of 391

217
Wheels and tyres
11.Wear rate indicator. A tyre rated at 400 for
example, will last twice as long as a tyre
rated at 200.
12. The traction rating grades a tyres
performance when stopping on a wet road
surface. The higher the grade the better the
braking performance. The grades from
highest to lowest are, AA, A, B, and C.
13. The maximum load which can be carried
by the tyre.
14. Heat resistance grading. The tyre's
resistance to heat is grade A, B, or C, with
A indicating the greatest resistance to heat.
This grading is provided for a correctly
inflated tyre, which is being used within its
speed and loading limits.
15. The maximum inflation pressure for the
tyre. This pressure should not be used for
normal driving.
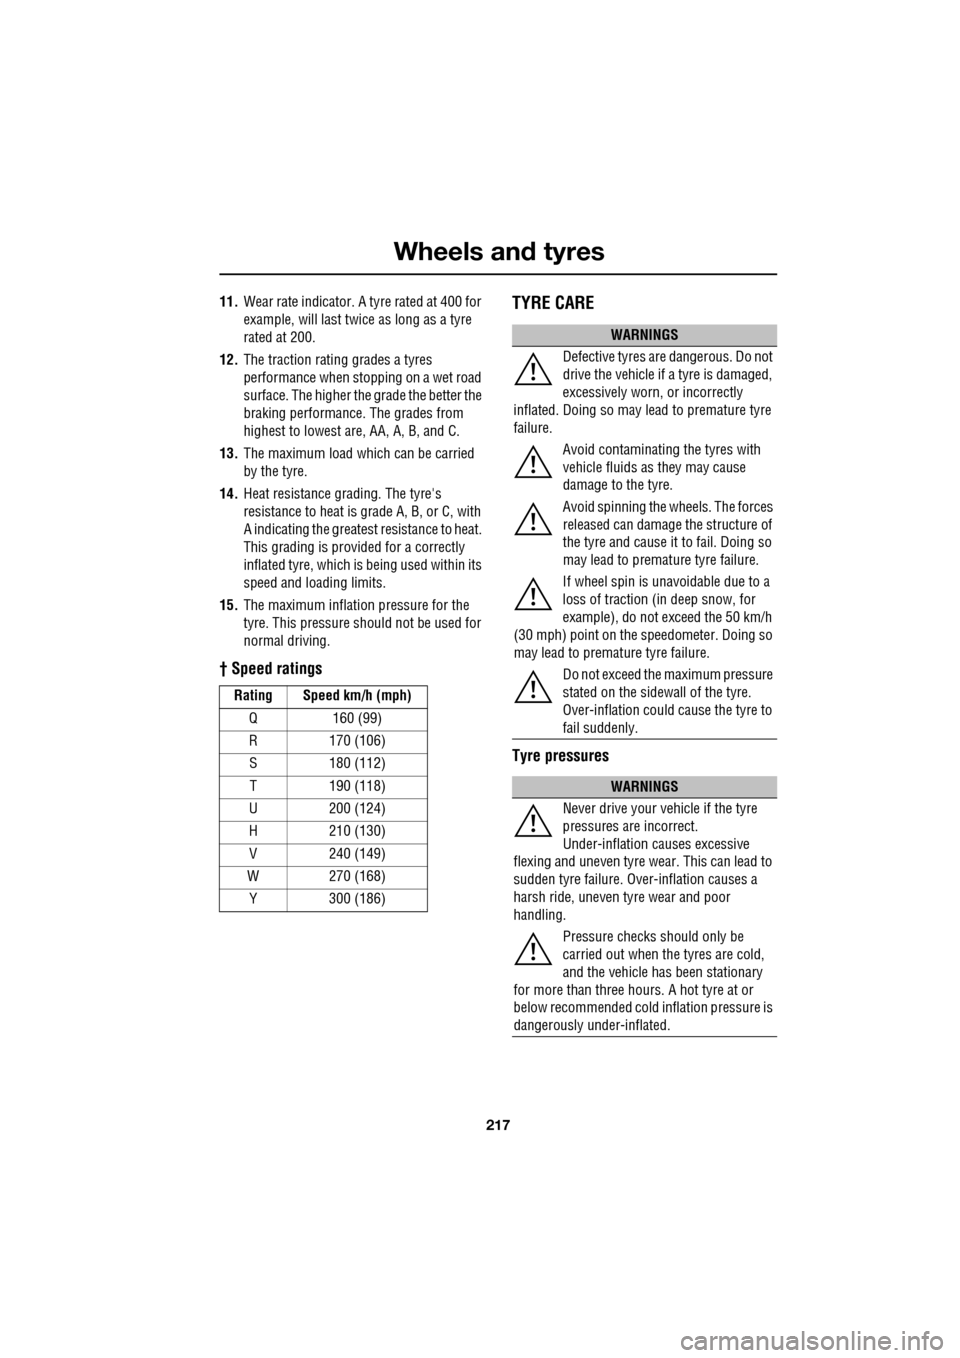
† Speed ratings
TYRE CARE
Tyre pressures
Rating Speed km/h (mph)
Q 160 (99)
R 170 (106)S 180 (112)
T 190 (118)
U 200 (124)
H 210 (130)
V 240 (149)
W 270 (168) Y 300 (186)
WARNINGS
Defective tyres are dangerous. Do not
drive the vehicle if a tyre is damaged,
excessively worn, or incorrectly
inflated. Doing so may lead to premature tyre
failure.
Avoid contaminating the tyres with
vehicle fluids as they may cause
damage to the tyre.
Avoid spinning the wh eels. The forces
released can damage the structure of
the tyre and cause it to fail. Doing so
may lead to premature tyre failure.
If wheel spin is unavoidable due to a
loss of traction (i n deep snow, for
example), do not exceed the 50 km/h
(30 mph) point on the speedometer. Doing so
may lead to premature tyre failure.
Do not exceed the maximum pressure
stated on the sidewall of the tyre.
Over-inflation could cause the tyre to
fail suddenly.
WARNINGS
Never drive your vehicle if the tyre
pressures are incorrect.
Under-inflation causes excessive
flexing and uneven tyre we ar. This can lead to
sudden tyre failure. Ov er-inflation causes a
harsh ride, uneven tyre wear and poor
handling.
Pressure checks should only be
carried out when the tyres are cold,
and the vehicle has been stationary
for more than three hours. A hot tyre at or
below recommended cold inflation pressure is
dangerously under-inflated.
Page 218 of 391

Wheels and tyres
218
All of the vehicle's tyres (including the spare)
should be checked regularly for damage, wear
and distortion. If you are in any doubt about the
condition of a tyre, have it checked immediately
by a tyre repair centre or your
Dealer/Authorised repairer.
Checking the tyre pressures
The recommended tyre pressures are listed on
a placard label fixed to the end of the left-hand
side door. These pressures provide optimum
ride and handling charac teristics for all normal
operating conditions.
If winter tyres are fitted, please refer to the
winter tyre pressure information. SeeUSING
WINTER TYRES (page 223).
In the interest of safe ty, reliability and fuel
efficiency, check the tyres, including the spare,
for condition and pressu re on a weekly basis
and before long journeys.
Do not check tyre pressures immediately after
the vehicle has travelled in excess of 1.6 km
(1.0 mile). Tyre temperatures and pressures
increase when running. Deflating a warm tyre
to the recommended pressure will result in
under-inflation.
If tyre pressures are checked while the vehicle
is inside a protected covered area, e.g. a
garage, and subsequent ly driven in lower
outdoor temperatures, tyre under-inflation
could occur.
A slight pressure loss occurs naturally with
time. If this exceeds 0.14 bar (2 lbf/in², 14 kPa,)
per week, have the cause investigated and
rectified by qualified assistance.
Tyre pressures (including the spare) should be
checked at least once a week with normal
on-road use, but should be checked daily if the
vehicle is used off-road. Always check the tyre
pressures before setti ng off on a long journey.
If it is necessary to check tyre pressures when
the tyres are warm, you should expect the
pressures to have increased by up to
0.3-0.4 bar (4-6 lbf/in², 30-40 kpa). Do not
reduce the tyre pressures to the cold inflation
pressure under these circumstances. Allow the
tyres to cool fully before adjusting the
pressures.
If the vehicle has been parked in
strong sunlight, or used in high
ambient temperatures do not reduce
the tyre pressures. move the vehicle into the
shade and allow the tyres to cool before
re-checking the pressures.
WARNING
Tyre pressures should be checked
regularly using an accurate pressure
gauge, when the tyres are cold.
Failure to properly maintain your tyre
pressures could increase the risk of tyre failure
resulting in loss of vehicle control and
personal injury.
WARNINGS
E95180
Page 219 of 391

219
Wheels and tyres
The following procedure should be used to
check and adjust the tyres pressures.
1.Remove the valve cap.
2. Firmly attach a tyre pressure gauge/inflator
to the valve.
3. Read the tyre pressure from the gauge,
and add air if required.
4. If air is added to the tyre, remove the gauge
and re-attach it be fore reading the
pressure. Failure to do so may result in an
inaccurate reading.
5. If the tyre pressure is too high, remove the
gauge and allow air out of the tyre by
pressing the centre of the valve. Refit the
gauge to the valve and check the pressure.
6. Repeat the process a dding or removing air
as required until the correct tyre pressure
is reached.
7. Refit the valve cap.
Note: It is an offence in certain countries to
drive a vehicle with incorrect tyre pressures.
Note: It is the driver's responsibility to ensure
that the tyre pressures are correct.
Tyre valves
Keep the valve caps screwed down firmly to
prevent water or dirt entering the valve. Check
the valves for leaks when checking the tyre
pressures.
Pressure compensation for ambient
temperature changes
If the intended journey will take the vehicle into
an area where the ambien t local temperature is
known to be lower than the journey start point,
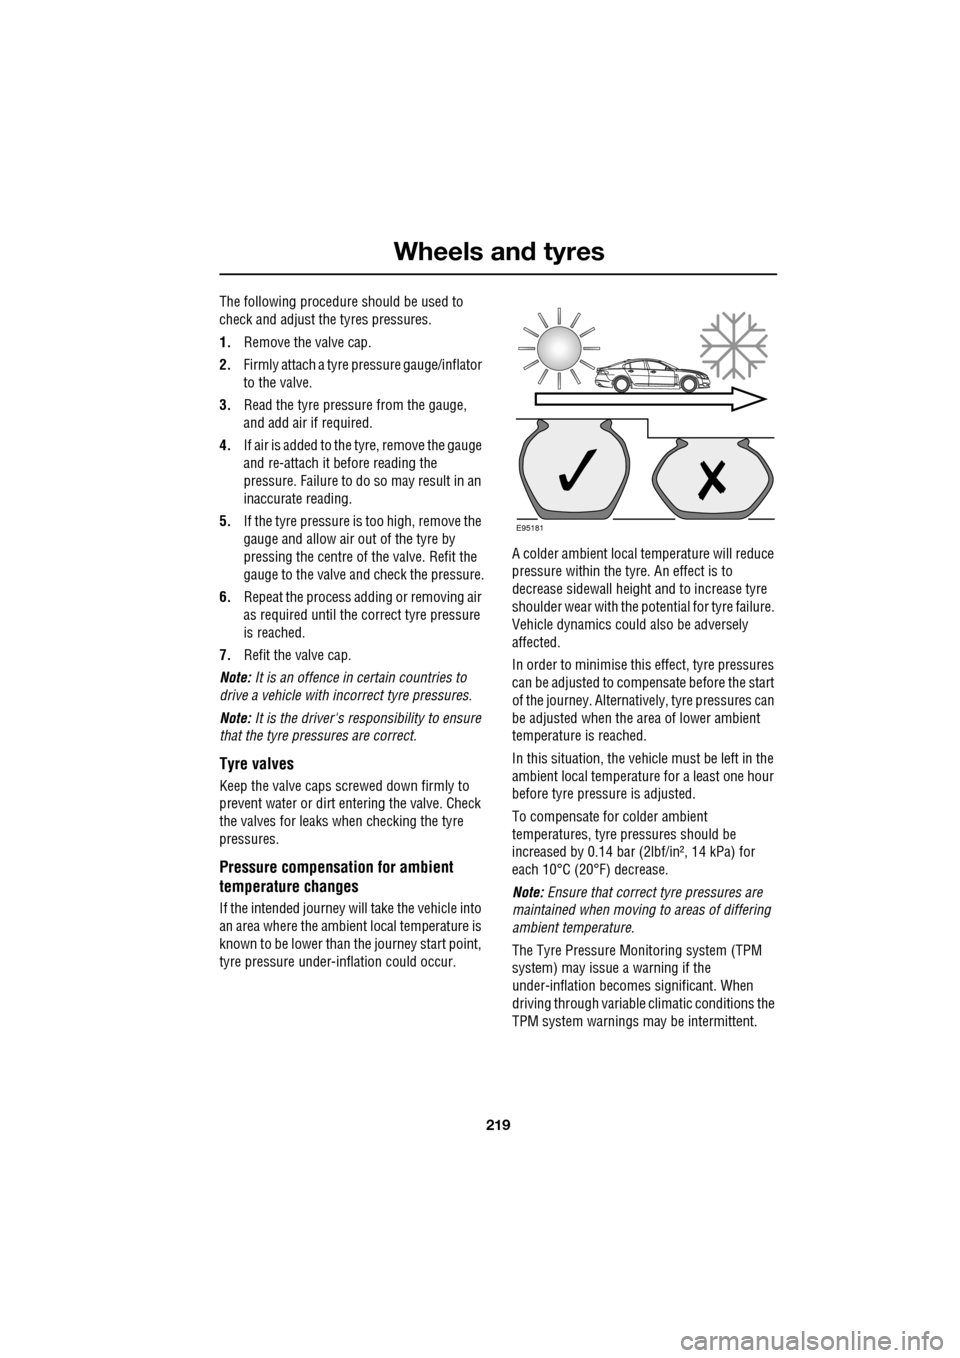
tyre pressure under-i nflation could occur. A colder ambient local temperature will reduce
pressure within the tyre. An effect is to
decrease sidewall height
and to increase tyre
shoulder wear with the potential for tyre failure.
Vehicle dynamics could also be adversely
affected.
In order to minimise this effect, tyre pressures
can be adjusted to compensate before the start
of the journey. Alternatively, tyre pressures can
be adjusted when the area of lower ambient
temperature is reached.
In this situation, the vehicle must be left in the
ambient local temperature for a least one hour
before tyre pressu re is adjusted.
To compensate for colder ambient
temperatures, tyre pressures should be
increased by 0.14 bar (2lbf/in², 14 kPa) for
each 10°C (20°F) decrease.
Note: Ensure that correct tyre pressures are
maintained when moving to areas of differing
ambient temperature.
The Tyre Pressure M onitoring system (TPM
system) may issue a warning if the
under-inflation becomes significant. When
driving through variable climatic conditions the
TPM system warnings may be intermittent.
E95181
Page 220 of 391

Wheels and tyres
220
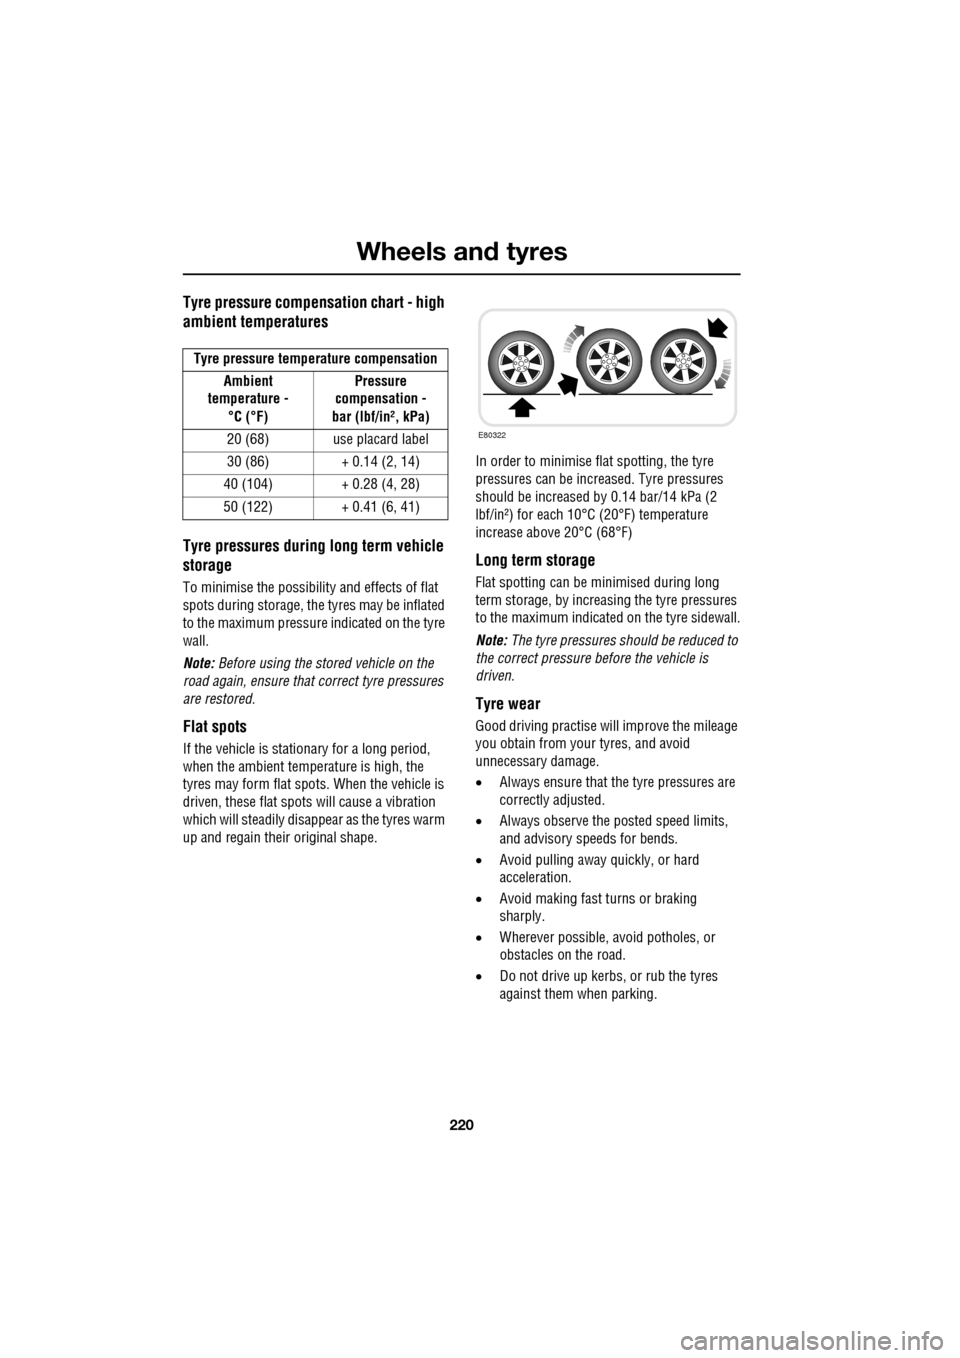
Tyre pressure compensation chart - high
ambient temperatures
Tyre pressures during long term vehicle
storage
To minimise the possibility and effects of flat
spots during storage, the tyres may be inflated
to the maximum pressure indicated on the tyre
wall.
Note: Before using the st ored vehicle on the
road again, ensure that correct tyre pressures
are restored.
Flat spots
If the vehicle is stati onary for a long period,
when the ambient temperature is high, the
tyres may form flat spots. When the vehicle is
driven, these flat spots will cause a vibration
which will steadily disappear as the tyres warm
up and regain their original shape. In order to minimise flat spotting, the tyre
pressures can be increa
sed. Tyre pressures
should be increased by 0.14 bar/14 kPa (2
lbf/in²) for each 10°C (20°F) temperature
increase above 20°C (68°F)
Long term storage
Flat spotting can be minimised during long
term storage, by increasing the tyre pressures
to the maximum indicated on the tyre sidewall.
Note: The tyre pressures s hould be reduced to
the correct pressure before the vehicle is
driven.
Tyre wear
Good driving practise will improve the mileage
you obtain from your tyres, and avoid
unnecessary damage.
• Always ensure that the tyre pressures are
correctly adjusted.
• Always observe the posted speed limits,
and advisory speeds for bends.
• Avoid pulling away quickly, or hard
acceleration.
• Avoid making fast turns or braking
sharply.
• Wherever possible, avoid potholes, or
obstacles on the road.
• Do not drive up kerbs, or rub the tyres
against them when parking.
Tyre pressure temperature compensation
Ambient
temperature -
°C (°F) Pressure
compensation -
bar (lbf/in², kPa)
20 (68) use placard label
30 (86) + 0.14 (2, 14)
40 (104) + 0.28 (4, 28)
50 (122) + 0.41 (6, 41)
E80322
Page 223 of 391

223
Wheels and tyres
USING WINTER TYRES
Winter tyres are more suitable during extremes
of low temperatures, snow and ice and will
considerably improve the vehicle’s handling
during these conditions.
Do not exceed 240 km/h (150 mph) when
using Jaguar approved winter tyres.
Winter tyres must be fitted to all four wheels.
Approved winter tyre sizes
Front :
• Dunlop Wintersport M3 - 235/55R17 99H,
245/45R18 96V, 245/45R18 100V,
245/40R19 98V.
• W240 Pirelli Sotto Zero - 245/45R18 100V,
245/40R19 98V, 255/35R20 97V
Rear:
• Dunlop Wintersport M3 - 235/55R17 99H,
245/45R18 96V, 245/45R18 100V,
245/40R19 98V.
• W240 Pirelli Sotto Zero - 245/45R18 100V,
245/40R19 98V, 285/30R20 99V
Winter tyre pressures
USING SNOW CHAINS
Snow chains, of the recommended type, can
only be fitted to rear wheels. They should not
be used on temporary use spare wheels.
You should contact your Dealer/Authorised
Repairer for details and availability of approved
snow chains.
The maximum speed when using snow chains
is 50 km/h (30 mph).
Remove the snow chains immediately the
roads are clear of snow.
Ensure the fitting instructions supplied with the
snow chains are kept in a safe place, for
example, with this literature pack.
Note: When using snow chains, select
JaguarDrive Control Winter mode with DSC
switched on.
CAUTION
Tyres with an all season icon or M+S
have a level of winter performance and
need not be replaced.
Up to 240 km/h (150 mph)
Front 2.0 bar (30 lbf/in², 207 kPa)
Rear 2.3 bar (33 lbf/in², 230 kPa)
CAUTION
It is essential that only snow chains of
the recommended type are fitted, other
snow chains may cause damage to the vehicle.
Page 224 of 391

Wheels and tyres
224
RUN FLAT TYRES
Run-flat tyres can be identified by the lettering
RSC on the sidewall. The tyre construction
utilises a specially reinforced sidewall, which
allows the vehicle to be driven at restricted
speeds, even when the tyre is depressurised.
Run-flat tyres can only be fitted to special rims,
constructed for ru n-flat tyre use.
A tyre pressure monitoring system is
mandatory when the vehicle is fitted with
run-flat tyres. See TYRE PRESSURE
MONITORING SYSTEM (page 234).
If the tyre has deflated, the vehicle should be
driven with caution, as handling characteristics
will be different compared to a fully inflated
tyre.
If the vehicle is fully la den with passengers and
luggage, the maximum di stance that can be
completed on a fully deflated tyre, is
approximately 80 kilo metres (50 miles).
Stop immediately if the tyre construction
begins to break down or if the tyre dislodges
from the wheel rim. Typi cally, this will be
accompanied by excessive vibration.
A tyre driven in a defl ated condition must be
replaced as s oon as possible. Vehicles fitted with run-flat tyres are not fitted
with a spare wheel or jacking equipment.
Therefore, run-flat tyre
s should be replaced
with the same type of tyre.
TOOL KIT
Tool kit contents
1. Jack.
2. Wheel brace.
3. Chock.
4. Locking wheel nut adaptor.
5. Towing eye.
Note: When returning the tool kit to its stowage
position, hook the T-bar of the clamp over the
jack handle, to se cure in position.
Note: The jack requi res occasional
maintenance. Examine the jack for wear,
damage or corrosion and lubricate the moving
parts.
WARNING
If a run-flat tyre is deflated, maximum
vehicle speed must not exceed
80 km/h (50 mph).
E91708
WARNING
After use, the tool kit should be
returned to the under floor storage
area and correctly stowed. Do not
leave the tool kit or it s components loose in the
storage area, as they can prove hazardous
during an impact or sudden manoeuvre.
E95183
5
1
34
2
Page 226 of 391

Wheels and tyres
226
Locking wheel nuts
Vehicles may be equipped with a locking wheel
nut on each wheel. These are similar to
standard wheel nuts, and can only be removed
using the special adaptor provided with the
jacking equipment.
1. Insert the adaptor firmly onto the locking
wheel nut.
2. Using the wheel brace, unscrew the wheel
nut and adaptor.
3. Return the locking wheel nut adaptor to the
correct storage position.
Note: A code number is stam ped on the side of
the locking nut. Ensure the number is recorded
on the Security Card supplied with the
literature pack. Quot e this number if a
replacement is require d. Do not keep the
Security Card in the vehicle.
Spare wheel location
The spare wheel and jacking tools are stored
under the luggage compartment floor panel.
To remove the spare wheel: Raise the luggage
compartment floor panel, hooking the strap
over the upper boot seal as illustrated.
Unscrew the Tee bolt, re leasing the retaining
clamp and hook.
Remove the tool tray from the spare wheel and
remove the spare wheel from the luggage
compartment.
Remove the jack and wheel nut wrench from
the tray.
Note: When refitting the Tee bolt, ensure that
the retaining hook ( 1) fits over the jack handle,
as illustrated.
If the vehicle is fitted with Tyre
Pressure Monitoring System (TPM
System). See
TYRE PRESSURE
MONITORING SYSTEM (page 234).
DSC must be on when the temporary
use spare wheel is in use.
WARNINGS
E91709
JAG1304
JAG13271
Page 229 of 391

229
Wheels and tyres
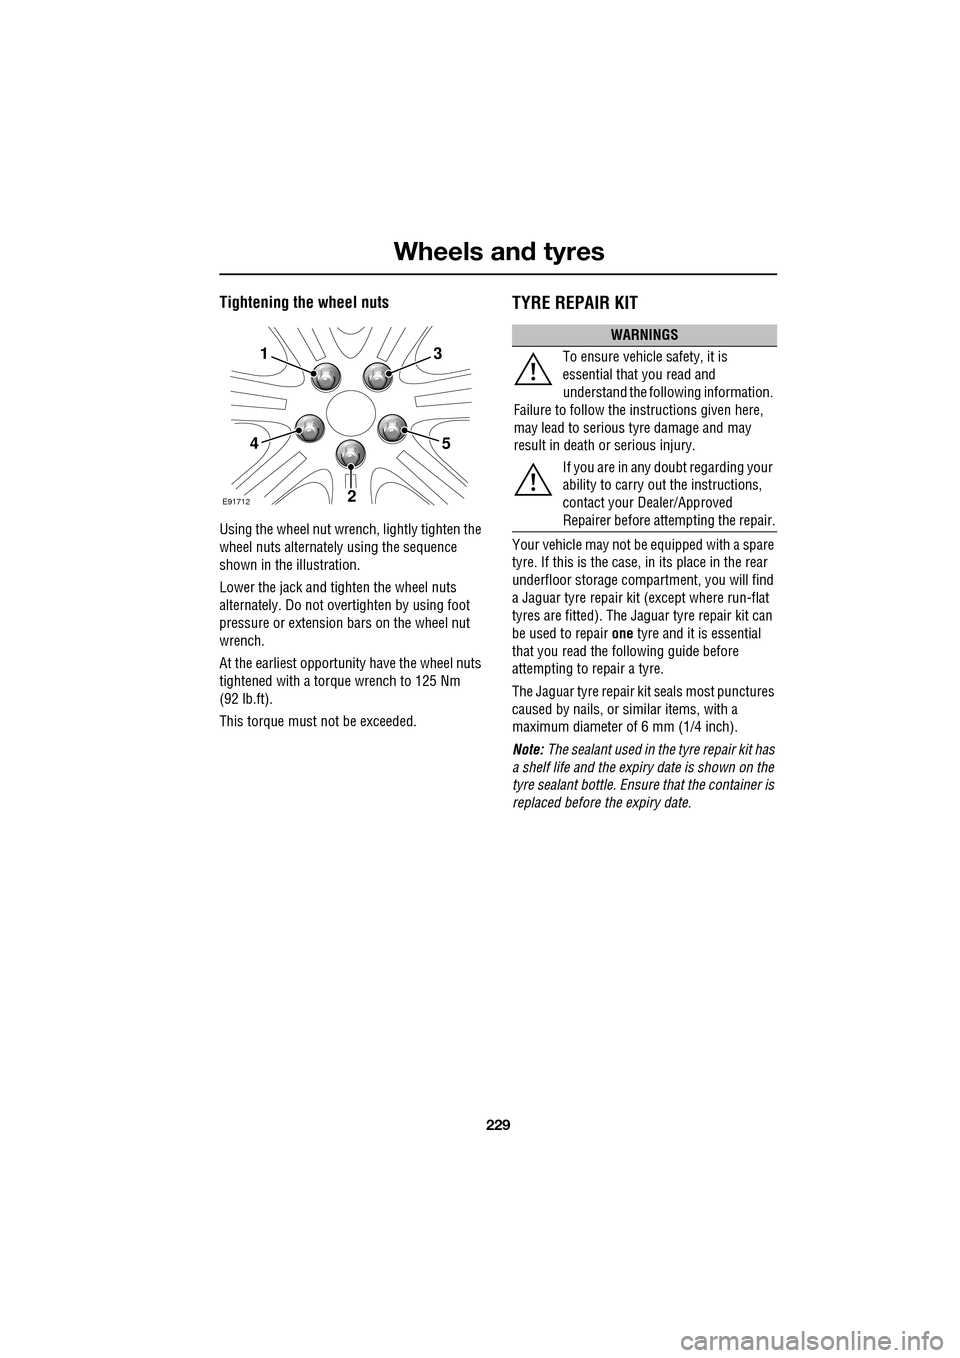
Tightening the wheel nuts
Using the wheel nut wrench, lightly tighten the
wheel nuts alternately using the sequence
shown in the illustration.
Lower the jack and tighten the wheel nuts
alternately. Do not over tighten by using foot
pressure or extension bars on the wheel nut
wrench.
At the earliest opportuni ty have the wheel nuts
tightened with a torque wrench to 125 Nm
(92 lb.ft).
This torque must not be exceeded.
TYRE REPAIR KIT
Your vehicle may not be equipped with a spare
tyre. If this is the case, in its place in the rear
underfloor storage compartment, you will find
a Jaguar tyre repair kit (except where run-flat
tyres are fitted). The Jaguar tyre repair kit can
be used to repair one tyre and it is essential
that you read the following guide before
attempting to repair a tyre.
The Jaguar tyre repair kit seals most punctures
caused by nails, or si milar items, with a
maximum diameter of 6 mm (1/4 inch).
Note: The sealant used in the tyre repair kit has
a shelf life and the expiry date is shown on the
tyre sealant bottle. Ensure that the container is
replaced before the expiry date.
1
4
2
5
3
E91712
WARNINGS
To ensure vehicle safety, it is
essential that you read and
understand the following information.
Failure to follow the instructions given here,
may lead to serious tyre damage and may
result in death or serious injury.
If you are in any doubt regarding your
ability to carry out the instructions,
contact your Dealer/Approved
Repairer before at tempting the repair.