2009 JAGUAR XF AUX
[x] Cancel search: AUXPage 232 of 391

Wheels and tyres
232
Using the Jaguar tyre repair kit
Note: All vehicle drivers and occupants should
be made aware that a temporary repair has
been made to a tyre fitted to the vehicle. They
should also be made aware of the special
driving conditions im posed when using a
repaired tyre.
Repair procedure
1. Open the tyre repair kit and peel off the
maximum speed label. Attach the label to
the fascia in the driver's field of vision.
Take care not to obstruct any of the
instruments or warning lights.
2. Uncoil the compressor power cable and
the inflation hose.
3. Unscrew the orange cap from the sealant
bottle receiver and the sealant bottle cap.
4. Screw the sealant bottle into the receiver
(clockwise) until tight.
•Screwing the bottle onto the receiver will
pierce the bottle's se al. Do not unscrew
a full, or partly us ed bottle from the
receiver. Doing so will result in sealant
leaking from the bottle.
5. Remove the valve cap from the damaged
tyre.
6. Remove the protective cap from the
inflation hose and connect the inflation
hose to the tyre valve. Ensure that the hose
is screwed on firmly.
7. Ensure that the compressor switch is in
the off (0) position.
8. Insert the power cable connector into the
auxiliary power socket. See AUXILIARY
POWER SOCKETS (page 125).
WARNINGS
Avoid skin contact with the sealant
which contains natu ral rubber latex.
If the tyre inflati on pressure does not
reach 1.8 bar (26 lbf/in², 180 kPa)
within seven minutes, the tyre may
have suffered excessive damage. A temporary
repair will not be poss ible, and the vehicle
should not be driven until the tyre has been
replaced.
CAUTIONS
Before attempting a ty re repair, ensure
that the vehicle is parked safely, as far
away from passing traffic as possible.
Ensure that the parki ng brake is applied
and P (Park) is selected.
Do not attempt to remove foreign
objects such as nails, screws, etc. from
the tyre.
Always run the engine when using the
compressor, unless the vehicle is in an
enclosed or poorly ventil ated space, as this
may cause asphyxiation.
To prevent overheating, do not operate
the compressor continuously for longer
than ten minutes.
WARNING
Check the tyre sidewall prior to
inflation. If there are any cracks,
bumps or similar damage, do not
attempt to inflate the tyre. Do not stand
directly beside the tyre while the compressor
is pumping. Watch the ty re sidewall. If any
cracks, bumps or simila r damage appear, turn
off the compressor and let the air out by
means of the pressure relief valve. Do not
continue to use the tyre.
Page 233 of 391

233
Wheels and tyres
9.Unless the vehicle is in an enclosed area,
start the engine.
10. Set the compressor switch to the on ( I)
position.
11. Inflate the tyre to a minimum of 1.9 bar
(26 lbf/in²) and a maximum of 3.5 bar
(51 lbf/in²).
•When pumping the sealant through the
tyre valve, the pressure may rise up to 6
bar (87 lbf/in²). The pressure will drop
again after approximately 30 seconds.
12. During the inflation, switch the
compressor off briefly, to check the tyre
pressure using the gauge mounted on the
compressor.
• It should not take longer than seven
minutes to inflate the tyre. If, after seven
minutes, the tyre has not yet reached
minimum pressure, the tyre should not
be used.
13. Once the tyre has been inflated, switch off
the compressor. If desired, the engine may
be turned off after the compressor has
been turned off.
14. Remove the power connector from the
auxiliary power socket.
15. Remove the inflation hose from the tyre
valve, by unscrewing it as quickly as
possible (count er-clockwise).
16. Replace the inflation hose protective cap
and the tyre valve cap.
17. Do not remove the sealant bottle from the
receiver.
18. Ensure that the tyre repair kit (including
the bottle and receiver caps) are placed
securely in the vehicle. You will need to
use the kit to check the tyre pressure after
approximately 3 km (2 miles), so ensure
they are easily accessible. 19.
Immediately drive the vehicle for
approximately 3 km (2 miles), to allow the
sealant to coat the inner surface of the tyre
and form a seal at the puncture.
Checking the tyre pressure after a repair
1.Drive the vehicle for 3 km (2 miles) then
stop in a safe place. Carry out a visual
examination of the tyres condition.
2. Make sure that the sealant container
section is in its original position.
3. Screw the inflation hos e connector firmly
onto the tyre valve.
4. Read the tyre pressure from the gauge.
5. If the pressure of the sealant filled tyre is
above 1.3 bar (19 lb/in²) adjust the
pressure to the correct value. See TYRE
CARE (page 217).
6. Ensure that the compressor switch is in
the off (O ) position and insert the power
cable connector into the auxiliary power
socket.
If the vehicle is in a well ventilated area,
start the engine.
WARNINGS
When driving the vehicle, if you
experience vibr ations, abnormal
steering, or noises, reduce speed
immediately. Drive with extreme caution and
reduced speed, to the first safe place to stop
the vehicle. Visually examine the tyre and
check its pressure. If there are any signs of
damage or deformity to the tyre, or the tyre
pressure is below 1.3 bar (19 lb/in²), do not
continue driving.
Consult a tyre repair centre or your
Dealer/Authorised Repairer, for
advice concerning the replacement of
a tyre after using a tyre repair kit.
Page 234 of 391

Wheels and tyres
234
7.Switch the compressor to on ( I) and inflate
the tyre to the correct pressure.
8. To check the tyre pressure, turn off the
compressor then read the pressure from
the gauge.
9. When the compressor is off, if the tyre
pressure is too high, release the required
amount of pressure using the pressure
relief valve.
10. Once the tyre is inflated to the correct
pressure, switch off the compressor and
remove the power plug from the auxiliary
socket.
•The use of the tyre re pair kit sealant may
lead to error prompts and incorrect
readings of the Tyre Pressure
Monitoring System. Therefore, use the
tyre repair kit pressure gauge to check
and adjust the damaged tyre's inflation
pressure.
11. Unscrew the inflation hose connector from
the tyre valve, replace the tyre valve cap
and the inflation hose connector protective
cap.
12. Ensure that the tyre repair kit is placed
securely in the vehicle.
13. Drive to the nearest tyre repair centre or
Dealer/Authorised Repairer, for a
replacement tyre to be fitted. Ensure that
you make the repair centre aware that the
tyre repair kit has been used before the tyre
is removed.
14. Both the tyre inflation hose, and the sealant
container should be replaced once a new
tyre has been fitted. Only sealant containers which are
completely empty should be
disposed of with normal household
waste. Sealant containe rs which contain some
sealant, and the tyre in flation hose, should be
disposed of by a tyre specialist or your
Dealer/Authorised Repairer, in compliance with
local waste dispos al regulations.
TYRE PRESSURE MONITORING
SYSTEM
Note: Non-approved accessories may interfere
with the system. If this occurs, TYRE
PRESSURE SYSTEM FAULT is displayed in the
message centre.
WARNINGS
The Tyre Pressure Monitoring (TPM)
system is NOT a substitute for
manually checking ty re pressures.
The TPM system only provides a low pressure
warning and does not re-i nflate your tyres.
Tyre pressures should be checked regularly
using an accurate pressure gauge when cold.
Failure to properly maintain your pressures
could increase the risk of tyre failure, with
consequential loss of vehicle control and
personal injury.
The TPM system can NOT register
damage to a tyre. Regularly check the
condition of your tyre s, especially if
the vehicle is driven off-road.
CAUTION
When inflating tyre s, care should be
taken to avoid bend ing or damaging the
TPM system valves. Always ensure correct
alignment of the inflation head to the valve
stem.
Page 247 of 391

247
Fuses
Passenger compartment fuse box
Fuse No Rating (amps) Fuse
Colour Circuit
F1 - - Not used.
F2 - - Not used.
F3 20A Blue Driver's seat adjustment.
F4 20A Blue Driver's seat adjustment.
F5 - - Not used.
F6 - - Not used.
F7 - - Not used.
F8 20A Blue Front passenger's seat adjustment.
F9 20A Blue Front passenger's seat adjustment.
F10 20A Blue Left-hand rear door controls.
F11 20A Blue Right-hand rear door controls.
F12 - - Not used.
F13 10A Red Steering column adjust.
F14 - - Not used.
F15 - - Not used.
F16 5A Tan Sunblind.
F17 - - Not used.
F18 - - Not used.
F19 - - Not used.
F20 5A Tan Remote control receiver.
F21 5A Tan Foot brake.
F22 5A Tan Electric parking brake.
F23 5A Tan Driver's seat. Audio system. Auto headlamps. Upper centre console switches.
F24 10A Red Front passen ger seat. Electric windows. Mirror adjustment.
F25 20A Yellow Driver's heated/climate seat
F26 15A Blue Trailer power connector. Road pricing system.
F27 20A Yellow Front passenger's heated/climate seat.
F28 15A Blue Auxiliary power socket.
F29 20A Yellow Keyless entry system.
F30 10A Red Air conditioning.
Page 280 of 391

Digital audio broadcasting
280
GENERAL INFORMATION
Digital radio reception
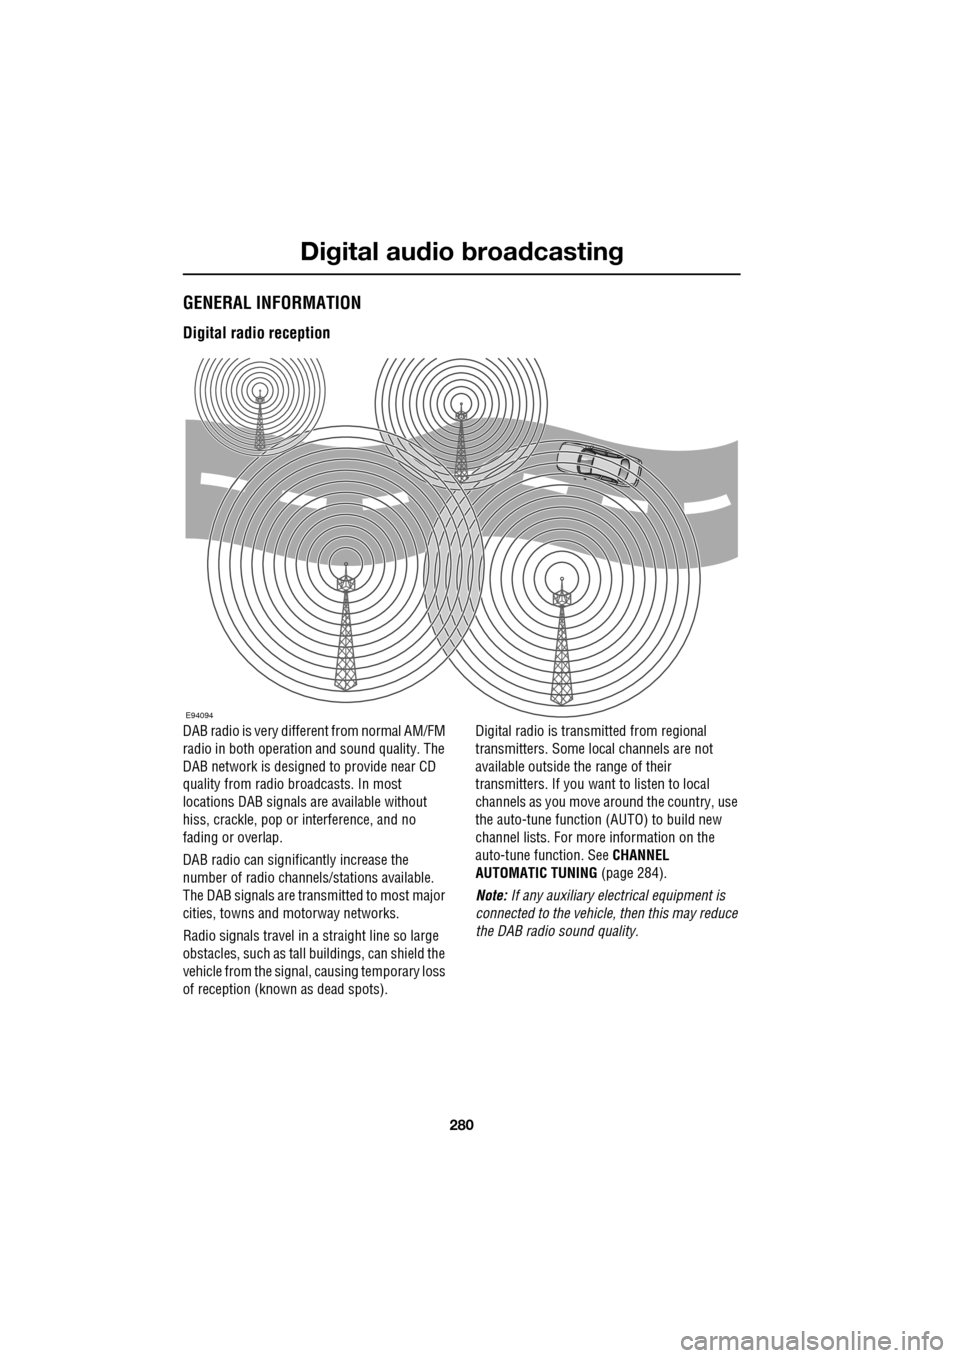
DAB radio is very different from normal AM/FM
radio in both operation and sound quality. The
DAB network is designed to provide near CD
quality from radio broadcasts. In most
locations DAB signals are available without
hiss, crackle, pop or interference, and no
fading or overlap.
DAB radio can significantly increase the
number of radio channe ls/stations available.
The DAB signals are transmitted to most major
cities, towns and motorway networks.
Radio signals travel in a straight line so large
obstacles, such as tall buildings, can shield the
vehicle from the signal, causing temporary loss
of reception (known as dead spots). Digital radio is transm
itted from regional
transmitters. Some local channels are not
available outside th e range of their
transmitters. If you want to listen to local
channels as you move around the country, use
the auto-tune function (AUTO) to build new
channel lists. For more information on the
auto-tune function. See CHANNEL
AUTOMATIC TUNING (page 284).
Note: If any auxiliary electrical equipment is
connected to the vehicle, then this may reduce
the DAB radio sound quality.
E94094
Page 282 of 391

Digital audio broadcasting
282
AUDIO CONTROLS
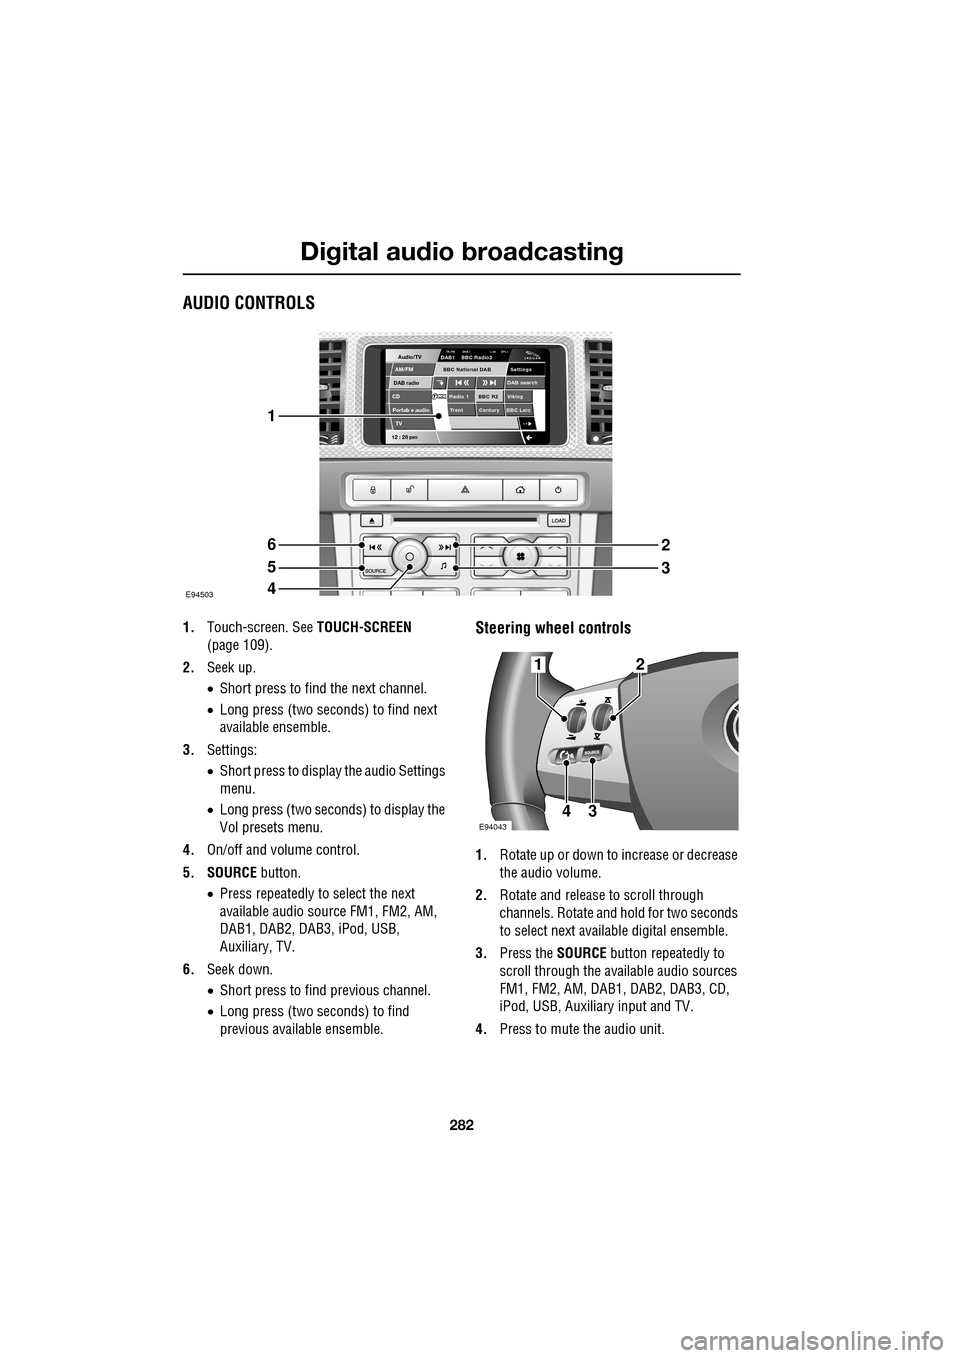
1.Touch-screen. See TOUCH-SCREEN
(page 109).
2. Seek up.
•Short press to find the next channel.
• Long press (two seconds) to find next
available ensemble.
3. Settings:
•Short press to display the audio Settings
menu.
• Long press (two seconds) to display the
Vol presets menu.
4. On/off and volume control.
5. SOURCE button.
• Press repeatedly to select the next
available audio sour ce FM1, FM2, AM,
DAB1, DAB2, DAB3, iPod, USB,
Auxiliary, TV.
6. Seek down.
•Short press to find previous channel.
• Long press (two seconds) to find
previous available ensemble.Steering wheel controls
1. Rotate up or down to increase or decrease
the audio volume.
2. Rotate and release to scroll through
channels. Rotate and hold for two seconds
to select next available digital ensemble.
3. Press the SOURCE button repeatedly to
scroll through the available audio sources
FM1, FM2, AM, DAB1, DAB2, DAB3, CD,
iPod, USB, Auxiliary input and TV.
4. Press to mute the audio unit.
Audio/TV
DAB radio
CDAM/FM
12 : 26 pm
BBC R2 Viking
Trent Century BBC LeicRadio 1
Settings
DAB search
TA-FM DAB-i L nk DPL IDAB1 BBC Radio2
Portab e audio
TV
BBC National DAB
E94503
1
6
5
4
2
3
E94043
12
43
Page 299 of 391

299
Portable audio
PORTABLE AUDIO
Portable audio overview
The portable audio system is located in the
centre console cubby box. You can connect a
variety of audio devices, including iPods, via
this interface to the audio system.
If you are connecting an iPod or mass storage
device, you can use the touch-screen to
operate and search the device. Many of the
controls are similar to those available for CD
play.
The devices that you can connect to the
portable audio interface include:
• USB mass storage devices, for example
memory stick.
• iPod.
• Auxiliary device (no to uch-screen control).
Note: The portable audio interface supports
the following iPods:
•iPod (generations 3-5).
•iPod Mini.
•iPod Nano (generations 1-3).
•iPod Photo.
•iPod Classic.
Note: The audio system will play MP3, WMA,
WAV and AAC files. Note:
Some MP3 players ha ve their own file
system that is not suppor ted by this system. To
use your MP3 player, y ou must set it to USB
Removable Device or Mass Storage Device
mode (see manufacturer's information for
further details). Only music that has been
added to the device in this mode can be played
via the vehicle's portable audio system.
Note: The system will suppor t devices with a
storage capacity up to 256 GB (approximately
65 000 tracks).
CAUTION
We recommend that you replace the
rubber cover when a portable device is
not plugged in. This will prevent damage to the
system. The cover is not waterproof.
Please disconnect your iPod when
leaving the vehicle. Failure to do so may
result in the iPod battery discharging.
Page 301 of 391

301
Portable audio
Connecting an auxiliary device
On the audio Home screen, select Audio/TV
and then select Portable audio.
Note: You can also press the SOURCE button
repeatedly to select Portable audio device .
Insert the AUX jack plug into the socket
indicated.
Select AUX.
Play will start when you switch on and start
playing the auxiliary device.
Note: You cannot operate or search the
auxiliary audio device using the touch-screen,
so all buttons on the touch-screen are
unavailable.
Connecting more than one device
You can connect an iPod and a USB device
simultaneously to the portable audio interface
and switch between them using the
touch-screen. Select iPod, USB or AUX , to
switch between modes.
The device docked first will remain the active
device until you choose to change.
If, after changing to the newly-docked device,
you change back to the first device, play will
resume at the point you left it (USB and iPod
only).
Note: You cannot use a USB hub to connect
more than one USB device to the audio unit.
Note: Devices connected to the iPod and USB
ports will be charged, but devices that are fully
discharged will not play. Please disconnect
your iPod when leaving the vehicle. Failure to
do so may result in the iPod battery
discharging.
Note: Options such as Repeat and Mix relate
to the device currently playing, they will not
apply to any subsequent device.
E94340
Audio/TV
DAB radio
CD
AM/FM
12 : 26 pm
iPod AUX
RepeUSB
Settings
Folders
TP TA PTY DPLIITr 04
Portable audio
TV
Sing for absolution
00:36
E94709