2009 INFINITI QX56 engine
[x] Cancel search: enginePage 3632 of 4171
PRECAUTIONSSTR-3
< PRECAUTION >
C
DE
F
G H
I
J
K L
M A
STR
NP
O
5. When the repair work is completed, return the ignition switch to the
″LOCK ″ position before connecting
the battery cables. (At this time, the steering lock mechanism will engage.)
6. Perform a self-diagnosis check of al l control units using CONSULT-III.
Precaution for Power Generation Variable Voltage Control SystemINFOID:0000000003771784
CAUTION:
For this model, the battery current sensor that is installed to the negative battery cable measures the
charging/discharging current of the battery and performs various engine controls. If an electrical com-
ponent is connected directly to the negative battery terminal, the current flowing through that compo-
nent will not be measured by the battery current sensor. This condition may cause a malfunction of
the engine control system and battery discharge m ay occur. Do not connect an electrical component
or ground wire directly to the battery terminal.
Revision: December 20092009 QX56
Page 3635 of 4171
STR-6
< BASIC INSPECTION >
DIAGNOSIS AND REPAIR WORKFLOW
NOTE:
To ensure a complete and thorough diagnosis, the battery, starter motor and generator test segments must be
done as a set from start to finish.
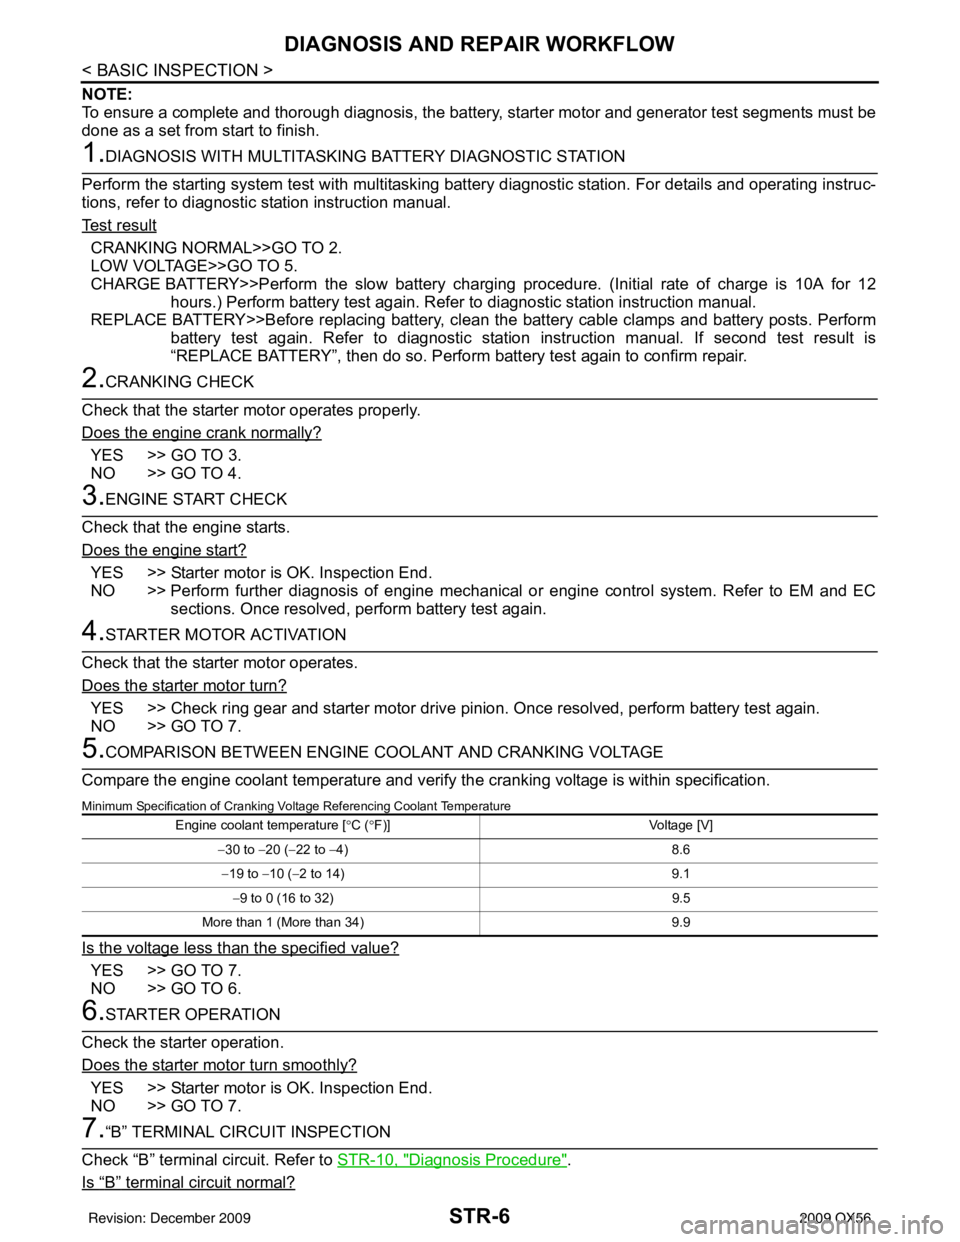
1.DIAGNOSIS WITH MULTITASKING BATTERY DIAGNOSTIC STATION
Perform the starting system test with multitasking batte ry diagnostic station. For details and operating instruc-
tions, refer to diagnostic station instruction manual.
Te s t r e s u l t
CRANKING NORMAL>>GO TO 2.
LOW VOLTAGE>>GO TO 5.
CHARGE BATTERY>>Perform the slow battery charging procedure. (Initial rate of charge is 10A for 12
hours.) Perform battery test again. Refer to diagnostic station instruction manual.
REPLACE BATTERY>>Before replacing battery, clean t he battery cable clamps and battery posts. Perform
battery test again. Refer to diagnostic station instruction manual. If second test result is
“REPLACE BATTERY”, then do so. Perform battery test again to confirm repair.
2.CRANKING CHECK
Check that the starter motor operates properly.
Does the engine crank normally?
YES >> GO TO 3.
NO >> GO TO 4.
3.ENGINE START CHECK
Check that the engine starts.
Does the engine start?
YES >> Starter motor is OK. Inspection End.
NO >> Perform further diagnosis of engine mechanical or engine control system. Refer to EM and EC sections. Once resolved, perform battery test again.
4.STARTER MOTOR ACTIVATION
Check that the starter motor operates.
Does the starter motor turn?
YES >> Check ring gear and starter motor drive pinion. Once resolved, perform battery test again.
NO >> GO TO 7.
5.COMPARISON BETWEEN ENGINE COOLANT AND CRANKING VOLTAGE
Compare the engine coolant temperature and verify the cranking voltage is within specification.
Minimum Specification of Cranking Voltage Referencing Coolant Temperature
Is the voltage less than the specified value?
YES >> GO TO 7.
NO >> GO TO 6.
6.STARTER OPERATION
Check the starter operation.
Does the starter motor turn smoothly?
YES >> Starter motor is OK. Inspection End.
NO >> GO TO 7.
7.“B” TERMINAL CIRCUIT INSPECTION
Check “B” terminal circuit. Refer to STR-10, "
Diagnosis Procedure".
Is
“B” terminal circuit normal?
Engine coolant temperature [ °C ( °F)] Voltage [V]
− 30 to − 20 (−22 to − 4) 8.6
− 19 to −10 ( −2 to 14) 9.1
− 9 to 0 (16 to 32) 9.5
More than 1 (More than 34) 9.9
Revision: December 20092009 QX56
Page 3636 of 4171
DIAGNOSIS AND REPAIR WORKFLOWSTR-7
< BASIC INSPECTION >
C
DE
F
G H
I
J
K L
M A
STR
NP
O
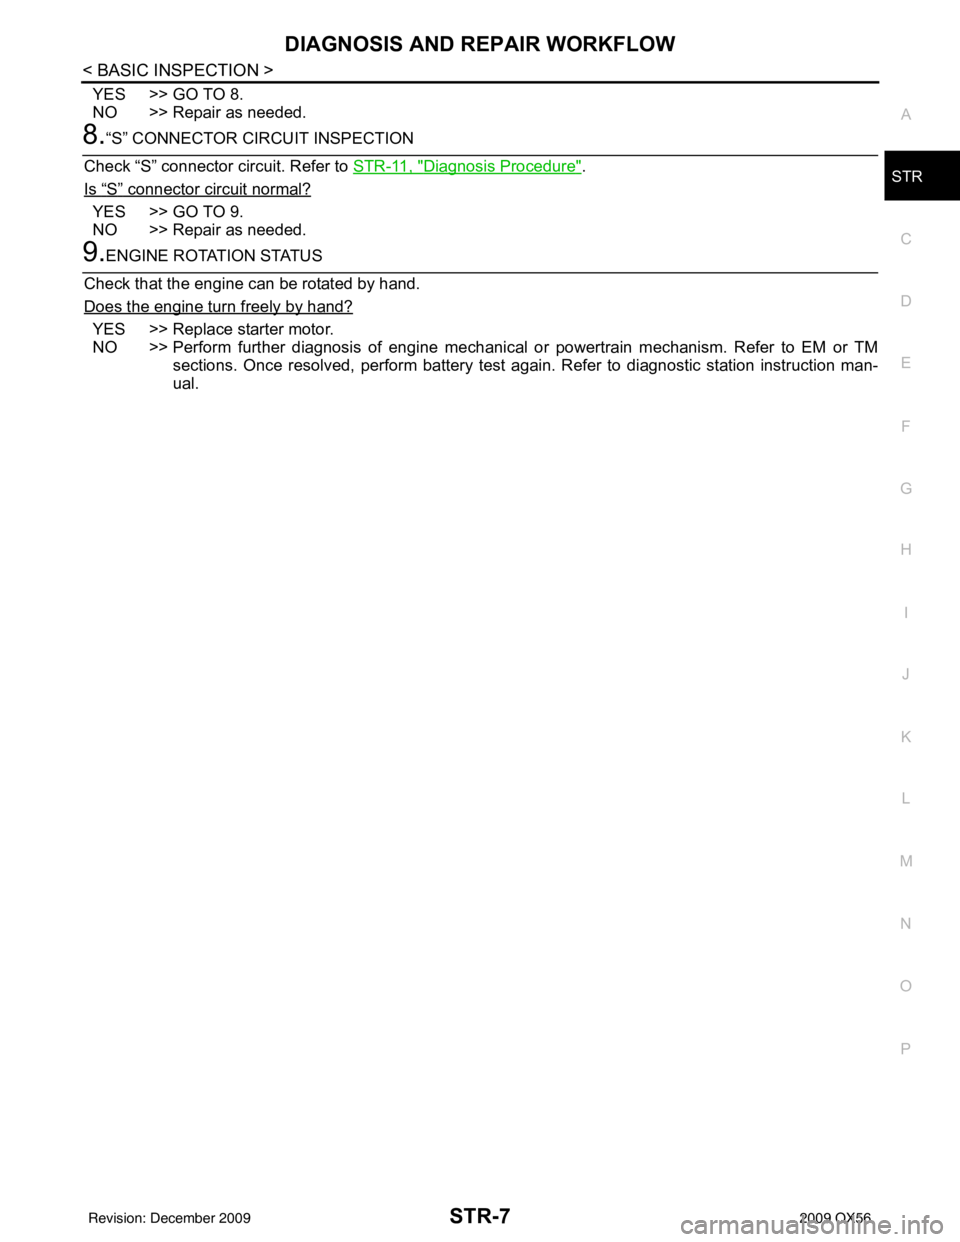
YES >> GO TO 8.
NO >> Repair as needed.
8.“S” CONNECTOR CIRCUIT INSPECTION
Check “S” connector circuit. Refer to STR-11, "
Diagnosis Procedure".
Is
“S” connector circuit normal?
YES >> GO TO 9.
NO >> Repair as needed.
9.ENGINE ROTATION STATUS
Check that the engine can be rotated by hand.
Does the engine turn freely by hand?
YES >> Replace starter motor.
NO >> Perform further diagnosis of engine mechanical or powertrain mechanism. Refer to EM or TM
sections. Once resolved, perform battery test agai n. Refer to diagnostic station instruction man-
ual.
Revision: December 20092009 QX56
Page 3638 of 4171
STARTING SYSTEMSTR-9
< FUNCTION DIAGNOSIS >
C
DE
F
G H
I
J
K L
M A
STR
NP
O
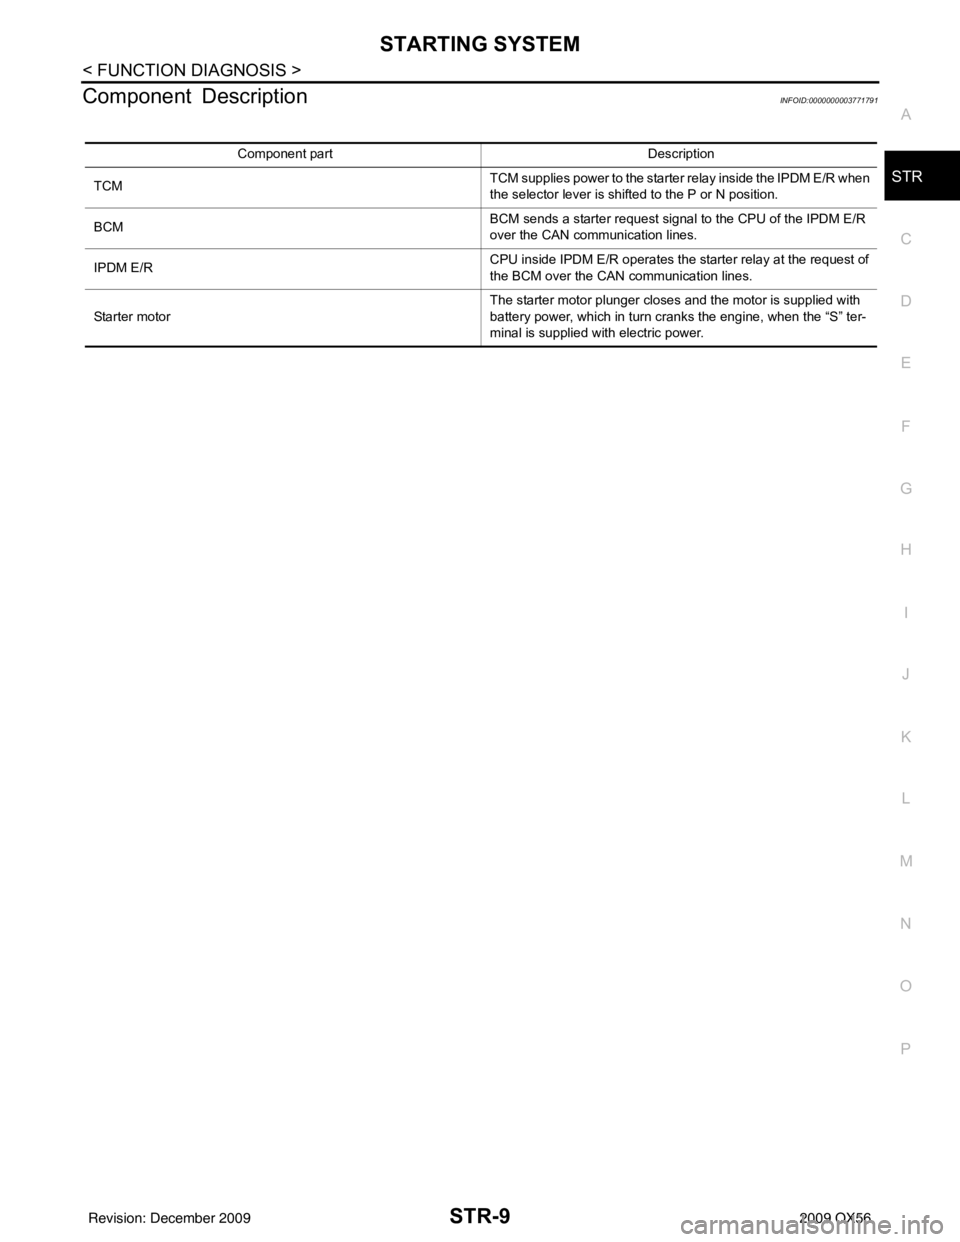
Component DescriptionINFOID:0000000003771791
Component part
Description
TCM TCM supplies power to the starter relay inside the IPDM E/R when
the selector lever is shifted to the P or N position.
BCM BCM sends a starter request signal to the CPU of the IPDM E/R
over the CAN communication lines.
IPDM E/R CPU inside IPDM E/R operates the starter relay at the request of
the BCM over the CAN communication lines.
Starter motor The starter motor plunger closes and the motor is supplied with
battery power, which in turn cranks the engine, when the “S” ter-
minal is supplied with electric power.
Revision: December 20092009 QX56
Page 3639 of 4171
STR-10
< COMPONENT DIAGNOSIS >
B TERMINAL CIRCUIT
COMPONENT DIAGNOSIS
B TERMINAL CIRCUIT
DescriptionINFOID:0000000003771792
Terminal "2" (B) is constantly supplied with battery power.
Diagnosis ProcedureINFOID:0000000003771793
CAUTION:
Perform diagnosis under the condition that the engine cannot start by the following procedure.
1. Remove fuel pump fuse.
2. Crank or start the engine (where possible) until the fuel pressure is depleted.
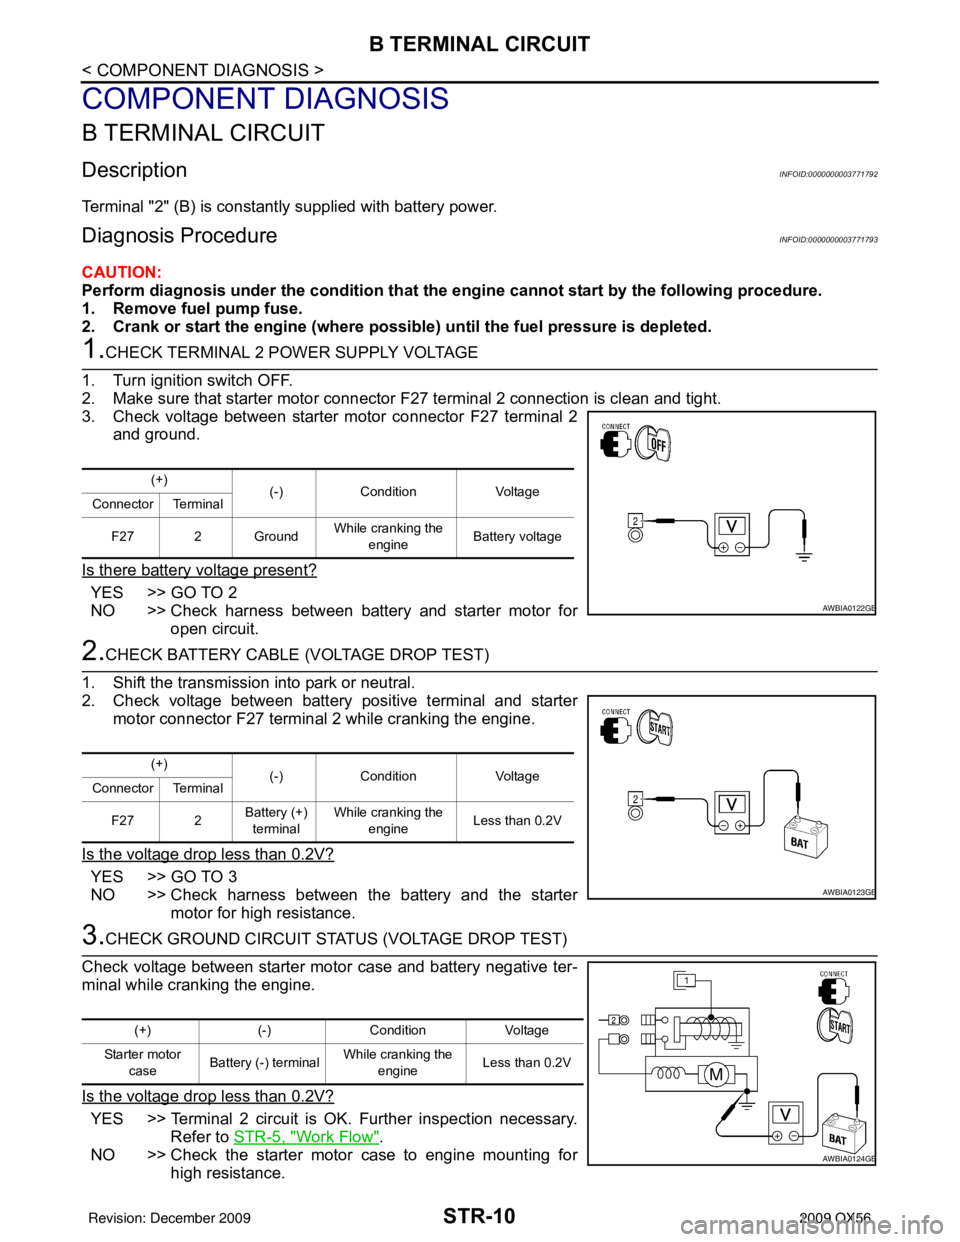
1.CHECK TERMINAL 2 POWER SUPPLY VOLTAGE
1. Turn ignition switch OFF.
2. Make sure that starter motor connector F27 terminal 2 connection is clean and tight.
3. Check voltage between starter motor connector F27 terminal 2
and ground.
Is there battery voltage present?
YES >> GO TO 2
NO >> Check harness between battery and starter motor for open circuit.
2.CHECK BATTERY CABLE (VOLTAGE DROP TEST)
1. Shift the transmission into park or neutral.
2. Check voltage between battery positive terminal and starter motor connector F27 terminal 2 while cranking the engine.
Is the voltage drop less than 0.2V?
YES >> GO TO 3
NO >> Check harness between the battery and the starter motor for high resistance.
3.CHECK GROUND CIRCUIT STATUS (VOLTAGE DROP TEST)
Check voltage between starter motor case and battery negative ter-
minal while cranking the engine.
Is the voltage drop less than 0.2V?
YES >> Terminal 2 circuit is OK. Further inspection necessary. Refer to STR-5, "
Work Flow".
NO >> Check the starter motor case to engine mounting for high resistance.
(+) (-)Condition Voltage
Connector Terminal
F27 2 Ground While cranking the
engine Battery voltage
AWBIA0122GB
(+)
(-)Condition Voltage
Connector Terminal
F27 2 Battery (+)
terminal While cranking the
engine Less than 0.2V
AWBIA0123GB
(+)
(-)Condition Voltage
Starter motor case Battery (-) terminal
While cranking the
engine Less than 0.2V
AWBIA0124GB
Revision: December 20092009 QX56
Page 3640 of 4171
S CONNECTOR CIRCUITSTR-11
< COMPONENT DIAGNOSIS >
C
DE
F
G H
I
J
K L
M A
STR
NP
O
S CONNECTOR CIRCUIT
DescriptionINFOID:0000000003771794
Terminal "1" (S) is the power supply for the starter mo
tor magnetic switch. Terminal 1 is supplied with power
when the ignition switch is turned to the START position while the selector lever is in the P or N position.
Diagnosis ProcedureINFOID:0000000003771795
CAUTION:
Perform diagnosis under the cond ition that engine cannot start by the following procedure.
1. Remove fuel pump fuse.
2. Crank or start the engine (where possi ble) until the fuel pressure is released.
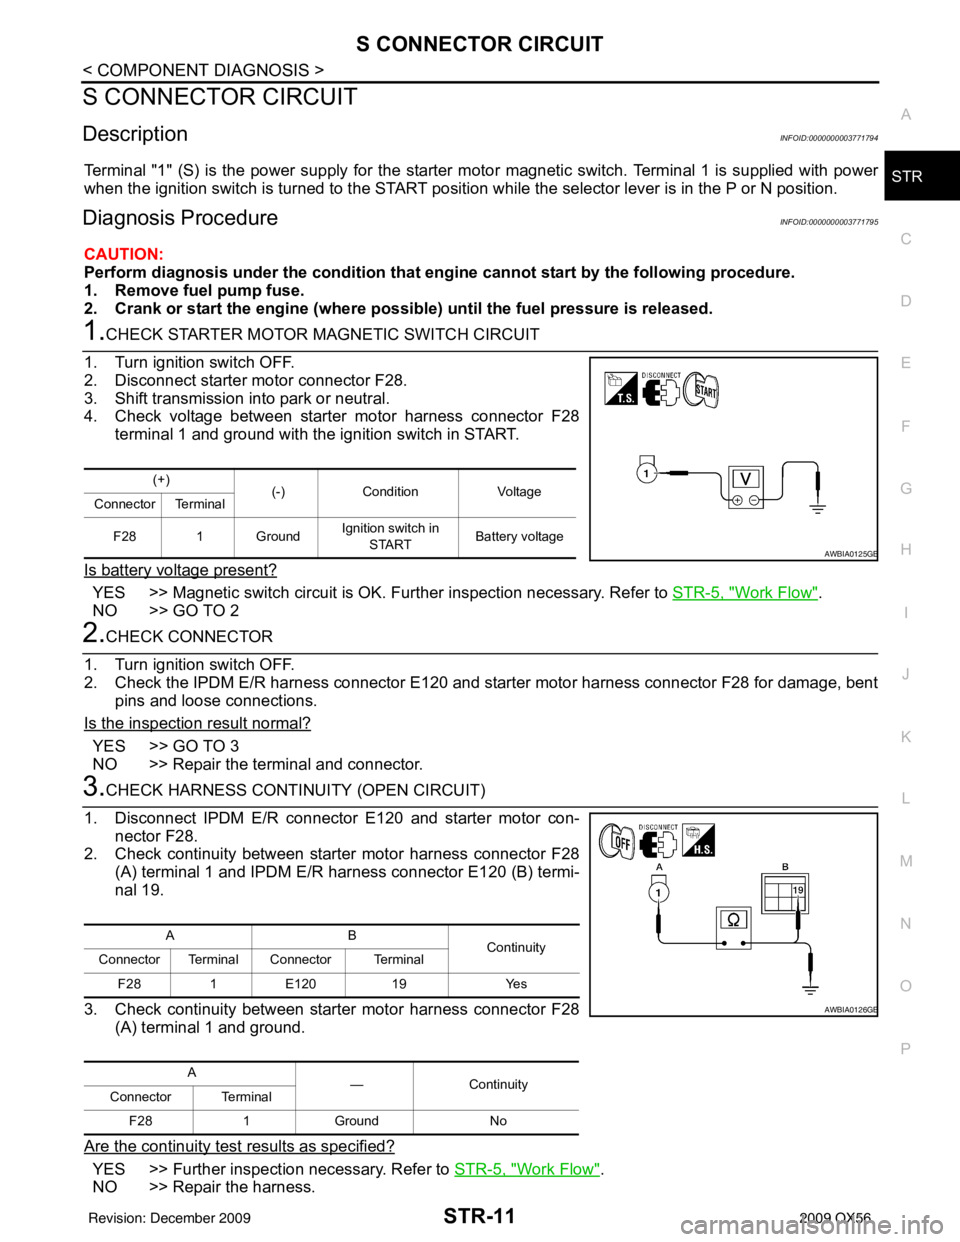
1.CHECK STARTER MOTOR MAGNETIC SWITCH CIRCUIT
1. Turn ignition switch OFF.
2. Disconnect starter motor connector F28.
3. Shift transmission into park or neutral.
4. Check voltage between starter motor harness connector F28 terminal 1 and ground with the ignition switch in START.
Is battery voltage present?
YES >> Magnetic switch circuit is OK. Further inspection necessary. Refer to STR-5, "Work Flow".
NO >> GO TO 2
2.CHECK CONNECTOR
1. Turn ignition switch OFF.
2. Check the IPDM E/R harness connector E120 and starter motor harness connector F28 for damage, bent pins and loose connections.
Is the inspection result normal?
YES >> GO TO 3
NO >> Repair the terminal and connector.
3.CHECK HARNESS CONTI NUITY (OPEN CIRCUIT)
1. Disconnect IPDM E/R connector E120 and starter motor con- nector F28.
2. Check continuity between starter motor harness connector F28 (A) terminal 1 and IPDM E/R harness connector E120 (B) termi-
nal 19.
3. Check continuity between starter motor harness connector F28 (A) terminal 1 and ground.
Are the continuity test results as specified?
YES >> Further inspection necessary. Refer to STR-5, "Work Flow".
NO >> Repair the harness.
(+) (-)Condition Voltage
Connector Terminal
F28 1 Ground Ignition switch in
START Battery voltage
AWBIA0125GB
AB
Continuity
Connector Terminal Connector Terminal
F28 1E120 19 Yes
A —Con tin uit y
Connector Terminal
F28 1Ground No
AWBIA0126GB
Revision: December 20092009 QX56
Page 3649 of 4171
TM-1
TRANSMISSION & DRIVELINE
CEF
G H
I
J
K L
M
SECTION TM
A
B
TM
N
O P
CONTENTS
TRANSAXLE & TRANSMISSION
BASIC INSPECTION ....... .............................5
DIAGNOSIS AND REPAIR WORKFLOW ..... .....5
Work Flow ........................................................... ......5
Diagnostic Work Sheet ..............................................6
FUNCTION DIAGNOSIS ...............................8
A/T CONTROL SYSTEM ................................ .....8
Cross-Sectional View (2WD models) .................. ......8
Cross-Sectional View (4WD models) ........................9
Shift Mechanism ........................................................9
TCM Function ..........................................................20
CAN Communication ...............................................21
Input/Output Signal of TCM .....................................22
Line Pressure Control .............................................22
Shift Control ............................................................24
Lock-up Control .......................................................25
Engine Brake Control ..............................................26
Control Valve ...........................................................26
Component Parts Location ......................................28
A/T SHIFT LOCK SYSTEM ............................ ....29
System Description ............................................. ....29
Component Parts Location ......................................29
ON BOARD DIAGNOSTIC (OBD) SYSTEM ......30
Introduction ......................................................... ....30
OBD-II Function for A/T System ..............................30
One or Two Trip Detection Logic of OBD-II ............30
OBD-II Diagnostic Trouble Code (DTC) ..................30
Malfunction Indicator Lamp (MIL) ............................31
DIAGNOSIS SYSTEM (TCM) .............................32
CONSULT-III Function (TRANSMISSION) ......... ....32
Diagnosis Procedure without CONSULT-III ............37
COMPONENT DIAGNOSIS .........................39
U1000 CAN COMM CIRCUIT ......................... ....39
Description .......................................................... ....39
On Board Diagnosis Logic ......................................39
Possible Cause .................................................... ....39
DTC Confirmation Procedure ..................................39
Diagnosis Procedure ...............................................39
P0615 STARTER RELAY .................................40
Description ...............................................................40
CONSULT-III Reference Value in Data Monitor
Mode ........................................................................
40
On Board Diagnosis Logic .......................................40
Possible Cause ........................................................40
DTC Confirmation Procedure ..................................40
Diagnosis Procedure ...............................................40
P0700 TRANSMISSION CONTROL .................43
Description ...............................................................43
On Board Diagnosis Logic .......................................43
Possible Cause ........................................................43
DTC Confirmation Procedure ..................................43
Diagnosis Procedure ...............................................43
P0705 TRANSMISSION RANGE SWITCH A ...44
Description ...............................................................44
CONSULT-III Reference Value in Data Monitor
Mode ........................................................................
44
On Board Diagnosis Logic .......................................44
Possible Cause ........................................................44
DTC Confirmation Procedure ..................................44
Diagnosis Procedure ...............................................44
P0717 INPUT SPEED SENSOR A ....................47
Description ...............................................................47
CONSULT-III Reference Value in Data Monitor
Mode ........................................................................
47
On Board Diagnosis Logic .......................................47
Possible Cause ........................................................47
DTC Confirmation Procedure ..................................47
Diagnosis Procedure ...............................................47
P0720 OUTPUT SPEED SENSOR ...................49
Description ...............................................................49
CONSULT-III Reference Value in Data Monitor
Mode ........................................................................
49
Revision: December 20092009 QX56
Page 3650 of 4171

TM-2
On Board Diagnosis Logic ......................................49
Possible Cause .......................................................49
DTC Confirmation Procedure .................................49
Diagnosis Procedure ..............................................50
P0725 ENGINE SPEED .....................................52
Description ........................................................... ...52
CONSULT-III Reference Value in Data Monitor
Mode .................................................................... ...
52
On Board Diagnosis Logic ......................................52
Possible Cause .......................................................52
DTC Confirmation Procedure .................................52
Diagnosis Procedure ..............................................52
P0731 1GR INCORRECT RATIO ......................54
Description ........................................................... ...54
On Board Diagnosis Logic ......................................54
Possible Cause .......................................................54
DTC Confirmation Procedure .................................54
Diagnosis Procedure ..............................................55
P0732 2GR INCORRECT RATIO ......................56
Description ........................................................... ...56
On Board Diagnosis Logic ......................................56
Possible Cause .......................................................56
DTC Confirmation Procedure .................................56
Diagnosis Procedure ..............................................57
P0733 3GR INCORRECT RATIO ......................58
Description ........................................................... ...58
On Board Diagnosis Logic ......................................58
Possible Cause .......................................................58
DTC Confirmation Procedure .................................58
Diagnosis Procedure ..............................................59
P0734 4GR INCORRECT RATIO ......................60
Description ........................................................... ...60
On Board Diagnosis Logic ......................................60
Possible Cause .......................................................60
DTC Confirmation Procedure .................................60
Diagnosis Procedure ..............................................61
P0735 5GR INCORRECT RATIO ......................62
Description ........................................................... ...62
On Board Diagnosis Logic ......................................62
Possible Cause .......................................................62
DTC Confirmation Procedure .................................62
Diagnosis Procedure ..............................................63
P0740 TORQUE CONVERTER .........................64
Description ........................................................... ...64
CONSULT-III Reference Value in Data Monitor
Mode .................................................................... ...
64
On Board Diagnosis Logic ......................................64
Possible Cause .......................................................64
DTC Confirmation Procedure .................................64
Diagnosis Procedure ..............................................64
P0744 TORQUE CONVERTER .........................66
Description ........................................................... ...66
CONSULT-III Reference Value in Data Monitor
Mode .................................................................... ...
66
On Board Diagnosis Logic ......................................66
Possible Cause .......................................................66
DTC Confirmation Procedure ..................................66
Diagnosis Procedure ...............................................67
P0745 PRESSURE CONTROL SOLENOID A ...68
Description ........................................................... ...68
CONSULT-III Reference Value in Data Monitor
Mode .......................................................................
68
On Board Diagnosis Logic ......................................68
Possible Cause .......................................................68
DTC Confirmation Procedure ..................................68
Diagnosis Procedure ...............................................68
P1705 TP SENSOR ...........................................70
Description ........................................................... ...70
CONSULT-III Reference Value in Data Monitor
Mode .......................................................................
70
On Board Diagnosis Logic ......................................70
Possible Cause .......................................................70
DTC Confirmation Procedure ..................................70
Diagnosis Procedure ...............................................70
P1710 TRANSMISSION FLUID TEMPERA-
TURE SENSOR .................................................
72
Description ........................................................... ...72
CONSULT-III Reference Value in Data Monitor
Mode .......................................................................
72
On Board Diagnosis Logic ......................................72
Possible Cause .......................................................72
DTC Confirmation Procedure ..................................72
Diagnosis Procedure ...............................................72
Component Inspection ............................................73
P1721 VEHICLE SPEED SIGNAL ....................74
Description ........................................................... ...74
CONSULT-III Reference Value in Data Monitor
Mode .......................................................................
74
On Board Diagnosis Logic ......................................74
Possible Cause .......................................................74
DTC Confirmation Procedure ..................................74
Diagnosis Procedure ...............................................74
P1730 INTERLOCK ...........................................76
Description ........................................................... ...76
On Board Diagnosis Logic ......................................76
Possible Cause .......................................................76
DTC Confirmation Procedure ..................................76
Judgement of Interlock ............................................76
Diagnosis Procedure ...............................................76
P1731 1ST ENGINE BRAKING .........................78
Description ........................................................... ...78
CONSULT-III Reference Value in Data Monitor
Mode .......................................................................
78
On Board Diagnosis Logic ......................................78
Possible Cause .......................................................78
DTC Confirmation Procedure ..................................78
Revision: December 20092009 QX56