Page 3620 of 4171
STEERING COLUMNST-29
< DISASSEMBLY AND ASSEMBLY >
C
DE
F
H I
J
K L
M A
B
ST
N
O P
DISASSEMBLY AND ASSEMBLY
STEERING COLUMN
Disassembly and AssemblyINFOID:0000000004187599
DISASSEMBLY
1. Remove bolt from upper joint, then remove upper joint from steering column assembly.
2. Remove ignition switch tamper resistant self-s hear screws with a drill or other suitable tool.
ASSEMBLY
Assembly is in the reverse order of disassembly.
Install new tamper resistant self-shear screws.
CAUTION:
Any time the ignition switch has been disconnected, removed
or installed, the keys must be re -registered in the BCM. Refer to
CONSULT-III operation manual IVIS/NVIS.
INSPECTION AFTER ASSEMBLY
When the steering wheel does not turn smoothl y, check the steering column as follows:
1. Steering column assembly 2. Upper joint 3. Ignition switch
4. Tamper resistant self-shear screw
WGIA0091E
WGIA0009E
Revision: December 20092009 QX56
Page 3621 of 4171

ST-30
< DISASSEMBLY AND ASSEMBLY >
STEERING COLUMN
1. Check the column bearings for damage or unevenness. Lubricate with recommended multi-purpose
grease. Replace the steering column as an assembly, if necessary.
2. Check the column tube for deformation or breakage. R eplace the steering column as an assembly, if nec-
essary.
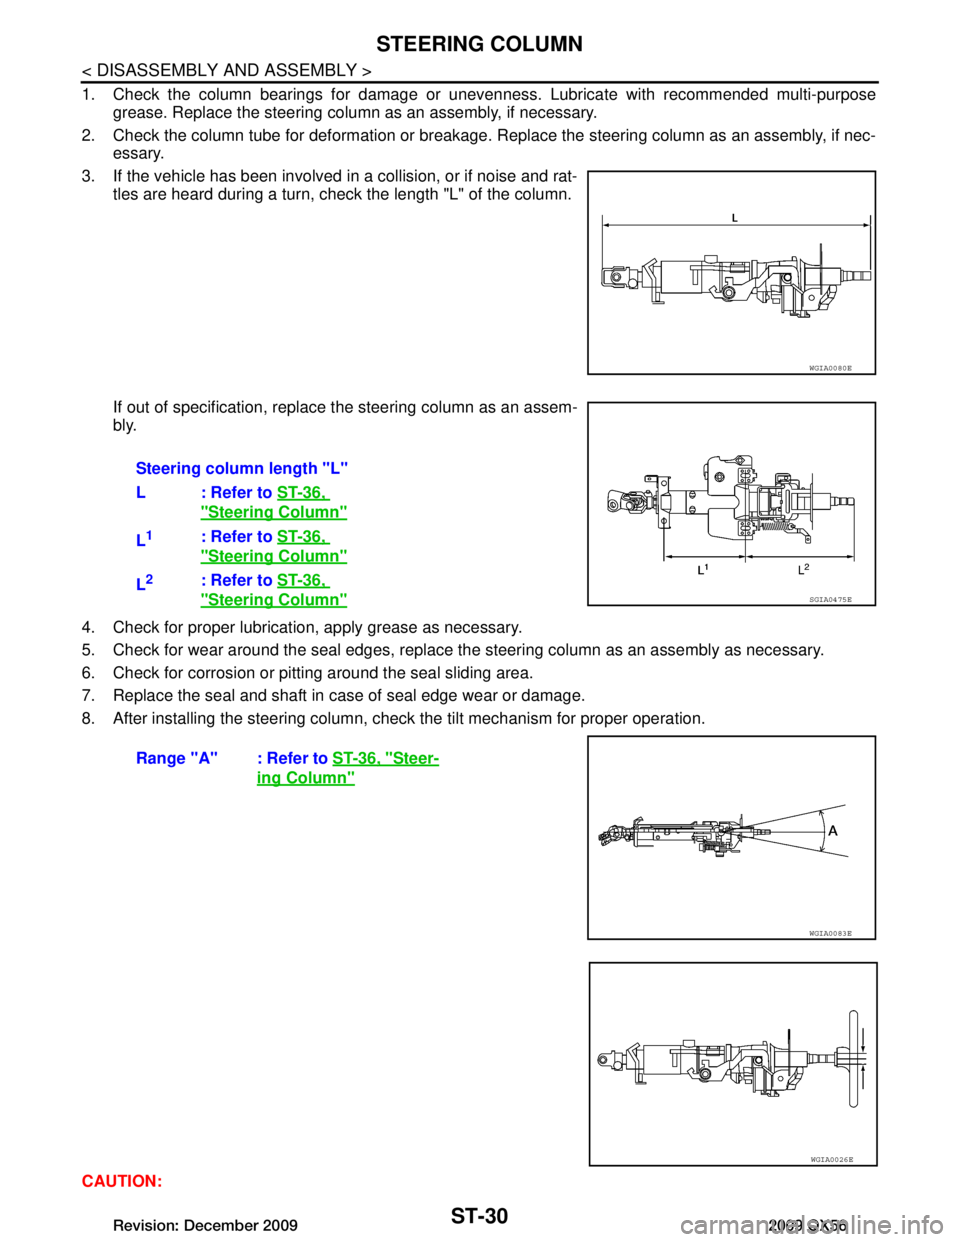
3. If the vehicle has been involved in a collision, or if noise and rat- tles are heard during a turn, check the length "L" of the column.
If out of specification, replace the steering column as an assem-
bly.
4. Check for proper lubrication, apply grease as necessary.
5. Check for wear around the seal edges, replace the steering column as an assembly as necessary.
6. Check for corrosion or pitting around the seal sliding area.
7. Replace the seal and shaft in case of seal edge wear or damage.
8. After installing the steering column, check the tilt mechanism for proper operation.
CAUTION:
WGIA0080E
Steering column length "L"
L: Refer to ST-36,
"Steering Column"
L1: Refer to ST-36,
"Steering Column"
L2: Refer to ST-36,
"Steering Column"
Range "A" : Refer to ST-36, "Steer-
ing Column"
SGIA0475E
WGIA0083E
WGIA0026E
Revision: December 20092009 QX56
Page 3622 of 4171
STEERING COLUMNST-31
< DISASSEMBLY AND ASSEMBLY >
C
DE
F
H I
J
K L
M A
B
ST
N
O P
Do not exert any load in the axi al direction immediately before or after column removal.
After installation, check smoo th steering wheel rotation, without any catches or noise.
Revision: December 20092009 QX56
Page 3623 of 4171

ST-32
< DISASSEMBLY AND ASSEMBLY >
POWER STEERING GEAR AND LINKAGE
POWER STEERING GEAR AND LINKAGE
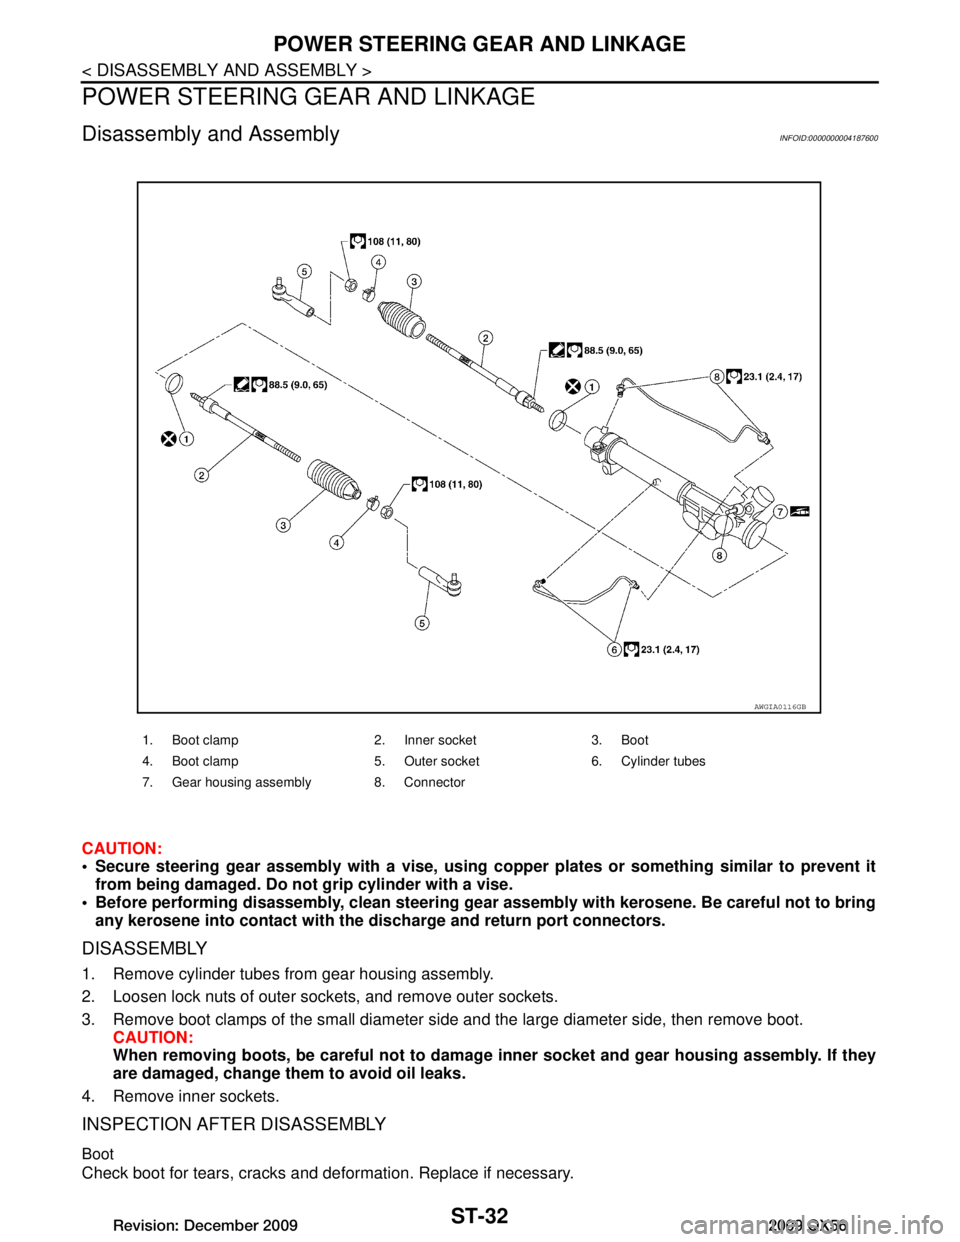
Disassembly and AssemblyINFOID:0000000004187600
CAUTION:
Secure steering gear assembly with a vise, using copper plates or something similar to prevent it
from being damaged. Do not grip cylinder with a vise.
Before performing disassembly, clean steering gear assembly with kerosene. Be careful not to bring
any kerosene into contact with the discharge and return port connectors.
DISASSEMBLY
1. Remove cylinder tubes from gear housing assembly.
2. Loosen lock nuts of outer sockets, and remove outer sockets.
3. Remove boot clamps of the small diameter si de and the large diameter side, then remove boot.
CAUTION:
When removing boots, be careful not to damage inner socket and gear housing assembly. If they
are damaged, change them to avoid oil leaks.
4. Remove inner sockets.
INSPECTION AFTER DISASSEMBLY
Boot
Check boot for tears, cracks and def ormation. Replace if necessary.
1. Boot clamp 2. Inner socket 3. Boot
4. Boot clamp 5. Outer socket 6. Cylinder tubes
7. Gear housing assembly 8. Connector
AWGIA0116GB
Revision: December 20092009 QX56
Page 3624 of 4171

POWER STEERING GEAR AND LINKAGEST-33
< DISASSEMBLY AND ASSEMBLY >
C
DE
F
H I
J
K L
M A
B
ST
N
O P
Gear Housing Assembly
Check gear housing assembly for dents, cracks or
damage. Replace as an assembly if necessary.
Outer Socket and Inner Socket
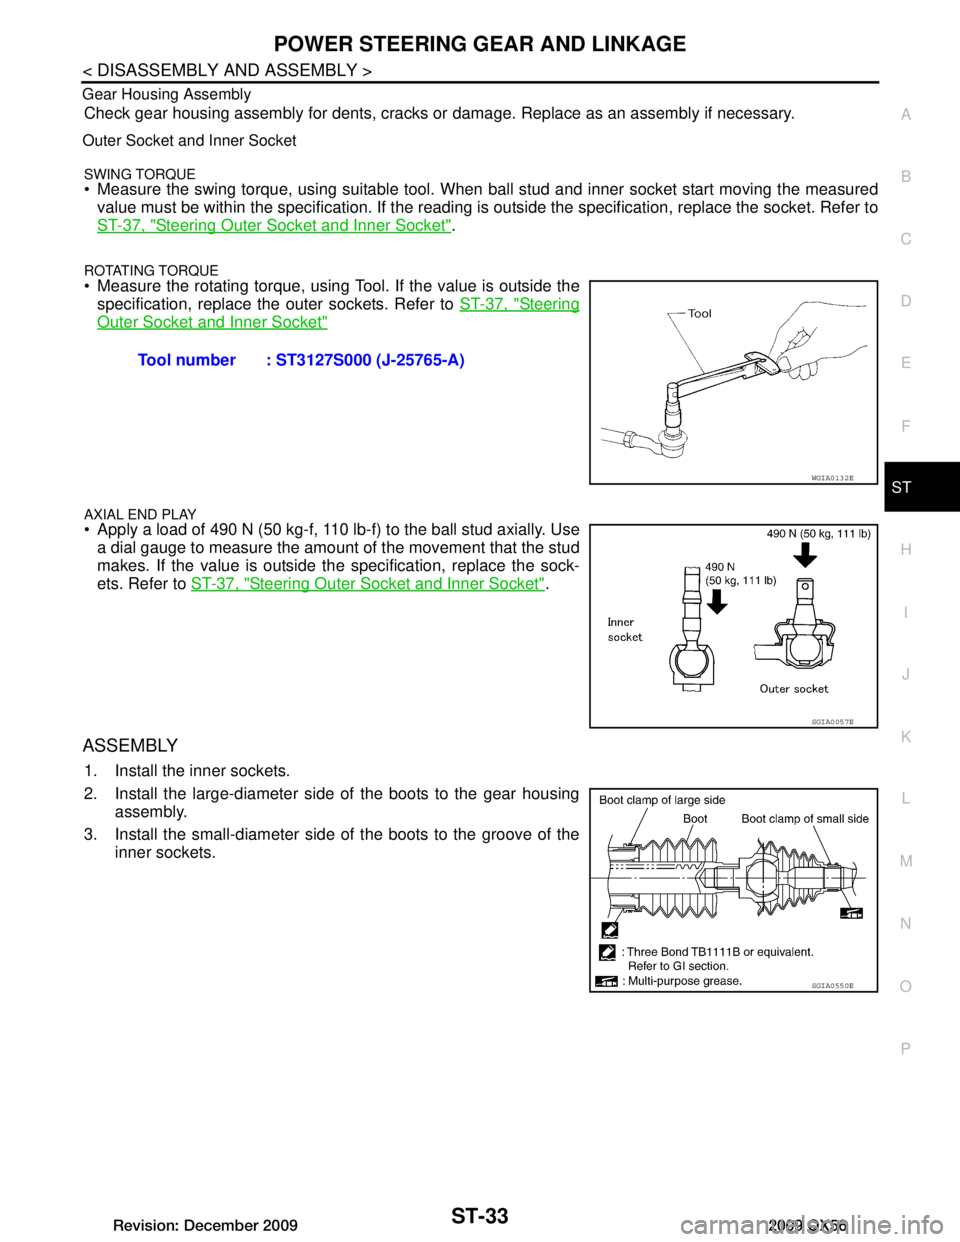
SWING TORQUE Measure the swing torque, using suitable tool. When ball stud and inner socket start moving the measured
value must be within the specification. If the reading is outside the specification, replace the socket. Refer to
ST-37, "Steering Outer Socket and Inner Socket"
.
ROTATING TORQUE
Measure the rotating torque, using Tool. If the value is outside the specification, replace the outer sockets. Refer to ST-37, "Steering
Outer Socket and Inner Socket"
AXIAL END PLAY Apply a load of 490 N (50 kg-f, 110 lb-f) to the ball stud axially. Use
a dial gauge to measure the amount of the movement that the stud
makes. If the value is outside the specification, replace the sock-
ets. Refer to ST-37, "Steering Outer Socket and Inner Socket"
.
ASSEMBLY
1. Install the inner sockets.
2. Install the large-diameter side of the boots to the gear housing
assembly.
3. Install the small-diameter side of the boots to the groove of the inner sockets.Tool number : ST3127S000 (J-25765-A)
WGIA0132E
SGIA0057E
SGIA0550E
Revision: December 20092009 QX56
Page 3625 of 4171
ST-34
< DISASSEMBLY AND ASSEMBLY >
POWER STEERING GEAR AND LINKAGE
4. Install the boot clamps to the boots, as shown.CAUTION:
Do not reuse the large-diameter boot clamps.
5. Crimp the large-diameter boot clamps, using Tool.
6. Install the cylinder tubes to the gear housing assembly.
7. Install the lock nuts and outer sockets to the inner sockets.
8. Thread the outer sockets onto the inner sockets to the specified length "L", then tighten the lock nut s to the specification. Refer to
ST-23, "Removal and Installation"
. Reconfirm that the tie-rod
length "L" is within specification.
AST139
Tool number : KV40107300 ( — )
RAC1133D
Maximum inner socket
length "L" : 115.2 mm (4.54 in)
SGIA0167E
Revision: December 20092009 QX56
Page 3626 of 4171

POWER STEERING OIL PUMPST-35
< DISASSEMBLY AND ASSEMBLY >
C
DE
F
H I
J
K L
M A
B
ST
N
O P
POWER STEERING OIL PUMP
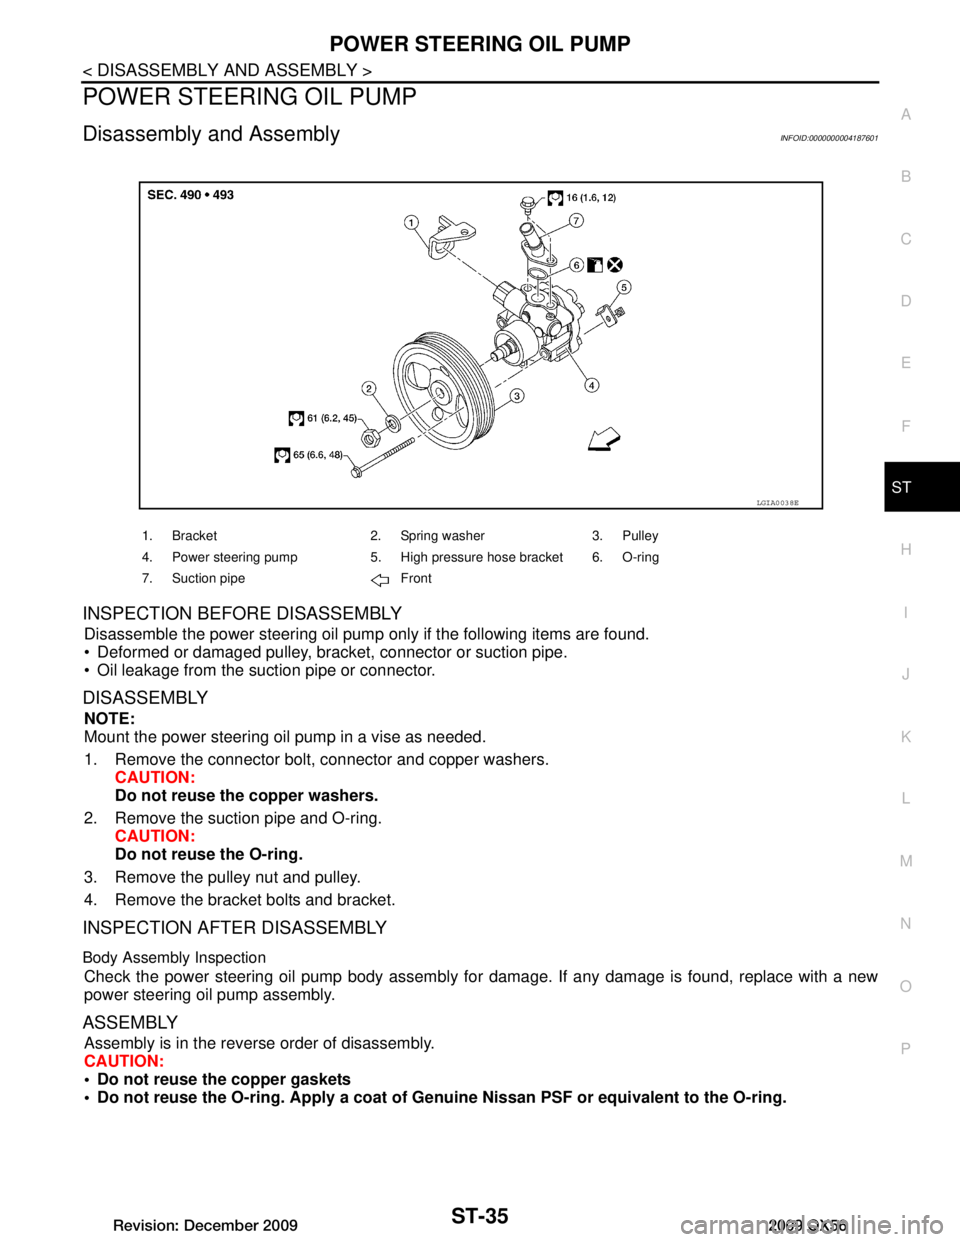
Disassembly and AssemblyINFOID:0000000004187601
INSPECTION BEFORE DISASSEMBLY
Disassemble the power steering oil pump only if the following items are found.
Deformed or damaged pulley, bracket, connector or suction pipe.
Oil leakage from the suction pipe or connector.
DISASSEMBLY
NOTE:
Mount the power steering oil pump in a vise as needed.
1. Remove the connector bolt, connector and copper washers. CAUTION:
Do not reuse the copper washers.
2. Remove the suction pipe and O-ring. CAUTION:
Do not reuse the O-ring.
3. Remove the pulley nut and pulley.
4. Remove the bracket bolts and bracket.
INSPECTION AFTER DISASSEMBLY
Body Assembly Inspection
Check the power steering oil pump body assembly fo r damage. If any damage is found, replace with a new
power steering oil pump assembly.
ASSEMBLY
Assembly is in the reverse order of disassembly.
CAUTION:
Do not reuse the copper gaskets
Do not reuse the O-ring. Apply a coat of Genuine Nissan PSF or equivalent to the O-ring.
1. Bracket 2. Spring washer 3. Pulley
4. Power steering pump 5. High pressure hose bracket 6. O-ring
7. Suction pipe Front
LGIA0038E
Revision: December 20092009 QX56
Page 3627 of 4171
ST-36
< SERVICE DATA AND SPECIFICATIONS (SDS)
SERVICE DATA AND SPECIFICATIONS (SDS)
SERVICE DATA AND SPECIFICATIONS (SDS)
SERVICE DATA AND SPECIFICATIONS (SDS)
Steering WheelINFOID:0000000004187586
Steering ColumnINFOID:0000000004187587
Inspection After AssemblyUnit: mm (in)
Inspection After Removal Unit: mm (in)
End play of the axial direction for steering wheel 0 mm (0 in)
Steering wheel play on the outer circumference 0 − 35 mm (0 − 1.38 in)
Steering wheel turning force 3 9 N (4 kg-f, 9 lb-f) or less
Steering column length “L” 640 (25.20)
WGIA0080E
Steering column length “L1”
Steering column length “L2” 165.1 (6.50)
258 (10.16)
SGIA0475E
Revision: December 20092009 QX56