2009 INFINITI QX56 drain bolt
[x] Cancel search: drain boltPage 2306 of 4171
HA-42
< ON-VEHICLE REPAIR >
HIGH-PRESSURE PIPE
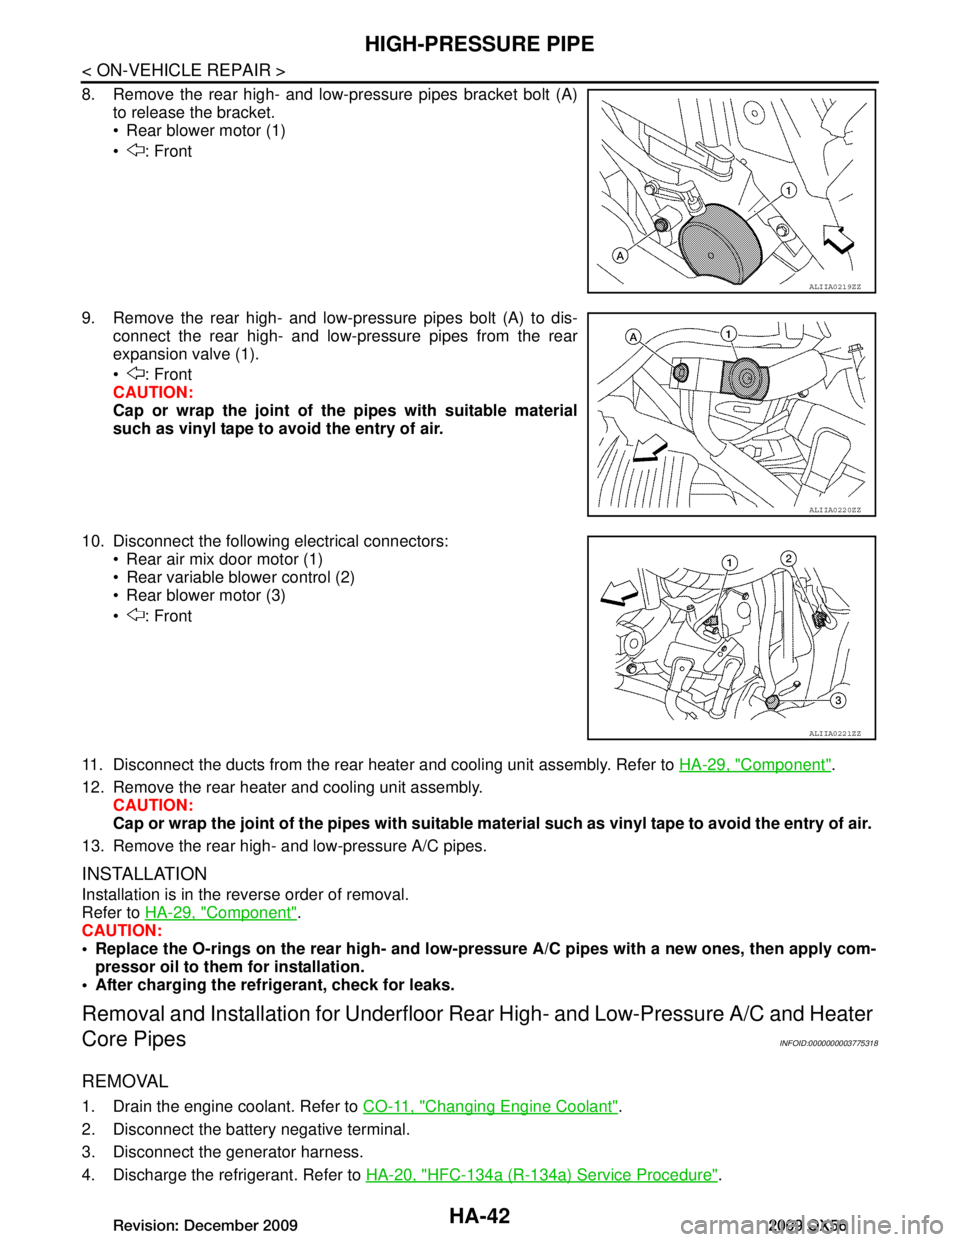
8. Remove the rear high- and low-pressure pipes bracket bolt (A)to release the bracket.
Rear blower motor (1)
: Front
9. Remove the rear high- and low-pressure pipes bolt (A) to dis- connect the rear high- and low-pressure pipes from the rear
expansion valve (1).
: Front
CAUTION:
Cap or wrap the joint of the pipes with suitable material
such as vinyl tape to avoid the entry of air.
10. Disconnect the following electrical connectors: Rear air mix door motor (1)
Rear variable blower control (2)
Rear blower motor (3)
: Front
11. Disconnect the ducts from the rear heater and cooling unit assembly. Refer to HA-29, "Component"
.
12. Remove the rear heater and cooling unit assembly. CAUTION:
Cap or wrap the joint of the pipes with suitable material such as viny l tape to avoid the entry of air.
13. Remove the rear high- and low-pressure A/C pipes.
INSTALLATION
Installation is in the reverse order of removal.
Refer to HA-29, "Component"
.
CAUTION:
Replace the O-rings on the rear high- and low-pr essure A/C pipes with a new ones, then apply com-
pressor oil to them for installation.
After charging the refrigerant, check for leaks.
Removal and Installation for Underfloor Rear High- and Lo w-Pressure A/C and Heater
Core Pipes
INFOID:0000000003775318
REMOVAL
1. Drain the engine coolant. Refer to CO-11, "Changing Engine Coolant".
2. Disconnect the battery negative terminal.
3. Disconnect the generator harness.
4. Discharge the refrigerant. Refer to HA-20, "HFC-134a (R-134a) Service Procedure"
.
ALIIA0219ZZ
ALIIA0220ZZ
ALIIA0221ZZ
Revision: December 20092009 QX56
Page 2667 of 4171
LU-12
< ON-VEHICLE REPAIR >
OIL COOLER
ON-VEHICLE REPAIR
OIL COOLER
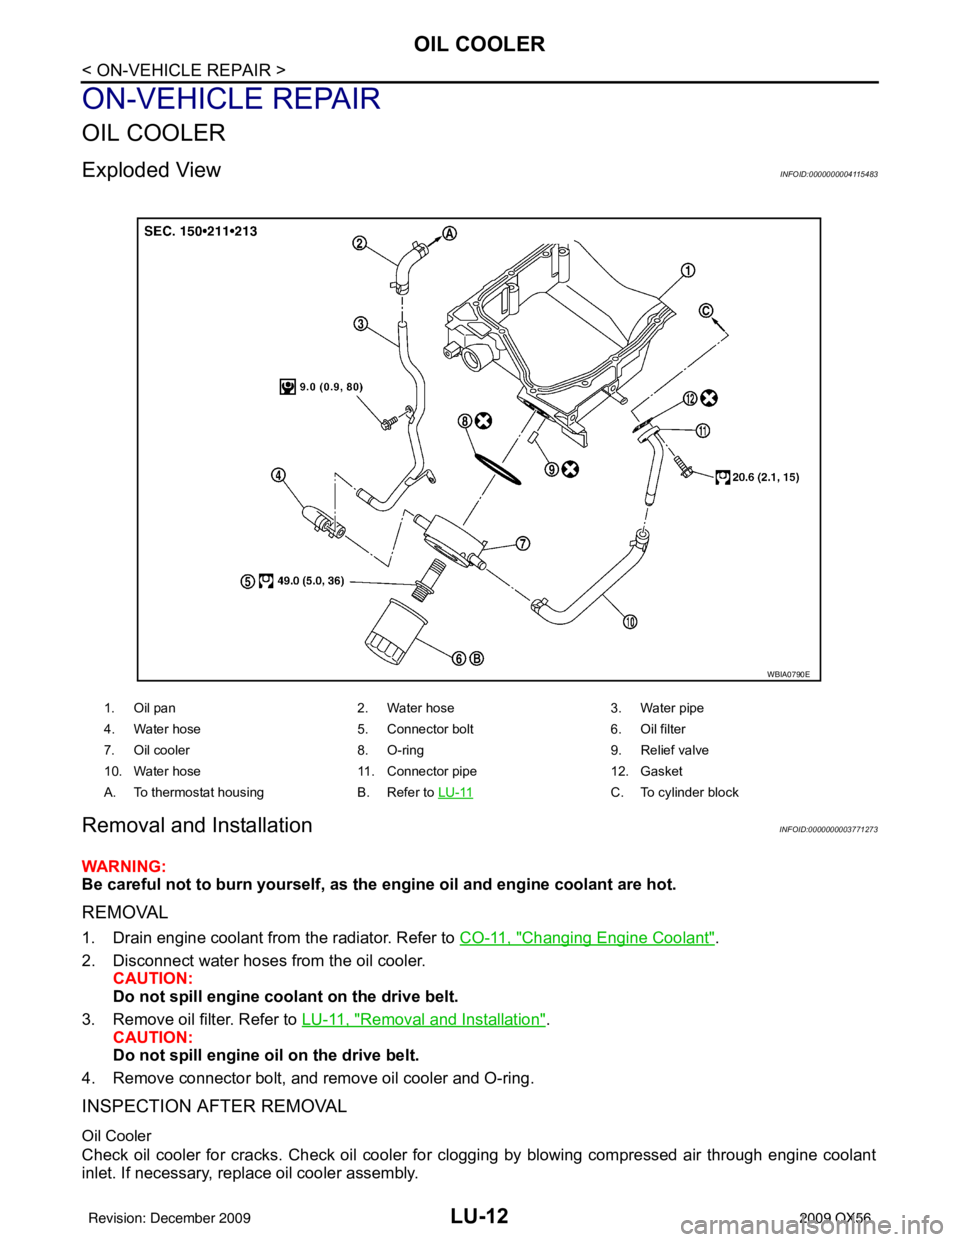
Exploded ViewINFOID:0000000004115483
Removal and InstallationINFOID:0000000003771273
WARNING:
Be careful not to burn yourself, as the engine oil and engine coolant are hot.
REMOVAL
1. Drain engine coolant from the radiator. Refer to CO-11, "Changing Engine Coolant".
2. Disconnect water hoses from the oil cooler. CAUTION:
Do not spill engine coolant on the drive belt.
3. Remove oil filter. Refer to LU-11, "
Removal and Installation".
CAUTION:
Do not spill engine oil on the drive belt.
4. Remove connector bolt, and remove oil cooler and O-ring.
INSPECTION AFTER REMOVAL
Oil Cooler
Check oil cooler for cracks. Check oil cooler for clogging by blowing compressed air through engine coolant
inlet. If necessary, replace oil cooler assembly.
1. Oil pan 2. Water hose3. Water pipe
4. Water hose 5. Connector bolt 6. Oil filter
7. Oil cooler 8. O-ring 9. Relief valve
10. Water hose 11. Connector pipe 12. Gasket
A. To thermostat housing B. Refer to LU-11
C. To cylinder block
WBIA0790E
Revision: December 20092009 QX56
Page 2697 of 4171
MA-24
< ON-VEHICLE MAINTENANCE >
CHASSIS AND BODY MAINTENANCE
NOTE:
The A/T fluid level will be significantly affected by the A/T fluid temperature as shown. Therefore monitor
the A/T fluid temperature data using the CONSULT-III.
a. Connect CONSULT-III to data link connector.
b. Select “MAIN SIGNALS” in “DATA MONI TOR” mode for “A/T” with CONSULT-III.
c. Read out the value of “ATF TEMP 1”.
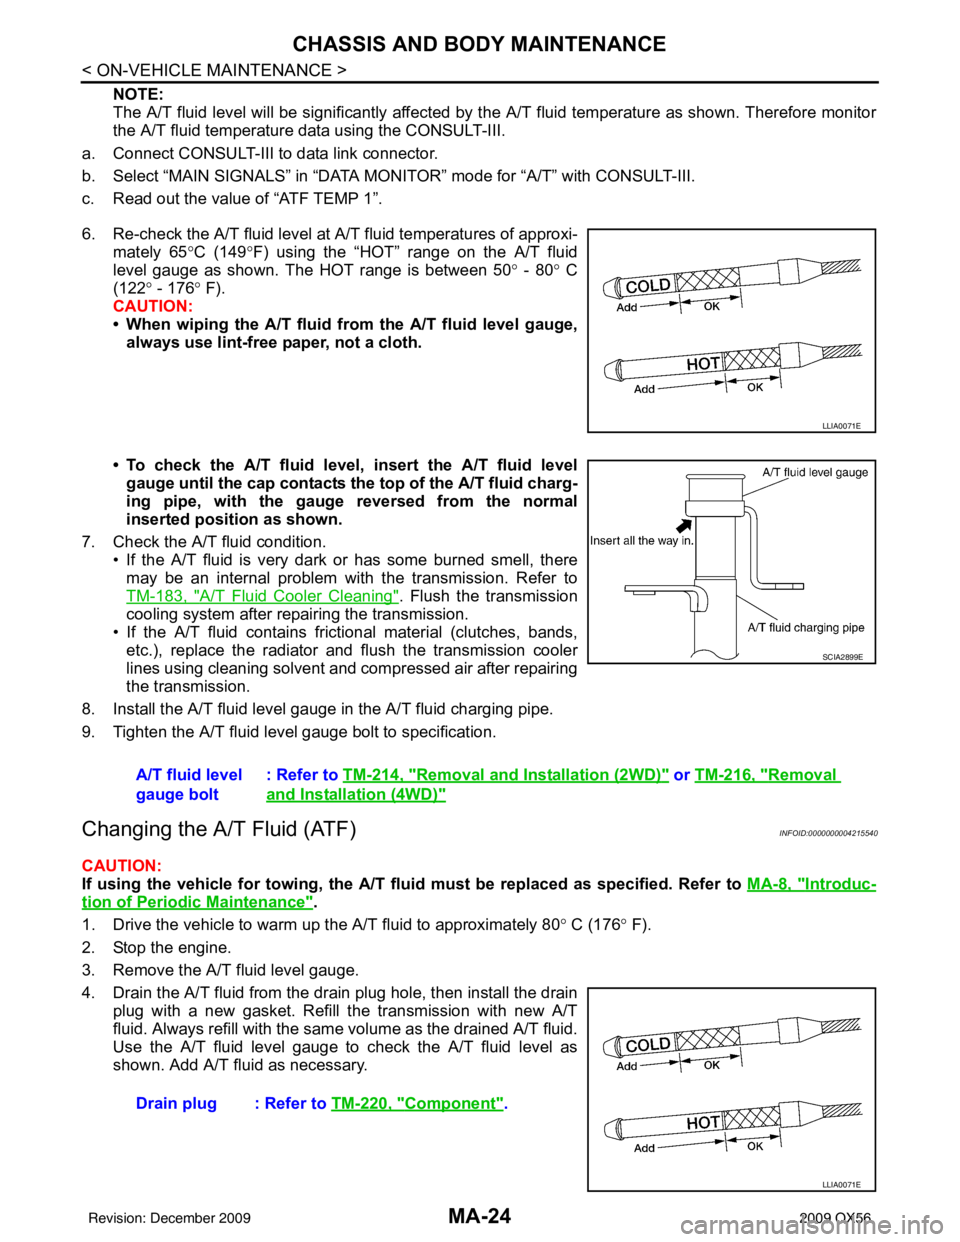
6. Re-check the A/T fluid level at A/T fluid temperatures of approxi- mately 65 °C (149° F) using the “HOT” range on the A/T fluid
level gauge as shown. The HOT range is between 50 ° - 80 ° C
(122° - 176 ° F).
CAUTION:
• When wiping the A/T fluid from the A/T fluid level gauge,
always use lint-free paper, not a cloth.
• To check the A/T fluid level , insert the A/T fluid level
gauge until the cap contacts the top of the A/T fluid charg-
ing pipe, with the gauge reversed from the normal
inserted position as shown.
7. Check the A/T fluid condition. • If the A/T fluid is very dark or has some burned smell, theremay be an internal problem with the transmission. Refer to
TM-183, "
A/T Fluid Cooler Cleaning". Flush the transmission
cooling system after repairing the transmission.
• If the A/T fluid contains frictional material (clutches, bands, etc.), replace the radiator and flush the transmission cooler
lines using cleaning solvent and compressed air after repairing
the transmission.
8. Install the A/T fluid level gauge in the A/T fluid charging pipe.
9. Tighten the A/T fluid level gauge bolt to specification.
Changing the A/T Fluid (ATF)INFOID:0000000004215540
CAUTION:
If using the vehicle for towing, the A/T fl uid must be replaced as specified. Refer to MA-8, "
Introduc-
tion of Periodic Maintenance".
1. Drive the vehicle to warm up the A/T fluid to approximately 80 ° C (176 ° F).
2. Stop the engine.
3. Remove the A/T fluid level gauge.
4. Drain the A/T fluid from the drain plug hole, then install the drain plug with a new gasket. Refill the transmission with new A/T
fluid. Always refill with the same volume as the drained A/T fluid.
Use the A/T fluid level gauge to check the A/T fluid level as
shown. Add A/T fluid as necessary.
LLIA0071E
A/T fluid level
gauge bolt : Refer to
TM-214, "Removal and Installation (2WD)" or TM-216, "Removal
and Installation (4WD)"
SCIA2899E
Drain plug : Refer to TM-220, "Component".
LLIA0071E
Revision: December 20092009 QX56
Page 2698 of 4171
CHASSIS AND BODY MAINTENANCEMA-25
< ON-VEHICLE MAINTENANCE >
C
DE
F
G H
I
J
K L
M B
MA
N
O A
• To flush out the old A/T fluid from the transmission o
il coolers, pour new A/T fluid into the A/T fluid charg-
ing pipe with the engine idling and at the same time drain the old A/T fluid from the auxiliary transmis-
sion oil cooler hose return line.
• When the color of the A/T fluid coming out of the aux iliary transmission oil cooler hose return line is
about the same as the color of the new A/T fluid, flushing out the old A/T fluid is complete. The amount
of new A/T fluid used for flushing should be 30% to 50% increase of the specified capacity.
CAUTION:
• If Genuine NISSAN Matic S ATF is not available, Genuine NISSAN Matic J ATF may also be used.
• Using ATF fluid other than Genuine NISSAN Matic S ATF or Matic J ATF will cause deterioration
in driveability and A/T durability, and may damage the A/T, which is not covered by the warranty.
• When filling the transmission with A/T fluid, do not spill the A/T fluid on any heat generating
parts such as the exhaust parts.
• Do not reuse the drain plug gasket.
5. Install the A/T fluid level gauge and tighten t he A/T fluid level gauge bolt to specification.
6. Drive the vehicle to warm up the A/T fluid to approximately 80 ° C (176 ° F).
7. Check the fluid level and condition. If the A/T fluid is still dirty, repeat steps 2 through 6.
8. Install the A/T fluid level gauge in the A/T fluid charging pipe and install the A/T fluid level gauge bolt.
9. Tighten the A/T fluid level gauge bolt to specification.
Checking Transfer FluidINFOID:0000000004215545
CAUTION:
If using the vehicle for towing, the transfer fluid must be replaced as specified. Refer to MA-8, "
Intro-
duction of Periodic Maintenance".
FLUID LEAKAGE AND FLUID LEVEL
1. Make sure that fluid is not leaking from the transfer assembly or around it.
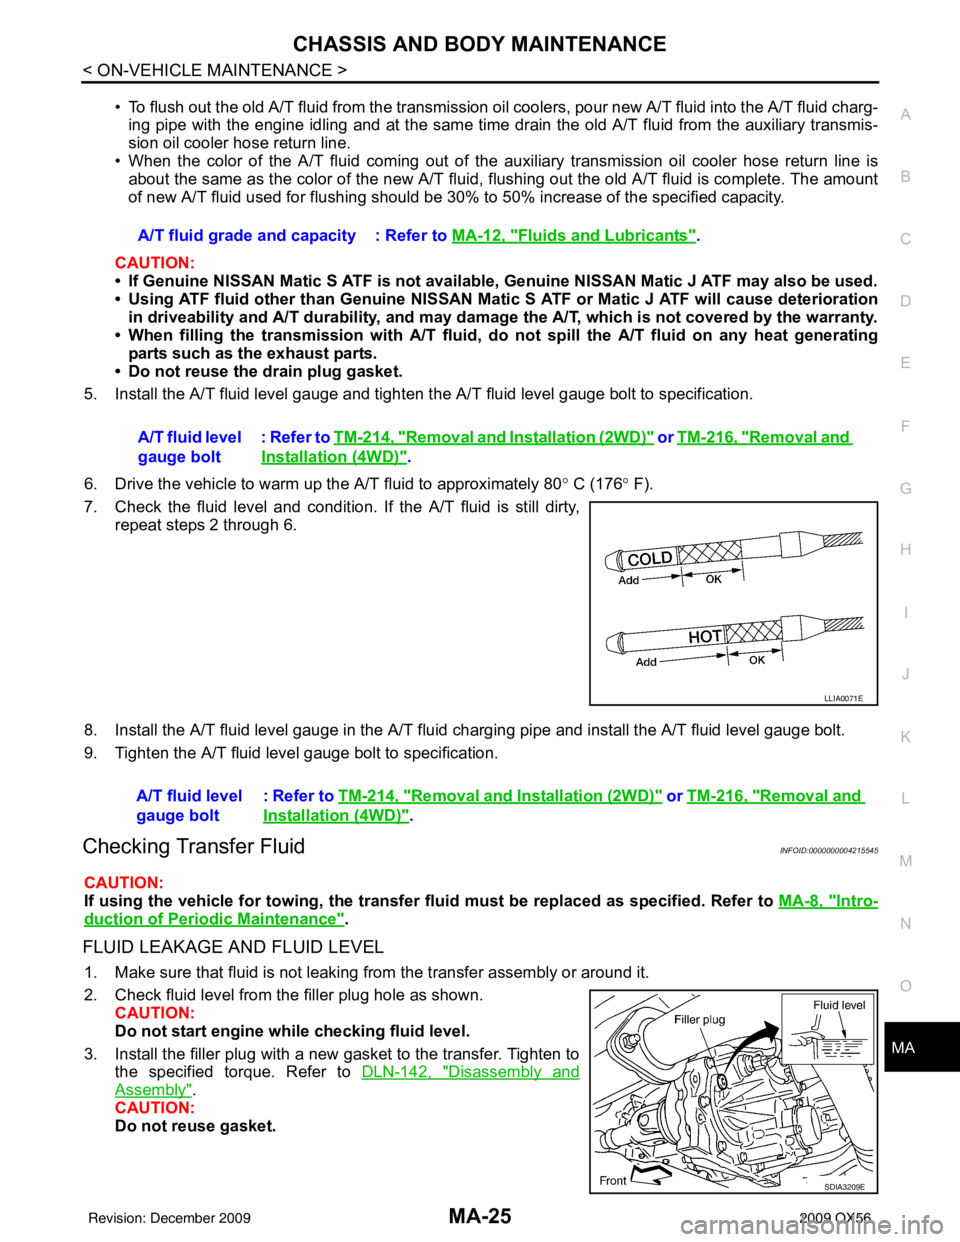
2. Check fluid level from the filler plug hole as shown.
CAUTION:
Do not start engine while checking fluid level.
3. Install the filler plug with a new gasket to the transfer. Tighten to the specified torque. Refer to DLN-142, "
Disassembly and
Assembly".
CAUTION:
Do not reuse gasket. A/T fluid grade and capacity : Refer to MA-12, "
Fluids and Lubricants".
A/T fluid level
gauge bolt : Refer to
TM-214, "
Removal and Installation (2WD)" or TM-216, "Removal and
Installation (4WD)".
LLIA0071E
A/T fluid level
gauge bolt : Refer to TM-214, "Removal and Installation (2WD)" or TM-216, "Removal and
Installation (4WD)".
SDIA3209E
Revision: December 20092009 QX56
Page 3146 of 4171
SUNROOF SYSTEMRF-55
< ON-VEHICLE REPAIR >
C
DE
F
G H
I
J
L
M A
B
RF
N
O P
CAUTION:
• Before removal, fully close the glass lid assembly. Then, after removal, do not move the motor
assembly.
• After installing or adjusting the sunroof and glass lid, check gap alignment and sunroof operation to
prevent malfunction.
• Handle glass lid with care so not to cause damage.
Removal and InstallationINFOID:0000000005877826
CAUTION:
• Always work with a helper.
• When taking sunroof unit out, use shop cloths to protect the seats and trim from damage.
• After installing the sunroof unit or glass lid, be sure to check gap adjustment to prevent any mal-
function.
SUNROOF FRAME ASSEMBLY
NOTE:
• For easier installation, mark each point before removal.
Removal
1. Remove headlining. Refer to INT-17, "Removal and Installation".
2. Remove the glass lid assembly. Follow the procedure for GLASS LID ASSEMBLY within this section.
3. Remove overhead console bracket.
4. Disconnect the front and rear drain hoses.
5. Remove front sunroof frame assembly bolts.
6. Remove sunroof frame assembly brackets.
7. Remove the side bolts and the sunroof frame assembly.
8. Remove the sunshade assembly as necessary. Fo llow the procedure for SUNSHADE ASSEMBLY within
this section.
Installation
1. Install the sunshade assembly.
2. Position the sunroof frame assembly and install the side bolts.
3. Install the sunroof brackets.
4. Install the front sunroof frame assembly bolts.
5. Connect front and rear drain hoses.
6. Install the overhead console bracket.
7. Install the glass lid assembly. Follow the procedure for GLASS LID ASSEMBLY within this section.
8. Install headlining. Refer to INT-17, "
Removal and Installation".
9. Perform initialization procedure. Refer to RF-5, "
ADDITIONAL SERVICE WHEN REPLACING CONTROL
UNIT : Special Repair Requirement".
GLASS LID ASSEMBLY
Removal
1. Open sunshade assembly.
2. Ensure glass lid assembly is closed.
3. Remove side cover LH and RH.
Revision: December 20092009 QX56
Page 3615 of 4171
ST-24
< REMOVAL AND INSTALLATION >
POWER STEERING GEAR AND LINKAGE
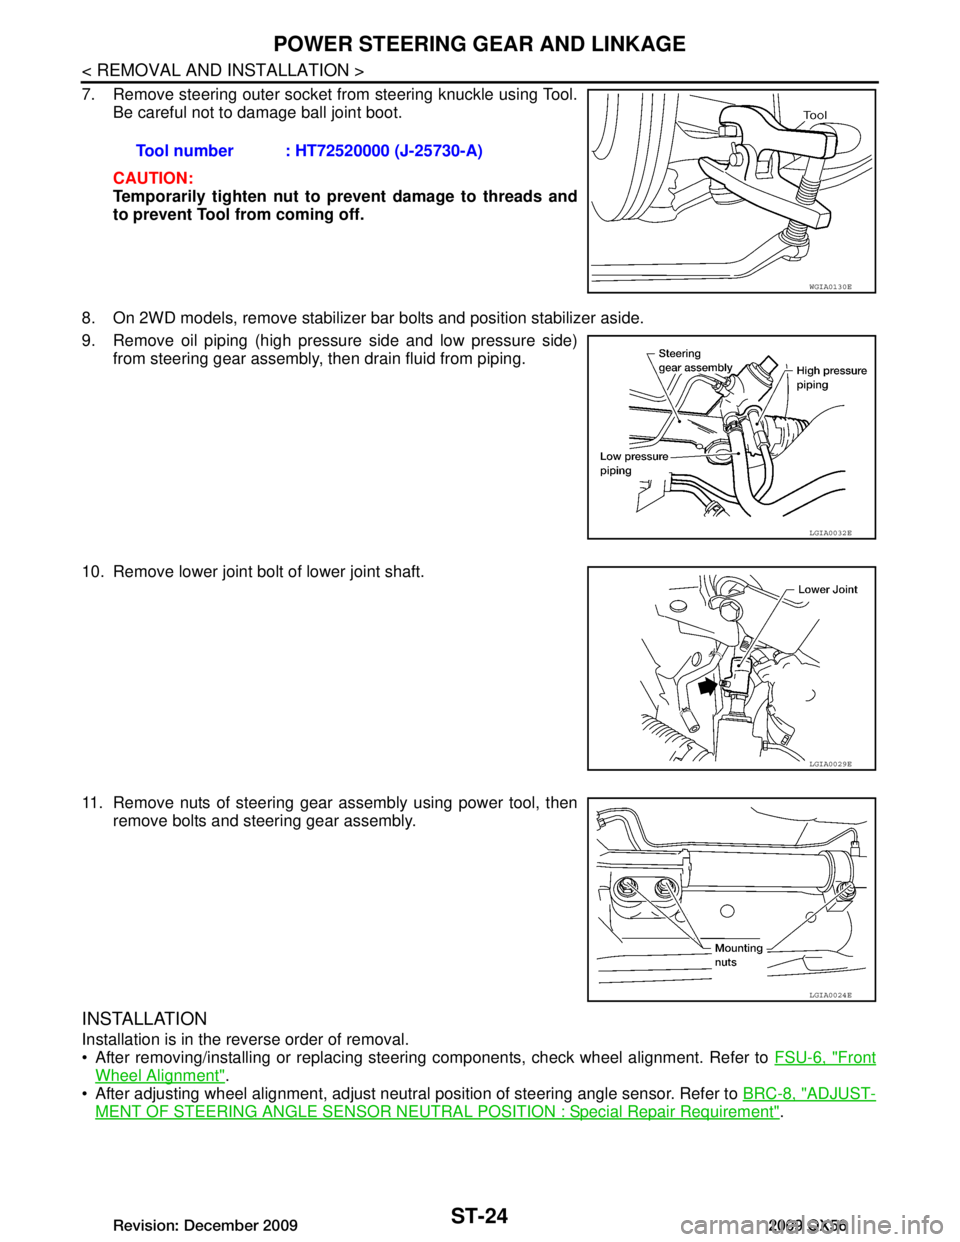
7. Remove steering outer socket from steering knuckle using Tool.Be careful not to damage ball joint boot.
CAUTION:
Temporarily tighten nut to prevent damage to threads and
to prevent Tool from coming off.
8. On 2WD models, remove stabilizer bar bolts and position stabilizer aside.
9. Remove oil piping (high pressure side and low pressure side) from steering gear assembly, then drain fluid from piping.
10. Remove lower joint bolt of lower joint shaft.
11. Remove nuts of steering gear assembly using power tool, then remove bolts and steering gear assembly.
INSTALLATION
Installation is in the reverse order of removal.
After removing/installing or replacing steering components, check wheel alignment. Refer to FSU-6, "Front
Wheel Alignment".
After adjusting wheel alignment, adjust neutral position of steering angle sensor. Refer to BRC-8, "ADJUST-
MENT OF STEERING ANGLE SENSOR NEUTRAL POSITION : Special Repair Requirement".
Tool number : HT72520000 (J-25730-A)
WGIA0130E
LGIA0032E
LGIA0029E
LGIA0024E
Revision: December 20092009 QX56
Page 3617 of 4171
ST-26
< REMOVAL AND INSTALLATION >
POWER STEERING OIL PUMP
POWER STEERING OIL PUMP
Removal and InstallationINFOID:0000000004187597
REMOVAL
1. Drain power steering fluid from reservoir tank.
2. Remove engine room cover. Refer to EM-24, "Removal and Installation"
.
3. Remove air duct assembly. Refer to EM-25, "Removal and Installation"
.
4. Remove power steering reservoir tank.
5. Remove serpentine drive belt belt from auto tensioner and power steering pump. Refer to EM-13,
"Removal and Installation".
6. Disconnect pressure sensor electrical connector.
7. Remove high pressure and low pressure piping from power steering oil pump. Refer to ST-27
.
8. Remove bolts, then remove power steering pump.
INSTALLATION
Installation is in the reverse order of removal. Refer to ST-27 for tightening torque.
After installation, bleed air. Refer to ST-13, "Air Bleeding Hydraulic System"
.
NOTE:
Belt tension is automatic and requires no adjustment.
Revision: December 20092009 QX56
Page 3829 of 4171
A/T FLUIDTM-181
< ON-VEHICLE MAINTENANCE >
CEF
G H
I
J
K L
M A
B
TM
N
O P
Changing the A/T Fluid (ATF)INFOID:0000000005892327
CAUTION:
If using the vehicle for towing, the A/T fl uid must be replaced as specified. Refer to MA-8, "Introduc-
tion of Periodic Maintenance".
1. Drive the vehicle to warm up the A/T fluid to approximately 80 ° C (176 ° F).
2. Stop the engine.
3. Remove the A/T fluid level gauge.
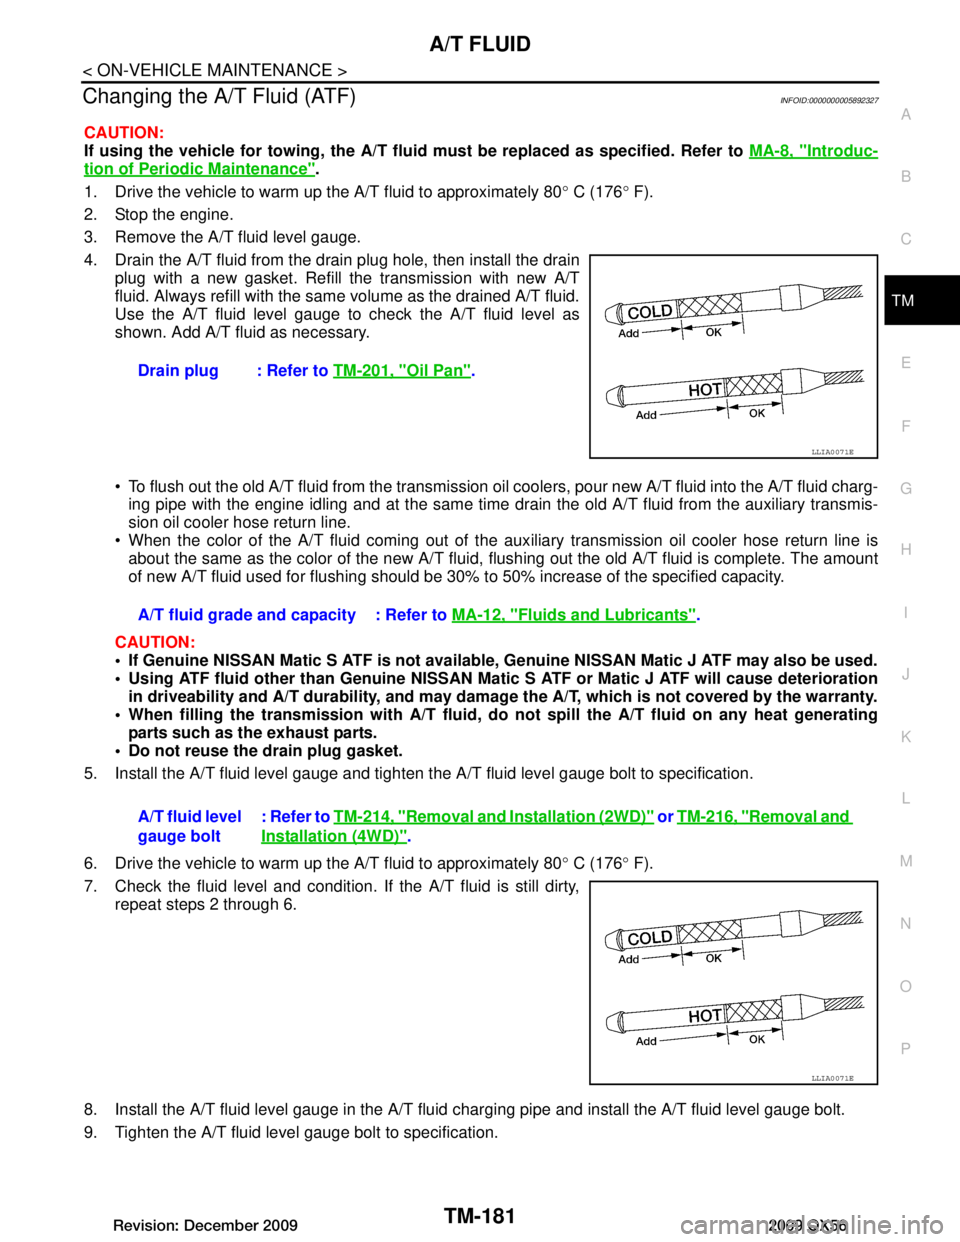
4. Drain the A/T fluid from the drai n plug hole, then install the drain
plug with a new gasket. Refill the transmission with new A/T
fluid. Always refill with the same volume as the drained A/T fluid.
Use the A/T fluid level gauge to check the A/T fluid level as
shown. Add A/T fluid as necessary.
To flush out the old A/T fluid from the transmission o il coolers, pour new A/T fluid into the A/T fluid charg-
ing pipe with the engine idling and at the same time drain the old A/T fluid from the auxiliary transmis-
sion oil cooler hose return line.
When the color of the A/T fluid coming out of the aux iliary transmission oil cooler hose return line is
about the same as the color of the new A/T fluid, flushing out the old A/T fluid is complete. The amount
of new A/T fluid used for flushing should be 30% to 50% increase of the specified capacity.
CAUTION:
If Genuine NISSAN Matic S ATF is not available, Genuine NISSAN Matic J ATF may also be used.
Using ATF fluid other than Genuine NISSAN Matic S ATF or Matic J ATF will cause deterioration
in driveability and A/T durability, and may damage the A/T, which is not covered by the warranty.
When filling the transmission with A/T fluid, do not spill the A/T fluid on any heat generating
parts such as the exhaust parts.
Do not reuse the drain plug gasket.
5. Install the A/T fluid level gauge and tighten t he A/T fluid level gauge bolt to specification.
6. Drive the vehicle to warm up the A/T fluid to approximately 80 ° C (176 ° F).
7. Check the fluid level and condition. If the A/T fluid is still dirty, repeat steps 2 through 6.
8. Install the A/T fluid level gauge in the A/T fluid charging pipe and install the A/T fluid level gauge bolt.
9. Tighten the A/T fluid level gauge bolt to specification. Drain plug : Refer to
TM-201, "Oil Pan"
.
LLIA0071E
A/T fluid grade and capacity : Refer to MA-12, "Fluids and Lubricants".
A/T fluid level
gauge bolt : Refer to
TM-214, "Removal and Installation (2WD)"
or TM-216, "Removal and
Installation (4WD)".
LLIA0071E
Revision: December 20092009 QX56