2009 INFINITI QX56 check transmission fluid
[x] Cancel search: check transmission fluidPage 3719 of 4171
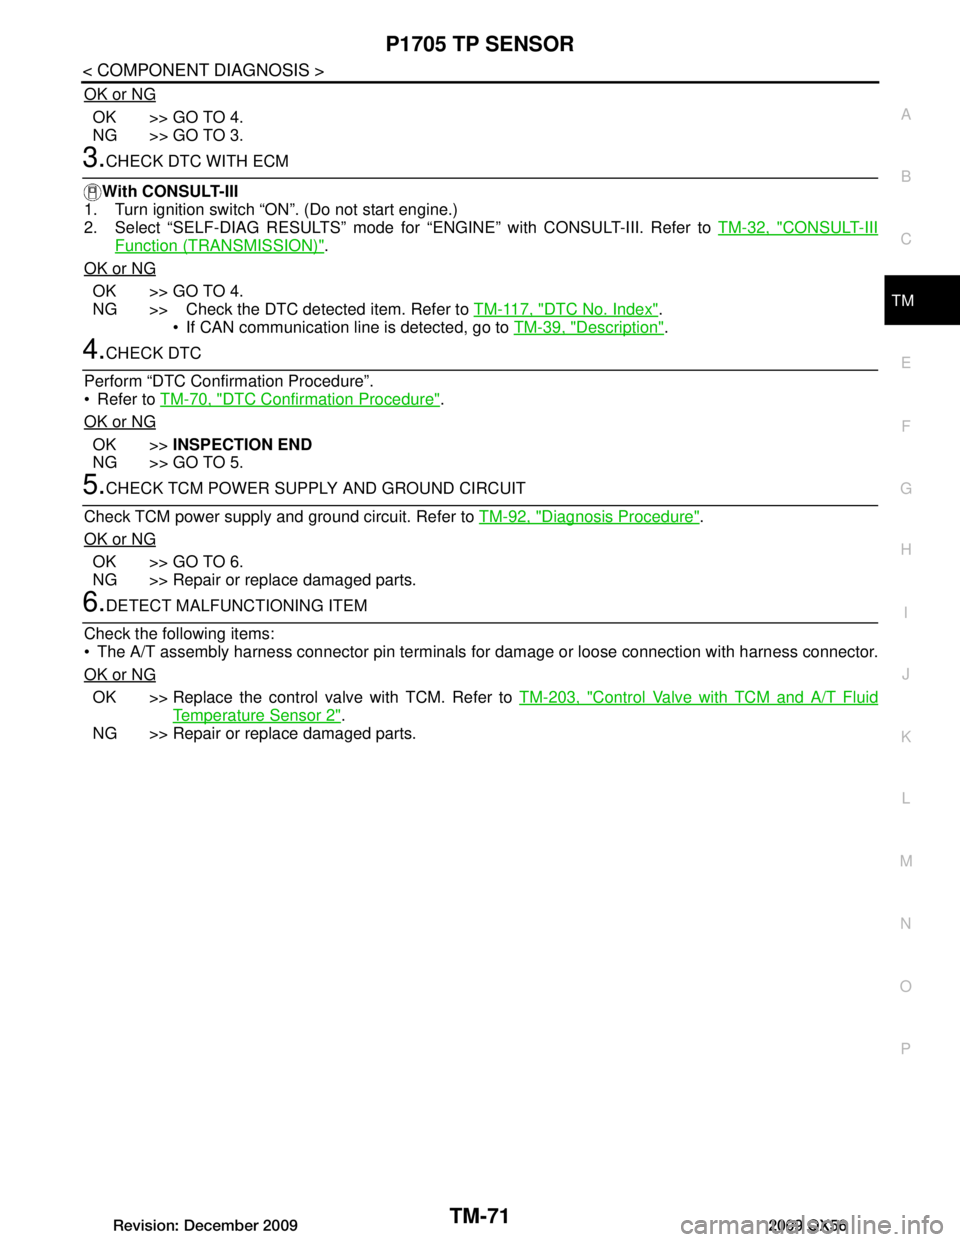
P1705 TP SENSORTM-71
< COMPONENT DIAGNOSIS >
CEF
G H
I
J
K L
M A
B
TM
N
O P
OK or NG
OK >> GO TO 4.
NG >> GO TO 3.
3.CHECK DTC WITH ECM
With CONSULT-III
1. Turn ignition switch “ON”. (Do not start engine.)
2. Select “SELF-DIAG RESULTS” mode for “ENGINE” with CONSULT-III. Refer to TM-32, "CONSULT-III
Function (TRANSMISSION)".
OK or NG
OK >> GO TO 4.
NG >> Check the DTC detected item. Refer to TM-117, "DTC No. Index"
.
If CAN communication line is detected, go to TM-39, "Description"
.
4.CHECK DTC
Perform “DTC Confirmation Procedure”.
Refer to TM-70, "DTC Confirmation Procedure"
.
OK or NG
OK >> INSPECTION END
NG >> GO TO 5.
5.CHECK TCM POWER SUPPLY AND GROUND CIRCUIT
Check TCM power supply and ground circuit. Refer to TM-92, "Diagnosis Procedure"
.
OK or NG
OK >> GO TO 6.
NG >> Repair or replace damaged parts.
6.DETECT MALFUNCTIONING ITEM
Check the following items:
The A/T assembly harness connector pin terminals for damage or loose connection with harness connector.
OK or NG
OK >> Replace the control valve with TCM. Refer to TM-203, "Control Valve with TCM and A/T Fluid
Temperature Sensor 2".
NG >> Repair or replace damaged parts.
Revision: December 20092009 QX56
Page 3720 of 4171
TM-72
< COMPONENT DIAGNOSIS >
P1710 TRANSMISSION FLUID TEMPERATURE SENSOR
P1710 TRANSMISSION FLUID TEMPERATURE SENSOR
DescriptionINFOID:0000000003771914
The A/T fluid temperature sensor detects the A/ T fluid temperature and sends a signal to the TCM.
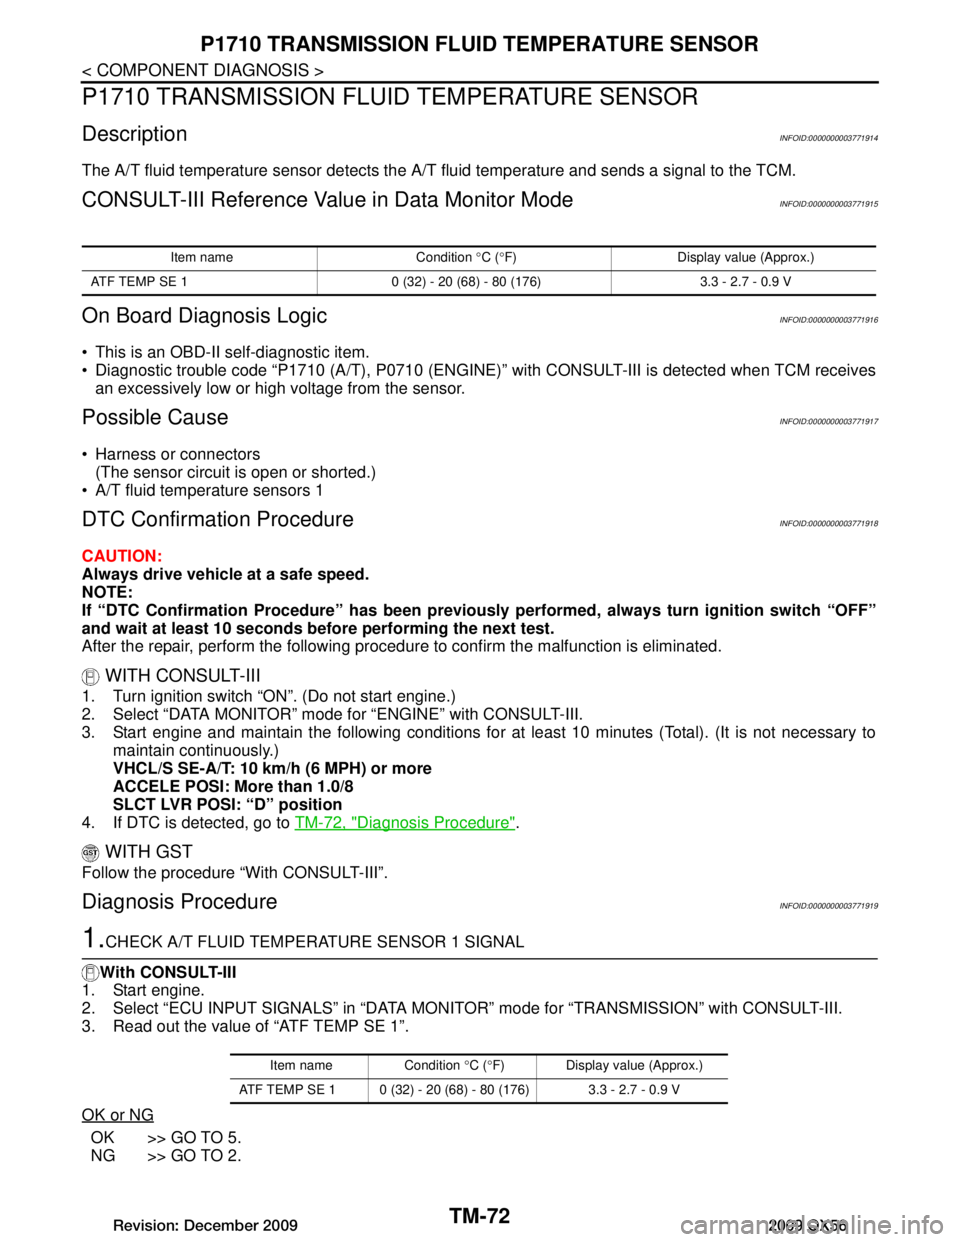
CONSULT-III Reference Value in Data Monitor ModeINFOID:0000000003771915
On Board Diagnosis LogicINFOID:0000000003771916
This is an OBD-II self-diagnostic item.
Diagnostic trouble code “P1710 (A/T), P0710 (ENGINE)” with CONSULT-III is detected when TCM receives
an excessively low or high voltage from the sensor.
Possible CauseINFOID:0000000003771917
Harness or connectors (The sensor circuit is open or shorted.)
A/T fluid temperature sensors 1
DTC Confirmation ProcedureINFOID:0000000003771918
CAUTION:
Always drive vehicle at a safe speed.
NOTE:
If “DTC Confirmation Procedure” has been previously performed, always turn ignition switch “OFF”
and wait at least 10 seconds before performing the next test.
After the repair, perform the following proc edure to confirm the malfunction is eliminated.
WITH CONSULT-III
1. Turn ignition switch “ON”. (Do not start engine.)
2. Select “DATA MONITOR” mode for “ENGINE” with CONSULT-III.
3. Start engine and maintain the following conditions for at least 10 minutes (Total). (It is not necessary to
maintain continuously.)
VHCL/S SE-A/T: 10 km/h (6 MPH) or more
ACCELE POSI: More than 1.0/8
SLCT LVR POSI: “D” position
4. If DTC is detected, go to TM-72, "Diagnosis Procedure"
.
WITH GST
Follow the procedure “With CONSULT-III”.
Diagnosis ProcedureINFOID:0000000003771919
1.CHECK A/T FLUID TEMPERATURE SENSOR 1 SIGNAL
With CONSULT-III
1. Start engine.
2. Select “ECU INPUT SIGNALS” in “DATA MONI TOR” mode for “TRANSMISSION” with CONSULT-III.
3. Read out the value of “ATF TEMP SE 1”.
OK or NG
OK >> GO TO 5.
NG >> GO TO 2.
Item name Condition °C ( °F) Display value (Approx.)
ATF TEMP SE 1 0 (32) - 20 (68) - 80 (176) 3.3 - 2.7 - 0.9 V
Item name Condition °C ( °F) Display value (Approx.)
ATF TEMP SE 1 0 (32) - 20 (68) - 80 (176) 3.3 - 2.7 - 0.9 V
Revision: December 20092009 QX56
Page 3721 of 4171
P1710 TRANSMISSION FLUID TEMPERATURE SENSOR
TM-73
< COMPONENT DIAGNOSIS >
C EF
G H
I
J
K L
M A
B
TM
N
O P
2.CHECK A/T FLUID TEMPERATURE SENSOR 1
Check A/T fluid temperature sensor 1. Refer to TM-73, "Component Inspection"
.
OK or NG
OK >> GO TO 3.
NG >> Replace the control valve with TCM. Refer to TM-203, "Control Valve with TCM and A/T Fluid
Temperature Sensor 2".
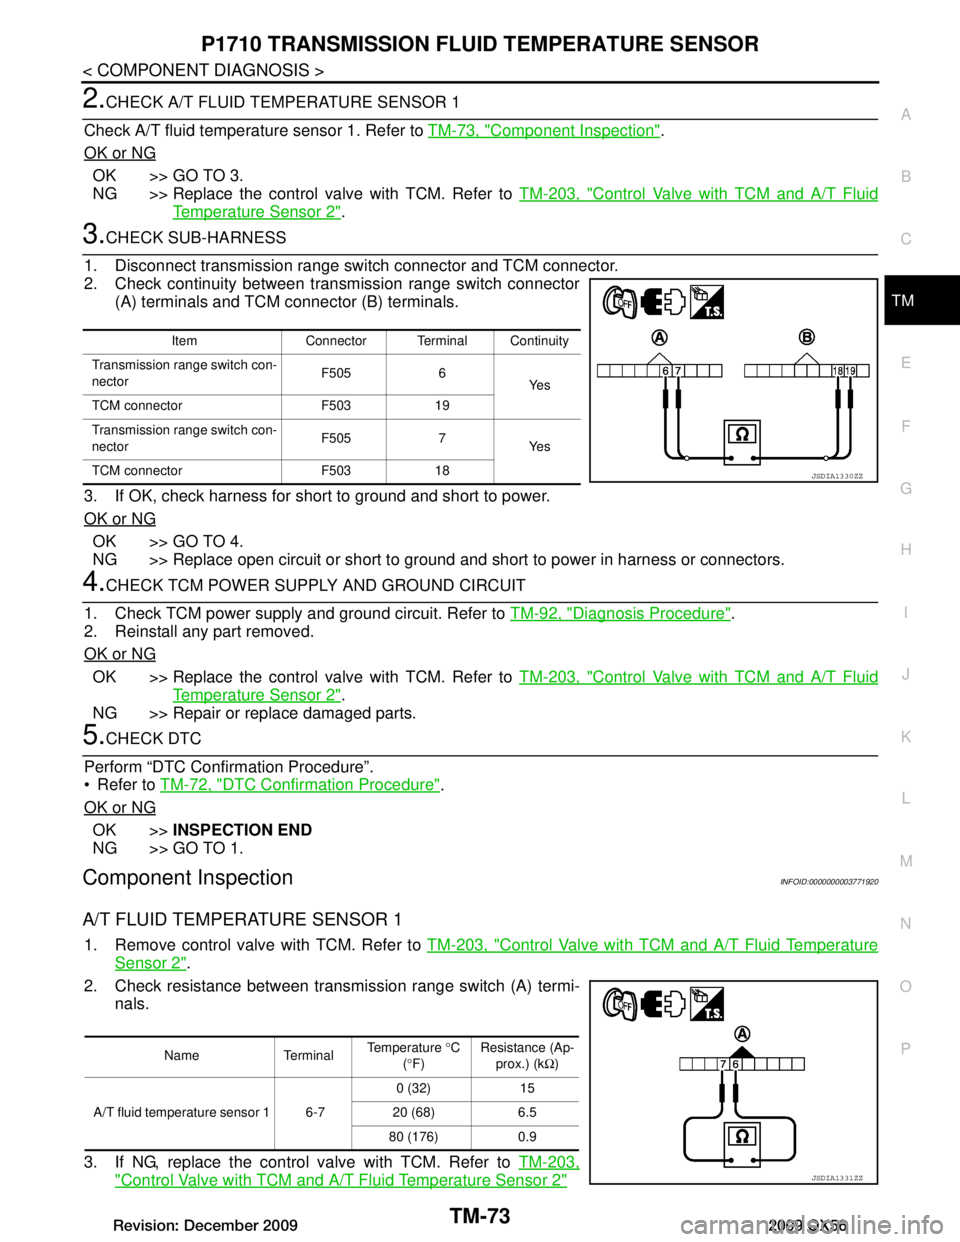
3.CHECK SUB-HARNESS
1. Disconnect transmission range switch connector and TCM connector.
2. Check continuity between transmission range switch connector (A) terminals and TCM connector (B) terminals.
3. If OK, check harness for short to ground and short to power.
OK or NG
OK >> GO TO 4.
NG >> Replace open circuit or short to ground and short to power in harness or connectors.
4.CHECK TCM POWER SUPPLY AND GROUND CIRCUIT
1. Check TCM power supply and ground circuit. Refer to TM-92, "Diagnosis Procedure"
.
2. Reinstall any part removed.
OK or NG
OK >> Replace the control valve with TCM. Refer to TM-203, "Control Valve with TCM and A/T Fluid
Temperature Sensor 2".
NG >> Repair or replace damaged parts.
5.CHECK DTC
Perform “DTC Confirmation Procedure”.
Refer to TM-72, "DTC Confirmation Procedure"
.
OK or NG
OK >> INSPECTION END
NG >> GO TO 1.
Component InspectionINFOID:0000000003771920
A/T FLUID TEMPERATURE SENSOR 1
1. Remove control valve with TCM. Refer to TM-203, "Control Valve with TCM and A/T Fluid Temperature
Sensor 2".
2. Check resistance between transmission range switch (A) termi- nals.
3. If NG, replace the control valve with TCM. Refer to TM-203,
"Control Valve with TCM and A/T Fluid Temperature Sensor 2"
Item Connector Terminal Continuity
Transmission range switch con-
nector F505 6
Ye s
TCM connector F503 19
Transmission range switch con-
nector F505 7
Ye s
TCM connector F503 18
JSDIA1330ZZ
Name Terminal Temperature
°C
( ° F) Resistance (Ap-
prox.) (k Ω)
0 (32) 15
A/T fluid temperature sensor 1 6-7 20 (68) 6.5 80 (176) 0.9
JSDIA1331ZZ
Revision: December 20092009 QX56
Page 3739 of 4171
P1774 LOW COAST BRAKE SOLENOIDTM-91
< COMPONENT DIAGNOSIS >
CEF
G H
I
J
K L
M A
B
TM
N
O P
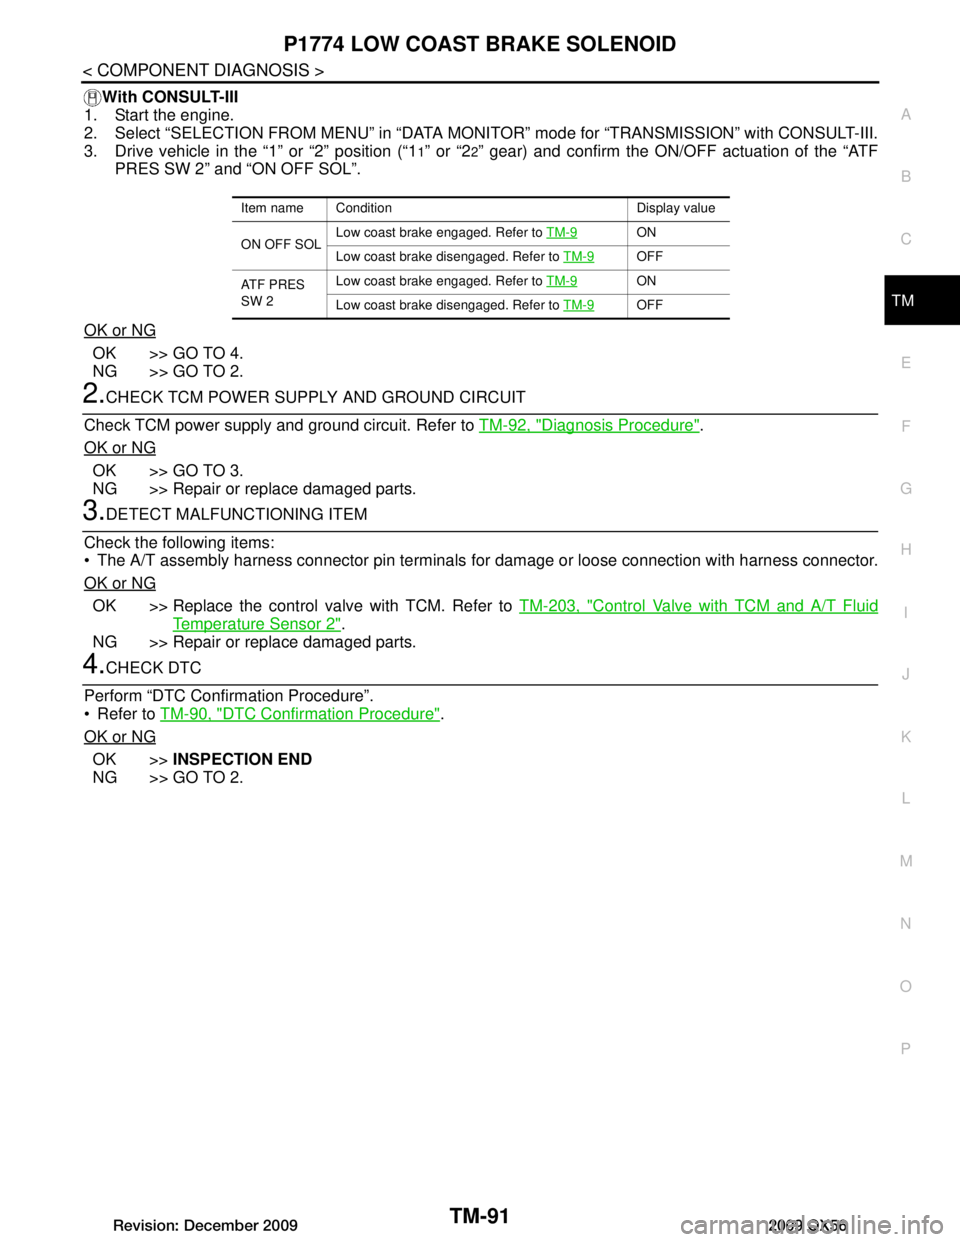
With CONSULT-III
1. Start the engine.
2. Select “SELECTION FROM MENU” in “DATA MONI TOR” mode for “TRANSMISSION” with CONSULT-III.
3. Drive vehicle in the “1” or “2” position (“1
1” or “22” gear) and confirm the ON/OFF actuation of the “ATF
PRES SW 2” and “ON OFF SOL”.
OK or NG
OK >> GO TO 4.
NG >> GO TO 2.
2.CHECK TCM POWER SUPPLY AND GROUND CIRCUIT
Check TCM power supply and ground circuit. Refer to TM-92, "Diagnosis Procedure"
.
OK or NG
OK >> GO TO 3.
NG >> Repair or replace damaged parts.
3.DETECT MALFUNCTIONING ITEM
Check the following items:
The A/T assembly harness connector pin terminals for damage or loose connection with harness connector.
OK or NG
OK >> Replace the control valve with TCM. Refer to TM-203, "Control Valve with TCM and A/T Fluid
Temperature Sensor 2".
NG >> Repair or replace damaged parts.
4.CHECK DTC
Perform “DTC Confirmation Procedure”.
Refer to TM-90, "DTC Confirmation Procedure"
.
OK or NG
OK >> INSPECTION END
NG >> GO TO 2.
Item name Condition Display value
ON OFF SOL Low coast brake engaged. Refer to
TM-9
ON
Low coast brake disengaged. Refer to TM-9
OFF
ATF PRES
SW 2 Low coast brake engaged. Refer to
TM-9
ON
Low coast brake disengaged. Refer to TM-9
OFF
Revision: December 20092009 QX56
Page 3741 of 4171
MAIN POWER SUPPLY AND GROUND CIRCUITTM-93
< COMPONENT DIAGNOSIS >
CEF
G H
I
J
K L
M A
B
TM
N
O P
5.DETECT MALFUNCTIONING ITEM
Check the following items:
The A/T assembly harness connector terminals for damage or loose connection with harness connector.
OK or NG
OK >> GO TO 6.
NG >> Repair or replace damaged parts.
6.PERFORM SELF-DIAGNOSIS
Perform self-diagnosis. Refer to TM-32, "CONSULT-III Function (TRANSMISSION)"
.
OK or NG
OK >> INSPECTION END
NG-1 >> Self-diagnosis does not activate: GO TO 7.
NG-2 >> DTC is displayed: Check t he malfunctioning system. Refer to TM-32, "CONSULT-III Function
(TRANSMISSION)".
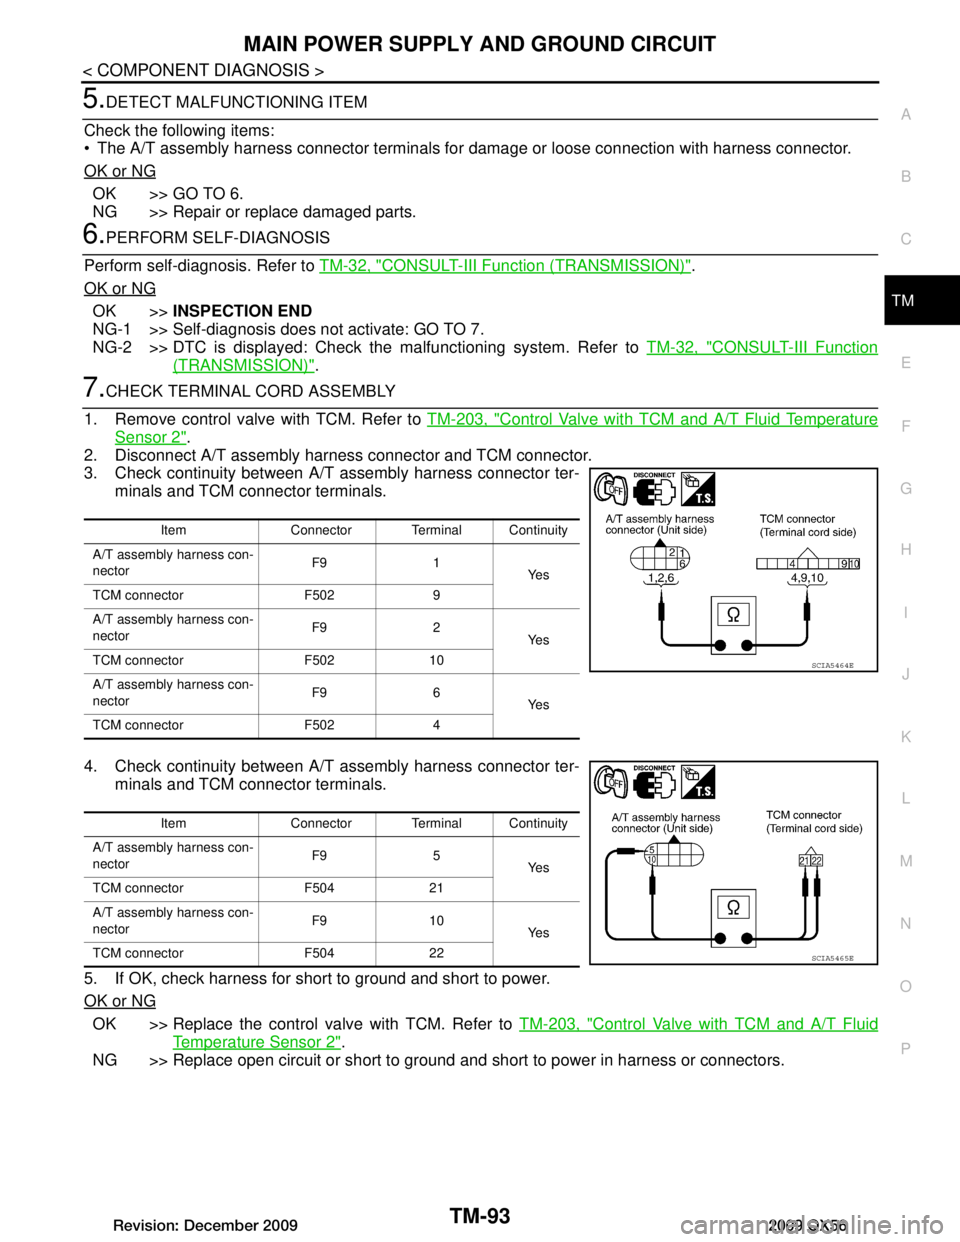
7.CHECK TERMINAL CORD ASSEMBLY
1. Remove control valve with TCM. Refer to TM-203, "Control Valve with TCM and A/T Fluid Temperature
Sensor 2".
2. Disconnect A/T assembly harness connector and TCM connector.
3. Check continuity between A/T assembly harness connector ter- minals and TCM connector terminals.
4. Check continuity between A/T assembly harness connector ter- minals and TCM connector terminals.
5. If OK, check harness for short to ground and short to power.
OK or NG
OK >> Replace the control valve with TCM. Refer to TM-203, "Control Valve with TCM and A/T Fluid
Temperature Sensor 2".
NG >> Replace open circuit or short to ground and short to power in harness or connectors.
Item Connector Terminal Continuity
A/T assembly harness con-
nector F9 1
Ye s
TCM connector F502 9
A/T assembly harness con-
nector F9 2
Ye s
TCM connector F502 10
A/T assembly harness con-
nector F9 6
Ye s
TCM connector F502 4
SCIA5464E
Item Connector Terminal Continuity
A/T assembly harness con-
nector F9 5
Ye s
TCM connector F504 21
A/T assembly harness con-
nector F9 10
Ye s
TCM connector F504 22
SCIA5465E
Revision: December 20092009 QX56
Page 3768 of 4171

TM-120
< SYMPTOM DIAGNOSIS >
SYSTEM SYMPTOM
Check the starting system. Refer to STR-5, "Work Flow".
OK or NG
OK >> INSPECTION END
NG >> Repair or replace damaged parts.
In "P" Position, Vehi cle Moves When PushedINFOID:0000000003771993
SYMPTOM:
Even though the selector lever is set in the “P ” position, the parking mechanism is not actuated,
allowing the vehicle to be moved when it is pushed.
DIAGNOSTIC PROCEDURE
1.CHECK TRANSMISSION RANGE SWITCH CIRCUIT
Perform self-diagnosis. Refer to TM-32, "CONSULT-III Function (TRANSMISSION)"
.
Do the self-diagnosis results indicate transmission range switch?
YES >> Check the malfunctioning system. Refer to TM-44, "Diagnosis Procedure".
NO >> GO TO 2.
2.CHECK CONTROL CABLE
Check the control cable.
Refer to TM-195, "Checking of A/T Position"
.
OK or NG
OK >> GO TO 3.
NG >> Adjust control cable. Refer to TM-195, "Adjustment of A/
T Position".
3.CHECK A/T FLUID CONDITION
1. Remove oil pan. Refer to TM-201, "Oil Pan"
.
2. Check A/T fluid condition. Refer to TM-179, "Checking the A/T
Fluid (ATF)".
OK or NG
OK >> INSPECTION END
NG >> GO TO 4.
4.DETECT MALFUNCTIONING ITEM
Check the malfunction items. If any items are dam aged, repair or replace damaged parts. Refer to TM-152,
"Symptom Table" (Symptom No. 58).
OK or NG
OK >> INSPECTION END
NG >> Repair or replace damaged parts.
In "N" Position, Vehicle MovesINFOID:0000000003771994
SYMPTOM:
Vehicle moves forward or backwar d when selecting “N” position.
DIAGNOSTIC PROCEDURE
LCIA0345E
SCIA5199E
Revision: December 20092009 QX56
Page 3769 of 4171
SYSTEM SYMPTOMTM-121
< SYMPTOM DIAGNOSIS >
CEF
G H
I
J
K L
M A
B
TM
N
O P
1.CHECK TRANSMISSION RANGE SWITCH CIRCUIT
Perform self-diagnosis. Refer to TM-32, "CONSULT-III Function (TRANSMISSION)"
.
Do the self-diagnostic results indicate transmission range switch?
YES >> Check the malfunctioning system. Refer to TM-44, "Diagnosis Procedure".
NO >> GO TO 2.
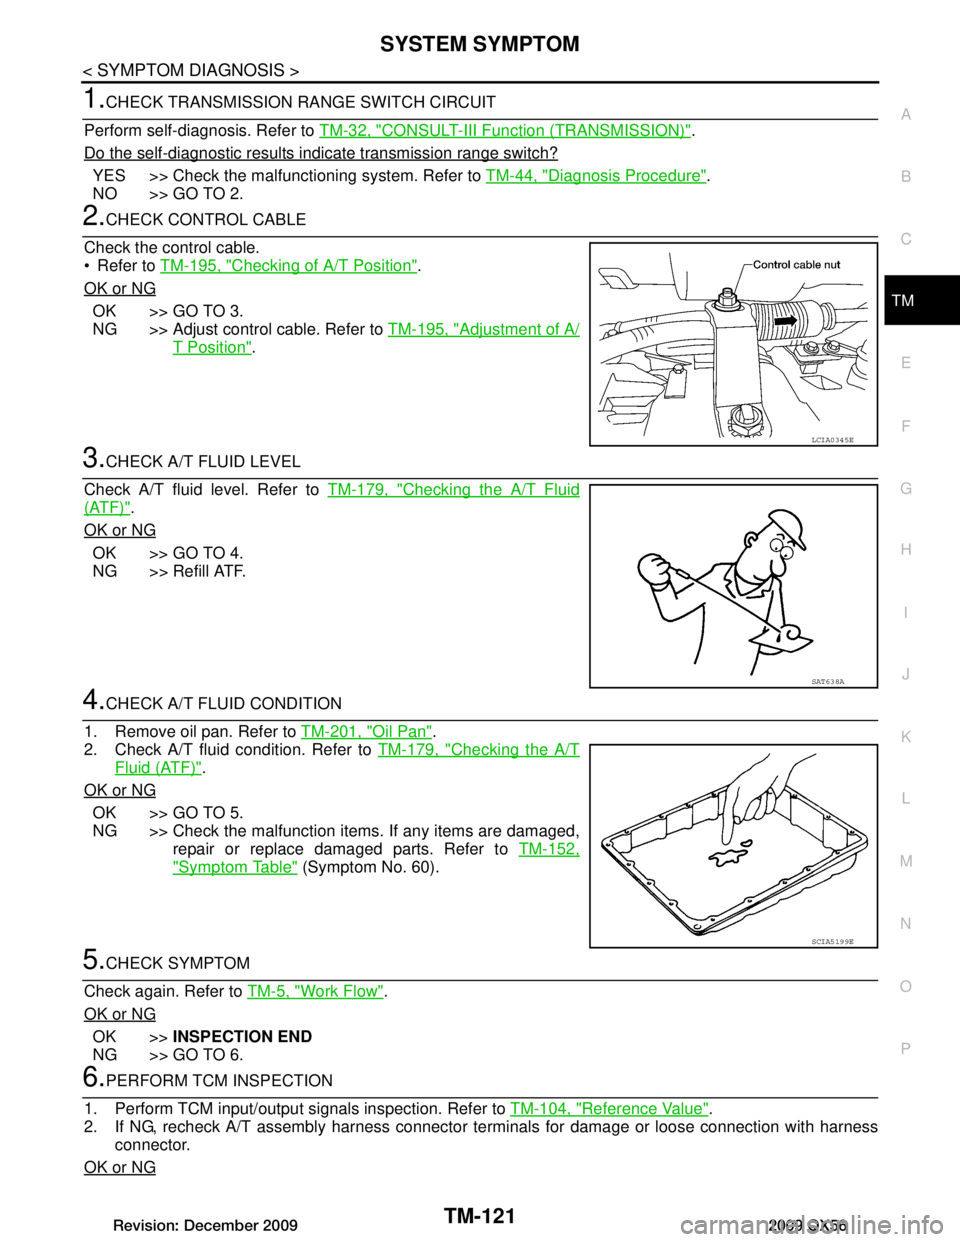
2.CHECK CONTROL CABLE
Check the control cable.
Refer to TM-195, "Checking of A/T Position"
.
OK or NG
OK >> GO TO 3.
NG >> Adjust control cable. Refer to TM-195, "Adjustment of A/
T Position".
3.CHECK A/T FLUID LEVEL
Check A/T fluid level. Refer to TM-179, "Checking the A/T Fluid
(ATF)".
OK or NG
OK >> GO TO 4.
NG >> Refill ATF.
4.CHECK A/T FLUID CONDITION
1. Remove oil pan. Refer to TM-201, "Oil Pan"
.
2. Check A/T fluid condition. Refer to TM-179, "Checking the A/T
Fluid (ATF)".
OK or NG
OK >> GO TO 5.
NG >> Check the malfunction items. If any items are damaged, repair or replace damaged parts. Refer to TM-152,
"Symptom Table" (Symptom No. 60).
5.CHECK SYMPTOM
Check again. Refer to TM-5, "Work Flow"
.
OK or NG
OK >> INSPECTION END
NG >> GO TO 6.
6.PERFORM TCM INSPECTION
1. Perform TCM input/output signals inspection. Refer to TM-104, "Reference Value"
.
2. If NG, recheck A/T assembly harness connector terminals for damage or loose connection with harness
connector.
OK or NG
LCIA0345E
SAT638A
SCIA5199E
Revision: December 20092009 QX56
Page 3770 of 4171
TM-122
< SYMPTOM DIAGNOSIS >
SYSTEM SYMPTOM
OK >>INSPECTION END
NG >> Repair or replace damaged parts.
Large Shock("N" to "D" Position)INFOID:0000000003771995
SYMPTOM:
A noticeable shock occurs when the selector lever is shifted from the “N” to “D” position.
DIAGNOSTIC PROCEDURE
1.CHECK SELF-DIAGNOSTIC RESULTS
Perform self-diagnosis. Refer to TM-32, "CONSULT-III Function (TRANSMISSION)"
.
Do the self-diagnostic results indicate A/T fluid temperature sensor, engine speed signal, accelerator pedal
position sensor, front brake solenoid valve, CAN communication line?
YES >> Check the malfunctioning system. Refer to TM-72, "Diagnosis Procedure", TM-52, "Diagnosis
Procedure", TM-70, "Diagnosis Procedure", TM-82, "Diagnosis Procedure", TM-39, "Diagnosis
Procedure".
NO >> GO TO 2.
2.ENGINE IDLE SPEED
Check the engine idle speed. Refer to EC-17, "Idle Speed and Ignition Timing Check"
.
OK or NG
OK >> GO TO 3.
NG >> Repair.
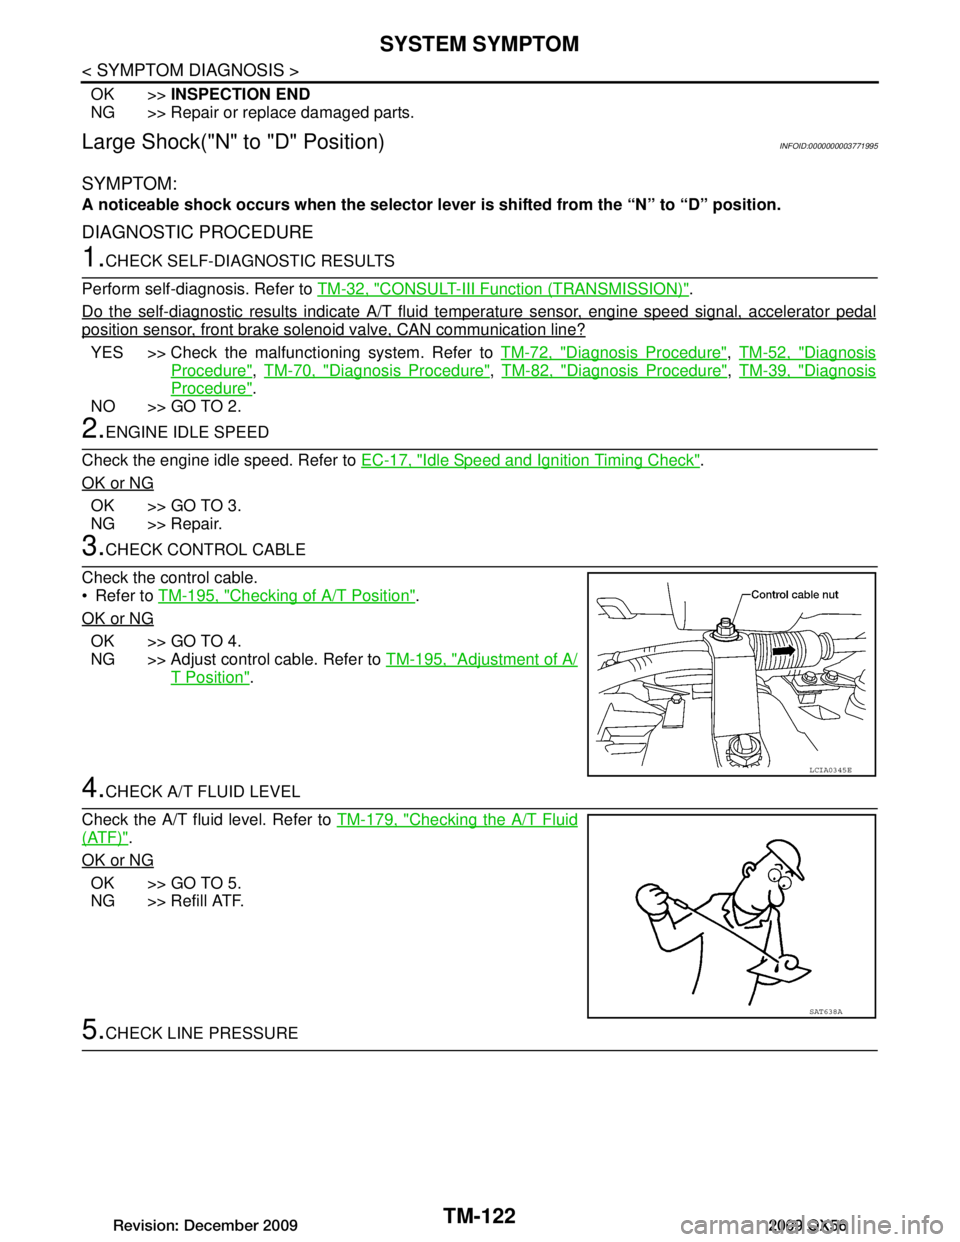
3.CHECK CONTROL CABLE
Check the control cable.
Refer to TM-195, "Checking of A/T Position"
.
OK or NG
OK >> GO TO 4.
NG >> Adjust control cable. Refer to TM-195, "Adjustment of A/
T Position".
4.CHECK A/T FLUID LEVEL
Check the A/T fluid level. Refer to TM-179, "Checking the A/T Fluid
(ATF)".
OK or NG
OK >> GO TO 5.
NG >> Refill ATF.
5.CHECK LINE PRESSURE
LCIA0345E
SAT638A
Revision: December 20092009 QX56