2009 INFINITI QX56 ECU
[x] Cancel search: ECUPage 3623 of 4171
ST-32
< DISASSEMBLY AND ASSEMBLY >
POWER STEERING GEAR AND LINKAGE
POWER STEERING GEAR AND LINKAGE
Disassembly and AssemblyINFOID:0000000004187600
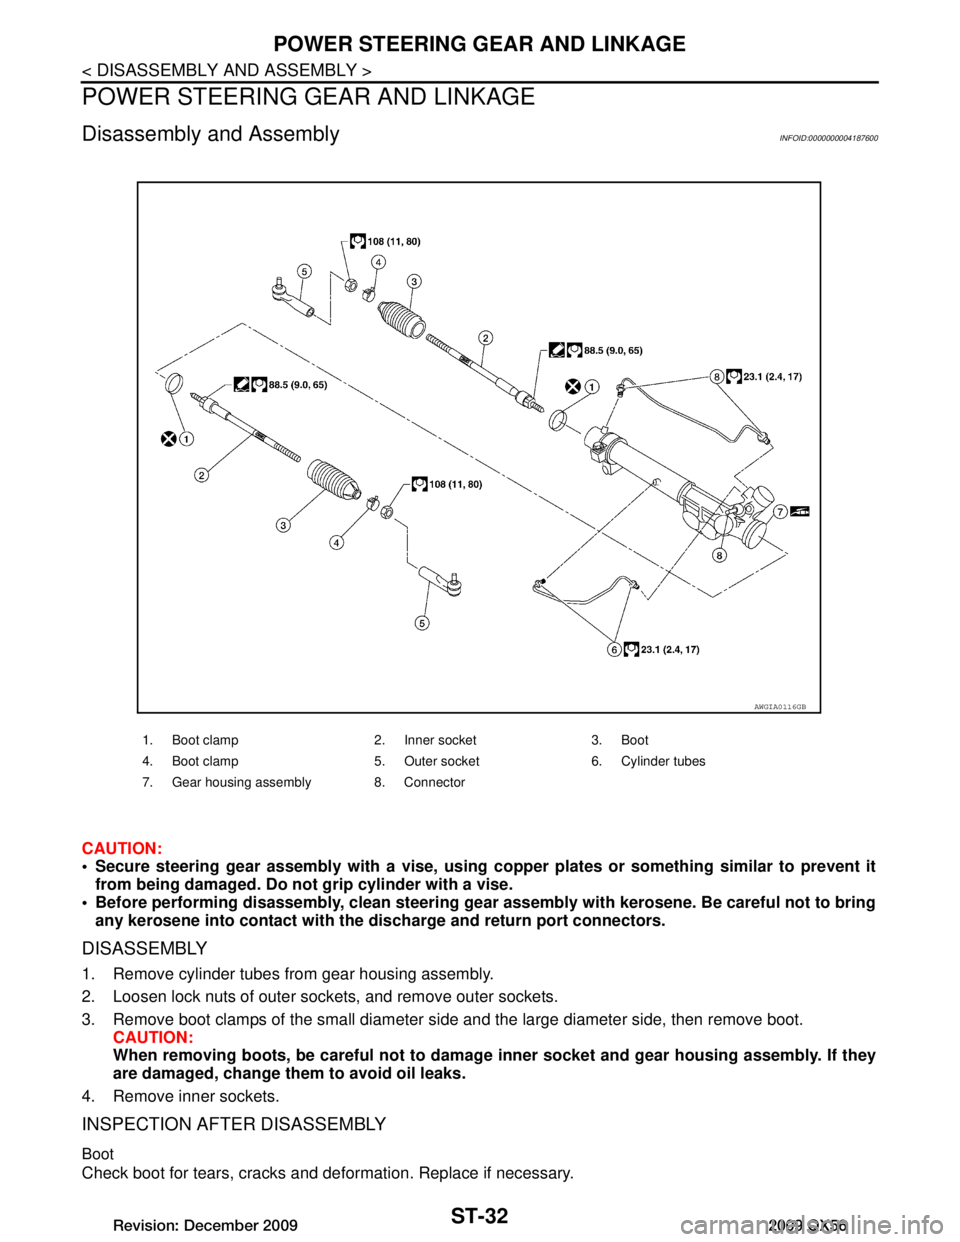
CAUTION:
Secure steering gear assembly with a vise, using copper plates or something similar to prevent it
from being damaged. Do not grip cylinder with a vise.
Before performing disassembly, clean steering gear assembly with kerosene. Be careful not to bring
any kerosene into contact with the discharge and return port connectors.
DISASSEMBLY
1. Remove cylinder tubes from gear housing assembly.
2. Loosen lock nuts of outer sockets, and remove outer sockets.
3. Remove boot clamps of the small diameter si de and the large diameter side, then remove boot.
CAUTION:
When removing boots, be careful not to damage inner socket and gear housing assembly. If they
are damaged, change them to avoid oil leaks.
4. Remove inner sockets.
INSPECTION AFTER DISASSEMBLY
Boot
Check boot for tears, cracks and def ormation. Replace if necessary.
1. Boot clamp 2. Inner socket 3. Boot
4. Boot clamp 5. Outer socket 6. Cylinder tubes
7. Gear housing assembly 8. Connector
AWGIA0116GB
Revision: December 20092009 QX56
Page 3651 of 4171

TM-3
CEF
G H
I
J
K L
M A
B
TM
N
O P
Diagnosis Procedure ...........................................
....
78
P1752 INPUT CLUTCH SOLENOID ..................80
Description .......................................................... ....80
CONSULT-III Reference Value in Data Monitor
Mode ................................................................... ....
80
On Board Diagnosis Logic ......................................80
Possible Cause .......................................................80
DTC Confirmation Procedure ..................................80
Diagnosis Procedure ...............................................80
P1757 FRONT BRAKE SOLENOID ...................82
Description .......................................................... ....82
CONSULT-III Reference Value in Data Monitor
Mode ................................................................... ....
82
On Board Diagnosis Logic ......................................82
Possible Cause .......................................................82
DTC Confirmation Procedure ..................................82
Diagnosis Procedure ...............................................82
P1762 DIRECT CLUTCH SOLENOID ................84
Description .......................................................... ....84
CONSULT-III Reference Value in Data Monitor
Mode ................................................................... ....
84
On Board Diagnosis Logic ......................................84
Possible Cause .......................................................84
DTC Confirmation Procedure ..................................84
Diagnosis Procedure ...............................................84
P1767 HIGH AND LOW REVERSE CLUTCH
SOLENOID .........................................................
86
Description .......................................................... ....86
CONSULT-III Reference Value in Data Monitor
Mode ................................................................... ....
86
On Board Diagnosis Logic ......................................86
Possible Cause .......................................................86
DTC Confirmation Procedure ..................................86
Diagnosis Procedure ...............................................86
P1772 LOW COAST BRAKE SOLENOID .........88
Description .......................................................... ....88
CONSULT-III Reference Value in Data Monitor
Mode ................................................................... ....
88
On Board Diagnosis Logic ......................................88
Possible Cause .......................................................88
DTC Confirmation Procedure ..................................88
Diagnosis Procedure ...............................................88
P1774 LOW COAST BRAKE SOLENOID .........90
Description .......................................................... ....90
CONSULT-III Reference Value in Data Monitor
Mode ................................................................... ....
90
On Board Diagnosis Logic ......................................90
Possible Cause .......................................................90
DTC Confirmation Procedure ..................................90
Diagnosis Procedure ...............................................90
MAIN POWER SUPPLY AND GROUND CIR-
CUIT ....................................................................
92
Diagnosis Procedure ........................................... ....92
CLOSED THROTTLE POSITION AND WIDE
OPEN THROTTLE POSITION CIRCUIT ...........
94
CONSULT-III Reference Value in Data Monitor
Mode .................................................................... ....
94
Diagnosis Procedure ...............................................94
BRAKE SIGNAL CIRCUIT ................................95
CONSULT-III Reference Value in Data Monitor
Mode .................................................................... ....
95
Diagnosis Procedure ...............................................95
TOW MODE SWITCH .......................................96
Description ...............................................................96
Diagnosis Procedure ...............................................96
A/T SHIFT LOCK SYSTEM ...............................97
Wiring Diagram - A/T Shift Lock System .................97
Terminals And Reference Values ..........................101
Component Description .........................................101
ECU DIAGNOSIS .......................................104
TCM .................................................................104
Reference Value .................................................. ..104
Wiring Diagram — A/T CONTROL SYSTEM — .. ..106
Fail-Safe .............................................................. ..115
DTC Inspection Priority Chart ................................117
DTC No. Index .......................................................117
DTC Alphabetical Index .........................................118
SYMPTOM DIAGNOSIS ............................119
SYSTEM SYMPTOM .......................................119
A/T Check Indicator Lamp Does Not Come On ... ..119
Engine Cannot Be Started in "P" or "N" Position ...119
In "P" Position, Vehicle Moves When Pushed .......120
In "N" Position, Vehicle Moves ..............................120
Large Shock("N" to "D" Position) ...........................122
Vehicle Does Not Creep Backward in "R" Position ..124
Vehicle Does Not Creep Forward in "D" Position ..126
Vehicle Cannot Be Started from D1 ......................129
A/T Does Not Shift: D1ÆD2 ..................................131
A/T Does Not Shift: D2ÆD3 ..................................132
A/T Does Not Shift: D3ÆD4 ..................................134
A/T Does Not Shift: D4ÆD5 ..................................136
A/T Does Not Perform Lock-up .............................138
A/T Does Not Hold Lock-up Condition ...................140
Lock-up Is Not Released .......................................141
Engine Speed Does Not Return to Idle .................142
A/T Does Not Shift: 5GR Æ 4GR ..........................143
A/T Does Not Shift: 4GR Æ 3GR ..........................145
A/T Does Not Shift: 3GR Æ 2GR ..........................147
A/T Does Not Shift: 2GR Æ 1GR ..........................148
Vehicle Does Not Decelerate By Engine Brake .....150
Symptom Table .....................................................152
PRECAUTION ............................................174
PRECAUTIONS ...............................................174
Revision: December 20092009 QX56
Page 3680 of 4171
TM-32
< FUNCTION DIAGNOSIS >
DIAGNOSIS SYSTEM (TCM)
DIAGNOSIS SYSTEM (TCM)
CONSULT-III Function (TRANSMISSION)INFOID:0000000004019470
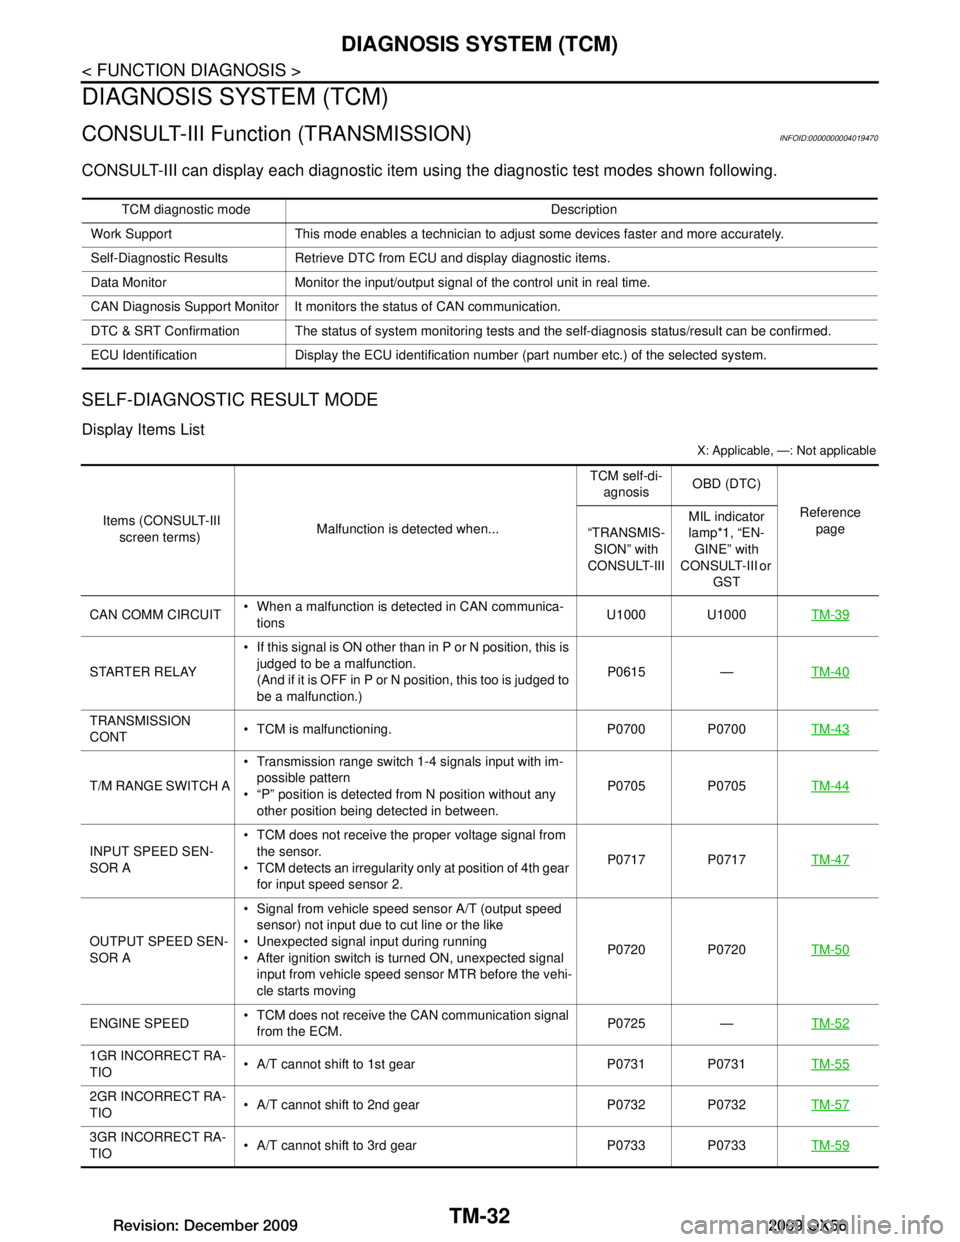
CONSULT-III can display each diagnostic item using the diagnostic test modes shown following.
SELF-DIAGNOSTIC RESULT MODE
Display Items List
X: Applicable, —: Not applicable
TCM diagnostic mode Description
Work Support This mode enables a technician to adjust some devices faster and more accurately.
Self-Diagnostic Results Retrieve DTC from ECU and display diagnostic items.
Data Monitor Monitor the input/output signal of the control unit in real time.
CAN Diagnosis Support Monitor It monitors the status of CAN communication.
DTC & SRT Confirmation The status of system monitoring tests and the self-diagnosis status/result can be confirmed.
ECU Identification Display the ECU identification nu mber (part number etc.) of the selected system.
Items (CONSULT-III
screen terms) Malfunction is detected when... TCM self-di-
agnosis OBD (DTC)
Reference page
“TRANSMIS-
SION” with
CONSULT-III MIL indicator
lamp*1, “EN-
GINE” with
CONSULT-III or
GST
CAN COMM CIRCUIT When a malfunction is detected in CAN communica-
tions U1000 U1000
TM-39
STARTER RELAY If this signal is ON other than in P or N position, this is
judged to be a malfunction.
(And if it is OFF in P or N position, this too is judged to
be a malfunction.) P0615 —
TM-40
TRANSMISSION
CONT TCM is malfunctioning. P0700 P0700
TM-43
T/M RANGE SWITCH A Transmission range switch 1-4 signals input with im-
possible pattern
“P” position is detected from N position without any other position being detected in between. P0705 P0705
TM-44
INPUT SPEED SEN-
SOR A TCM does not receive the proper voltage signal from
the sensor.
TCM detects an irregularity only at position of 4th gear for input speed sensor 2. P0717 P0717
TM-47
OUTPUT SPEED SEN-
SOR A Signal from vehicle speed sensor A/T (output speed
sensor) not input due to cut line or the like
Unexpected signal input during running
After ignition switch is turned ON, unexpected signal input from vehicle speed sensor MTR before the vehi-
cle starts moving P0720 P0720
TM-50
ENGINE SPEED TCM does not receive the CAN communication signal
from the ECM. P0725 —
TM-52
1GR INCORRECT RA-
TIO A/T cannot shift to 1st gear P0731 P0731
TM-55
2GR INCORRECT RA-
TIO A/T cannot shift to 2nd gear P0732 P0732
TM-57
3GR INCORRECT RA-
TIO A/T cannot shift to 3rd gear P0733 P0733
TM-59
Revision: December 20092009 QX56
Page 3682 of 4171
TM-34
< FUNCTION DIAGNOSIS >
DIAGNOSIS SYSTEM (TCM)
*1: Refer to EC-55, "Malfunction Indicator Lamp (MIL)".
*2:These malfunctions cannot be displayed MIL if another malfunction is assigned to MIL.
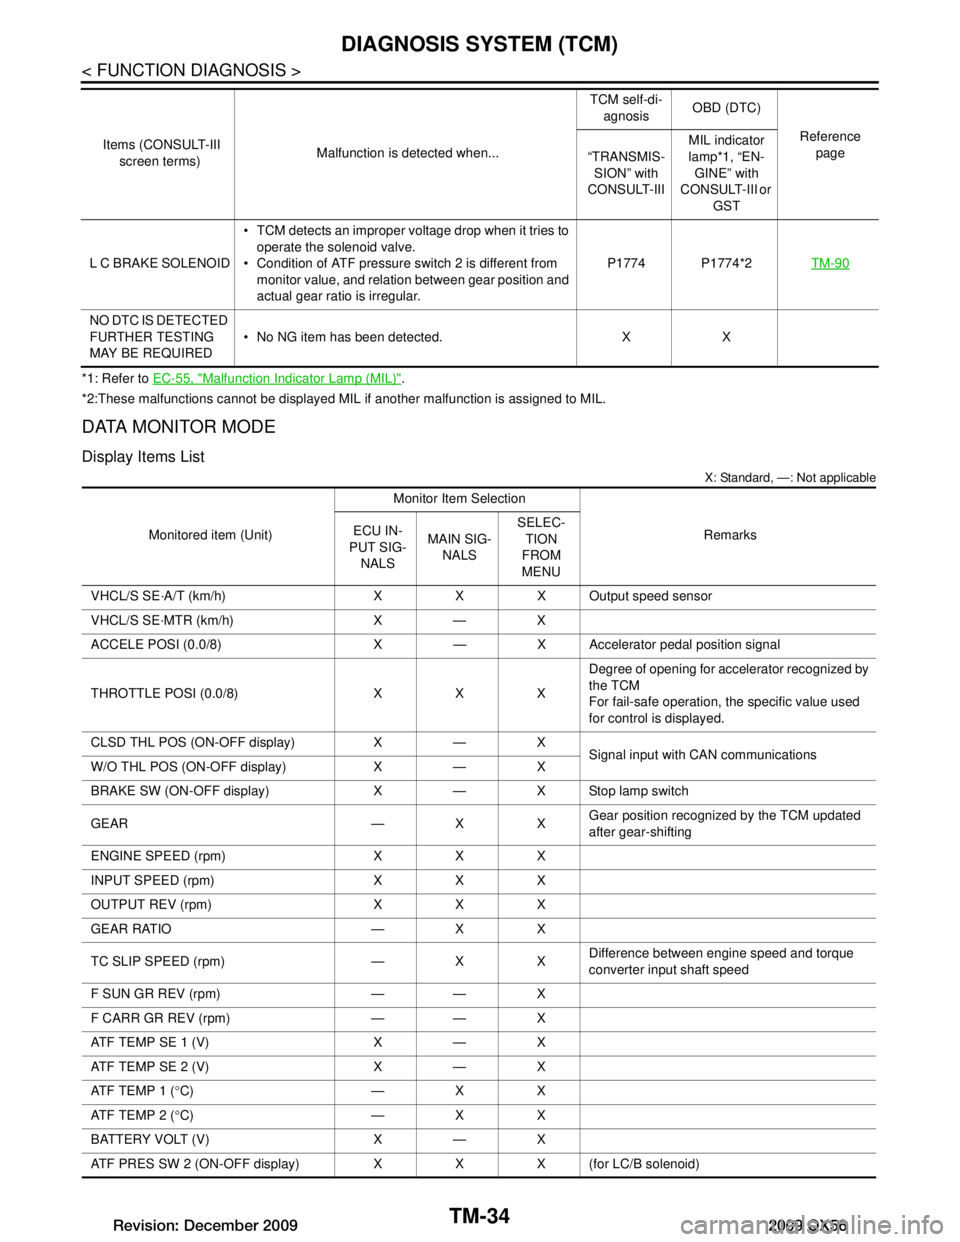
DATA MONITOR MODE
Display Items List
X: Standard, —: Not applicable
L C BRAKE SOLENOID TCM detects an improper voltage drop when it tries to
operate the solenoid valve.
Condition of ATF pressure switch 2 is different from
monitor value, and relation between gear position and
actual gear ratio is irregular. P1774 P1774*2
TM-90
NO DTC IS DETECTED
FURTHER TESTING
MAY BE REQUIRED No NG item has been detected. X X
Items (CONSULT-III
screen terms) Malfunction is detected when... TCM self-di-
agnosis OBD (DTC)
Reference page
“TRANSMIS-
SION” with
CONSULT-III MIL indicator
lamp*1, “EN-
GINE” with
CONSULT-III or
GST
Monitored item (Unit) Monitor Item Selection
Remarks
ECU IN-
PUT SIG-
NALS MAIN SIG-
NALS SELEC-
TION
FROM
MENU
VHCL/S SE·A/T (km/h) X X X Output speed sensor
VHCL/S SE·MTR (km/h) X — X
ACCELE POSI (0.0/8) X — X Accelerator pedal position signal
THROTTLE POSI (0.0/8) X X X Degree of opening for accelerator recognized by
the TCM
For fail-safe operation, the specific value used
for control is displayed.
CLSD THL POS (ON-OFF display) X — X Signal input with CAN communications
W/O THL POS (ON-OFF display) X — X
BRAKE SW (ON-OFF display) X — X Stop lamp switch
GEAR — X X Gear position recognized by the TCM updated
after gear-shifting
ENGINE SPEED (rpm) X X X
INPUT SPEED (rpm) X X X
OUTPUT REV (rpm) X X X
GEAR RATIO — X X
TC SLIP SPEED (rpm) — X X Difference between engine speed and torque
converter input shaft speed
F SUN GR REV (rpm) — — X
F CARR GR REV (rpm) — — X
ATF TEMP SE 1 (V) X — X
ATF TEMP SE 2 (V) X — X
ATF TEMP 1 ( °C) — X X
ATF TEMP 2 ( °C) — X X
BATTERY VOLT (V) X — X
ATF PRES SW 2 (ON-OFF display) X X X (for LC/B solenoid)
Revision: December 20092009 QX56
Page 3683 of 4171

DIAGNOSIS SYSTEM (TCM)TM-35
< FUNCTION DIAGNOSIS >
CEF
G H
I
J
K L
M A
B
TM
N
O P
RANGE SW 1 (ON-OFF display) X — X
RANGE SW 2 (ON-OFF display) X — X
RANGE SW 3 (ON-OFF display) X — X
RANGE SW 4 (ON-OFF display) X — X
SLCT LVR POSI — X X Selector lever position is recognized by the TCM.
For fail-safe operation, the specific value used
for control is displayed.
1 POSITION SW (ON-OFF display) X — X 1st position switch
OD CONT SW (ON-OFF display) X — X 4th position switch
POWERSHIFT SW (ON-OFF display) X — X
Not mounted but displayed.
HOLD SW (ON-OFF display) X — X
MANU MODE SW (ON-OFF display) X — X
NON M-MODE SW (ON-OFF display) X — X
UP SW LEVER (ON-OFF display) X — X
DOWN SW LEVER (ON-OFF display) X — X
SFT UP ST SW (ON-OFF display) — — X
SFT DWN ST SW (ON-OFF display) — — X
ASCD-OD CUT (ON-OFF display) — — X
ASCD-CRUISE (ON-OFF display) — — X
ABS SIGNAL (ON-OFF display) — — X
ACC OD CUT (ON-OFF display) — — X
ICC (Intelligent cruise control)
ACC SIGNAL (ON-OFF display) — — X
TCS GR/P KEEP (ON-OFF display) — — X
TCS SIGNAL 2 (ON-OFF display) — — X
TCS SIGNAL 1 (ON-OFF display) — — X
TCC SOLENOID (A) — X X
LINE PRES SOL (A) — X X
I/C SOLENOID (A) — X X
FR/B SOLENOID (A) — X X
D/C SOLENOID (A) — X X
HLR/C SOL (A) — X X
ON OFF SOL (ON-OFF display) — — X LC/B solenoid
TCC SOL MON (A) — — X
L/P SOL MON (A) — — X
I/C SOL MON (A) — — X
FR/B SOL MON (A) — — X
D/C SOL MON (A) — — X
HLR/C SOL MON (A) — — X
ONOFF SOL MON (ON-OFF display) — — X LC/B solenoid
P POSI IND (ON-OFF display) — — X
R POSI IND (ON-OFF display) — — X
N POSI IND (ON-OFF display) — — X Monitored item (Unit)
Monitor Item Selection
Remarks
ECU IN-
PUT SIG- NALS MAIN SIG-
NALS SELEC-
TION
FROM
MENU
Revision: December 20092009 QX56
Page 3684 of 4171

TM-36
< FUNCTION DIAGNOSIS >
DIAGNOSIS SYSTEM (TCM)
DTC & SRT CONFIRMATION
DTC Work Support Mode
D POSI IND (ON-OFF display) — — X
4TH POSI IND (ON-OFF display) — — X
3RD POSI IND (ON-OFF display) — — X
2ND POSI IND (ON-OFF display) — — X
1ST POSI IND (ON-OFF display) — — X
MANU MODE IND (ON-OFF display) — — XNot mounted but displayed.
POWER M LAMP (ON-OFF display) — — X
F-SAFE IND/L (ON-OFF display) — — X
ATF WARN LAMP (ON-OFF display) — — X
BACK-UP LAMP (ON-OFF display) — — X
STARTER RELAY (ON-OFF display) — — X
RANGE SW3M (ON-OFF display) — — X
C/V CLB ID1 — — X
C/V CLB ID2 — — X
C/V CLB ID3 — — X
UNIT CLB ID1 — — X
UNIT CLB ID2 — — X
UNIT CLB ID3 — — X
TRGT GR RATIO — — X
TRGT PRES TCC (kPa) — — X
TRGT PRES L/P (kPa) — — X
TRGT PRES I/C (kPa) — — X
TRGT PRE FR/B (kPa) — — X
TRGT PRES D/C (kPa) — — X
TRG PRE HLR/C (kPa) — — X
SHIFT PATTERN — — X
DRV CST JUDGE — — X
START RLY MON — — X
NEXT GR POSI — — X
SHIFT MODE — — X
MANU GR POSI — — X
VEHICLE SPEED (km/h) — X X Vehicle speed recognized by the TCM.
Voltage (V) — — X Displays the value measured by the voltage
probe.
Frequency (Hz) — — X
The value measured by the pulse probe is dis-
played.
DUTY-HI (high) (%) — — X
DUTY-LOW (low) (%) — — X
PLS WIDTH-HI (ms) — — X
PLS WIDTH-LOW (ms) — — X Monitored item (Unit)
Monitor Item Selection
Remarks
ECU IN-
PUT SIG- NALS MAIN SIG-
NALS SELEC-
TION
FROM
MENU
Revision: December 20092009 QX56
Page 3686 of 4171
TM-38
< FUNCTION DIAGNOSIS >
DIAGNOSIS SYSTEM (TCM)
12. Depress accelerator pedal fully and release it.>> GO TO 3.
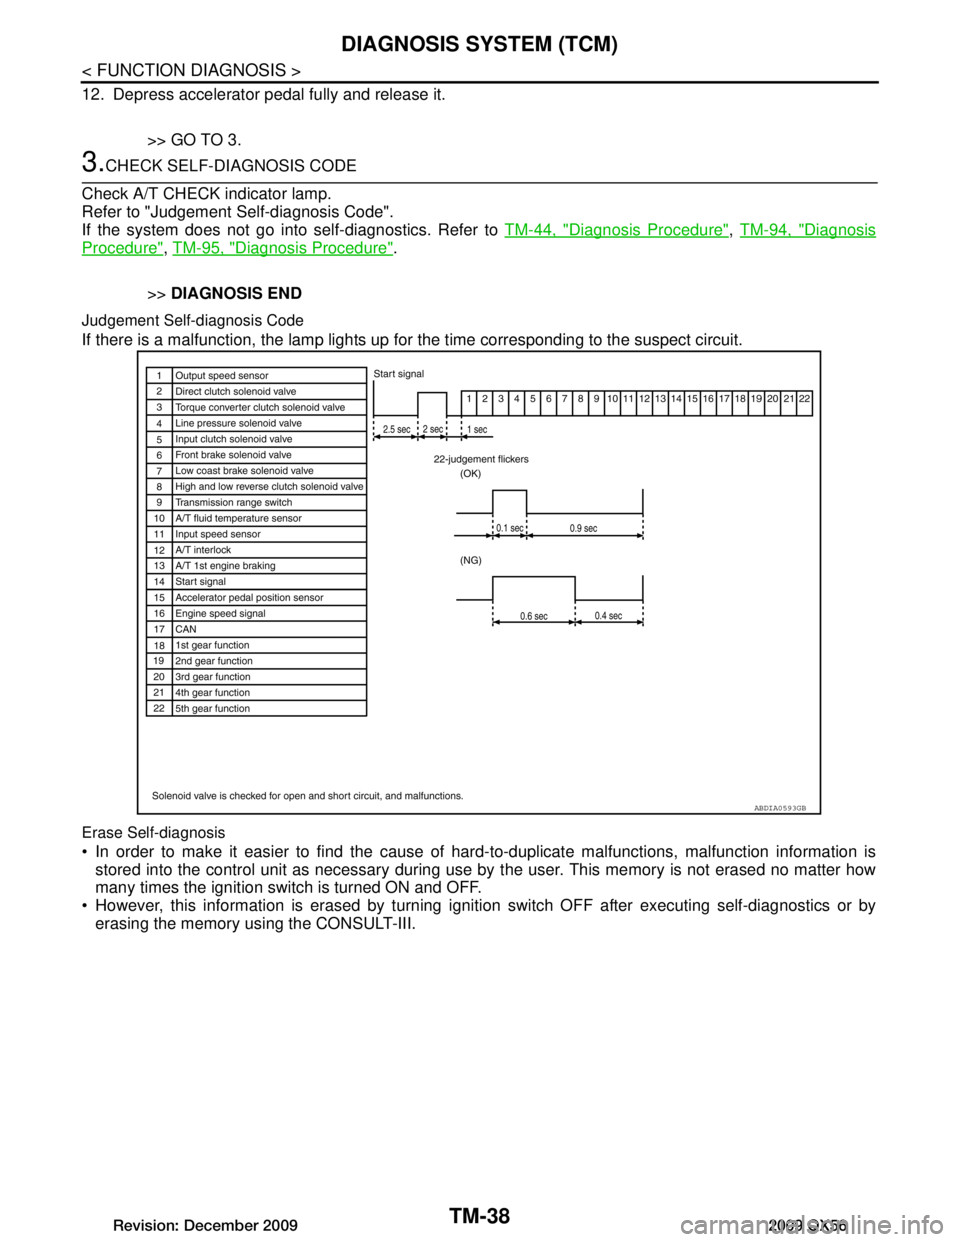
3.CHECK SELF-DIAGNOSIS CODE
Check A/T CHECK indicator lamp.
Refer to "Judgement Self-diagnosis Code".
If the system does not go into self-diagnostics. Refer to TM-44, "Diagnosis Procedure"
, TM-94, "Diagnosis
Procedure", TM-95, "Diagnosis Procedure".
>> DIAGNOSIS END
Judgement Self-diagnosis Code
If there is a malfunction, the lamp lights up fo r the time corresponding to the suspect circuit.
Erase Self-diagnosis
In order to make it easier to find the cause of hard-to-duplicate malfunctions, malfunction information is
stored into the control unit as necessary during use by the user. This memory is not erased no matter how
many times the ignition switch is turned ON and OFF.
However, this information is erased by turning igni tion switch OFF after executing self-diagnostics or by
erasing the memory using the CONSULT-III.
ABDIA0593GB
Revision: December 20092009 QX56
Page 3688 of 4171
TM-40
< COMPONENT DIAGNOSIS >
P0615 STARTER RELAY
P0615 STARTER RELAY
DescriptionINFOID:0000000003771830
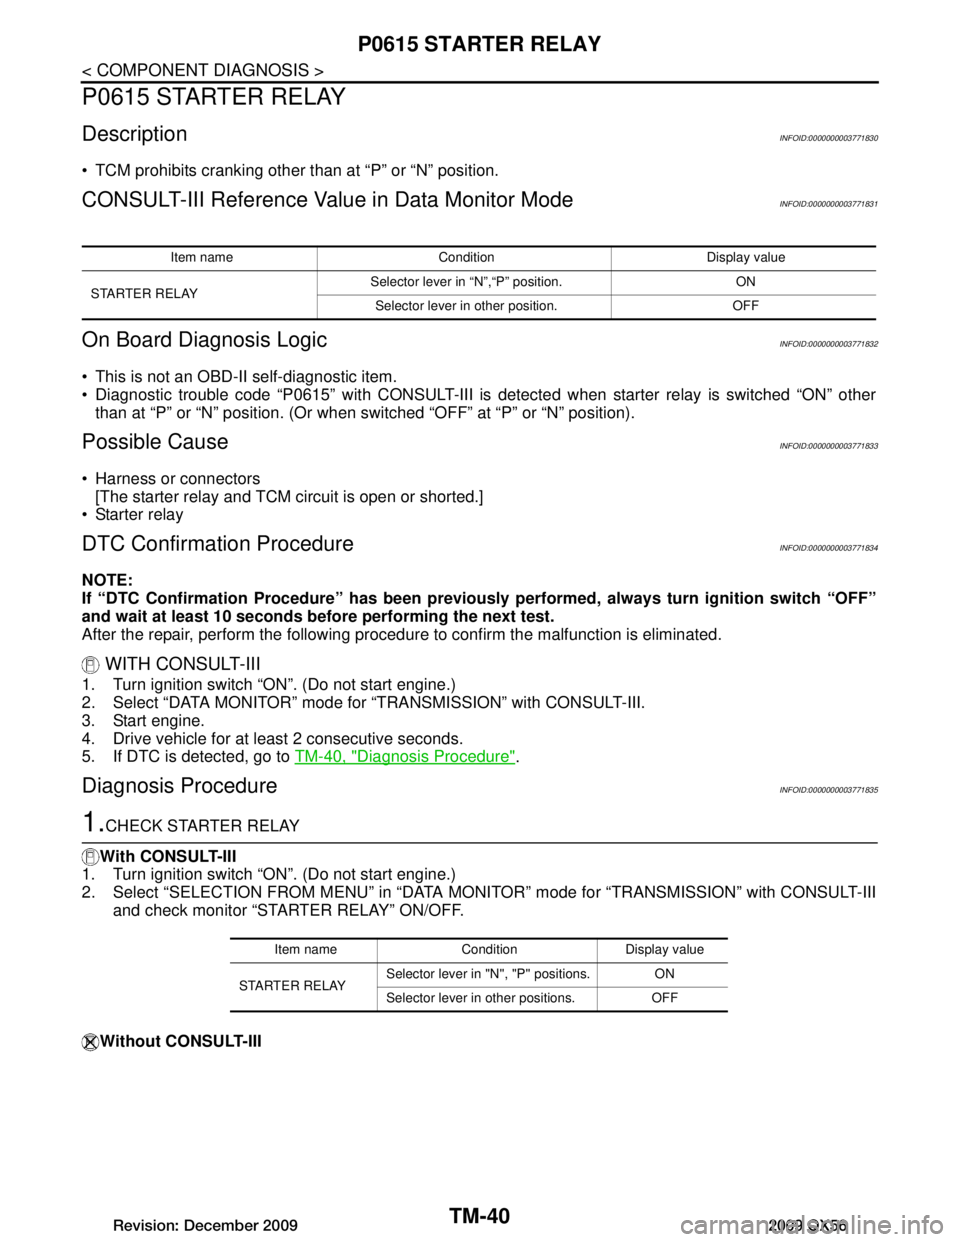
TCM prohibits cranking other than at “P” or “N” position.
CONSULT-III Reference Value in Data Monitor ModeINFOID:0000000003771831
On Board Diagnosis LogicINFOID:0000000003771832
This is not an OBD-II self-diagnostic item.
Diagnostic trouble code “P0615” with CONSULT-III is det ected when starter relay is switched “ON” other
than at “P” or “N” position. (Or when sw itched “OFF” at “P” or “N” position).
Possible CauseINFOID:0000000003771833
Harness or connectors
[The starter relay and TCM circuit is open or shorted.]
Starter relay
DTC Confirmation ProcedureINFOID:0000000003771834
NOTE:
If “DTC Confirmation Procedure” has been previously performed, always turn ignition switch “OFF”
and wait at least 10 seconds before performing the next test.
After the repair, perform the following proc edure to confirm the malfunction is eliminated.
WITH CONSULT-III
1. Turn ignition switch “ON”. (Do not start engine.)
2. Select “DATA MONITOR” mode for “TRANSMISSION” with CONSULT-III.
3. Start engine.
4. Drive vehicle for at least 2 consecutive seconds.
5. If DTC is detected, go to TM-40, "Diagnosis Procedure"
.
Diagnosis ProcedureINFOID:0000000003771835
1.CHECK STARTER RELAY
With CONSULT-III
1. Turn ignition switch “ON”. (Do not start engine.)
2. Select “SELECTION FROM MENU” in “DATA MONI TOR” mode for “TRANSMISSION” with CONSULT-III
and check monitor “STARTER RELAY” ON/OFF.
Without CONSULT-III
Item name Condition Display value
STARTER RELAY Selector lever in “N”,“P” position. ON
Selector lever in other position. OFF
Item name Condition Display value
STARTER RELAY Selector lever in "N'', "P'' positions. ON
Selector lever in other positions. OFF
Revision: December 20092009 QX56