2009 HYUNDAI TUCSON warning light
[x] Cancel search: warning lightPage 182 of 273
3
WHAT TO DO IN AN EMERGENCY
13
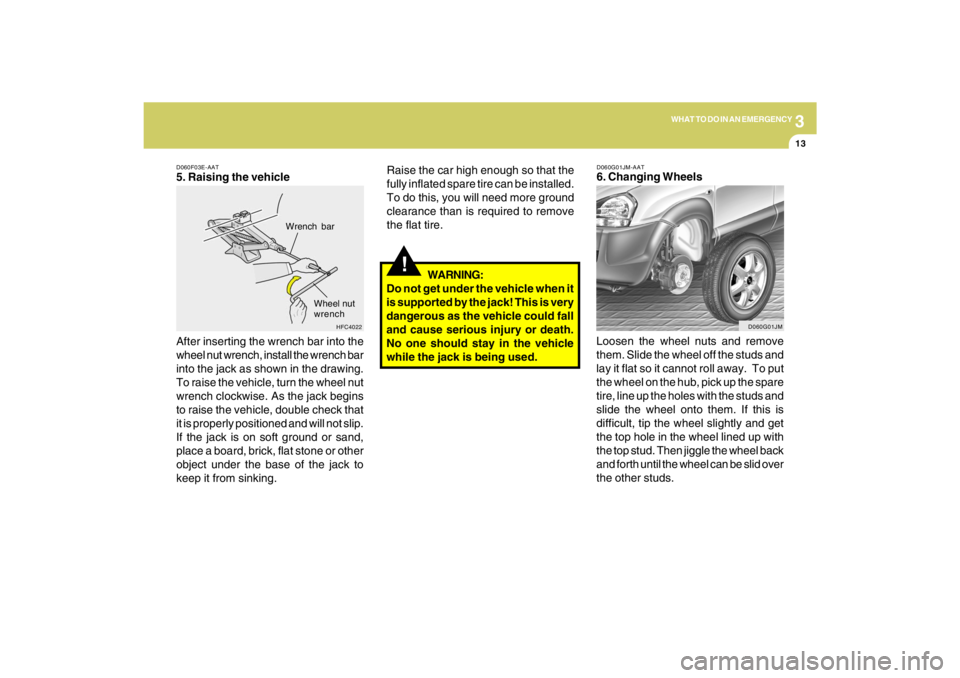
D060F03E-AAT5. Raising the vehicle
After inserting the wrench bar into the
wheel nut wrench, install the wrench bar
into the jack as shown in the drawing.
To raise the vehicle, turn the wheel nut
wrench clockwise. As the jack begins
to raise the vehicle, double check that
it is properly positioned and will not slip.
If the jack is on soft ground or sand,
place a board, brick, flat stone or other
object under the base of the jack to
keep it from sinking.
HFC4022
Wrench bar
Wheel nut
wrench
!
Raise the car high enough so that the
fully inflated spare tire can be installed.
To do this, you will need more ground
clearance than is required to remove
the flat tire.
WARNING:
Do not get under the vehicle when it
is supported by the jack! This is very
dangerous as the vehicle could fall
and cause serious injury or death.
No one should stay in the vehicle
while the jack is being used.
D060G01JM-AAT6. Changing Wheels
Loosen the wheel nuts and remove
them. Slide the wheel off the studs and
lay it flat so it cannot roll away. To put
the wheel on the hub, pick up the spare
tire, line up the holes with the studs and
slide the wheel onto them. If this is
difficult, tip the wheel slightly and get
the top hole in the wheel lined up with
the top stud. Then jiggle the wheel back
and forth until the wheel can be slid over
the other studs.
D060G01JM
Page 227 of 273
6
DO-IT-YOURSELF MAINTENANCE
23
CHECKING THE BATTERY!
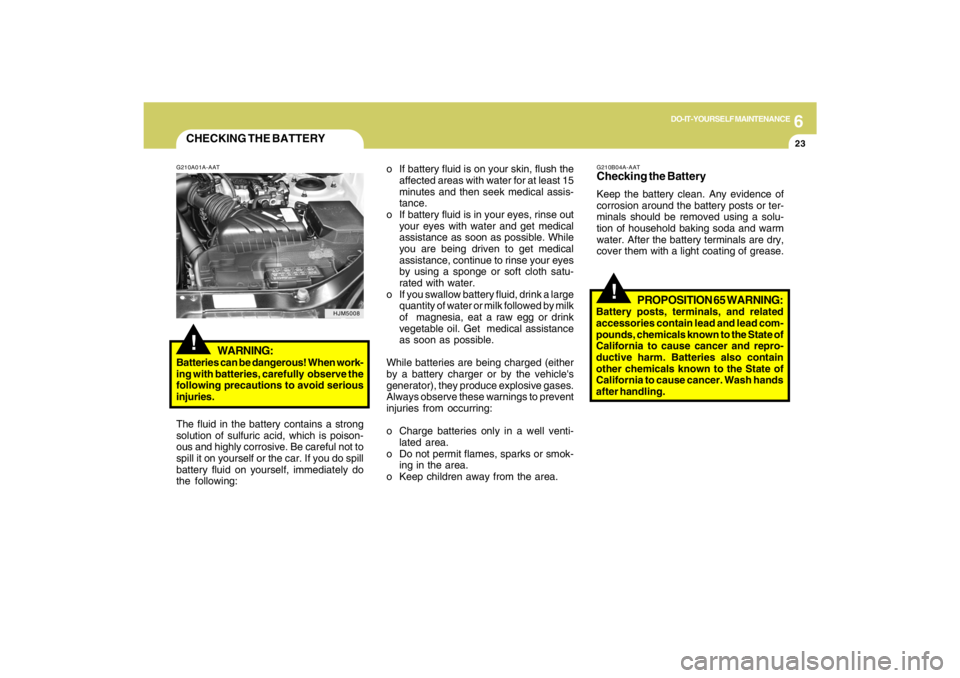
G210A01A-AAT
WARNING:
Batteries can be dangerous! When work-
ing with batteries, carefully observe the
following precautions to avoid serious
injuries.
The fluid in the battery contains a strong
solution of sulfuric acid, which is poison-
ous and highly corrosive. Be careful not to
spill it on yourself or the car. If you do spill
battery fluid on yourself, immediately do
the following:
HJM5008
!
G210B04A-AATChecking the BatteryKeep the battery clean. Any evidence of
corrosion around the battery posts or ter-
minals should be removed using a solu-
tion of household baking soda and warm
water. After the battery terminals are dry,
cover them with a light coating of grease. o If battery fluid is on your skin, flush the
affected areas with water for at least 15
minutes and then seek medical assis-
tance.
o If battery fluid is in your eyes, rinse out
your eyes with water and get medical
assistance as soon as possible. While
you are being driven to get medical
assistance, continue to rinse your eyes
by using a sponge or soft cloth satu-
rated with water.
o If you swallow battery fluid, drink a large
quantity of water or milk followed by milk
of magnesia, eat a raw egg or drink
vegetable oil. Get medical assistance
as soon as possible.
While batteries are being charged (either
by a battery charger or by the vehicle's
generator), they produce explosive gases.
Always observe these warnings to prevent
injuries from occurring:
o Charge batteries only in a well venti-
lated area.
o Do not permit flames, sparks or smok-
ing in the area.
o Keep children away from the area.
PROPOSITION 65 WARNING:
Battery posts, terminals, and related
accessories contain lead and lead com-
pounds, chemicals known to the State of
California to cause cancer and repro-
ductive harm. Batteries also contain
other chemicals known to the State of
California to cause cancer. Wash hands
after handling.
Page 228 of 273
6
DO-IT-YOURSELF MAINTENANCE
24
G220C01A-AATChecking Condenser Cooling FanThe condenser cooling fan should come
on automatically whenever the air condi-
tioning is in operation.G220B01A-AATChecking Engine Cooling FanThe engine cooling fan should come on
automatically if the engine coolant tem-
perature is high.CHECKING ELECTRIC COOLING
FANS!
G220A01A-AAT
WARNING:
The cooling fan is controlled by engine
coolant temperature and may some-
times operate even when the engine is
not running. Use extreme caution when
working near the blades of the cooling
fan, so that you are not injured by a
rotating fan blade. As the engine coolant
temperature decreases the fan will au-
tomatically shut off. This is a normal
condition.
If electrolyte gets on your skin,
thoroughly wash the contacted
area.
If you feel a pain or a burning
sensation, get medical atten-
tion immediately.
Wear eye protection when
charging or working near a bat-
tery.
Always provide ventilation
when working in an enclosed
space.
o When lifting a plastic-cased battery,
excessive pressure on the case may
cause battery acid to leak, resulting in
personal injury. Lift with a battery
carrier or with your hands on opposite
corners.
o Never attempt to charge the battery
when the battery cables are con-
nected.
o The electrical ignition system works
with high voltage.
Never touch these components with
the engine running or the ignition
switched on.
!
WARNING:
!
WARNING:Always read the following in-
structions carefully when han-
dling a battery.
Keep lighted cigarettes and all
other flames or sparks away
from the battery.
Hydrogen, which is a highly
combustible gas, is always
present in battery cells and
may explode if ignited.
Keep batteries out of the reach
of children because batteries
contain highly corrosive SUL-
FURIC ACID. Do not allow bat-
tery acid to contact your skin,
eyes, clothing or paint finish.
If any electrolyte gets into your
eyes, flush your eyes with
clean water for at least 15 min-
utes and get immediate medi-
cal attention. If possible, con-
tinue to apply water with a
sponge or cloth until medical
attention is received.
Page 230 of 273
6
DO-IT-YOURSELF MAINTENANCE
26
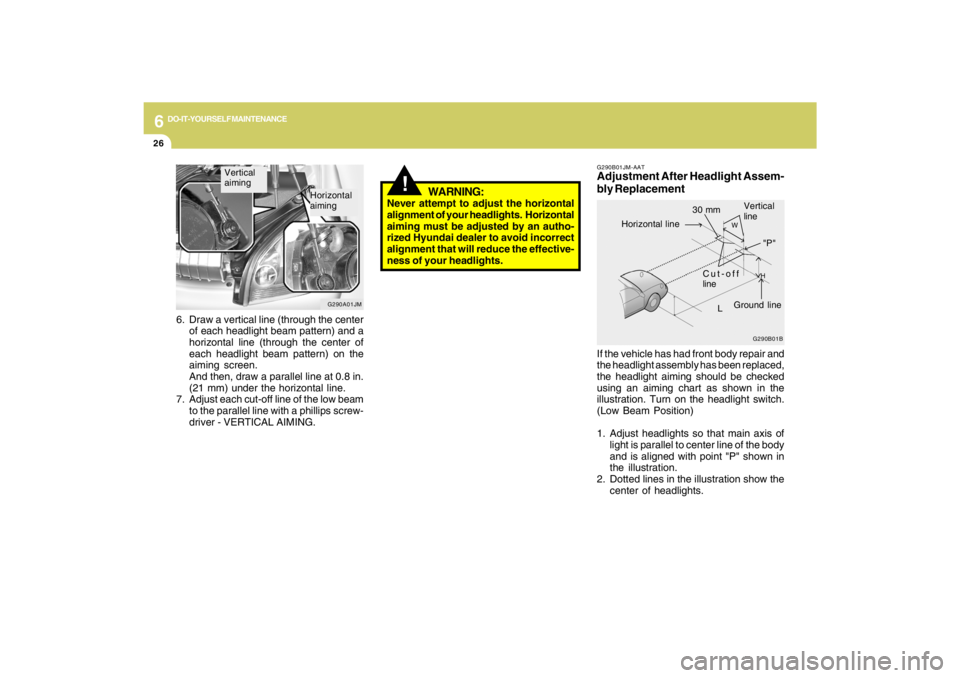
G290B01JM-AATAdjustment After Headlight Assem-
bly ReplacementIf the vehicle has had front body repair and
the headlight assembly has been replaced,
the headlight aiming should be checked
using an aiming chart as shown in the
illustration. Turn on the headlight switch.
(Low Beam Position)
1. Adjust headlights so that main axis of
light is parallel to center line of the body
and is aligned with point "P" shown in
the illustration.
2. Dotted lines in the illustration show the
center of headlights.
G290B01B
L
W
H
Cut-off
line
Ground line
"P" Horizontal line
Vertical
line
30 mm
!
WARNING:
Never attempt to adjust the horizontal
alignment of your headlights. Horizontal
aiming must be adjusted by an autho-
rized Hyundai dealer to avoid incorrect
alignment that will reduce the effective-
ness of your headlights.
6. Draw a vertical line (through the center
of each headlight beam pattern) and a
horizontal line (through the center of
each headlight beam pattern) on the
aiming screen.
And then, draw a parallel line at 0.8 in.
(21 mm) under the horizontal line.
7. Adjust each cut-off line of the low beam
to the parallel line with a phillips screw-
driver - VERTICAL AIMING.
G290A01JM
Vertical
aiming
Horizontal
aiming
Page 233 of 273
6
DO-IT-YOURSELF MAINTENANCE
29
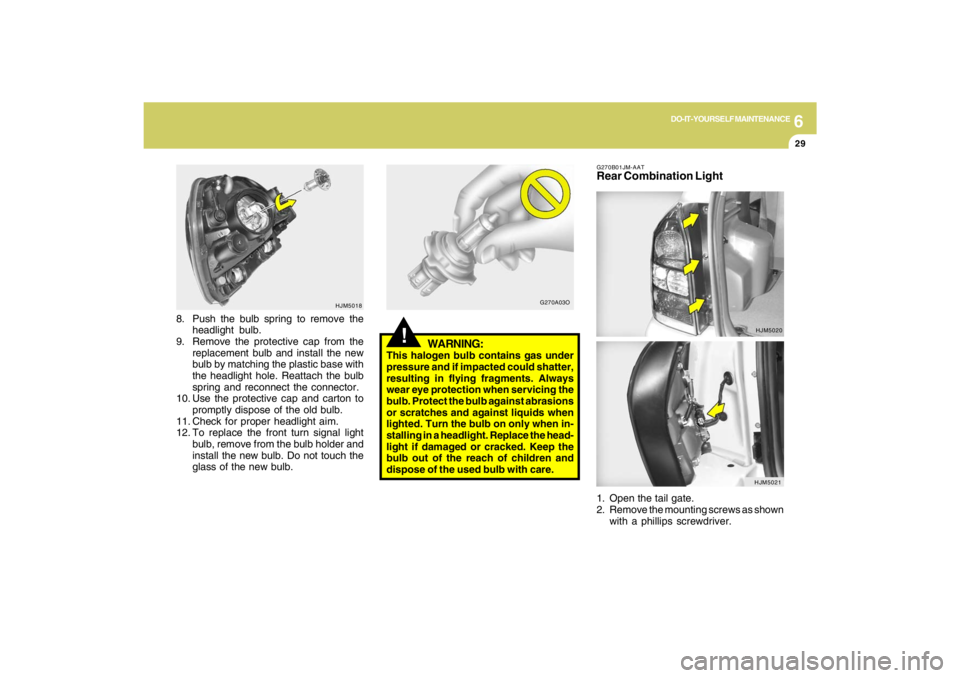
8. Push the bulb spring to remove the
headlight bulb.
9. Remove the protective cap from the
replacement bulb and install the new
bulb by matching the plastic base with
the headlight hole. Reattach the bulb
spring and reconnect the connector.
10. Use the protective cap and carton to
promptly dispose of the old bulb.
11. Check for proper headlight aim.
12. To replace the front turn signal light
bulb, remove from the bulb holder and
install the new bulb. Do not touch the
glass of the new bulb.
HJM5018G270B01JM-AAT
Rear Combination Light
!
WARNING:
This halogen bulb contains gas under
pressure and if impacted could shatter,
resulting in flying fragments. Always
wear eye protection when servicing the
bulb. Protect the bulb against abrasions
or scratches and against liquids when
lighted. Turn the bulb on only when in-
stalling in a headlight. Replace the head-
light if damaged or cracked. Keep the
bulb out of the reach of children and
dispose of the used bulb with care.
G270A03O
HJM5020
HJM5021
1. Open the tail gate.
2. Remove the mounting screws as shown
with a phillips screwdriver.
Page 238 of 273
6
DO-IT-YOURSELF MAINTENANCE
34
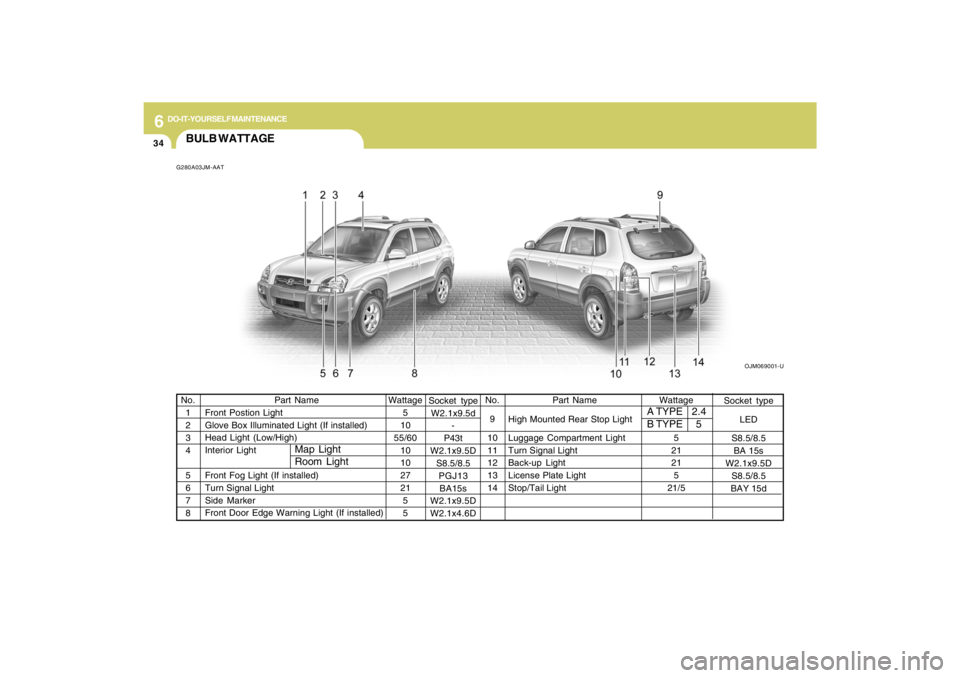
BULB WATTAGEG280A03JM-AAT
OJM069001-U
Part Name
Front Postion Light
Glove Box Illuminated Light (If installed)
Head Light (Low/High)
Interior Light
Front Fog Light (If installed)
Turn Signal Light
Side Marker
Front Door Edge Warning Light (If installed) No.
1
2
3
4
5
6
7
8Wattage
5
10
55/60
10
10
27
21
5
5Wattage
5
21
21
5
21/5 No.
9
10
11
12
13
14
Part Name
High Mounted Rear Stop Light
Luggage Compartment Light
Turn Signal Light
Back-up Light
License Plate Light
Stop/Tail Light
Map Light
Room Light
A TYPE
B TYPE2.4
5
Socket type
LED
S8.5/8.5
BA 15s
W2.1x9.5D
S8.5/8.5
BAY 15d Socket type
W2.1x9.5d
-
P43t
W2.1x9.5D
S8.5/8.5
PGJ13
BA15s
W2.1x9.5D
W2.1x4.6D
Page 269 of 273
10
INDEX
2
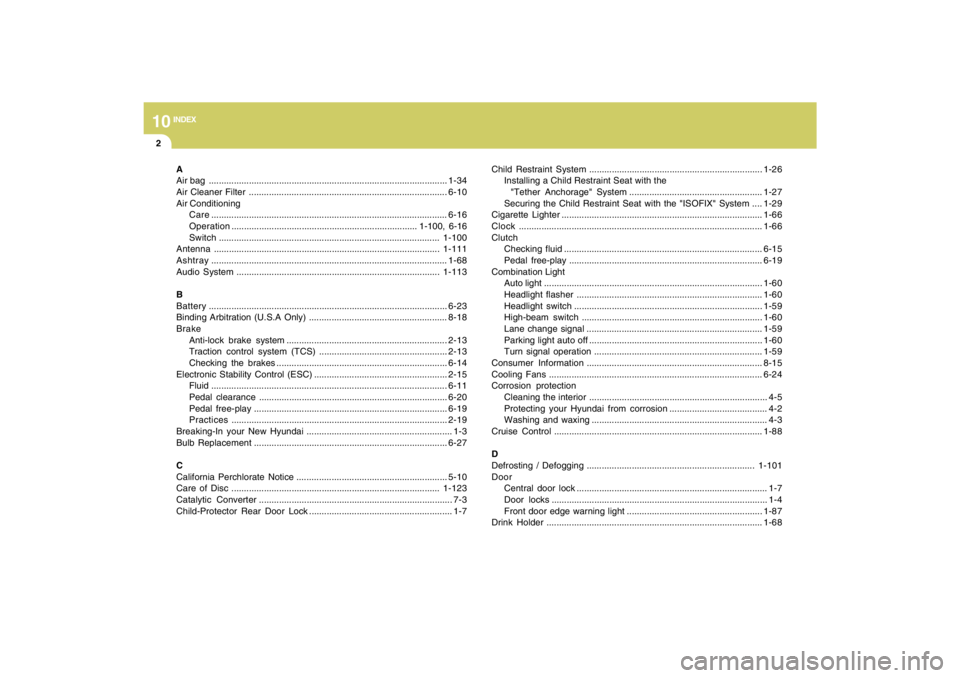
A
Air bag ...............................................................................................1-34
Air Cleaner Filter ...............................................................................6-10
Air Conditioning
Care..............................................................................................6-16
Operation.......................................................................... 1-100, 6-16
Switch........................................................................................1-100
Antenna..........................................................................................1-111
Ashtray..............................................................................................1-68
Audio System.................................................................................1-113
B
Battery...............................................................................................6-23
Binding Arbitration (U.S.A Only) .......................................................8-18
Brake
Anti-lock brake system ................................................................2-13
Traction control system (TCS) ...................................................2-13
Checking the brakes ....................................................................6-14
Electronic Stability Control (ESC) .....................................................2-15
Fluid ..............................................................................................6-11
Pedal clearance...........................................................................6-20
Pedal free-play.............................................................................6-19
Practices......................................................................................2-19
Breaking-In your New Hyundai .......................................................... 1-3
Bulb Replacement.............................................................................6-27
C
California Perchlorate Notice ............................................................5-10
Care of Disc ...................................................................................1-123
Catalytic Converter ............................................................................. 7-3
Child-Protector Rear Door Lock ......................................................... 1-7Child Restraint System.....................................................................1-26
Installing a Child Restraint Seat with the
"Tether Anchorage" System .....................................................1-27
Securing the Child Restraint Seat with the "ISOFIX" System ....1-29
Cigarette Lighter................................................................................1-66
Clock.................................................................................................1-66
Clutch
Checking fluid...............................................................................6-15
Pedal free-play.............................................................................6-19
Combination Light
Auto light.......................................................................................1-60
Headlight flasher..........................................................................1-60
Headlight switch...........................................................................1-59
High-beam switch........................................................................1-60
Lane change signal ......................................................................1-59
Parking light auto off .....................................................................1-60
Turn signal operation...................................................................1-59
Consumer Information......................................................................8-15
Cooling Fans.....................................................................................6-24
Corrosion protection
Cleaning the interior....................................................................... 4-5
Protecting your Hyundai from corrosion....................................... 4-2
Washing and waxing...................................................................... 4-3
Cruise Control...................................................................................1-88
D
Defrosting / Defogging ...................................................................1-101
Door
Central door lock............................................................................ 1-7
Door locks...................................................................................... 1-4
Front door edge warning light ......................................................1-87
Drink Holder ......................................................................................1-68
Page 270 of 273

10
INDEX
3
Drive Belts.........................................................................................6-20
Driving
Driving for economy .....................................................................2-22
Smooth cornering.........................................................................2-23
Winter driving...............................................................................2-23
E
Emission Control System ................................................................... 7-2
Engine
Before starting the engine .............................................................. 2-4
Compartment................................................................................. 6-2
Coolant........................................................................................... 6-8
If the engine overheats .................................................................. 3-4
Number........................................................................................... 8-2
Oil ................................................................................................... 6-5
Starting........................................................................................... 2-6
Engine Exhaust Can Be Dangerous .................................................. 2-2
F
4WD Lock System ............................................................................2-19
Fan Speed Control............................................................................1-94
Floor Mat Anchor ..............................................................................1-86
Fog Light
Front.............................................................................................1-64
Front Seats
Adjustable front seats ..................................................................1-13
Adjustable headrests...................................................................1-14
Adjusting seat forward and rearward..........................................1-13
Adjusting seatback angle .............................................................1-13
Fuel
Capacity......................................................................................... 9-2
Gauge...........................................................................................1-55
Recommendations......................................................................... 1-2Fuel Filler Lid
Remote release............................................................................1-83
Full-time 4WD Operation..................................................................2-16
Fuses ................................................................................................6-21
Fuse panel description......................................................................6-35
G
General Checks.................................................................................. 6-4
Glove Box..........................................................................................1-72
H
Hazard Warning System ..................................................................1-64
Heating and Cooling Control.............................................................1-93
Heating and Ventilation
Air flow control..............................................................................1-95
Air intake control switch ............................................................1-105
Bi-level heating.............................................................................1-99
Defrosting / Defogging ..............................................................1-101
Fan speed control (Blower control).............................................1-94
Temperature control....................................................................1-98
High-Mounted Rear Stop Light .........................................................1-83
Hood Release....................................................................................1-85
Horn.................................................................................................1-88
How to Use Luggage Room.............................................................1-80
I
Ignition Switch ...................................................................................... 2-5
Instrument Cluster and Indicator Lights...........................................1-48
Instrument Panel Light Control (Rheostat).......................................1-66
Interior Light.......................................................................................1-71
J
Jump Starting...................................................................................... 3-3