Page 205 of 273
6
Engine Compartment .................................................... 6-2
General Checks ............................................................ 6-4
Checking the Engine Oil ............................................... 6-5
Changing the Oil and Filter ............................................ 6-6
Checking and Changing the Engine Coolant ................ 6-8
Changing the Air Cleaner Filter ...................................6-10
Checking the Transaxle Oil (Manual) .........................6-11
Checking the Transaxle Fluid (Automatic)..................6-12
Checking the Brakes ..................................................6-14
Checking the Clutch Fluid...........................................6-15
Air Conditioning Care..................................................6-16
Changing the Climate Control Air Filter .......................6-17
Checking the Free-play...............................................6-19
Checking Drive Belts ..................................................6-20
Checking and Replacing Fuses..................................6-21
Checking the Battery..................................................6-23
Power Steering Fluid Level .........................................6-25
Replacement of Light Bulbs ........................................6-27
Bulb Wattage ...............................................................6-34
Fuse Panel Description...............................................6-35
6
DO-IT-YOURSELF MAINTENANCE
Page 206 of 273
6
DO-IT-YOURSELF MAINTENANCE
2
ENGINE COMPARTMENTG010A01JM-GAT(2.7 Gasoline)1. Power steering fluid reservoir
2. Brake & Clutch fluid reservoir
3. Air cleaner
4. Fuse and Relay box5. Windshield washer fluid reservoir
6. Engine oil level dipstick
7. Coolant reservoir cap
8. Engine oil filler cap9. Automatic transaxle fluid level dipstick
(Vehicle with Automatic Transaxle)
10. Radiator cap
11. Battery
G010A01JM
CAUTION:
When inspecting or servicing the
engine, you should handle tools
and other heavy objects care-
fully so that the plastic cover of
the engine is not damaged.
!
Page 207 of 273
6
DO-IT-YOURSELF MAINTENANCE
3
G010B01JM-AAT(2.0 Gasoline)
G010B01JM
1. Power steering fluid reservoir
2. Engine oil filler cap
3. Brake & Clutch fluid reservoir
4. Air cleaner5. Fuse and Relay box
6. Windshield washer fluid reservoir
7. Engine oil level dipstick
8. Coolant reservoir cap9. Automatic transaxle fluid level dipstick
(Vehicle with Automatic Transaxle)
10. Radiator cap
11. Battery
CAUTION:
When inspecting or servicing the
engine, you should handle tools
and other heavy objects care-
fully so that the plastic cover of
the engine is not damaged.
!
Page 208 of 273
6
DO-IT-YOURSELF MAINTENANCE
4
GENERAL CHECKS
G020C01A-AATVehicle InteriorThe following should be checked each
time when the vehicle is driven:
o Lights operation
o Windshield wiper operation
o Horn operation
o Defroster, heating system operation
(and air conditioning, if installed)
o Steering operation and condition
o Mirror condition and operation
o Turn signal operation
o Accelerator pedal operation
o Brake operation, including parking
brake
o Manual transaxle operation, including
clutch operation
o Automatic transaxle operation, includ-
ing "Park" mechanism operation
o Seat control condition and operation
o Seat belt condition and operation
o Sunvisor operation
If you notice anything that does not operate
correctly or appears to be functioning cor-
rectly, inspect it carefully and seek assis-
tance from your Hyundai dealer if service
is needed.
G020B01A-AATVehicle ExteriorThe following should be checked monthly:
o Overall appearance and condition
o Wheel condition and wheel nut torque
o Exhaust system condition
o Light condition and operation
o Windshield glass condition
o Wiper blade condition
o Paint condition and body corrosion
o Fluid leaks
o Door and hood lock condition
o Tire pressure and condition
(including spare tire)
G020A01A-AATEngine CompartmentThe following should be checked regu-
larly:
o Engine oil level and condition
o Transaxle fluid level and condition
o Brake fluid level
o Clutch fluid level
o Engine coolant level
o Windshield washer fluid level
o Accessory drive belt condition
o Engine coolant hose condition
o Fluid leaks (on or below components)
o Power steering fluid level
o Battery condition
o Air filter condition
Page 221 of 273
6
DO-IT-YOURSELF MAINTENANCE
17
G190A01GK
DOHC CVVT V6
Water Pump Pulley
0.2~0.24 in.
(5~6 mm)
Power steering
COMP
Auto
tensioner
Alternator Pulley
Crankshaft PulleyAlternator
Eng.pulley
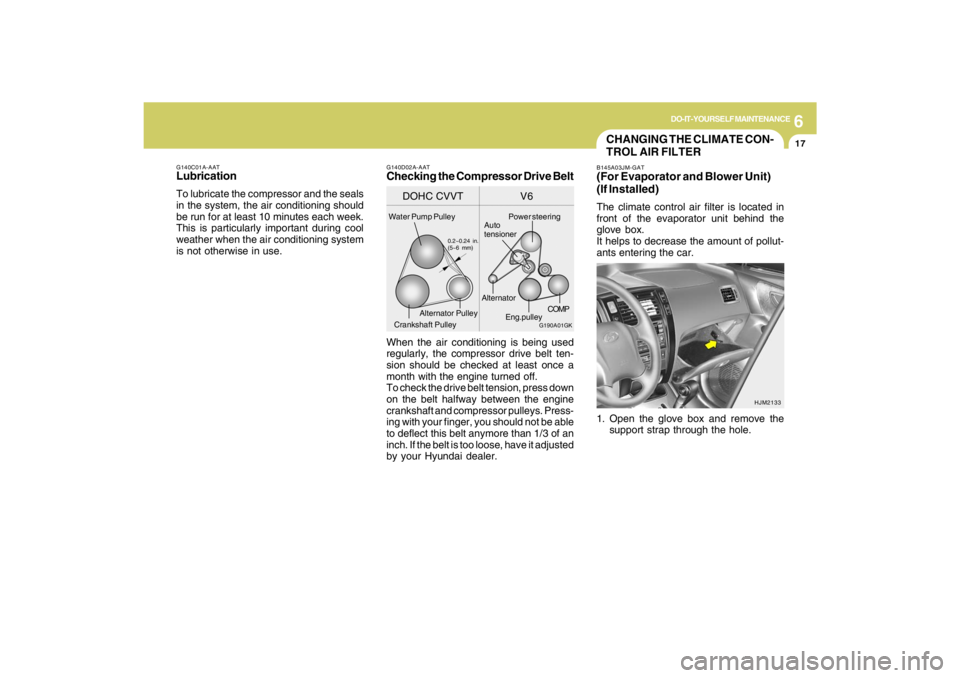
G140D02A-AATChecking the Compressor Drive Belt
G140C01A-AATLubricationTo lubricate the compressor and the seals
in the system, the air conditioning should
be run for at least 10 minutes each week.
This is particularly important during cool
weather when the air conditioning system
is not otherwise in use.
When the air conditioning is being used
regularly, the compressor drive belt ten-
sion should be checked at least once a
month with the engine turned off.
To check the drive belt tension, press down
on the belt halfway between the engine
crankshaft and compressor pulleys. Press-
ing with your finger, you should not be able
to deflect this belt anymore than 1/3 of an
inch. If the belt is too loose, have it adjusted
by your Hyundai dealer.
CHANGING THE CLIMATE CON-
TROL AIR FILTERB145A03JM-GAT(For Evaporator and Blower Unit)
(If Installed)The climate control air filter is located in
front of the evaporator unit behind the
glove box.
It helps to decrease the amount of pollut-
ants entering the car.
1. Open the glove box and remove the
support strap through the hole.
HJM2133
Page 223 of 273
6
DO-IT-YOURSELF MAINTENANCE
19
G150A01JM
!
B145A01JM
CAUTION:
Be sure to install the air conditioner filter
in the direction of the arrow sign. Other-
wise, noise or filter damage may result.
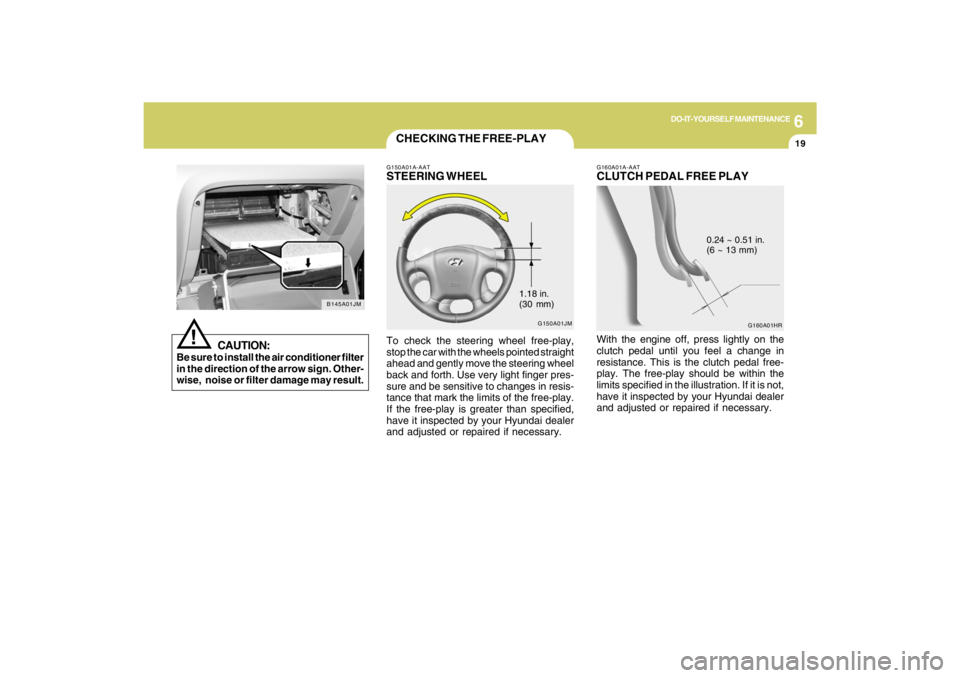
CHECKING THE FREE-PLAYG150A01A-AATSTEERING WHEELTo check the steering wheel free-play,
stop the car with the wheels pointed straight
ahead and gently move the steering wheel
back and forth. Use very light finger pres-
sure and be sensitive to changes in resis-
tance that mark the limits of the free-play.
If the free-play is greater than specified,
have it inspected by your Hyundai dealer
and adjusted or repaired if necessary.
1.18 in.
(30 mm)
G160A01HR G160A01A-AAT
CLUTCH PEDAL FREE PLAYWith the engine off, press lightly on the
clutch pedal until you feel a change in
resistance. This is the clutch pedal free-
play. The free-play should be within the
limits specified in the illustration. If it is not,
have it inspected by your Hyundai dealer
and adjusted or repaired if necessary.
0.24 ~ 0.51 in.
(6 ~ 13 mm)
Page 224 of 273
6
DO-IT-YOURSELF MAINTENANCE
20
G190A01GK
DOHC CVVT V6
Water Pump Pulley
0.2~0.24 in.
(5~6 mm)
Power steering
COMP
Auto
tensioner
Alternator Pulley
Crankshaft PulleyAlternator
Eng.pulley
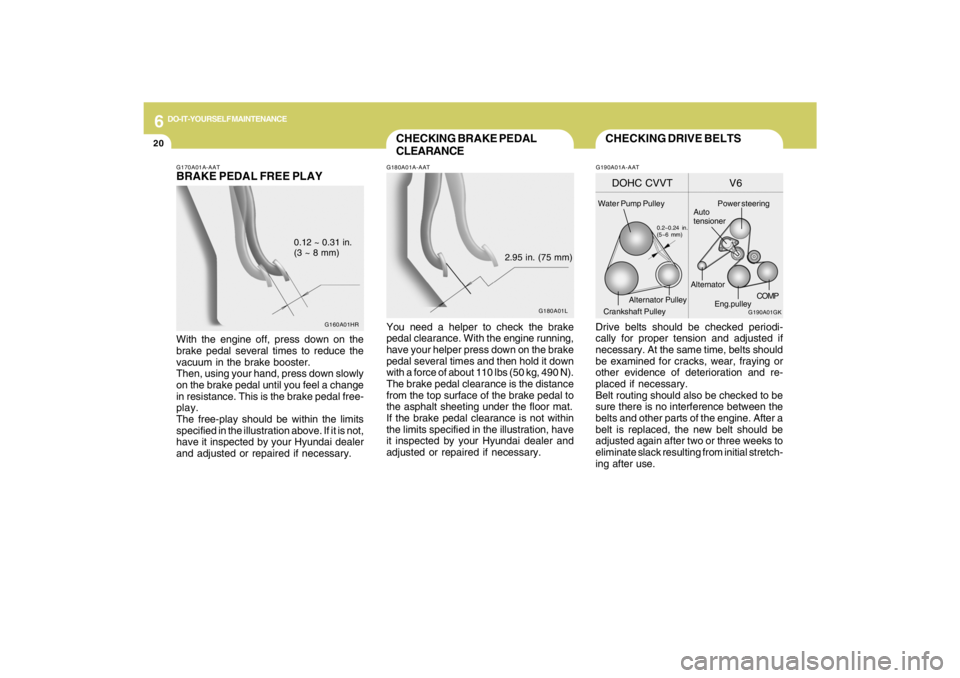
CHECKING DRIVE BELTSDrive belts should be checked periodi-
cally for proper tension and adjusted if
necessary. At the same time, belts should
be examined for cracks, wear, fraying or
other evidence of deterioration and re-
placed if necessary.
Belt routing should also be checked to be
sure there is no interference between the
belts and other parts of the engine. After a
belt is replaced, the new belt should be
adjusted again after two or three weeks to
eliminate slack resulting from initial stretch-
ing after use.G190A01A-AAT
G180A01L
G160A01HR
CHECKING BRAKE PEDAL
CLEARANCEG180A01A-AATYou need a helper to check the brake
pedal clearance. With the engine running,
have your helper press down on the brake
pedal several times and then hold it down
with a force of about 110 lbs (50 kg, 490 N).
The brake pedal clearance is the distance
from the top surface of the brake pedal to
the asphalt sheeting under the floor mat.
If the brake pedal clearance is not within
the limits specified in the illustration, have
it inspected by your Hyundai dealer and
adjusted or repaired if necessary.
2.95 in. (75 mm)
G170A01A-AATBRAKE PEDAL FREE PLAYWith the engine off, press down on the
brake pedal several times to reduce the
vacuum in the brake booster.
Then, using your hand, press down slowly
on the brake pedal until you feel a change
in resistance. This is the brake pedal free-
play.
The free-play should be within the limits
specified in the illustration above. If it is not,
have it inspected by your Hyundai dealer
and adjusted or repaired if necessary.
0.12 ~ 0.31 in.
(3 ~ 8 mm)
Page 229 of 273
6
DO-IT-YOURSELF MAINTENANCE
25
POWER STEERING FLUID
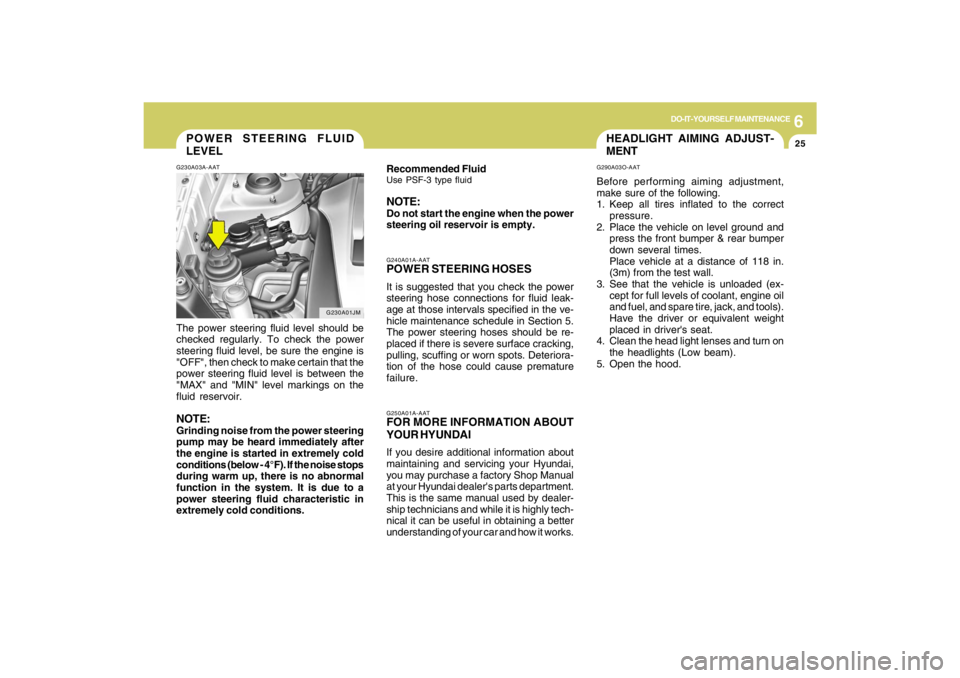
LEVELG230A03A-AATThe power steering fluid level should be
checked regularly. To check the power
steering fluid level, be sure the engine is
"OFF", then check to make certain that the
power steering fluid level is between the
"MAX" and "MIN" level markings on the
fluid reservoir.NOTE:Grinding noise from the power steering
pump may be heard immediately after
the engine is started in extremely cold
conditions (below - 4°F). If the noise stops
during warm up, there is no abnormal
function in the system. It is due to a
power steering fluid characteristic in
extremely cold conditions.
G230A01JM
HEADLIGHT AIMING ADJUST-
MENTG290A03O-AATBefore performing aiming adjustment,
make sure of the following.
1. Keep all tires inflated to the correct
pressure.
2. Place the vehicle on level ground and
press the front bumper & rear bumper
down several times.
Place vehicle at a distance of 118 in.
(3m) from the test wall.
3. See that the vehicle is unloaded (ex-
cept for full levels of coolant, engine oil
and fuel, and spare tire, jack, and tools).
Have the driver or equivalent weight
placed in driver's seat.
4. Clean the head light lenses and turn on
the headlights (Low beam).
5. Open the hood.
G250A01A-AATFOR MORE INFORMATION ABOUT
YOUR HYUNDAIIf you desire additional information about
maintaining and servicing your Hyundai,
you may purchase a factory Shop Manual
at your Hyundai dealer's parts department.
This is the same manual used by dealer-
ship technicians and while it is highly tech-
nical it can be useful in obtaining a better
understanding of your car and how it works.G240A01A-AATPOWER STEERING HOSESIt is suggested that you check the power
steering hose connections for fluid leak-
age at those intervals specified in the ve-
hicle maintenance schedule in Section 5.
The power steering hoses should be re-
placed if there is severe surface cracking,
pulling, scuffing or worn spots. Deteriora-
tion of the hose could cause premature
failure. Recommended FluidUse PSF-3 type fluidNOTE:Do not start the engine when the power
steering oil reservoir is empty.