Page 225 of 286

6
DO-IT-YOURSELF MAINTENANCE
10
3. Be sure your drain receptacle is in place.
Open the drain cock on the radiator.
Allow all the engine coolant to drain
from the cooling system, and then
securely close the drain cock.
4. Check Section 9 for the capacity of the
cooling system in your car. Then,
following the manufacturer's directions
on the engine coolant container, add
the appropriate quantity of coolant to
the radiator.
5. Slowly fill the radiator with the proper
coolant mixture (see the "Recom-
mended Engine Coolant in previous
page) until the fluid level stays up in the
radiator neck. And pump the radiator
hose in order to bleed the air.
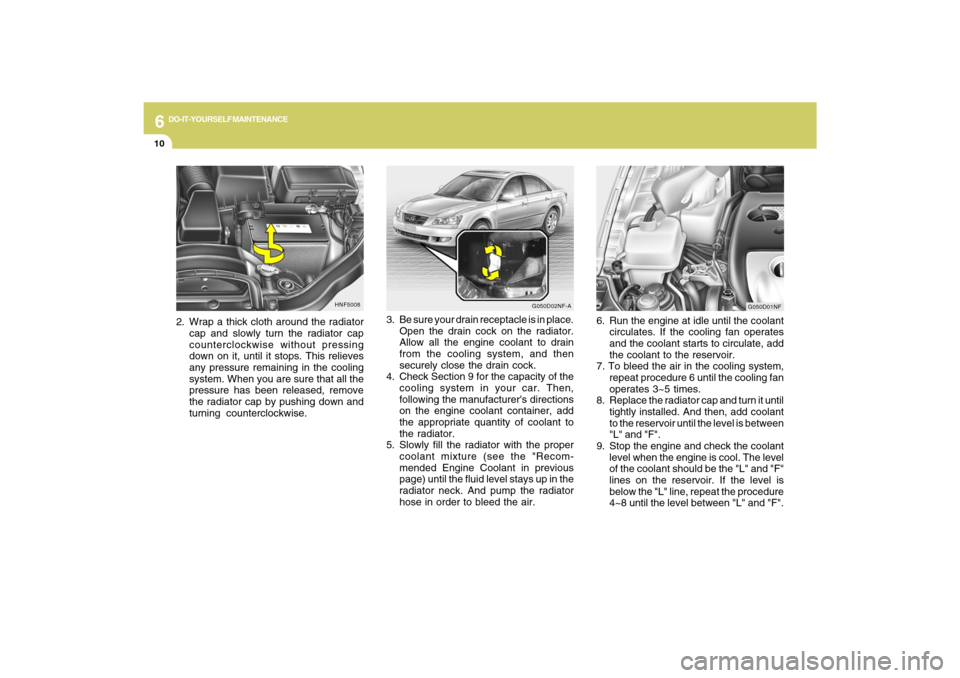
HNF5008
2. Wrap a thick cloth around the radiator
cap and slowly turn the radiator cap
counterclockwise without pressing
down on it, until it stops. This relieves
any pressure remaining in the cooling
system. When you are sure that all the
pressure has been released, remove
the radiator cap by pushing down and
turning counterclockwise.
G050D02NF-A
G050D01NF
6. Run the engine at idle until the coolant
circulates. If the cooling fan operates
and the coolant starts to circulate, add
the coolant to the reservoir.
7. To bleed the air in the cooling system,
repeat procedure 6 until the cooling fan
operates 3~5 times.
8. Replace the radiator cap and turn it until
tightly installed. And then, add coolant
to the reservoir until the level is between
"L" and "F".
9. Stop the engine and check the coolant
level when the engine is cool. The level
of the coolant should be the "L" and "F"
lines on the reservoir. If the level is
below the "L" line, repeat the procedure
4~8 until the level between "L" and "F".
Page 226 of 286

6
DO-IT-YOURSELF MAINTENANCE
11
!!
10. Replace the reservoir cap and check to
be sure the drain cock and the radiator
cap are fully closed and not leaking.
CAUTION:
Recheck after a few days and add the
coolant if the level is below the "L" level.
WARNING:
The cooling fan is controlled by engine
coolant temperature and may
sometimes operate even when the
engine is not running. Use extreme
caution when working near the blades of
the coolant fan so that you are not injured
by a rotating fan blade. As the engine
coolant temperature decreases, the fan
will automatically shut off. This is a
normal condition.
CAUTION:
o Operating your vehicle without using
a proper air cleaner filter in place can
result in excessive engine wear.
o When removing the air cleaner filter,
be careful that dust or dirt does not
enter the air intake. These may result
in damage to the air cleaner filter.
!
CHANGING THE AIR
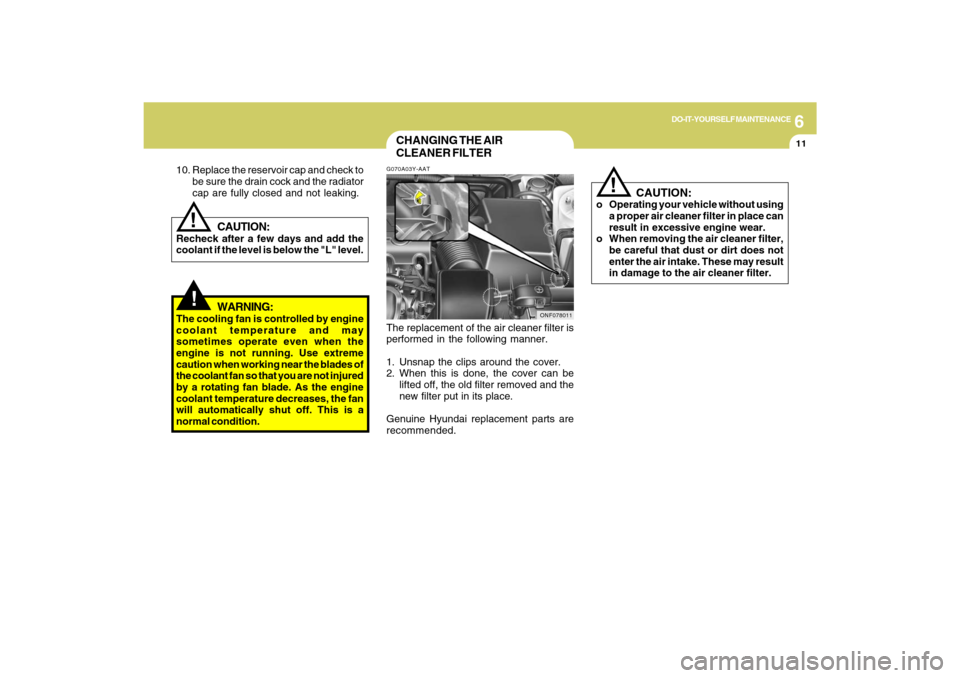
CLEANER FILTERG070A03Y-AATThe replacement of the air cleaner filter is
performed in the following manner.
1. Unsnap the clips around the cover.
2. When this is done, the cover can be
lifted off, the old filter removed and the
new filter put in its place.
Genuine Hyundai replacement parts are
recommended.
ONF078011
Page 227 of 286
6
DO-IT-YOURSELF MAINTENANCE
12
HHR5048
(1)
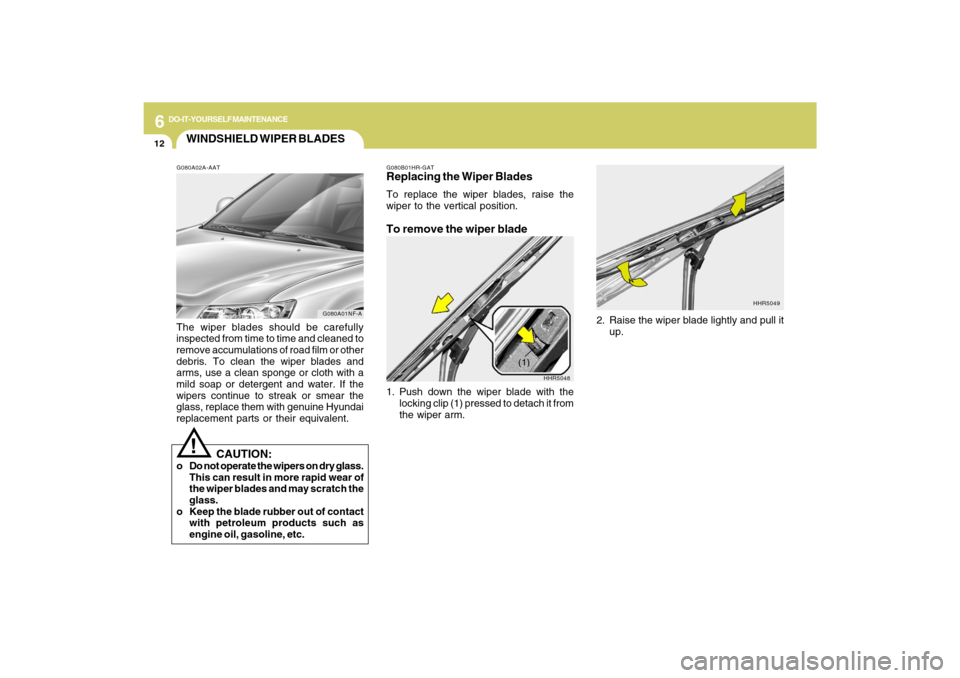
WINDSHIELD WIPER BLADESG080A02A-AATThe wiper blades should be carefully
inspected from time to time and cleaned to
remove accumulations of road film or other
debris. To clean the wiper blades and
arms, use a clean sponge or cloth with a
mild soap or detergent and water. If the
wipers continue to streak or smear the
glass, replace them with genuine Hyundai
replacement parts or their equivalent.
!
CAUTION:
o Do not operate the wipers on dry glass.
This can result in more rapid wear of
the wiper blades and may scratch the
glass.
o Keep the blade rubber out of contact
with petroleum products such as
engine oil, gasoline, etc.
G080B01HR-GATReplacing the Wiper BladesTo replace the wiper blades, raise the
wiper to the vertical position.To remove the wiper blade1. Push down the wiper blade with the
locking clip (1) pressed to detach it from
the wiper arm.
G080A01NF-A
2. Raise the wiper blade lightly and pull it
up.
HHR5049
Page 228 of 286
6
DO-IT-YOURSELF MAINTENANCE
13
HHR5051
HHR5050
FILLING THE WASHER
RESERVOIRG090A02NF-AAT
G090A02NF
ONF078009
(3.3L)(2.4L)
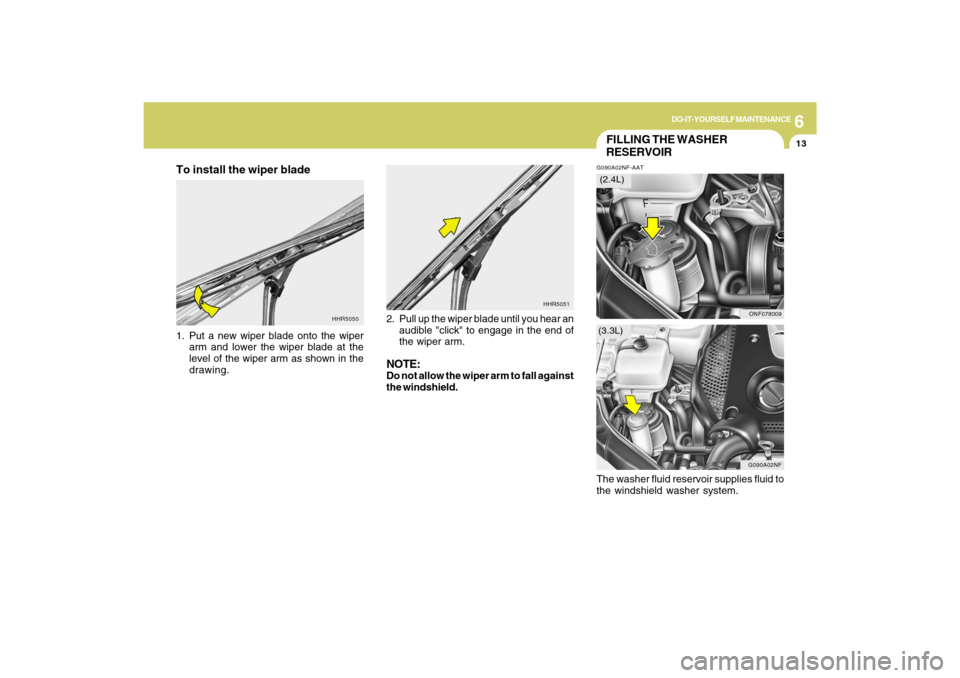
To install the wiper blade1. Put a new wiper blade onto the wiper
arm and lower the wiper blade at the
level of the wiper arm as shown in the
drawing.2. Pull up the wiper blade until you hear an
audible "click" to engage in the end of
the wiper arm.
NOTE:Do not allow the wiper arm to fall against
the windshield.
The washer fluid reservoir supplies fluid to
the windshield washer system.
Page 229 of 286

6
DO-IT-YOURSELF MAINTENANCE
14
CAUTION:
o Radiator antifreeze (engine coolant)
should not be used in the washer
system because it will damage the
car's finish.
o The washer lever should not be pulled
and the washer should not be operated
if the washer reservoir is empty. This
can damage the washer fluid pump.
!
A good quality washer fluid should be
used to fill the washer reservoir. The fluid
level should be checked more frequently
during bad weather or whenever the
washer system is in more frequent use.
The capacity of the washer reservoir is 3.2
U.S. quarts (4.0 liters).
!
WARNING:
It is always better to check the transaxle
oil level when the engine is cool or cold.
If the engine is hot, you should exercise
great caution to avoid burning yourself
on hot engine or exhaust parts.
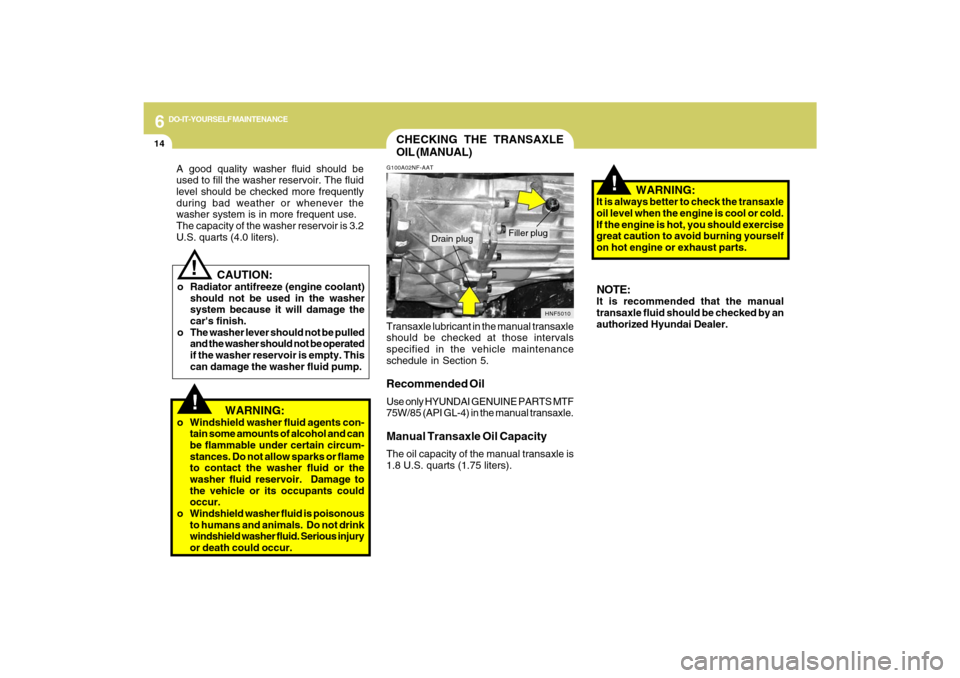
CHECKING THE TRANSAXLE
OIL (MANUAL)G100A02NF-AAT
HNF5010
Filler plug
Drain plug
Transaxle lubricant in the manual transaxle
should be checked at those intervals
specified in the vehicle maintenance
schedule in Section 5.Recommended OilUse only HYUNDAI GENUINE PARTS MTF
75W/85 (API GL-4) in the manual transaxle.Manual Transaxle Oil CapacityThe oil capacity of the manual transaxle is
1.8 U.S. quarts (1.75 liters).
!
WARNING:
o Windshield washer fluid agents con-
tain some amounts of alcohol and can
be flammable under certain circum-
stances. Do not allow sparks or flame
to contact the washer fluid or the
washer fluid reservoir. Damage to
the vehicle or its occupants could
occur.
o Windshield washer fluid is poisonous
to humans and animals. Do not drink
windshield washer fluid. Serious injury
or death could occur.
NOTE:It is recommended that the manual
transaxle fluid should be checked by an
authorized Hyundai Dealer.
Page 230 of 286

6
DO-IT-YOURSELF MAINTENANCE
15
CHECKING THE TRANSAXLE
FLUID (AUTOMATIC)G110A01E-AATTransaxle fluid in the automatic transaxle
should be checked at those intervals
specified in the vehicle maintenance
schedule in Section 5.NOTE:Automatic transaxle fluid is basically
red in color. As driving distance in-
creases, the fluid color turns darkish red
gradually. It is a normal condition and
you should not judge the need to replace
based upon the changing color.
You must replace the automatic
transaxle fluid in accordance with
intervals specified in the vehicle
maintenance schedule in section 5.
!
G110B05A-AATRecommended Fluid
Your Hyundai automatic transaxle is
specially designed to operate with
HYUNDAI GENUINE ATF SP III, DIAMOND
ATF SP III, SK ATF SP III or other brands
meeting the SP III specification approved
by Hyundai Motor Co.. Damage caused
by a nonspecified fluid is not covered by
your new vehicle limited warranty.
CAUTION:
Use of aftermarket ATF additives may
cause damage to the automatic
transaxle.
Only use HYUNDAI GENUINE ATF SP III,
DIAMOND ATF SP III, SK ATF SP III or
other brands meeting the SP III specifi-
cation approved by Hyundai Motor Co..
If you are having your vehicle serviced
at a facility other than a Hyundai dealer,
verify that the correct ATF is used for
your vehicle.
!
G110C01NF-AATTransaxle Fluid CapacityThe fluid capacity of the automatic
transaxle is:
WARNING:
The transaxle fluid level should be
checked when the engine is at normal
operating temperature. This means that
the engine, radiator, radiator hose,
exhaust system etc., are very hot.
Exercise great care not to burn yourself
during this procedure.2.4L
3.3L
8.24 U.S. quarts (7.8 liters)
11.52 U.S. quarts (10.9 liters)
Page 231 of 286

6
DO-IT-YOURSELF MAINTENANCE
16
2. After the transaxle is warmed up
sufficiently (fluid temperature 70~80°C
(158~176°F), for example by 10 minutes
usual driving, move the shift lever
through all positions then place the
selector lever in “N (Neutral) or P (Park)”
position.
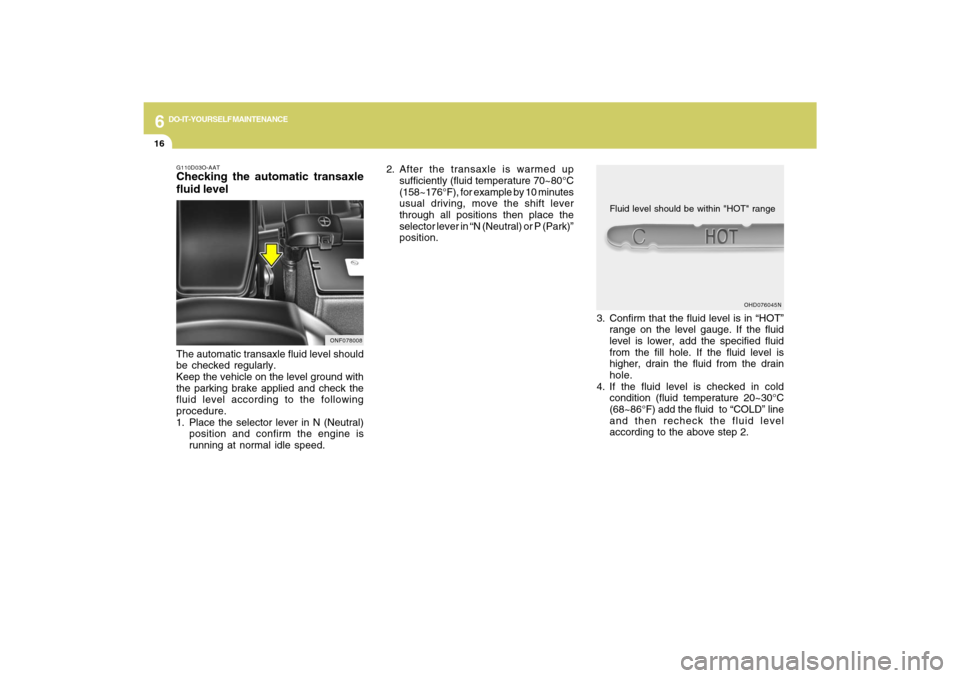
G110D03O-AATChecking the automatic transaxle
fluid levelThe automatic transaxle fluid level should
be checked regularly.
Keep the vehicle on the level ground with
the parking brake applied and check the
fluid level according to the following
procedure.
1. Place the selector lever in N (Neutral)
position and confirm the engine is
running at normal idle speed.
ONF078008
OHD076045N
Fluid level should be within "HOT" range
3. Confirm that the fluid level is in “HOT”
range on the level gauge. If the fluid
level is lower, add the specified fluid
from the fill hole. If the fluid level is
higher, drain the fluid from the drain
hole.
4. If the fluid level is checked in cold
condition (fluid temperature 20~30°C
(68~86°F) add the fluid to “COLD” line
and then recheck the fluid level
according to the above step 2.
Page 232 of 286

6
DO-IT-YOURSELF MAINTENANCE
17
CHECKING THE BRAKES!
G120B01A-AATChecking the Brake Fluid Level
WARNING:Use caution when handling brake fluid. It
can damage your vision if it gets into
your eyes. It will also damage your
vehicle's paint if spilled on it and not
removed immediately.
!
WARNING:
The cooling fan is controlled by engine
coolant temperature and may
sometimes operate even when the
engine is not running. Use extreme
caution when working near the blades of
the cooling fan so that you are not injured
by a rotating fan blade. As the engine
coolant temperature decreases, the fan
will automatically shut off. This is a
normal condition.
G120A01A-AAT
CAUTION:
Because brakes are essential to the
safe operation of the car, it is suggested
that they be checked and inspected by
your Hyundai dealer. The brakes should
be checked and inspected for wear at
those intervals specified in the vehicle
maintenance schedule in Section 5.
!
G120D01A-AATTo Check the Fluid LevelThe fluid level in the brake fluid reservoir
should be checked periodically. The level
should be between the "MIN" and "MAX"
marks on the side of the reservoir. If the
level is at or below the "MIN" mark, carefully
add fluid to bring it up to "MAX". Do not
overfill.G120C02A-AATRecommended Brake FluidUse only hydraulic brake fluid conforming
to DOT 3 or DOT 4 specifications in your
braking system. Follow the instructions
printed on the container.