Page 71 of 269
1FEATURES OF YOUR HYUNDAI
60
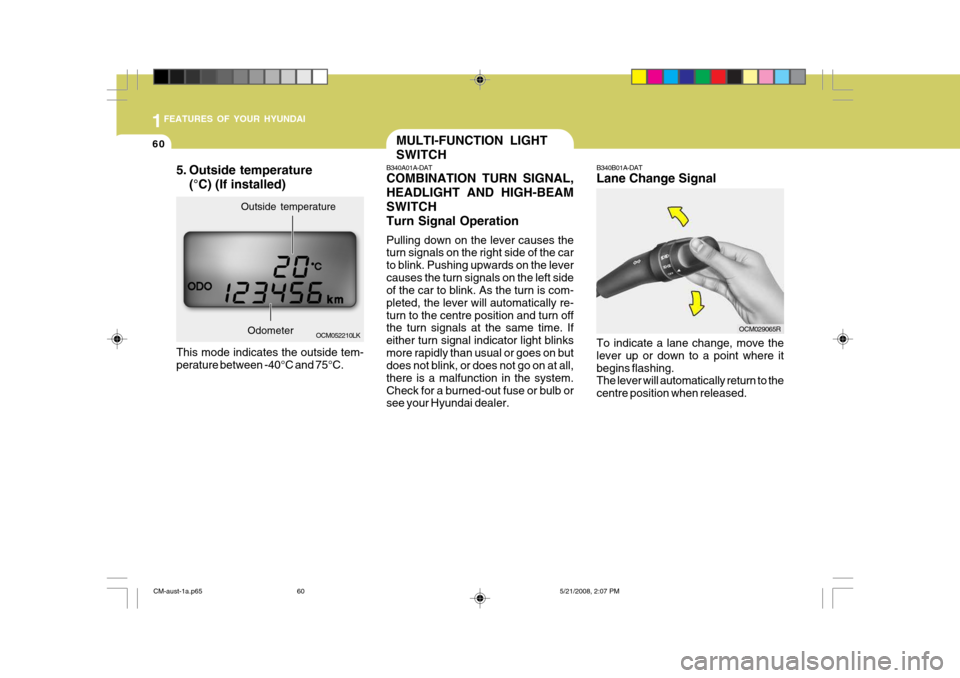
B340B01A-DAT Lane Change Signal To indicate a lane change, move the lever up or down to a point where itbegins flashing. The lever will automatically return to the centre position when released.
OCM029065R
MULTI-FUNCTION LIGHT SWITCH
B340A01A-DAT COMBINATION TURN SIGNAL, HEADLIGHT AND HIGH-BEAMSWITCHTurn Signal Operation Pulling down on the lever causes the turn signals on the right side of the car to blink. Pushing upwards on the levercauses the turn signals on the left side of the car to blink. As the turn is com- pleted, the lever will automatically re-turn to the centre position and turn off the turn signals at the same time. If either turn signal indicator light blinksmore rapidly than usual or goes on but does not blink, or does not go on at all, there is a malfunction in the system.Check for a burned-out fuse or bulb or see your Hyundai dealer.
OCM052210LK
Outside temperature
Odometer
5. Outside temperature
(°C) (If installed)
This mode indicates the outside tem- perature between -40°C and 75°C.
CM-aust-1a.p65 5/21/2008, 2:07 PM
60
Page 148 of 269
2
DRIVING YOUR HYUNDAI
3
!
BEFORE STARTING THE ENGINE
C020A01CM-DAT Before you start the engine, you should always:
1. Look around the vehicle to be sure
there are no flat tyres, puddles of oil, water or other indications of possible trouble.
2. After entering the car, check to be sure the hand brake is engaged.
3. Check that all windows, and lights are clean.
4. Check that the interior and exterior
mirrors are clean and in position.
5. Check your seat, seatback and head- rest to be sure they are in their properpositions.
6. Lock all the doors.
7. Fasten your seat belt and be sure
that all other occupants have fas- tened theirs.
8. Turn off all lights and accessories
that are not needed.
9. When you turn the ignition switch to "ON", check that all appropriate warn-ing lights are operating and that youhave sufficient fuel.
10. Check the operation of warning lights
and all bulbs when key is in the "ON"position.
C020A01HP-DAT
o In a collision crash, an unbelted
person is significantly more likelyto die than a person wearing aseatbelt.
RISK OF ROLLOVER
WARNING:
o Utility vehicle has a significantly higher collision rate than othertype of vehicles.
o Utility vehicle have higher ground clearance and a narrower trackto make them capable of perform-ing in a wide variety of off-road applications. Specific design characteristics give them a highercentre of gravity than ordinary cars. An advantage of the higher ground clearance is a better viewof the road allowing you to antici- pate problem. They are not de- signed for cornering at the samespeeds as conventional 2-wheel drive vehicles any more than low- slung sports cars are designed toperform satisfactorily under off- road conditions. If at all possible, avoid sharp turns or abrupt ma-neuvers. As with other vehicles of this type, failure to operate this vehicle correctly may result inloss of control or vehicle rollover.
CM-aust-2.p65 5/19/2008, 6:34 PM
3
Page 208 of 269
Engine Compartment .................................................... 6-2
General Checks ........................................................... 6-5
Maintenance Precautions ............................................. 6-6
Checking the Engine Oil .............................................. 6-6
Checking the Engine Coolant ...................................... 6-9
Changing the Air Cleaner Filter ...................................6-11
Checking the Transaxle Fluid (Automatic) .................6-15
Checking the Brakes .................................................. 6-17
Air Conditioning Care .................................................. 6-19
Changing the Climate Control Air Filter .. ....................6-19
Checking and Replacing Fuses ..................................6-21
Checking the Battery .................................................. 6-24
Power Steering Fluid Level ......................................... 6-26
Removal of Water from the Fuel Filter ........................6-27
Headlight Aiming Adjustment ...................................... 6-28
Replacement of Light Bulbs ........................................6-29
Bulb Wattage ............................................................... 6-37
Fuse Panel D escription ............................................... 6-38
DO-IT-YOURSELF MAINTENANCE
6
6
CM-aust-6.p65
5/19/2008, 6:37 PM
1
Page 236 of 269
6
DO-IT-YOURSELF MAINTENANCE
29
G290B01CM-DAT
Adjustment After Headlight Assembly Replacement
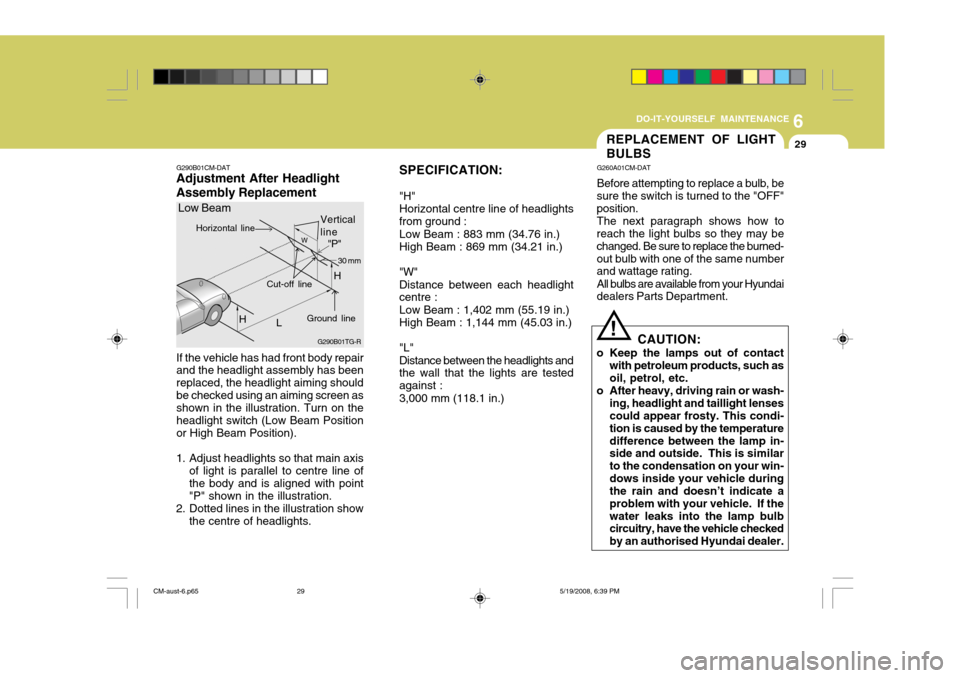
If the vehicle has had front body repair and the headlight assembly has been replaced, the headlight aiming shouldbe checked using an aiming screen as shown in the illustration. Turn on the headlight switch (Low Beam Positionor High Beam Position).
1. Adjust headlights so that main axis of light is parallel to centre line ofthe body and is aligned with point"P" shown in the illustration.
2. Dotted lines in the illustration show the centre of headlights. SPECIFICATION: "H" Horizontal centre line of headlightsfrom ground : Low Beam : 883 mm (34.76 in.) High Beam : 869 mm (34.21 in.) "W" Distance between each headlight centre : Low Beam : 1,402 mm (55.19 in.) High Beam : 1,144 mm (45.03 in.) "L" Distance between the headlights and the wall that the lights are tested against : 3,000 mm (118.1 in.)
G290B01TG-R
Low Beam
LW
H Cut-off line
"P"
Horizontal line
Ground line 30 mm
Vertical line
H
REPLACEMENT OF LIGHT BULBS
G260A01CM-DAT Before attempting to replace a bulb, be
sure the switch is turned to the "OFF" position.
The next paragraph shows how to
reach the light bulbs so they may bechanged. Be sure to replace the burned-out bulb with one of the same number and wattage rating.
All bulbs are available from your Hyundai
dealers Parts Department.
CAUTION:
o Keep the lamps out of contact with petroleum products, such asoil, petrol, etc.
o After heavy, driving rain or wash- ing, headlight and taillight lensescould appear frosty. This condi- tion is caused by the temperaturedifference between the lamp in- side and outside. This is similar to the condensation on your win-dows inside your vehicle during the rain and doesn’t indicate a problem with your vehicle. If thewater leaks into the lamp bulb circuitry, have the vehicle checked by an authorised Hyundai dealer.
!
CM-aust-6.p65 5/19/2008, 6:39 PM
29
Page 237 of 269
6DO-IT-YOURSELF MAINTENANCE
30
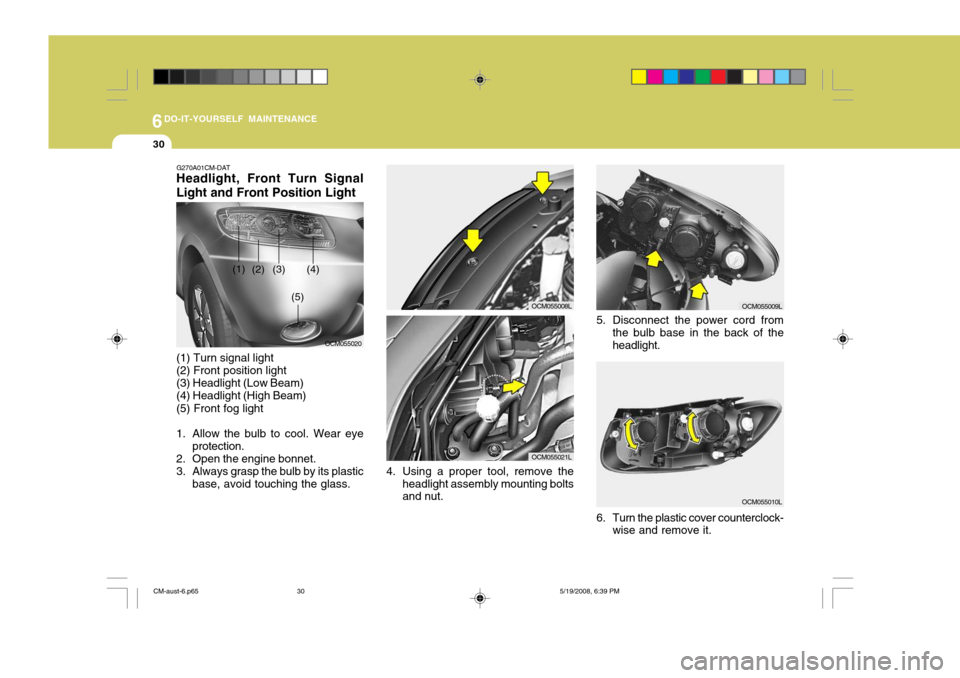
OCM055020
(1)
(2) (3) (4)
(5)
5. Disconnect the power cord fromthe bulb base in the back of the headlight.
6. Turn the plastic cover counterclock- wise and remove it.
OCM055010L
G270A01CM-DAT
Headlight, Front Turn Signal Light and Front Position Light
OCM055008L
OCM055021L
OCM055009L
(1) Turn signal light (2) Front position light (3) Headlight (Low Beam) (4) Headlight (High Beam) (5) Front fog light
1. Allow the bulb to cool. Wear eye protection.
2. Open the engine bonnet.
3. Always grasp the bulb by its plastic base, avoid touching the glass. 4. Using a proper tool, remove the
headlight assembly mounting bolts and nut.
CM-aust-6.p65 5/19/2008, 6:39 PM
30
Page 238 of 269
6
DO-IT-YOURSELF MAINTENANCE
31
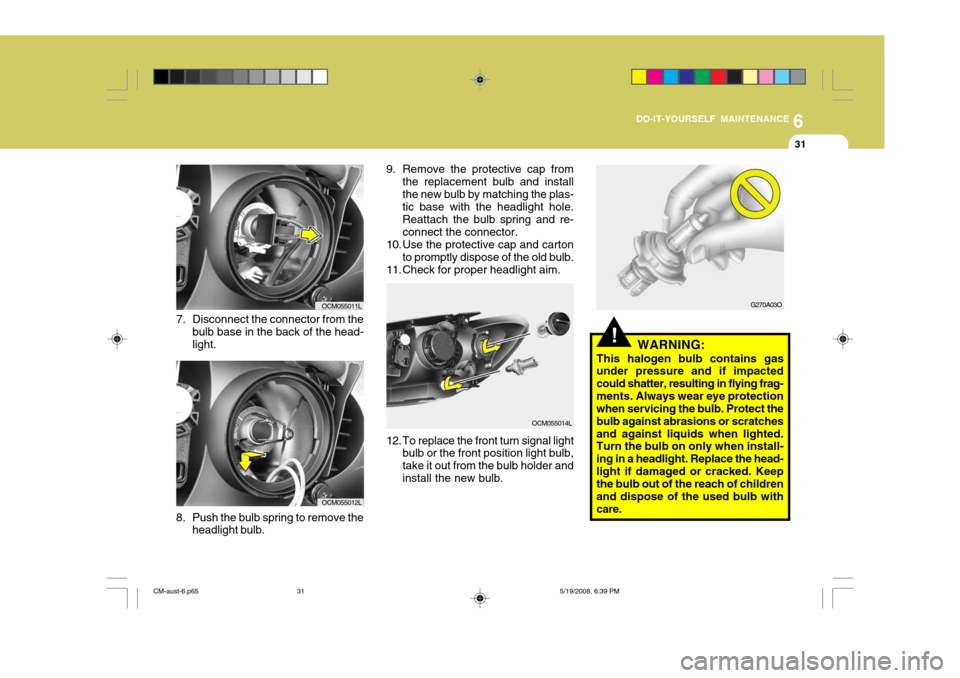
8. Push the bulb spring to remove the headlight bulb.
7. Disconnect the connector from the
bulb base in the back of the head- light.
OCM055011L
OCM055012L 9. Remove the protective cap from
the replacement bulb and install the new bulb by matching the plas- tic base with the headlight hole. Reattach the bulb spring and re-connect the connector.
10. Use the protective cap and carton
to promptly dispose of the old bulb.
11. Check for proper headlight aim.
OCM055014L
12. To replace the front turn signal light bulb or the front position light bulb, take it out from the bulb holder andinstall the new bulb.
!WARNING:
This halogen bulb contains gas
under pressure and if impacted could shatter, resulting in flying frag-ments. Always wear eye protection when servicing the bulb. Protect the bulb against abrasions or scratchesand against liquids when lighted. Turn the bulb on only when install- ing in a headlight. Replace the head-light if damaged or cracked. Keep the bulb out of the reach of children and dispose of the used bulb withcare.
G270A03O
CM-aust-6.p65 5/19/2008, 6:39 PM
31
Page 239 of 269
6DO-IT-YOURSELF MAINTENANCE
32
G270K01CM-DAT Front Fog Light (If Installed) NOTE: It is recommended that the front fog light bulb be replaced by an authorised Hyundai dealer.
G270B01CM-GAT
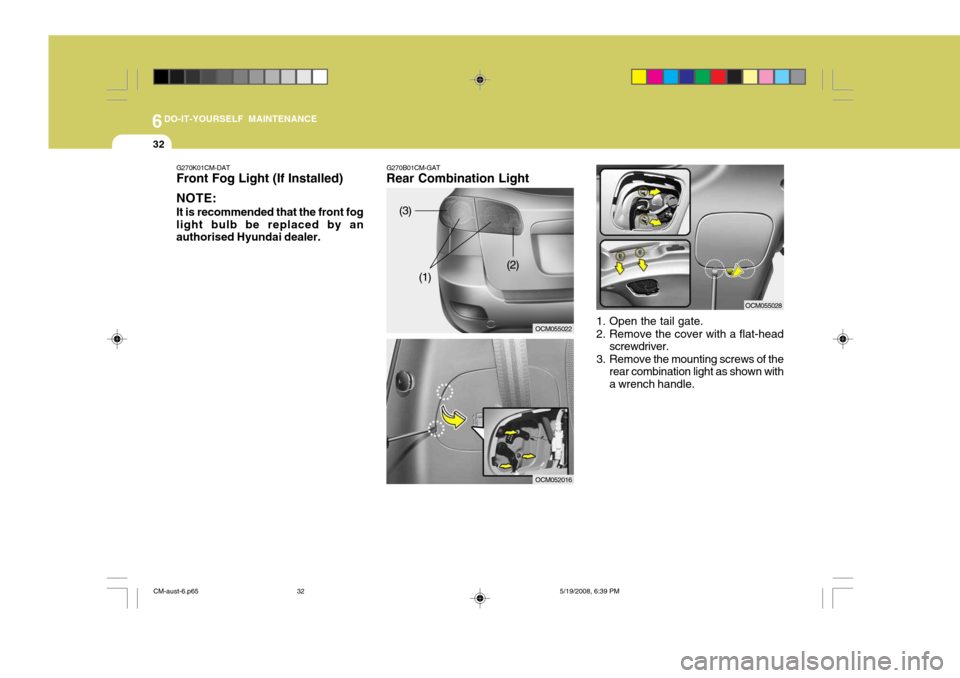
Rear Combination Light
OCM055022
(3)
(1) (2)
1. Open the tail gate.
2. Remove the cover with a flat-headscrewdriver.
3. Remove the mounting screws of the rear combination light as shown with a wrench handle.
OCM052016
OCM055028
CM-aust-6.p65 5/19/2008, 6:39 PM
32
Page 240 of 269
6
DO-IT-YOURSELF MAINTENANCE
33
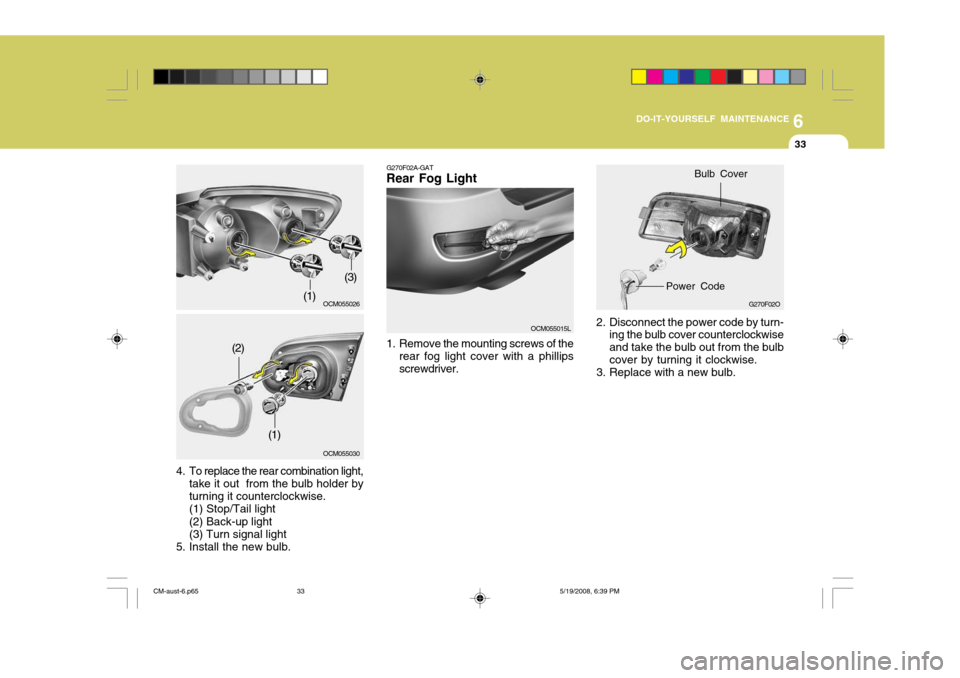
2. Disconnect the power code by turn-
ing the bulb cover counterclockwise and take the bulb out from the bulbcover by turning it clockwise.
3. Replace with a new bulb. G270F02O
Bulb Cover
Power Code
1. Remove the mounting screws of the rear fog light cover with a phillips screwdriver.
G270F02A-GAT
Rear Fog Light
OCM055015L
4. To replace the rear combination light, take it out from the bulb holder byturning it counterclockwise.(1) Stop/Tail light (2) Back-up light (3) Turn signal light
5. Install the new bulb.
OCM055030
(1)
(2)
OCM055026(1)
(3)
CM-aust-6.p65
5/19/2008, 6:39 PM
33