2009 Hyundai H-1 (Grand Starex) fuses
[x] Cancel search: fusesPage 138 of 303
477
Features of your vehicle
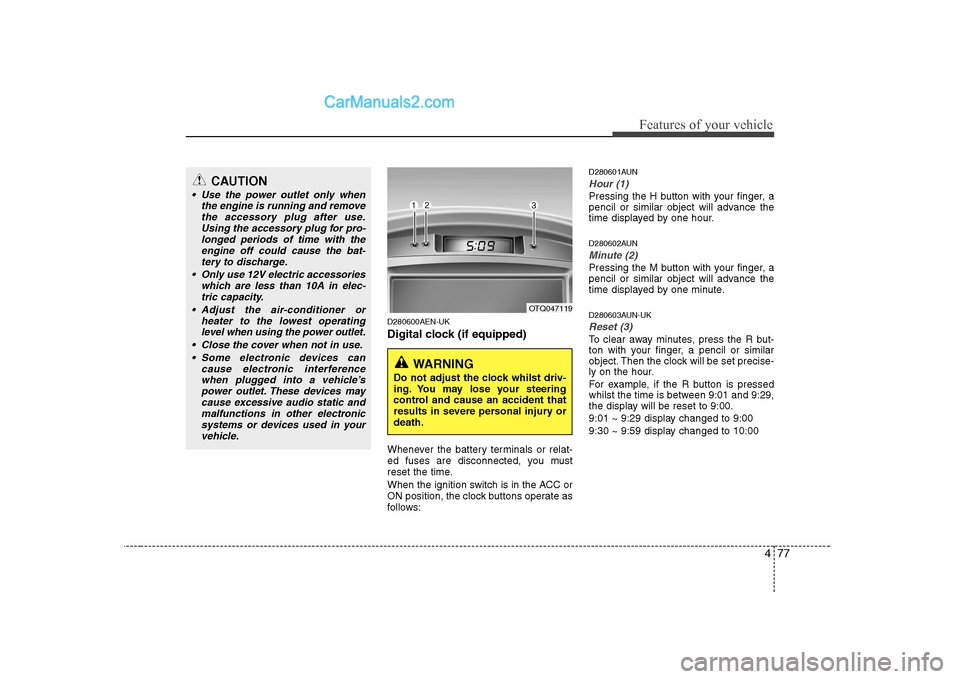
D280600AEN-UK
Digital clock (if equipped)
Whenever the battery terminals or relat-
ed fuses are disconnected, you must
reset the time.
When the ignition switch is in the ACC or
ON position, the clock buttons operate as
follows:D280601AUN
Hour (1)
Pressing the H button with your finger, a
pencil or similar object will advance the
time displayed by one hour.
D280602AUN
Minute (2)
Pressing the M button with your finger, a
pencil or similar object will advance the
time displayed by one minute.
D280603AUN-UK
Reset (3)
To clear away minutes, press the R but-
ton with your finger, a pencil or similar
object. Then the clock will be set precise-
ly on the hour.
For example, if the R button is pressed
whilst the time is between 9:01 and 9:29,
the display will be reset to 9:00.
9:01 ~ 9:29 display changed to 9:00
9:30 ~ 9:59 display changed to 10:00
OTQ047119
WARNING
Do not adjust the clock whilst driv-
ing. You may lose your steering
control and cause an accident that
results in severe personal injury ordeath.
CAUTION
Use the power outlet only when the engine is running and removethe accessory plug after use.Using the accessory plug for pro-
longed periods of time with theengine off could cause the bat- tery to discharge.
Only use 12V electric accessories which are less than 10A in elec-
tric capacity.
Adjust the air-conditioner or heater to the lowest operatinglevel when using the power outlet.
Close the cover when not in use. Some electronic devices can cause electronic interferencewhen plugged into a vehicle’s power outlet. These devices maycause excessive audio static and
malfunctions in other electronicsystems or devices used in your vehicle.
Page 204 of 303
63
What to do in an emergency
3. Passengers must not be allowed toremain inside the vehicle during wheel
changing. If a puncture occurs whilst
the vehicle is on a motorway, the pas-
sengers should take refuge on the
motorway embankment to avoid the
possibility of injury occurring should
the vehicle be struck by other motor-
way traffic.
4. Wheel changing should be performed according to the following instructions.
F020300AEN-UK If engine stalls whilst driving
1. Reduce your speed gradually, keeping a straight line. Move cautiously off the
road to a safe place.
2. Turn on your emergency flashers.
3. Try to start the engine again. If your vehicle will not start, contact a
HYUNDAI authorised repairer or seek
other qualified assistance. F030100AUN-UK If engine cannot be cranked
1. If your car has an automatic transmis-
sion, be sure the gear selector lever is
in N (Neutral) or P (Park) and the
emergency brake is set.
2. Check the battery terminals and con- nections to ensure that these are cleanand also tight.
3. If the ignition warning lights dim when the engine is cranked and the battery
terminals have been checked, a dis-
charged battery is indicated.
4. Do not attempt to push or tow start the vehicle, refer to "Jump Starting" for
information regarding engine starting
when the battery is discharged.
F030200AEN-UK
If engine turns over normally but
does not start
1. Check fuel level.
2. With the ignition switch in the LOCKposition, check all connectors at the
ignition coils and spark plugs.
Reconnect any that may be discon-
nected or loose.
3. Check the fuel line in the engine com- partment.
4. If the engine still does not start, call a HYUNDAI authorised repairer or seek
other qualified assistance.
IF THE ENGINE WILL NOT START
WARNING
If the engine refuses to start, no attempt should be made to push or
tow start the vehicle. Vehicles withautomatic transmission or fuel
injection will not be able to be start-ed in this manner since no drive is
transmitted through the automatictransmission whilst the engine is
not running, and in the case of fuel
injected derivatives, the fuel pump
will not operate under tow start
conditions. In addition, if the vehi-
cle is equipped with an exhaust cat-
alyst, damage to the catalyst may
result if the vehicle is tow started.
Page 220 of 303
7
Engine compartment / 7-2 Maintenance services / 7-4
Owner maintenance / 7-6Scheduled maintenance service / 7-8Explanation of scheduled maintenance items / 7-9Engine oil / 7-12Engine coolant / 7-13Brake and clutch fluid / 7-16
Power steering fluid / 7-17Automatic transmission fluid / 7-18
Washer fluid / 7-20Parking brake / 7-20
Fuel filter / 7-21
Air cleaner / 7-22
Climate control air filter / 7-23
Wiper blades / 7-25Battery / 7-27
Tyres and wheels / 7-30 Fuses / 7-39Light bulbs / 7-49
Appearance care / 7-56
Emission control system / 7-62
Maintenance
Page 258 of 303
739
Maintenance
FUSES
G210000AEN-UK
A vehicle’s electrical system is protected
from electrical overload damage by
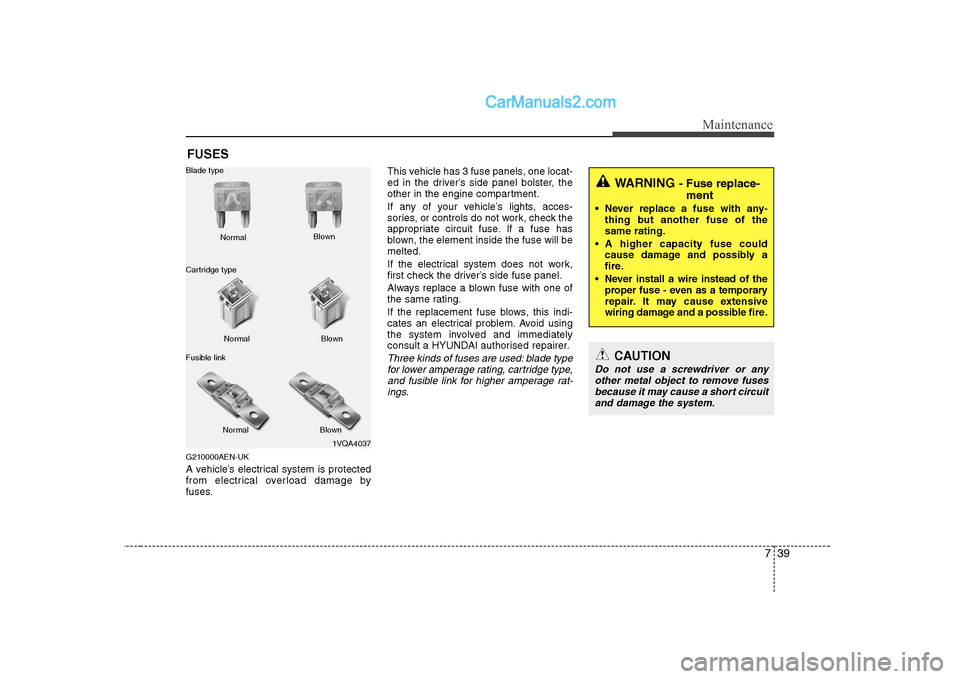
fuses. This vehicle has 3 fuse panels, one locat-
ed in the driver’s side panel bolster, the
other in the engine compartment.
If any of your vehicle’s lights, acces-
sories, or controls do not work, check the
appropriate circuit fuse. If a fuse has
blown, the element inside the fuse will bemelted.
If the electrical system does not work,
first check the driver’s side fuse panel.
Always replace a blown fuse with one of
the same rating.
If the replacement fuse blows, this indi-
cates an electrical problem. Avoid using
the system involved and immediately
consult a HYUNDAI authorised repairer.
Three kinds of fuses are used: blade type
for lower amperage rating, cartridge type,
and fusible link for higher amperage rat-ings.
1VQA4037
Normal
Normal
Blade type
Cartridge type
Fusible link Blown
Blown
Normal Blown
WARNING - Fuse replace-
ment
Never replace a fuse with any- thing but another fuse of the same rating.
A higher capacity fuse could cause damage and possibly a
fire.
Never install a wire instead of the proper fuse - even as a temporary
repair. It may cause extensive
wiring damage and a possible fire.
CAUTION
Do not use a screwdriver or any
other metal object to remove fusesbecause it may cause a short circuit and damage the system.
Page 259 of 303
Maintenance
40
7
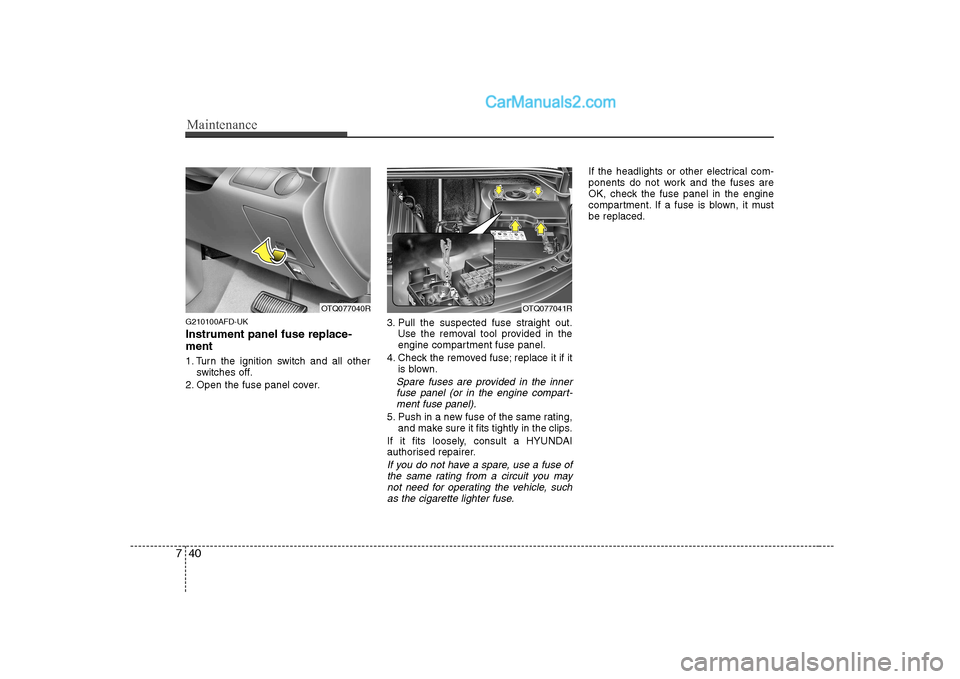
G210100AFD-UK Instrument panel fuse replace- ment
1. Turn the ignition switch and all other
switches off.
2. Open the fuse panel cover. 3. Pull the suspected fuse straight out.
Use the removal tool provided in the
engine compartment fuse panel.
4. Check the removed fuse; replace it if it is blown.
Spare fuses are provided in the inner
fuse panel (or in the engine compart- ment fuse panel).
5. Push in a new fuse of the same rating, and make sure it fits tightly in the clips.
If it fits loosely, consult a HYUNDAI
authorised repairer.
If you do not have a spare, use a fuse of the same rating from a circuit you may not need for operating the vehicle, suchas the cigarette lighter fuse.
If the headlights or other electrical com-
ponents do not work and the fuses are
OK, check the fuse panel in the engine
compartment. If a fuse is blown, it mustbe replaced.
OTQ077041ROTQ077040R
Page 301 of 303
Index
2
I
Air bag - supplemental restraint system ······················ 3-35
Air cleaner ··································································· 7-22
Appearance care ·························································· 7-56
Audio system ······························································· 4-79
Automatic transmission ··············································· 5-11
Automatic transmission fluid ······································ 7-18
Battery ········································································· 7-27
Before driving ································································ 5-3
Bonnet ·········································································· 4-21
Brake and clutch fluid ················································· 7-16
Brake system ······························································· 5-18
Bulb wattage ·································································· 9-2
Child restraint system ·················································· 3-24
Climate control air filter ·············································· 7-23
Defroster ······································································ 4-58
Dimensions ···································································· 9-2
Door locks ····································································· 4-8 Economical operation ·················································· 5-29
Emergency starting ························································ 6-4
Emission control system ·············································· 7-62
Engine compartment ·············································· 2-4, 7-2
Engine coolant ····························································· 7-13
Engine number ······························································· 8-3
Engine oil ····································································· 7-12
Explanation of scheduled maintenance items ··············· 7-9
Fuel filler lid ································································ 4-23
Fuel filter ····································································· 7-21
Fuel requirements ·························································· 1-2
Fuses ············································································ 7-39
Hazard warning flasher ··············································· 4-46
How to use this manual ················································· 1-2
If the engine overheats ·················································· 6-6
If the engine will not start ············································· 6-3
If you have a flat tyre ···················································· 6-7
A
B
C
D
E
F
H
I