2009 Hyundai H-1 (Grand Starex) fuse
[x] Cancel search: fusePage 8 of 303
Your vehicle at a glance
2
2
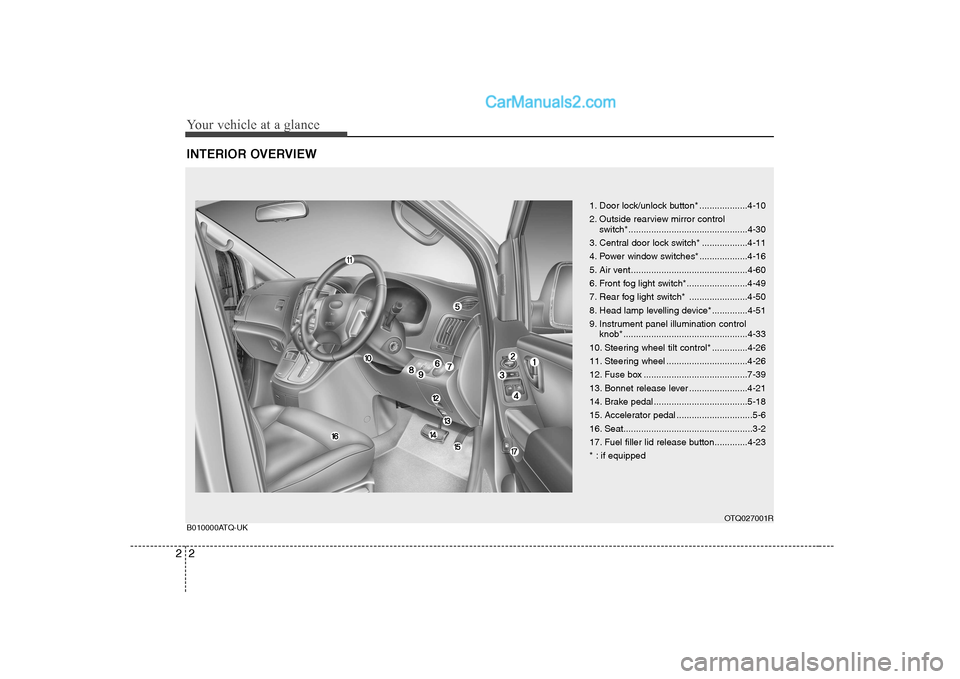
INTERIOR OVERVIEW
1. Door lock/unlock button* ...................4-10
2. Outside rearview mirror control
switch*...............................................4-30
3. Central door lock switch* ..................4-11
4. Power window switches* ...................4-16
5. Air vent ..............................................4-60
6. Front fog light switch*........................4-49
7. Rear fog light switch* .......................4-50
8. Head lamp levelling device* ..............4-51
9. Instrument panel illumination control knob* .................................................4-33
10. Steering wheel tilt control* ..............4-26
11. Steering wheel ................................4-26
12. Fuse box .........................................7-39
13. Bonnet release lever .......................4-21
14. Brake pedal .....................................5-18
15. Accelerator pedal ..............................5-6
16. Seat...................................................3-2
17. Fuel filler lid release button.............4-23
* : if equipped
OTQ027001R
B010000ATQ-UK
Page 10 of 303
Your vehicle at a glance
4
2
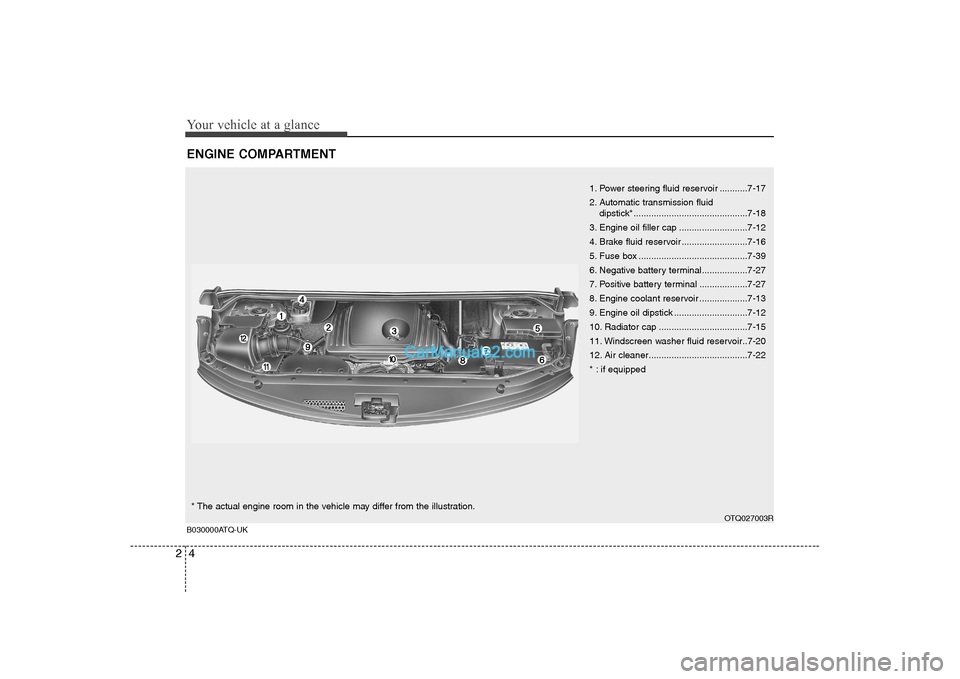
ENGINE COMPARTMENT
1. Power steering fluid reservoir ...........7-17
2. Automatic transmission fluid
dipstick*.............................................7-18
3. Engine oil filler cap ...........................7-12
4. Brake fluid reservoir ..........................7-16
5. Fuse box ...........................................7-39
6. Negative battery terminal..................7-27
7. Positive battery terminal ...................7-27
8. Engine coolant reservoir ...................7-13
9. Engine oil dipstick .............................7-12
10. Radiator cap ...................................7-15
11. Windscreen washer fluid reservoir..7-20
12. Air cleaner.......................................7-22
* : if equipped
OTQ027003R
B030000ATQ-UK* The actual engine room in the vehicle may differ from the illustration.
Page 51 of 303
341
Safety features of your vehicle
C040400BTQ-UK
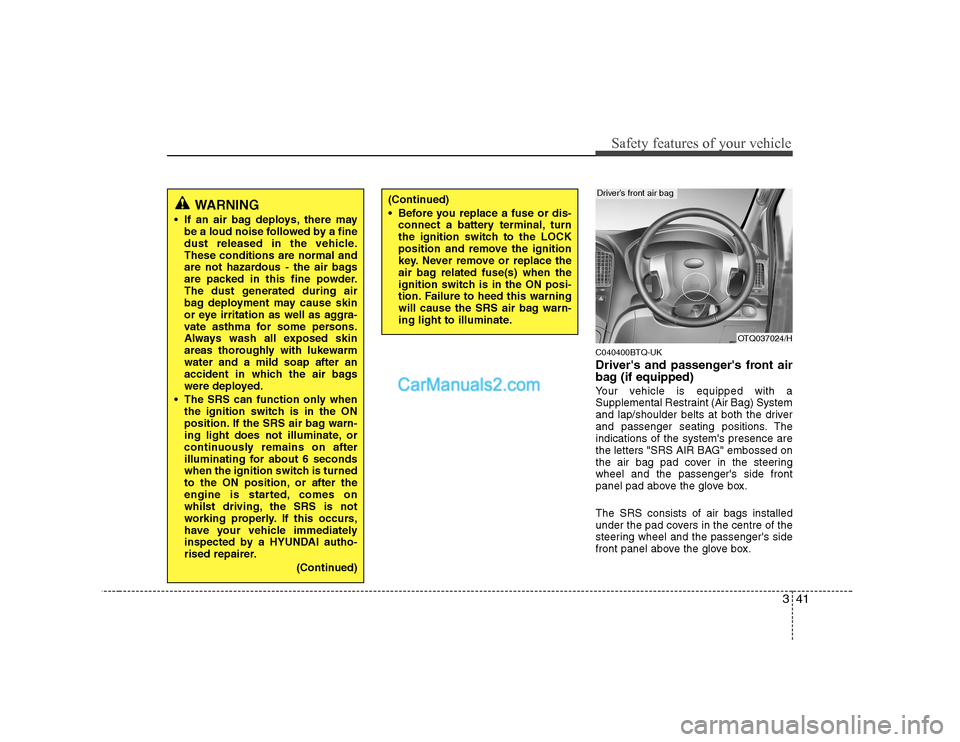
Driver's and passenger's front air
bag (if equipped)
Your vehicle is equipped with a
Supplemental Restraint (Air Bag) System
and lap/shoulder belts at both the driver
and passenger seating positions. Theindications of the system's presence are
the letters "SRS AIR BAG" embossed on
the air bag pad cover in the steeringwheel and the passenger's side front
panel pad above the glove box. The SRS consists of air bags installed
under the pad covers in the centre of the
steering wheel and the passenger's side
front panel above the glove box.
WARNING
If an air bag deploys, there may be a loud noise followed by a fine
dust released in the vehicle.These conditions are normal and
are not hazardous - the air bags
are packed in this fine powder.
The dust generated during air
bag deployment may cause skin
or eye irritation as well as aggra-
vate asthma for some persons.
Always wash all exposed skin
areas thoroughly with lukewarmwater and a mild soap after an
accident in which the air bags
were deployed.
The SRS can function only when the ignition switch is in the ON
position. If the SRS air bag warn-
ing light does not illuminate, or
continuously remains on after
illuminating for about 6 seconds
when the ignition switch is turned
to the ON position, or after the
engine is started, comes on
whilst driving, the SRS is not
working properly. If this occurs,
have your vehicle immediately
inspected by a HYUNDAI autho-
rised repairer.
(Continued)(Continued)
Before you replace a fuse or dis-connect a battery terminal, turn
the ignition switch to the LOCK
position and remove the ignition
key. Never remove or replace the
air bag related fuse(s) when the
ignition switch is in the ON posi-
tion. Failure to heed this warning
will cause the SRS air bag warn-
ing light to illuminate.
OTQ037024/H
Driver’s front air bag
Page 79 of 303
Features of your vehicle
18
4
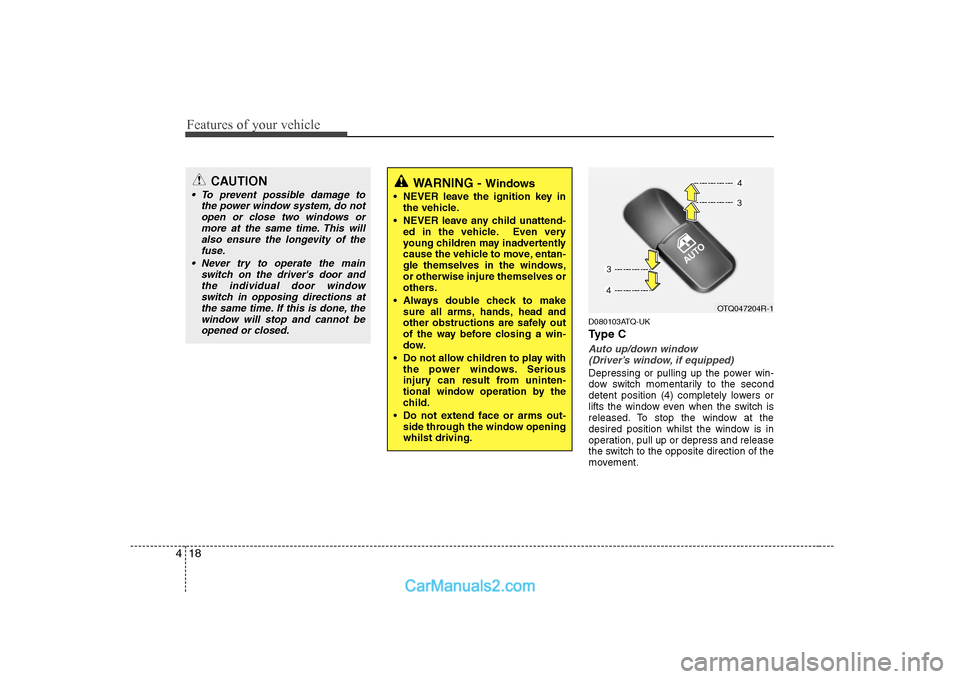
D080103ATQ-UK
Ty p e C
Auto up/down window
(Driver’s window, if equipped)
Depressing or pulling up the power win-
dow switch momentarily to the second
detent position (4) completely lowers or
lifts the window even when the switch is
released. To stop the window at the
desired position whilst the window is in
operation, pull up or depress and release
the switch to the opposite direction of the
movement.
CAUTION
To prevent possible damage to the power window system, do notopen or close two windows ormore at the same time. This will
also ensure the longevity of thefuse.
Never try to operate the main switch on the driver's door andthe individual door window
switch in opposing directions atthe same time. If this is done, thewindow will stop and cannot be
opened or closed.WARNING - Windows
NEVER leave the ignition key in the vehicle.
NEVER leave any child unattend- ed in the vehicle. Even very
young children may inadvertently
cause the vehicle to move, entan-
gle themselves in the windows,or otherwise injure themselves or
others.
Always double check to make sure all arms, hands, head and
other obstructions are safely out
of the way before closing a win-
dow.
Do not allow children to play with the power windows. Serious
injury can result from uninten-
tional window operation by the
child.
Do not extend face or arms out- side through the window openingwhilst driving.
OTQ047204R-1
Page 138 of 303
477
Features of your vehicle
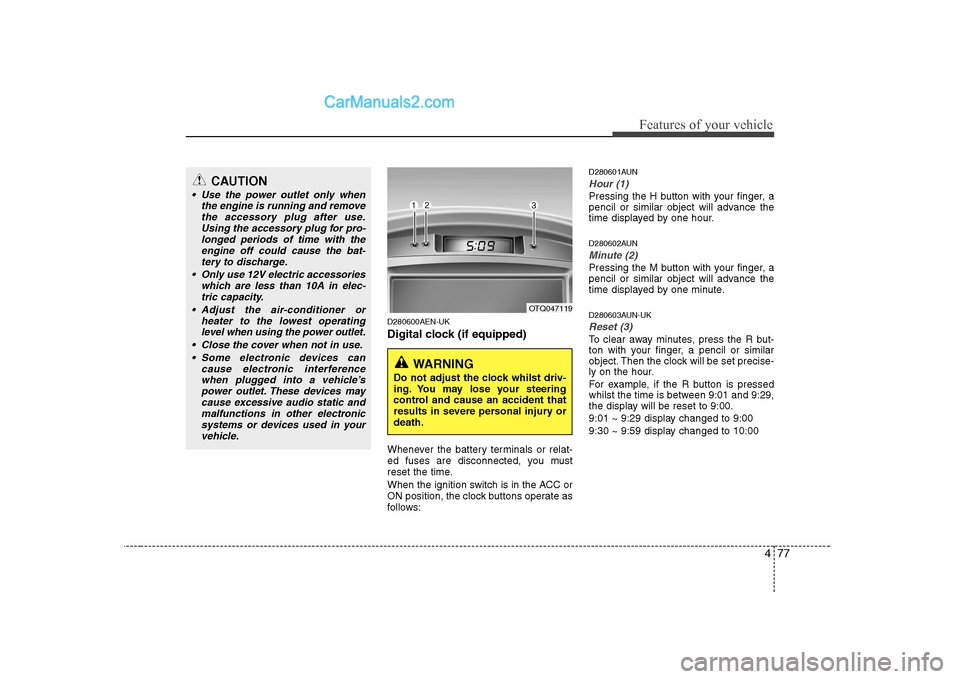
D280600AEN-UK
Digital clock (if equipped)
Whenever the battery terminals or relat-
ed fuses are disconnected, you must
reset the time.
When the ignition switch is in the ACC or
ON position, the clock buttons operate as
follows:D280601AUN
Hour (1)
Pressing the H button with your finger, a
pencil or similar object will advance the
time displayed by one hour.
D280602AUN
Minute (2)
Pressing the M button with your finger, a
pencil or similar object will advance the
time displayed by one minute.
D280603AUN-UK
Reset (3)
To clear away minutes, press the R but-
ton with your finger, a pencil or similar
object. Then the clock will be set precise-
ly on the hour.
For example, if the R button is pressed
whilst the time is between 9:01 and 9:29,
the display will be reset to 9:00.
9:01 ~ 9:29 display changed to 9:00
9:30 ~ 9:59 display changed to 10:00
OTQ047119
WARNING
Do not adjust the clock whilst driv-
ing. You may lose your steering
control and cause an accident that
results in severe personal injury ordeath.
CAUTION
Use the power outlet only when the engine is running and removethe accessory plug after use.Using the accessory plug for pro-
longed periods of time with theengine off could cause the bat- tery to discharge.
Only use 12V electric accessories which are less than 10A in elec-
tric capacity.
Adjust the air-conditioner or heater to the lowest operatinglevel when using the power outlet.
Close the cover when not in use. Some electronic devices can cause electronic interferencewhen plugged into a vehicle’s power outlet. These devices maycause excessive audio static and
malfunctions in other electronicsystems or devices used in your vehicle.
Page 204 of 303
63
What to do in an emergency
3. Passengers must not be allowed toremain inside the vehicle during wheel
changing. If a puncture occurs whilst
the vehicle is on a motorway, the pas-
sengers should take refuge on the
motorway embankment to avoid the
possibility of injury occurring should
the vehicle be struck by other motor-
way traffic.
4. Wheel changing should be performed according to the following instructions.
F020300AEN-UK If engine stalls whilst driving
1. Reduce your speed gradually, keeping a straight line. Move cautiously off the
road to a safe place.
2. Turn on your emergency flashers.
3. Try to start the engine again. If your vehicle will not start, contact a
HYUNDAI authorised repairer or seek
other qualified assistance. F030100AUN-UK If engine cannot be cranked
1. If your car has an automatic transmis-
sion, be sure the gear selector lever is
in N (Neutral) or P (Park) and the
emergency brake is set.
2. Check the battery terminals and con- nections to ensure that these are cleanand also tight.
3. If the ignition warning lights dim when the engine is cranked and the battery
terminals have been checked, a dis-
charged battery is indicated.
4. Do not attempt to push or tow start the vehicle, refer to "Jump Starting" for
information regarding engine starting
when the battery is discharged.
F030200AEN-UK
If engine turns over normally but
does not start
1. Check fuel level.
2. With the ignition switch in the LOCKposition, check all connectors at the
ignition coils and spark plugs.
Reconnect any that may be discon-
nected or loose.
3. Check the fuel line in the engine com- partment.
4. If the engine still does not start, call a HYUNDAI authorised repairer or seek
other qualified assistance.
IF THE ENGINE WILL NOT START
WARNING
If the engine refuses to start, no attempt should be made to push or
tow start the vehicle. Vehicles withautomatic transmission or fuel
injection will not be able to be start-ed in this manner since no drive is
transmitted through the automatictransmission whilst the engine is
not running, and in the case of fuel
injected derivatives, the fuel pump
will not operate under tow start
conditions. In addition, if the vehi-
cle is equipped with an exhaust cat-
alyst, damage to the catalyst may
result if the vehicle is tow started.
Page 220 of 303
7
Engine compartment / 7-2 Maintenance services / 7-4
Owner maintenance / 7-6Scheduled maintenance service / 7-8Explanation of scheduled maintenance items / 7-9Engine oil / 7-12Engine coolant / 7-13Brake and clutch fluid / 7-16
Power steering fluid / 7-17Automatic transmission fluid / 7-18
Washer fluid / 7-20Parking brake / 7-20
Fuel filter / 7-21
Air cleaner / 7-22
Climate control air filter / 7-23
Wiper blades / 7-25Battery / 7-27
Tyres and wheels / 7-30 Fuses / 7-39Light bulbs / 7-49
Appearance care / 7-56
Emission control system / 7-62
Maintenance
Page 221 of 303
Maintenance
2
7
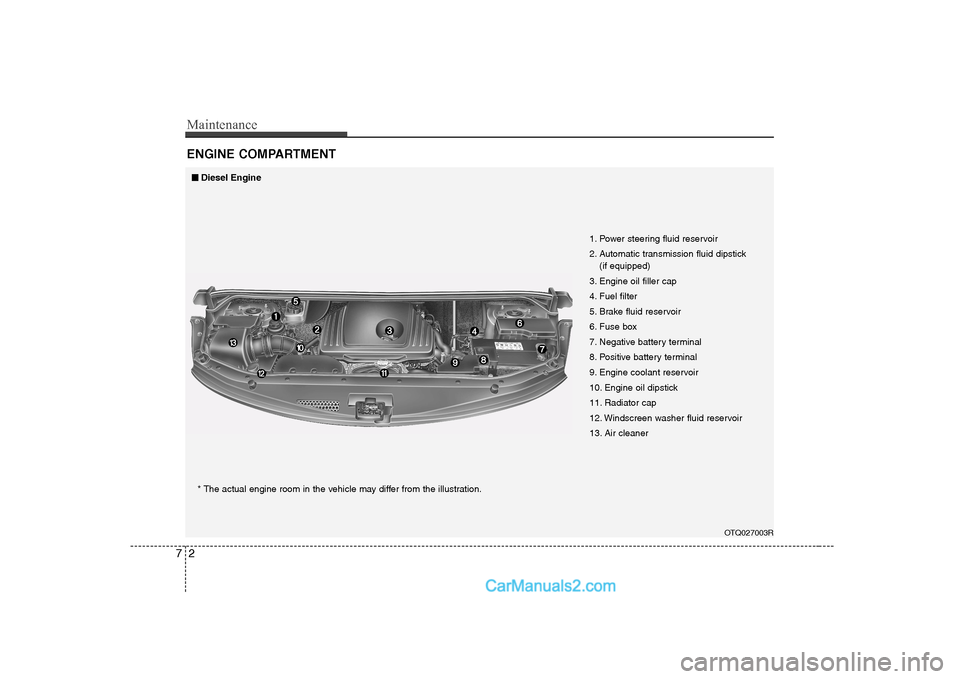
ENGINE COMPARTMENT
OTQ027003R
1. Power steering fluid reservoir
2. Automatic transmission fluid dipstick
(if equipped)
3. Engine oil filler cap
4. Fuel filter
5. Brake fluid reservoir
6. Fuse box
7. Negative battery terminal
8. Positive battery terminal
9. Engine coolant reservoir
10. Engine oil dipstick
11. Radiator cap
12. Windscreen washer fluid reservoir
13. Air cleaner
* The actual engine room in the vehicle may differ from the illustration.
■
■
Diesel Engine