2009 Hyundai H-1 (Grand Starex) ECO mode
[x] Cancel search: ECO modePage 147 of 303
Features of your vehicle
86
4
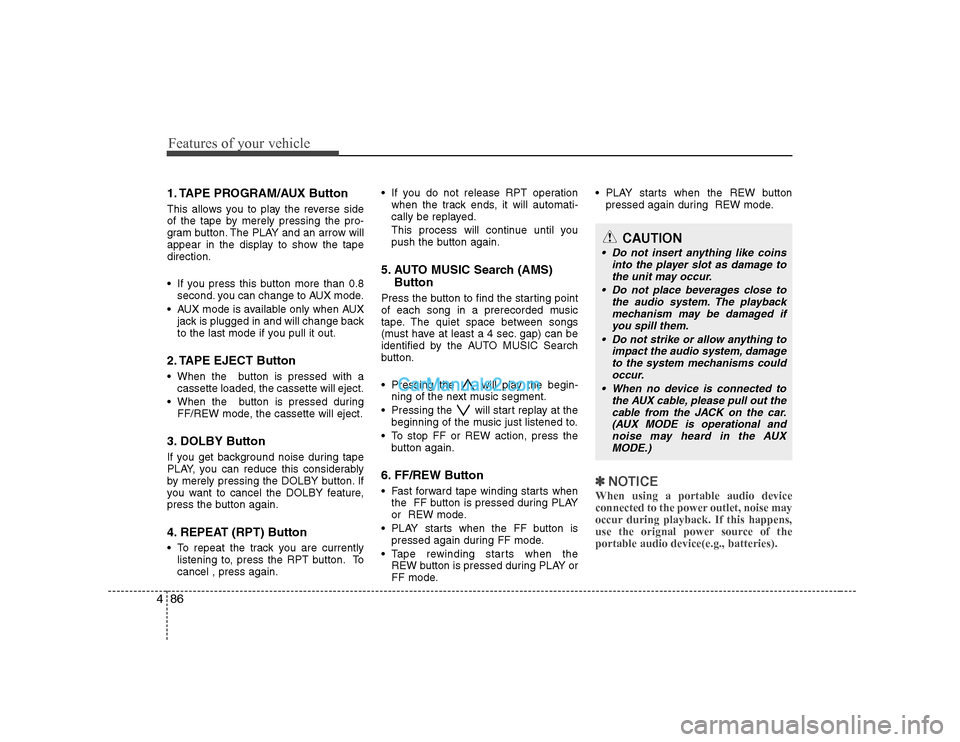
1. TAPE PROGRAM/AUX Button
This allows you to play the reverse side
of the tape by merely pressing the pro-
gram button. The PLAY and an arrow will
appear in the display to show the tapedirection.
If you press this button more than 0.8
second. you can change to AUX mode.
AUX mode is available only when AUX jack is plugged in and will change back
to the last mode if you pull it out.
2. TAPE EJECT Button
When the button is pressed with a cassette loaded, the cassette will eject.
When the button is pressed during FF/REW mode, the cassette will eject.
3. DOLBY Button
If you get background noise during tape
PLAY, you can reduce this considerably
by merely pressing the DOLBY button. If
you want to cancel the DOLBY feature,
press the button again.
4. REPEAT (RPT) Button
To repeat the track you are currently listening to, press the RPT button. To cancel , press again. If you do not release RPT operation
when the track ends, it will automati-
cally be replayed.
This process will continue until you
push the button again.
5. AUTO MUSIC Search (AMS) Button
Press the button to find the starting point
of each song in a prerecorded music
tape. The quiet space between songs
(must have at least a 4 sec. gap) can be
identified by the AUTO MUSIC Search
button.
Pressing the will play the begin- ning of the next music segment.
Pressing the will start replay at the beginning of the music just listened to.
To stop FF or REW action, press the button again.
6. FF/REW Button
Fast forward tape winding starts when the FF button is pressed during PLAY
or REW mode.
PLAY starts when the FF button is pressed again during FF mode.
Tape rewinding starts when the REW button is pressed during PLAY or
FF mode. PLAY starts when the REW button
pressed again during REW mode.
✽✽ NOTICE
When using a portable audio device
connected to the power outlet, noise may
occur during playback. If this happens,
use the orignal power source of theportable audio device(e.g., batteries).
CAUTION
Do not insert anything like coins into the player slot as damage to
the unit may occur.
Do not place beverages close to the audio system. The playbackmechanism may be damaged if
you spill them.
Do not strike or allow anything to impact the audio system, damageto the system mechanisms could
occur.
When no device is connected to the AUX cable, please pull out thecable from the JACK on the car.(AUX MODE is operational and
noise may heard in the AUXMODE.)
Page 149 of 303
Features of your vehicle
88
4
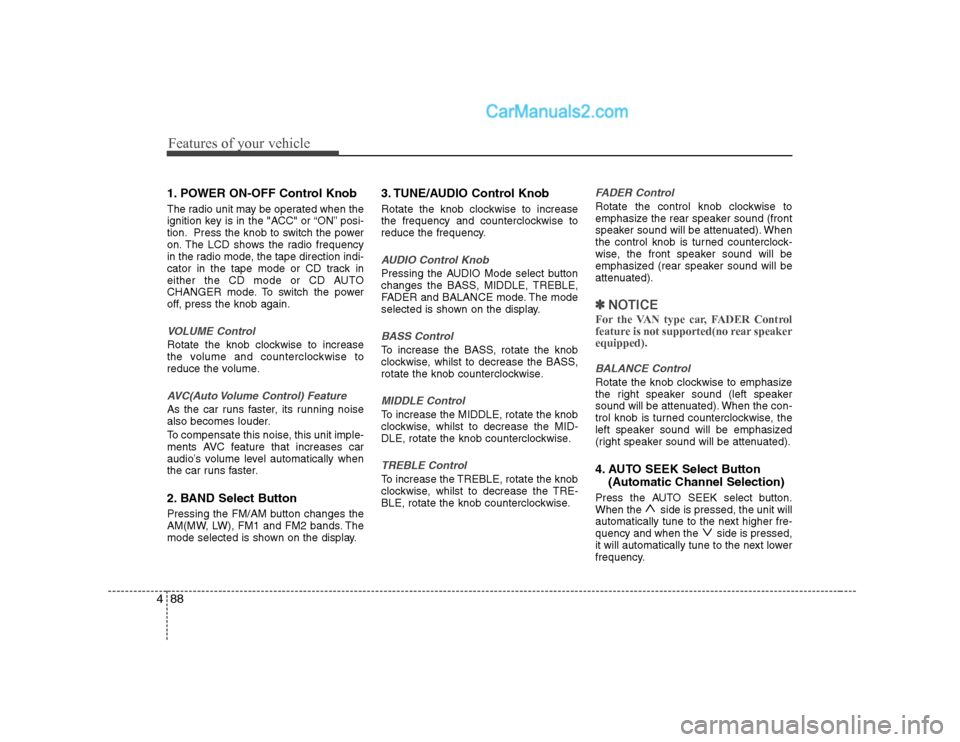
1. POWER ON-OFF Control Knob
The radio unit may be operated when the
ignition key is in the "ACC" or “ON” posi-
tion. Press the knob to switch the power
on. The LCD shows the radio frequency
in the radio mode, the tape direction indi-
cator in the tape mode or CD track in
either the CD mode or CD AUTO
CHANGER mode. To switch the power
off, press the knob again.
VOLUME Control
Rotate the knob clockwise to increase
the volume and counterclockwise to
reduce the volume.
AVC(Auto Volume Control) Feature
As the car runs faster, its running noise
also becomes louder.
To compensate this noise, this unit imple-
ments AVC feature that increases car
audio’s volume level automatically when
the car runs faster.
2. BAND Select Button
Pressing the FM/AM button changes the
AM(MW, LW), FM1 and FM2 bands. The
mode selected is shown on the display. 3. TUNE/AUDIO Control Knob
Rotate the knob clockwise to increase
the frequency and counterclockwise to
reduce the frequency.
AUDIO Control Knob
Pressing the AUDIO Mode select button
changes the BASS, MIDDLE, TREBLE,
FADER and BALANCE mode. The mode
selected is shown on the display.
BASS Control
To increase the BASS, rotate the knob
clockwise, whilst to decrease the BASS,
rotate the knob counterclockwise.
MIDDLE Control
To increase the MIDDLE, rotate the knob
clockwise, whilst to decrease the MID-
DLE, rotate the knob counterclockwise.
TREBLE Control
To increase the TREBLE, rotate the knob
clockwise, whilst to decrease the TRE-
BLE, rotate the knob counterclockwise.
FADER Control
Rotate the control knob clockwise to
emphasize the rear speaker sound (front
speaker sound will be attenuated). When
the control knob is turned counterclock-
wise, the front speaker sound will be
emphasized (rear speaker sound will be
attenuated).
✽✽
NOTICE
For the VAN type car, FADER Control
feature is not supported(no rear speakerequipped).
BALANCE Control
Rotate the knob clockwise to emphasize
the right speaker sound (left speaker
sound will be attenuated). When the con-
trol knob is turned counterclockwise, the
left speaker sound will be emphasized
(right speaker sound will be attenuated).
4. AUTO SEEK Select Button (Automatic Channel Selection)
Press the AUTO SEEK select button.
When the side is pressed, the unit will
automatically tune to the next higher fre-
quency and when the side is pressed,
it will automatically tune to the next lower
frequency.
Page 150 of 303
489
Features of your vehicle
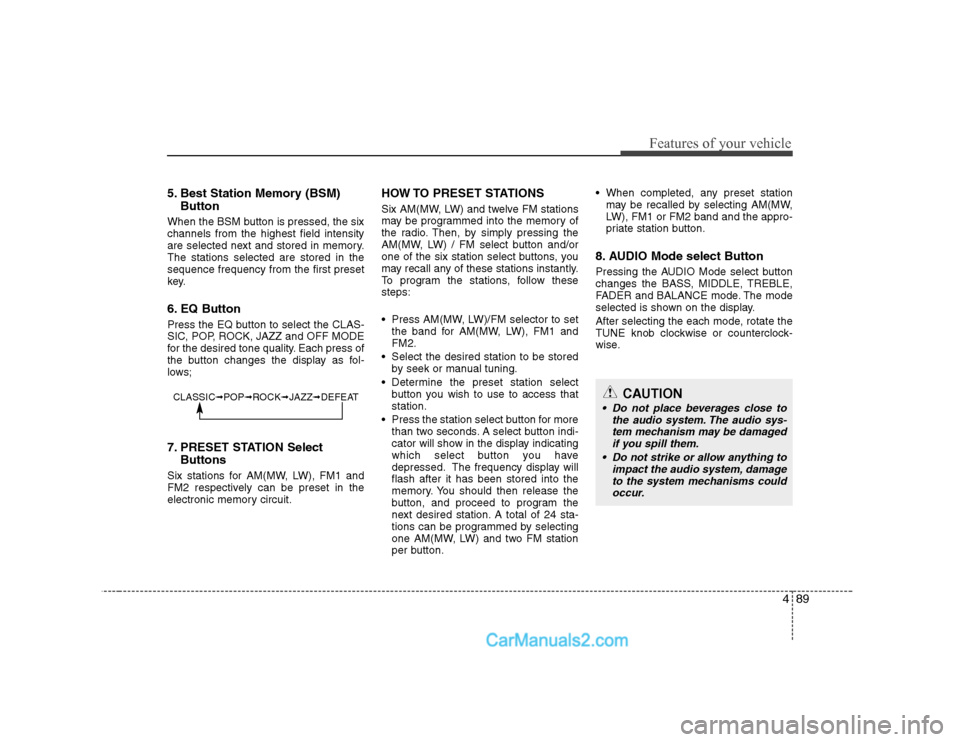
5. Best Station Memory (BSM)Button
When the BSM button is pressed, the six channels from the highest field intensity
are selected next and stored in memory.The stations selected are stored in thesequence frequency from the first preset
key.
6. EQ Button
Press the EQ button to select the CLAS-
SIC, POP, ROCK, JAZZ and OFF MODE
for the desired tone quality. Each press of
the button changes the display as fol-
lows;
7. PRESET STATION Select Buttons
Six stations for AM(MW, LW), FM1 and
FM2 respectively can be preset in the
electronic memory circuit. HOW TO PRESET STATIONS
Six AM(MW, LW) and twelve FM stations
may be programmed into the memory of
the radio. Then, by simply pressing the
AM(MW, LW) / FM select button and/or
one of the six station select buttons, you
may recall any of these stations instantly.
To program the stations, follow thesesteps:
Press AM(MW, LW)/FM selector to set
the band for AM(MW, LW), FM1 and FM2.
Select the desired station to be stored by seek or manual tuning.
Determine the preset station select button you wish to use to access thatstation.
Press the station select button for more than two seconds. A select button indi-
cator will show in the display indicating
which select button you have
depressed. The frequency display willflash after it has been stored into the
memory. You should then release the
button, and proceed to program the
next desired station. A total of 24 sta-
tions can be programmed by selecting
one AM(MW, LW) and two FM station
per button. When completed, any preset station
may be recalled by selecting AM(MW,
LW), FM1 or FM2 band and the appro-
priate station button.
8. AUDIO Mode select Button
Pressing the AUDIO Mode select button
changes the BASS, MIDDLE, TREBLE,
FADER and BALANCE mode. The mode
selected is shown on the display.
After selecting the each mode, rotate the
TUNE knob clockwise or counterclock-
wise.
CLASSIC ➟POP ➟ROCK ➟JAZZ ➟DEFEATCAUTION
Do not place beverages close to
the audio system. The audio sys-tem mechanism may be damaged if you spill them.
Do not strike or allow anything to impact the audio system, damageto the system mechanisms couldoccur.
Page 152 of 303
491
Features of your vehicle
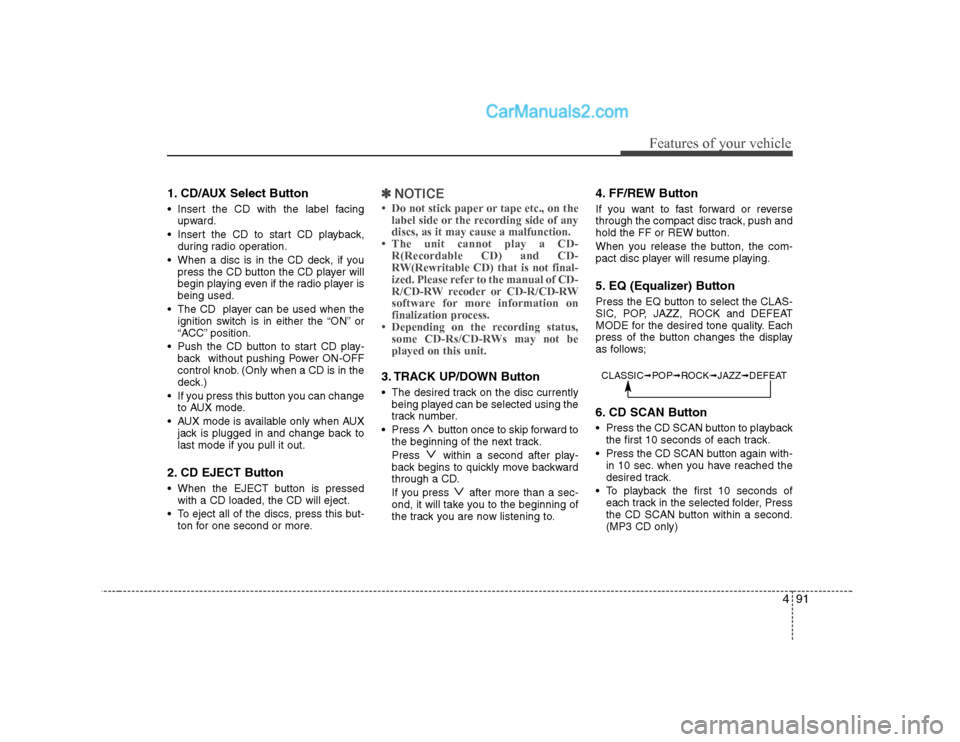
1. CD/AUX Select Button
Insert the CD with the label facingupward.
Insert the CD to start CD playback, during radio operation.
When a disc is in the CD deck, if you press the CD button the CD player will
begin playing even if the radio player isbeing used.
The CD player can be used when the ignition switch is in either the “ON” or
“ACC” position.
Push the CD button to start CD play- back without pushing Power ON-OFF
control knob. (Only when a CD is in the
deck.)
If you press this button you can change to AUX mode.
AUX mode is available only when AUX jack is plugged in and change back to
last mode if you pull it out.
2. CD EJECT Button
When the EJECT button is pressed with a CD loaded, the CD will eject.
To eject all of the discs, press this but- ton for one second or more.✽✽ NOTICE
Page 153 of 303
Features of your vehicle
92
4
7. MARK (Bookmark) Button
When the CD player unit is operating, the
desired track on the disc can be book-
marked by using the MARK button.
Press the MARK button for more than
one second to bookmark the desired
track. "M" will be displayed on the LCD
and "MEMORY NO." will display for
approximately five seconds with a
beep sound. To play the bookmarked
tracks, press the MARK button withinone second and select the book-
marked track to play.
To erase a bookmarked track, press the MARK button for more than one
second. This will erase the bookmarkwith a beep sound.
If you want to delete all tracks stored on
Mark Memory, press FILE SEARCH
knob in the Mark Play mode for more
than one second. You will hear a beep
sound and all tracks will be deleted from
Mark Memory with "MARK DELETE
ALL" displayed on the LCD.
✽✽ NOTICE
Tracks stored on Mark Memory will be
automatically erased after you eject CDsthat contain those tracks.
8. RPT (Repeat) Button
To repeat the track you are currently listening to, press the RPT button. To
cancel, press it again. If it is pressed
for more than one second, it will repeat
all tracks within the currently played
CD.
To repeat the music within currently played folder, press the RPT button for
more than one second. Then it willrepeat in sequential order within the
currently played folder. To cancel,
press it again. (MP3 CD only)
If you do not release RPT operation when the track ends, it will automati-
cally be replayed. This process will
continue until you push the buttonagain.
9. RDM (Random) Button
To listen to the music in random order, press the RDM Button with a beep
sound for more than one second. Tocancel, press it again.
To listen to the music within the cur- rently played folder in random order,press the RDM Button within one sec-ond. To cancel, press it again within one
second. If it is pressed for more than
one second, it will be played in random
order within currently played CD (MP3CD only).
10. FILE SEARCH Knob (TUNE Select Knob)
You can move through the track by turning the FILE SEARCH knob clock-
wise or counterclockwise.
After moving through the desired file, press the FILE SEARCH knob to play-
back in the selected file.
If you do not press the FILE SEARCH knob within five seconds, the filesearching function will be released.
11. FLDR (FOLDER Search) Button
You can move through the folder by pushing the FLDR button to up ( )
and down ( ).
After moving the desired folder, press the FILE SEARCH knob to play back in
the selected folder. If you do not pressthe FILE SEARCH knob within 5 sec-
onds, the folder searching function will
be released. It is not operated in a sin-
gle folder.
Page 183 of 303
529
Driving your vehicle
E100000AFD-UK
Your vehicle's fuel economy depends
mainly on your style of driving, where you
drive and when you drive.
Each of these factors affects how many
miles (kilometers) you can get from a gal-
lon (litre) of fuel. To operate your vehicle
as economically as possible, use the fol-
lowing driving suggestions to help save
money in both fuel and repairs:
Drive smoothly. Accelerate at a moder-ate rate. Don't make "jack-rabbit" starts or full-throttle shifts and maintain a
steady cruising speed. Don't race
between stoplights. Try to adjust your
speed to that of the other traffic so you
don't have to change speeds unneces-
sarily. Avoid heavy traffic whenever
possible. Always maintain a safe dis-
tance from other vehicles so you can
avoid unnecessary braking. This also
reduces brake wear.
Drive at a moderate speed. The faster you drive, the more fuel your car uses.
Driving at a moderate speed, especial-
ly on the highway, is one of the most
effective ways to reduce fuel consump-tion. Don't "ride" the brake or clutch pedal.
This can increase fuel consumption
and also increase wear on these com-
ponents. In addition, driving with your
foot resting on the brake pedal may
cause the brakes to overheat, which
reduces their effectiveness and may
lead to more serious consequences.
Take care of your tyres. Keep them inflated to the recommended pressure.
Incorrect inflation, either too much or
too little, results in unnecessary tyre
wear. Check the tyre pressures at leastonce a month.
Be sure that the wheels are aligned correctly. Improper alignment can
result from hitting kerbs or driving too
fast over irregular surfaces. Poor align-
ment causes faster tyre wear and may
also result in other problems as well as
greater fuel consumption.
Keep your car in good condition. For better fuel economy and reduced
maintenance costs, maintain your carin accordance with the maintenance
schedule. If you drive your car in
severe conditions, more frequent main-tenance is required. Keep your car clean. For maximum
service, your vehicle should be kept
clean and free of corrosive materials. It
is especially important that mud, dirt,
ice, etc. not be allowed to accumulate
on the underside of the car. This extra
weight can result in increased fuel con-
sumption and also contribute to corro-sion.
Travel lightly. Don't carry unnecessary weight in your car. Weight reduces fuel
economy.
Don't let the engine idle longer than necessary. If you are waiting (and not
in traffic), turn off your engine and
restart only when you're ready to go.
Remember, your vehicle does not require extended warm-up. After the
engine has started, allow the engine to
run for 10 to 20 seconds prior to plac-
ing the vehicle in gear. In very cold
weather, however, give your engine a
slightly longer warm-up period.
Don't "labour" or "over-rev" the engine. Labouring is driving too slowly in too
high a gear resulting in the vehicle kan-
garooing. If this happens, shift to a
lower gear. Over-revving is racing the
engine beyond its safe limit. This can
be avoided by shifting at the recom-
mended speeds.
ECONOMICAL OPERATION
Page 199 of 303
545
Driving your vehicle
E140600ATQ-UK
If you do decide to pull a trailer
Here are some important points if you
decide to pull a trailer:
Consider using a sway control. You canask a towbar dealer about sway con- trol.
Do not do any towing with your car dur- ing its first 1,000 miles in order to allow
the engine to properly run-in. Failure to
heed this caution may result in serious
engine or transmission damage.
When towing a trailer, be sure to con- sult a HYUNDAI authorised repairer for
further information on additional
requirements such as a towing kit, etc.
Always drive your vehicle at a moder- ate speed (less than 60 mph (100km/h)).
On a long uphill grade, do not exceed 45 mph (70 km/h) or the posted towing
speed limit, whichever is lower.
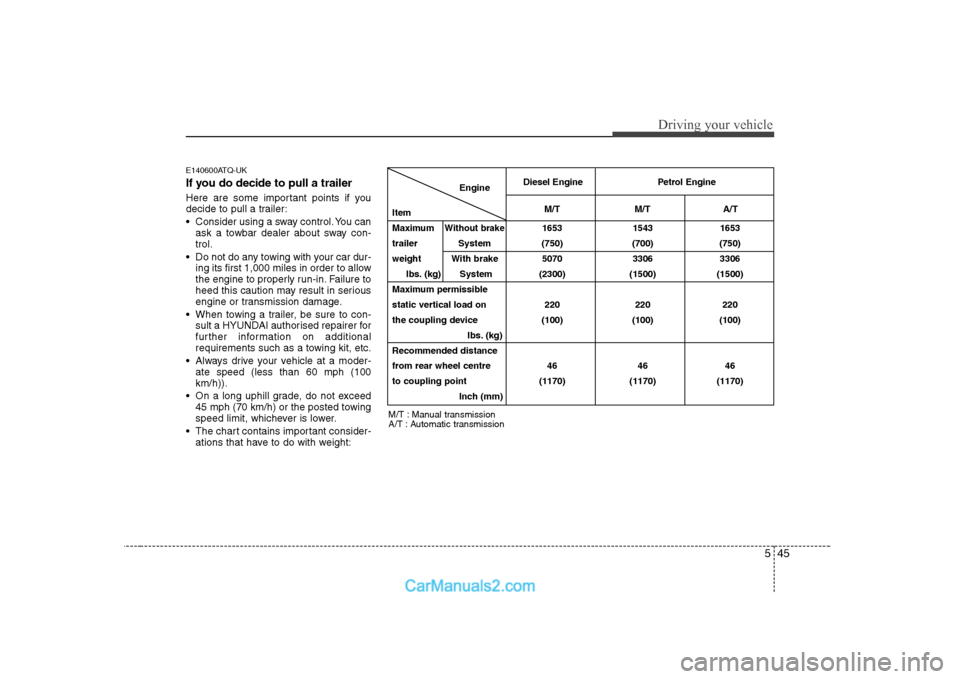
The chart contains important consider- ations that have to do with weight:
Engine
Item
Maximum
Without brake1653 1543 1653
trailer System (750) (700) (750)
weight With brake 5070 3306 3306 Ibs. (kg) System (2300) (1500) (1500)
Maximum permissible
static vertical load on 220 220 220
the coupling device (100) (100) (100) Ibs. (kg)
Recommended distance
from rear wheel centre 46 46 46
to coupling point (1170) (1170) (1170) Inch (mm)
M/T : Manual transmission
A/T : Automatic transmission Diesel Engine Petrol Engine
M/T M/T A/T