Page 205 of 232
6 DO-IT-YOURSELF MAINTENANCE
24
Headlight
1. Allow the bulb to cool. Wear eye protection.
2. Open the engine bonnet and discon- nect the negative (-) post of the battery.
3. Always grasp the bulb by its plastic base, avoid touching the glass.
4. Disconnect the power cord from the
back of the headlight.
o After heavy, driving rain or wash-ing, headlight and taillight lenses could appear frosty. This condi-tion is caused by the temperature difference between the lamp in- side and outside. This is similarto the condensation on your win- dows inside your vehicle during the rain and doesn’t indicate aproblem with your vehicle. If the water leaks into the lamp bulb circuitry, have the vehicle checkedby an authorised Hyundai dealer.
REPLACEMENT OF LIGHT BULBS
G260A01MC-DAT Before attempting to replace a light bulb, be sure the switch is turned to the "OFF" position. The next paragraph shows how to reachthe light bulbs so they may be changed. Be sure to replace the burned-out bulb with one of the same number and watt-age rating. All bulbs are available from your Hyundai dealers Parts Department. See page 6-29 for the wattage descrip-tions.
CAUTION:
o Keep the lamps out of contact with petroleum products, such as oil, petrol, etc.
o If you don't have necessary tools, the correct bulbs and the exper-tise, consult your authorised Hyundai dealer.
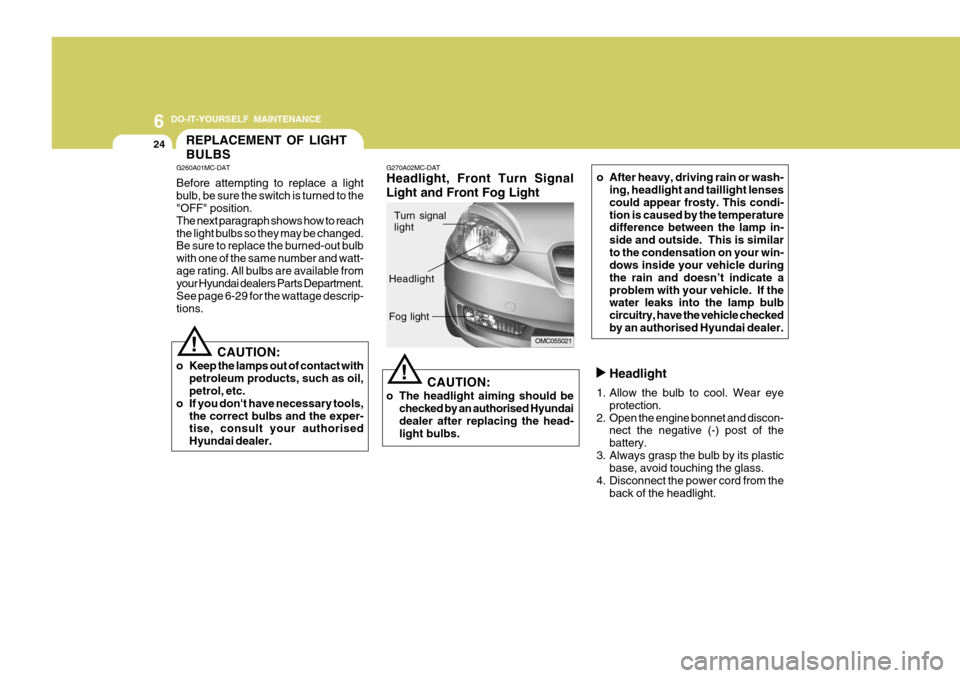
! G270A02MC-DAT Headlight, Front Turn Signal Light and Front Fog Light
CAUTION:
o The headlight aiming should be checked by an authorised Hyundai dealer after replacing the head- light bulbs.
!
OMC055021
Turn signal light
Headlight Fog light
Page 206 of 232
6
DO-IT-YOURSELF MAINTENANCE
25
Front Turn Signal light
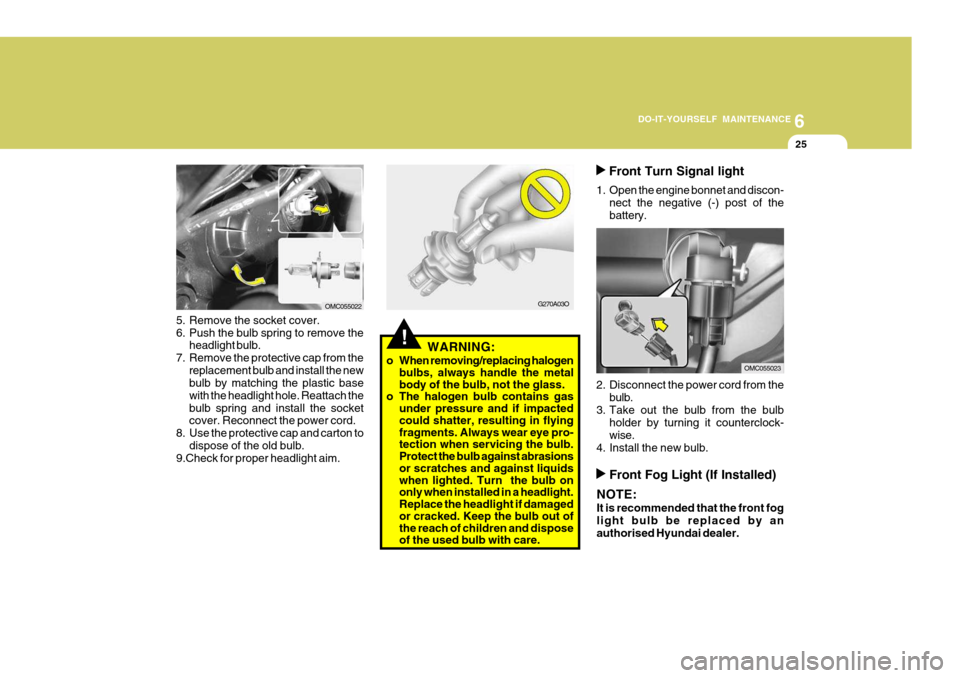
1. Open the engine bonnet and discon- nect the negative (-) post of the battery.
2. Disconnect the power cord from the bulb.
3. Take out the bulb from the bulb holder by turning it counterclock-wise.
4. Install the new bulb.
G270A03O
!WARNING:
o When removing/replacing halogen bulbs, always handle the metal body of the bulb, not the glass.
o The halogen bulb contains gas
under pressure and if impacted could shatter, resulting in flying fragments. Always wear eye pro- tection when servicing the bulb. Protect the bulb against abrasions or scratches and against liquids when lighted. Turn the bulb on only when installed in a headlight. Replace the headlight if damaged or cracked. Keep the bulb out of the reach of children and dispose of the used bulb with care.
5. Remove the socket cover.
6. Push the bulb spring to remove the
headlight bulb.
7. Remove the protective cap from the replacement bulb and install the new bulb by matching the plastic base with the headlight hole. Reattach thebulb spring and install the socket cover. Reconnect the power cord.
8. Use the protective cap and carton to dispose of the old bulb.
9.Check for proper headlight aim.
OMC055022
OMC055023
Front Fog Light (If Installed)
NOTE: It is recommended that the front fog light bulb be replaced by anauthorised Hyundai dealer.
Page 211 of 232
6 DO-IT-YOURSELF MAINTENANCE
30FUSE PANEL DESCRIPTION
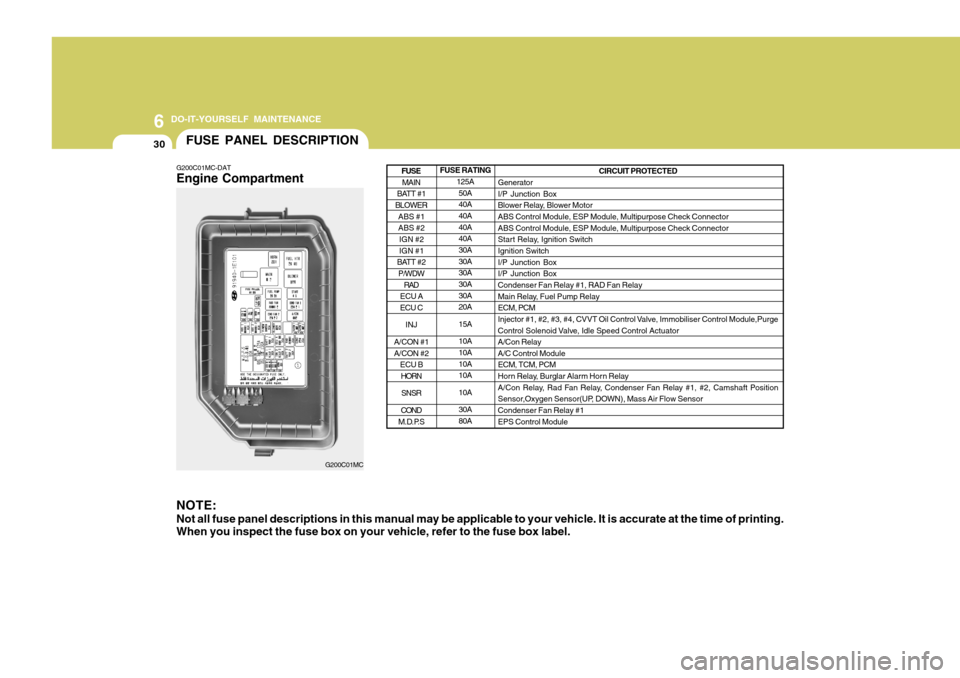
G200C01MC-DAT Engine Compartment NOTE: Not all fuse panel descriptions in this manual may be applicable to your vehicle. It is accurate at the time of printing. When you inspect the fuse box on your vehicle, refer to the fuse box label.
G200C01MC FUSE RATING
125A50A 40A 40A 40A40A 30A 30A30A 30A 30A20A 15A10A 10A 10A10A 10A30A 80A CIRCUIT PROTECTED
GeneratorI/P Junction Box
Blower Relay, Blower MotorABS Control Module, ESP Module, Multipurpose Check Connector ABS Control Module, ESP Module, Multipurpose Check Connector
Start Relay, Ignition SwitchIgnition Switch I/P Junction Box I/P Junction BoxCondenser Fan Relay #1, RAD Fan Relay
Main Relay, Fuel Pump Relay ECM, PCM
Injector #1, #2, #3, #4, CVVT Oil Control Valve, Immobiliser Control Module,Purge
Control Solenoid Valve, Idle Speed Control Actuator A/Con RelayA/C Control ModuleECM, TCM, PCM
Horn Relay, Burglar Alarm Horn Relay
A/Con Relay, Rad Fan Relay, Condenser Fan Relay #1, #2, Camshaft Position
Sensor,Oxygen Sensor(UP, DOWN), Mass Air Flow Sensor Condenser Fan Relay #1 EPS Control Module
MAIN
BATT #1
BLOWER
ABS #1 ABS #2IGN #2 IGN #1
BATT #2 P/WDW
RAD
ECU A ECU C
INJ
A/CON #1 A/CON #2 ECU BHORN
SNSR
COND
M.D.P.S
FUSE
Page 215 of 232
7EMISSION CONTROL SYSTEMS
2EMISSION CONTROL SYS- TEM
H010A01A-DAT Your Hyundai is equipped with an
emission control system to meet all Australian Design Rules(ADR) require- ments.
There are three emission control sys-
tems which are as follows.
1. Crankcase emission control sys-
tem
2. Evaporative emission control sys-
tem
3. Exhaust emission control system
In order to assure the proper function
of the emission control systems, it is recommended that you have your carinspected and maintained by an authorised Hyundai dealer in accor- dance with the maintenance schedulein this manual. H010B01A-AAT
1. Crankcase Emission Control
System
The positive crankcase ventilation
(PCV) system is employed to prevent air pollution caused by blow-by gases being emitted from the crankcase.This system supplies fresh air to the crankcase through the air intake hose. Inside the crankcase, the fresh airmixes with blow-by gases, which then pass through the PCV valve and into the induction system.
H010C03Y-DAT
2. Evaporative Emission Control
System
The Evaporative Emission Control
System is designed to prevent fuelvapours from escaping into the atmo- sphere. H010D01A-AAT
3. Exhaust Emission Control
System
The exhaust emission control system
is a highly effective system whichcontrols exhaust emission while main- taining good vehicle performance.
Canister
Fuel vapors generated inside the fuel
tank are absorbed and stored in theonboard canister. When the engine isrunning, the fuel vapors absorbed in the canister are drawn into the surge tank system through the purge controlsolenoid valve. Purge Control Solenoid Valve
The purge control solenoid valve is
controlled by the ECM (Engine Control Module); when the engine coolant tem- perature is low, and during idling, it closes, so that evaporated fuel is not taken into the engine. After engine warm-up, during ordinary driving, itopens so as to introduce evaporated fuel to the engine.
Page 216 of 232
7
EMISSION CONTROL SYSTEMS
3CATALYTIC CONVERTER
H020A01A-DAT
(If Installed)
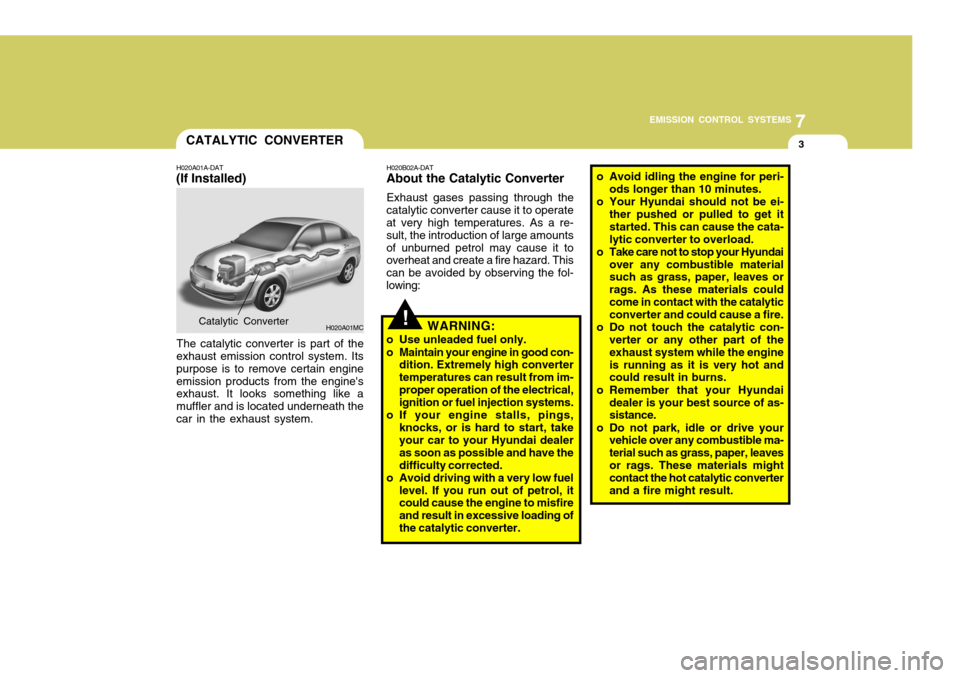
The catalytic converter is part of the
exhaust emission control system. Its purpose is to remove certain engineemission products from the engine's exhaust. It looks something like a muffler and is located underneath thecar in the exhaust system. H020B02A-DAT
About the Catalytic Converter
Exhaust gases passing through the
catalytic converter cause it to operate at very high temperatures. As a re- sult, the introduction of large amountsof unburned petrol may cause it to overheat and create a fire hazard. This can be avoided by observing the fol-lowing:
H020A01MCCatalytic Converter!WARNING:
o Use unleaded fuel only.
o Maintain your engine in good con- dition. Extremely high converter temperatures can result from im-proper operation of the electrical, ignition or fuel injection systems.
o If your engine stalls, pings, knocks, or is hard to start, takeyour car to your Hyundai dealer as soon as possible and have thedifficulty corrected.
o Avoid driving with a very low fuel
level. If you run out of petrol, it could cause the engine to misfire and result in excessive loading ofthe catalytic converter. o Avoid idling the engine for peri-
ods longer than 10 minutes.
o Your Hyundai should not be ei- ther pushed or pulled to get itstarted. This can cause the cata-lytic converter to overload.
o Take care not to stop your Hyundai over any combustible material such as grass, paper, leaves or rags. As these materials couldcome in contact with the catalytic converter and could cause a fire.
o Do not touch the catalytic con- verter or any other part of the exhaust system while the engineis running as it is very hot and could result in burns.
o Remember that your Hyundai dealer is your best source of as-sistance.
o Do not park, idle or drive your vehicle over any combustible ma- terial such as grass, paper, leavesor rags. These materials might contact the hot catalytic converter and a fire might result.
Page 217 of 232
Vehicle Identification Number (VIN) .............................. 8-2
Engine Number ............................................................. 8-3
Vehicle Compliance Plate ............................................. 8-3
Recommended Inflation Pressures .............................. 8-3
Snow Tyres .................................................................. 8-4
Tyre Chains .................................................................. 8-5
Tyre Rotation ................................................................ 8-5
Tyre Balancing .............................................................. 8-6
Tyre Traction ................................................................ 8-6
When to Replace Tyres ................................................ 8-6
Spare Tyre and Tools ................................................... 8-7
8
CONSUMER INFORMATION
8
Page 219 of 232
8
CONSUMER INFORMATION
3TYREVEHICLE COMPLIANCE PLATEENGINE NUMBER
I010B01A-GAT
The engine number is stamped on the engine block as shown in the drawing. I020A01A-DAT TYRE INFORMATION The tyres supplied on your new Hyundai are chosen to provide the best perfor-mance for normal driving.
I010C01MC-DAT A vehicle safety Compliance Plate con- firming that your Hyundai vehicle com-plied with Australian Design Rules ap- plicable at its time of manufacture is located on the left wheel housing of theluggage compartment.
I030A01MC-DAT RECOMMENDED INFLATION PRESSURES The tyre label located on the driver's side of the centre pillar gives the tyrepressures recommended for your car.
OMC065001
OMC079014R
Page 224 of 232
Measurement................................................................ 9-2
Engine ........................................................................... 9-3
Lubrication Chart .......................................................... 9-4
9
VEHICLE SPECIFICATIONS
9