Page 155 of 268

When VSA activates, you may notice
that the engine does not respond to
the accelerator in the same way it
does at other times.
The VSA system cannot enhance the
vehicle’s driving stability in all
situations and does not control your
vehicle’s entire braking system. It is
still your responsibility to drive and
corner at reasonable speeds and to
leave a sufficient margin of safety.When VSA activates, you will see the
VSA activation indicator blink (see
page ).
The vehicle stability assist (VSA)
system helps to stabilize the vehicle
during cornering if the vehicle turns
more or less than desired. It also
assists you in maintaining traction
while accelerating on loose or
slippery road surf aces. It does this
by regulating the engine’s output and
by selectively applying the brakes. If this indicator comes on while
driving, pull to the side of the road
when it is saf e, and turn of f the
engine. Reset the system by
restarting the engine. If the VSA
system indicator stays on or comes
back on while driving, have the VSA
system inspected by your dealer.If the indicator does not come on
when the ignition switch is turned to
the ON (II) position, there may be a
problem with the VSA system. Have
your dealer inspect your vehicle as
soon as possible (see page ).
Without VSA, your vehicle still has
normal braking and cornering ability,
but it does not have VSA traction and
stability enhancement.
The VSA system indicator may come
on along with the ABS indicator if
there is a problem with the anti-lock
brake system.
The main f unction of the
VSA system is generally known as
Electronic Stability Control (ESC).
The system also includes a traction
control f unction. 50
50
VSA A ctivation Indicator
VSA System Indicator
Vehicle Stability A ssist (VSA), aka Electronic Stability Control (ESC), System
152
NOTE:
2009 S2000
Page 175 of 268

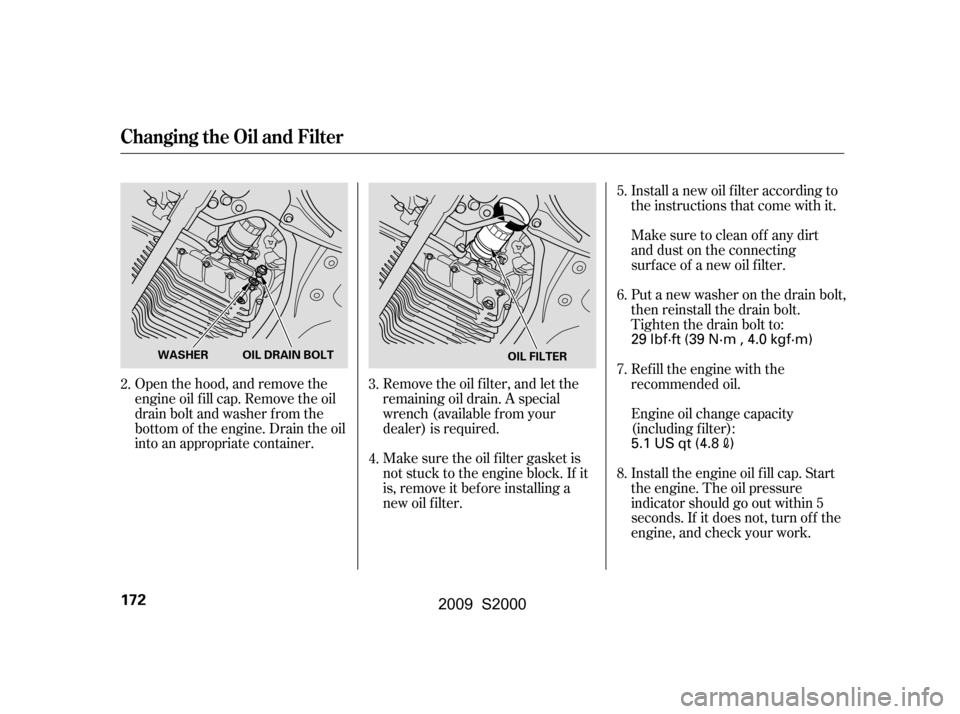
Remove the oil f ilter, and let the
remaining oil drain. A special
wrench (available from your
dealer) is required.
Open the hood, and remove the
engine oil f ill cap. Remove the oil
drain bolt and washer f rom the
bottom of the engine. Drain the oil
into an appropriate container. Install a new oil f ilter according to
the instructions that come with it.
Make sure the oil f ilter gasket is
not stuck to the engine block. If it
is, remove it bef ore installing a
new oil f ilter. Make sure to clean of f any dirt
and dust on the connecting
surf ace of a new oil f ilter.
Install the engine oil f ill cap. Start
the engine. The oil pressure
indicator should go out within 5
seconds. If it does not, turn of f the
engine, and check your work.
Engine oil change capacity
(including f ilter):
Refill the engine with the
recommended oil.
Put a new washer on the drain bolt,
then reinstall the drain bolt.
Tighten the drain bolt to:
2. 3.
4. 5.
6.
7.
8.
Changing the Oil and Filter
172
WASHER OIL DRAIN BOLT
OIL FILTER
5.1 US qt (4.8)
29 lbf·ft (39 N·m , 4.0 kgf·m)
2009 S2000
Page 177 of 268

If the reserve tank is completely
empty, you should also check the
coolant level in the radiator.When the radiator and engine are
cool, relieve any pressure in the
cooling system by turning the
radiator cap counterclockwise,
without pressing down.
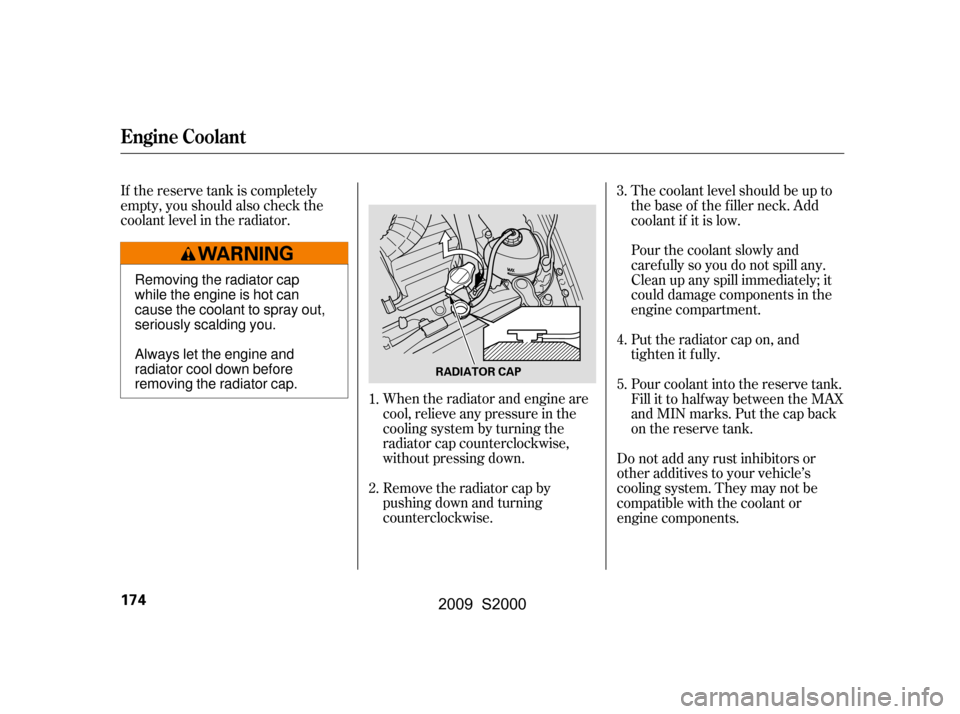
Remove the radiator cap by
pushing down and turning
counterclockwise.The coolant level should be up to
the base of the f iller neck. Add
coolant if it is low.
Pourthecoolantslowlyand
caref ully so you do not spill any.
Clean up any spill immediately; it
could damage components in the
engine compartment.
Put the radiator cap on, and
tighten it fully.
Pour coolant into the reserve tank.
Fill it to half way between the MAX
and MIN marks. Put the cap back
on the reserve tank.
Do not add any rust inhibitors or
other additives to your vehicle’s
cooling system. They may not be
compatible with the coolant or
engine components.
2. 3.
4.
5.
1.
Engine Coolant
174
RADIATOR CAP
Removing the radiator cap
while the engine is hot can
cause the coolant to spray out,
seriously scalding you.
Always let the engine and
radiator cool down before
removing the radiator cap.
2009 S2000
Page 183 of 268

Open the hood.
If you need to change the high
beam headlight bulb on the driver’s
side, remove the coolant reserve
tank f rom its holder by pulling it
straight up.
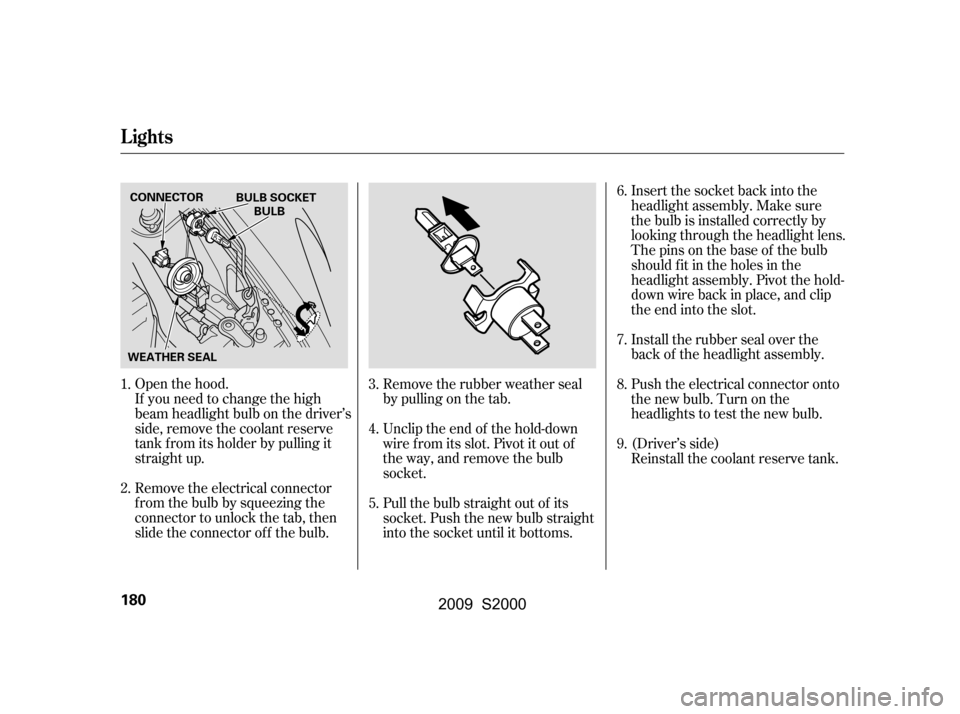
Remove the electrical connector
f rom the bulb by squeezing the
connector to unlock the tab, then
slide the connector of f the bulb.Remove the rubber weather seal
by pulling on the tab.
Unclip the end of the hold-down
wire f rom its slot. Pivot it out of
the way, and remove the bulb
socket.Insert the socket back into the
headlight assembly. Make sure
the bulb is installed correctly by
looking through the headlight lens.
The pins on the base of the bulb
should f it in the holes in the
headlight assembly. Pivot the hold-
down wire back in place, and clip
the end into the slot.
Install the rubber seal over the
back of the headlight assembly.
Push the electrical connector onto
the new bulb. Turn on the
headlights to test the new bulb.
Pull the bulb straight out of its
socket. Push the new bulb straight
into the socket until it bottoms. Reinstall the coolant reserve tank.
(Driver’s side)
1.
2. 3.
4.
5.6.
7.
8.
9.
Lights
180
CONNECTOR
BULB
BULB SOCKET
WEATHER SEAL
2009 S2000
Page 184 of 268
If you are changing the bulb on
the driver’s side, start the engine,
turn the steering wheel all the way
to the right, then turn off the
engine. If you are changing the
bulb on the passenger’s side, turn
the steering wheel to the left.Use a f lat-tipped screwdriver to
remove the three holding clips
f rom the inner f ender.
Pull the inner f ender cover back.
Remove the socket from the
headlight assembly by turning it
one-quarter turn counterclockwise.
Pull the bulb straight out of its
socket.Insert the socket back into the
headlight assembly. Turn it
clockwise to lock it in place.
Install the new bulb in the socket.
Put the inner f ender cover in place.
Install the three holding clips.
Lock each clip in place by pushing
on the center.
Turn on the lights to make sure
the new bulb is working.
1.
2.
3.
4.
5.6.
7.
8.
9.
Replacing Front Turn Signal and
Side Marker/Parking L ight Bulbs
Lights
Maint enance
181
SOCKET
SOCKET BULB
BULB
2009 S2000
Page 185 of 268
Use a small flat-tipped screwdriver
to pry caref ully on the back edge
of the side turn signal assembly
until it pops out of the body.
Turn the bulb holder one-quarter
turn counterclockwise to remove it
from the lens.Pull the bulb straight out of its
socket. Push the new bulb straight
into the socket until it bottoms.
Put the bulb holder back into its
hole in the lens, and turn it
clockwise until it locks.
Turn on the lights to make sure
the new bulb is working.
Put the side turn signal assembly
back into the body, front first.
Push on the back edge until it
snaps into place.
1.
2. 3.
4.
5.
6.
Replacing a Side Turn Signal Bulb
Lights
182
LENS
BULB SOCKET
2009 S2000
Page 186 of 268
Open the trunk.
Remove the fasteners from the
trunk lining. To remove a f astener,
push on the center of the head
until it pops in, then pull the
f astener out.
Pull the lining back.Remove the socket by turning it
one-quarter turn counterclockwise.
Remove the burned out bulb by
pulling it straight out of its socket.
Determine which bulb is burned
out: turn signal or back-up light.
1.
2.
3. 4.
5.
6.
CONT INUED
Replacing Rear Bulbs
Lights
Maint enance
183
SOCKET BULB
2009 S2000
Page 187 of 268

Install the new bulb into the
socket.
Push the socket into the light
assembly, and turn it clockwise
until it locks.Install the trunk lining, and secure
it with the fasteners. To reinstall a
f astener, reset the f astener by
pushing on the pointed end until it
pops back almost f lush with the
f ingers on the housing. Put the
f astener in the hole of the trunk
lining, and push on the center until
it locks (the center is flush with
the head).
Turn on the lights to make sure
the new bulb is working.
If your seat belts get dirty, use a sof t
brush with a mixture of mild soap
and warm water to clean them. Do
not use bleach, dye, or cleaning
solvents. Let the belts air-dry bef ore
you use the vehicle.
Dirt build-up in the loops of the seat
belt anchors can cause the belts to
retract slowly. Wipe the insides of
the loops with a clean cloth
dampened in mild soap and warm
water or isopropyl alcohol.
7.
8.
9.
10. Cleaning the Seat Belts
Lights, Cleaning the Seat Belts
184
2009 S2000