Page 327 of 578
When you press the MENU
SCROLL button while a DVD is
playing, the DVD Menu appears.
ThemenuoptionsareTOPMENU,
MENU, PLAY MODE, SEARCH,
and NumInput.
To go to your selected menu, use theor button to highlight the
icon and press the ENT button. To
return to the DVD video screen,
select EXIT. When you select ‘‘TOP MENU’’, the
screen changes to the DVD’s title
menu. This menu also appears when
you press the MENU SCROLL
button while a DVD is not playing.
To go back to play, press the
RETURN button. Top Menu
When you press the DISP MODE
button while a DVD is playing, the
current status of title, chapter,
elapsed time, angle, subtitle, audio,
and sound characteristics, with the
personal surround logo are displayed.
To return to the DVD video screen,
press the DISP MODE button again.
CONT INUED
Rear Entertainment System
MENU SCROLL Button
DISP MODE Button
Features
323
�����—�����—�
���y�
����
������
�y���
�(�/���������y���������y
2009 Pilot
Page 328 of 578
�Û�Ý
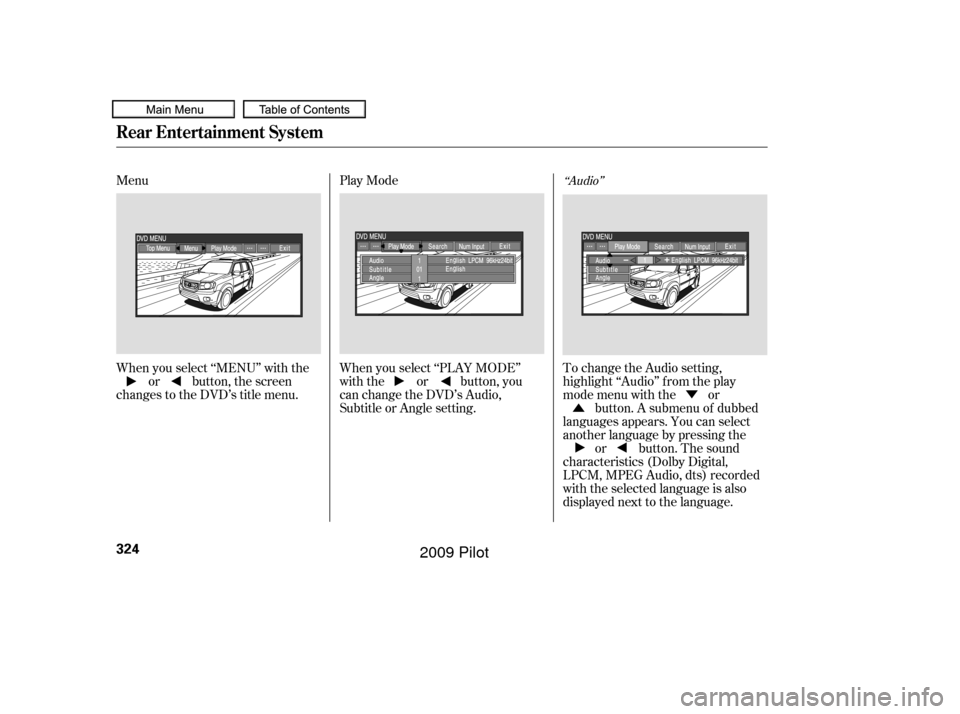
Menu
Play Mode
When you select ‘‘MENU’’ with the or button, the screen
changes to the DVD’s title menu. When you select ‘‘PLAY MODE’’
with the or button, you
can change the DVD’s Audio,
Subtitle or Angle setting.To change the Audio setting,
highlight ‘‘Audio’’ f rom the play
mode menu with the or
button. A submenu of dubbed
languages appears. You can select
another language by pressing the or button. The sound
characteristics (Dolby Digital,
LPCM, MPEG Audio, dts) recorded
with the selected language is also
displayed next to the language.
‘‘Audio’’
Rear Entertainment System
324
�����—�����—�
���y�
����
��������y���
�(�/���������y���������y
2009 Pilot
Page 338 of 578

�Ý�Û
Audio Language
If you select ‘‘Yes,’’ the display
changes to the language code input
mode. Select the f irst number digit
usingthe,,,or button, and press the ENT
button to enter it. Repeat this until all
f our digits are f illed. When the
f ourth digit is entered, the cursor
automatically moves to ‘‘ENT’’ on the
display. Press the ENT button on the
control panel to enter the new
language code. If you made a mistake entering a
number digit, select ‘‘DEL’’ on the
display with the , , ,
or button, and press the ENT
buttononthecontrolpanel.Then
select and enter the correct number
digit as described. The display
returns to the initial ‘‘Language’’
menu screen.
You can select the dubbed language
bef ore playing DVDs.
Select ‘‘Audio Language’’ by pressing
the or button. You will see the
submenu next to ‘‘Audio Language.’’
Follow the same instructions you
used to set the menu language.
Rear Entertainment System
334
�����—�����—�
���y�
����
��������y���
�(�/���������y���������y
2009 Pilot
Page 347 of 578

Thechartontherightexplainsthe
error messages you may see in the
display while playing a disc.
If you see an error message in the
display while playing a disc, press
the eject button. After ejecting the
disc, check it for damage or
deformation. If there is no damage,
insert the disc again.
Theaudiosystemwilltrytoplaythe
disc. If there is still a problem, the
error message will reappear. Press
the eject button, and pull out the disc.
Insert a dif f erent disc. If the new
disc plays, there is a problem with
the f irst disc. If the error message
cycle repeats and you cannot clear it,
take your vehicle to a dealer.Solution
Cause
Error Message
Press the disc eject button, and remove the disc.
Check for an error indication. Insert the disc
again. If the code does not disappear or the disc
cannot be removed, consult your dealer.
Press the disc eject button, and remove the disc.
Check for an error indication. Insert the disc
again. If the code does not disappear or the disc
cannot be removed, consult your dealer.
Will disappear when the temperature returns to
normal.
The disc is not playable in this unit. Eject the
disc, and insert a disc compatible with this
system.
Reinsert the disc, and increase the parental
control level (see page 337).
FOCUS Error
Mechanical Error
High Temperature
Invalid region code
Invalid parental
control level
Rear Entertainment System
DVD Player Error Messages
Features
343
CHECK DISC
MECH ERROR HEAT ERRORREGION ERR
PARENTAL CHECK
�����—�����—�
���y�
����
��������y���
�(�/���������y���������y
2009 Pilot
Page 348 of 578
Some state and local government
agencies prohibit the use of
headphones by the driver of a motor
vehicle. Always obey applicable laws
and regulations.The audio f or the rear entertainment
system is sent to the wireless
headphones that come with the
system. When using the headphones,
make sure you wear them correctly:
L (lef t) and R (right) are marked on
the sides of the frame. Wearing the
headphones backwards may affect
audio reception, limiting the sound
quality and range.To use the headphones, pivot the
earpieces outward. This turns them
on. To adjust the volume, turn the
dial on the bottom of the right
earpiece. When you remove the
headphones, the earpieces
automatically pivot inward, and the
headphones turn of f . When not in
use, store the headphones in the
pocketof eitherfrontseat,orthe
rear door lining pockets.
Wireless Headphones
Rear Entertainment System
344
VOLUME DIAL
�����—�����—�
���y�
����
��������y���
�(�/���������y���������y
2009 Pilot
Page 350 of 578
There are three headphone
connectors f or the third seat
passengers. Each connector has its
own volume control.
The system will accept auxiliary
inputs f rom standard video games
and video equipment.
Some video game power supplies
may cause poor picture quality.
V=Videojack
L = Lef t audio jack
R = Right audio jack
Rear Entertainment System
346
AUXILIARY INPUT JACKS VOLUME DIALS
HEADPHONE CONNECTORS
�����—�����—�
���y�
����
��������y���
�(�/���������y�������
�y
2009 Pilot
Page 351 of 578

The security system automatically
sets 15 seconds after you lock the
doors, the hood, the tailgate, and the
glass hatch. For the system to
activate, you must lock the doors,
thetailgateandtheglasshatchfrom
the outside with the key, driver’s
lock tab, door lock master switch, or
remote transmitter. The security
system indicator on the instrument
panel starts blinking immediately to
show you the system is setting itself . The security system helps to protect
your vehicle and valuables f rom thef t.
The horn sounds and a combination
of headlights, parking lights, side
marker lights and taillights f lashes if
someone attempts to break into your
vehicle or remove the audio unit.
This alarm continues for two
minutes, then the system resets. To
reset an alarming system bef ore the
two minutes have elapsed, unlock
the driver’s door with the key or the
remote transmitter.Once the security system is set,
opening any door, the tailgate, the
glass hatch, or the hood without
using the key or the remote
transmitter will cause the alarm to
sound. It will also sound if the radio
is removed f rom the dashboard or
the wiring is cut.The security system will not set if
the hood, the tailgate, the glass
hatch, or any door is not f ully closed.
If the system will not set, check that
thedoors,thetailgateandthehood
are f ully closed.
Do not attempt to alter this system
or add other devices to it.
Except LX models
Security System
Features
347
SECURITY SYSTEM INDICATOR
�����—�����—�
���y�
����
��������y���
�(�/���������y���������y
2009 Pilot
Page 356 of 578

Turn the selector or TUNE/
SOUND knob to select
‘‘CALIBRATION.’’Press the selector or TUNE/
SOUND knob to enter your
selection. The display shows you
‘‘PUSH CAL START.’’
While setting the compass,
pressing the RETURN button (on
EX and EX-L models) will go back
to the previous display. Pressing
the MENU button will cancel the
compass setting mode.Press the selector or TUNE/
SOUND knob. The compass
display is blinking and the CAL
indicator is shown.
Drive the vehicle slowly in two
complete circles.
When the calibration is successf ully
completed, the CAL indicator goes
of f and the compass display will stop
blinking and show an actual heading.
The audio system is not related to
the compass system. Even if the
compasssystemiscalibrating,the
display returns to the normal display
which you last selected. Do this procedure in an open
area, away f rom buildings, power
lines, and other vehicles. 5.
6.
4.
3.
Compass
352
NOTE:
�����—�����—�
���y�
����
��������y���
�(�/���������y���������y
2009 Pilot