Page 301 of 578

�Î
�ΠThis audio system can operate the
audio f iles on a USB f lash memory
device with the same controls used
f or the in-dash disc changer. To play
a USB f lash memory device, connect
it to the USB adapter cable in the
console compartment, then press the
AUX button. The ignition switch
must be in the ACCESSORY (I) or
ON (II) position.Only AAC f ormat f iles recorded
with iTunes are playable on this
audio unit. Do not keep the USB f lash
memory device in the vehicle.
Direct sunlight and high heat will
damage it.
We recommend backing up your
data bef ore playing a USB f lash
memory device.
Depending on the type and
number of f iles, it may take some
time bef ore they begin to play.
Depending on the sof tware the
f iles were made with, it may not be
possibletoplaysomefiles,or
display some text data.
You can select the AUX mode by
using the navigation system voice
control buttons, but cannot operate
theplaymodefunctions.
The recommended USB f lash
memory devices are 256 Mbyte or
higher USB f lash memory devices.
Some digital audio players may be
compatible as well.
The audio system reads and plays
the audio f iles on the USB f lash
memory device in MP3, WMA or
AAC f ormats. Depending on the
f ormat, the display shows MP3,
WMA or AAC when a USB flash
memory device is playing. The USB
f lash memory device limit is up to
700 f olders or up to 65535 f iles. Some USB f lash memory device
(such as devices with security lock-
out f eatures, etc.) will not work in
this audio unit.
Do not use a device such as a card
reader or hard drive as the device
or your f iles may be damaged.
Do not connect your USB f lash
memory device using a HUB.
Do not use an extension cable to
the USB adapter cable equipped
with your vehicle.
:
CONT INUED
To Play a USB Flash Memory
Device
Voice Cont rol Syst em
Playing a USB Flash Memory Device (Models with navigation system)
Features
297
NOTE:
�����—�����—�
���y�
���������
���y���
�(�/���������y���������y
2009 Pilot
Page 316 of 578
 button to set the time back to
the previous")
You can quickly set the time to the
nearest hour. If the displayed time is
bef ore the half hour, press and hold
the CLOCK button, then press the R
(reset) button to set the time back to
the previous hour. If the displayed
time is af ter the half hour, the same
procedure sets the time f orward to
the beginning of the next hour.
For example: 1:06 will reset to 1:001:52 will reset to 2:00
The navigation system receives
signals f rom the global positioning
system (GPS), and the displayed
time is updated automatically by the
GPS. Ref er to the navigation system
manual f or how to adjust the time.
If your vehicle’s battery is
disconnected or goes dead, you may
need to set the clock.
To set the time, press the CLOCK
button until you hear a beep. The
displayed time begins to blink. Change the hours by pressing the H
(hour) button until the numbers
advance to the desired time. Change
the minutes by pressing the M
(minute) button until the numbers
advance to the desired time.
Press the CLOCK button again to
enter the set time.
Except Touring models
On Touring models
Setting the Clock
312
HOUR BUTTON
(PRESET 4)
CLOCK
BUTTONEX and EX-L models
RESET
BUTTON
(PRESET 6) HOUR
BUTTON
(PRESET 4) MINUTE
BUTTON
(PRESET 5)
MINUTE BUTTON
(PRESET 5) SELECTOR KNOB
MENU BUTTON
EX-L model with rear
entertainment system is shown.
LX models
CLOCK BUTTON
RESET BUTTON
(PRESET 6)
�����—�����—�
���y�
�������������y���
�(�/���������y�����
���y
2009 Pilot
Page 317 of 578
�Ú
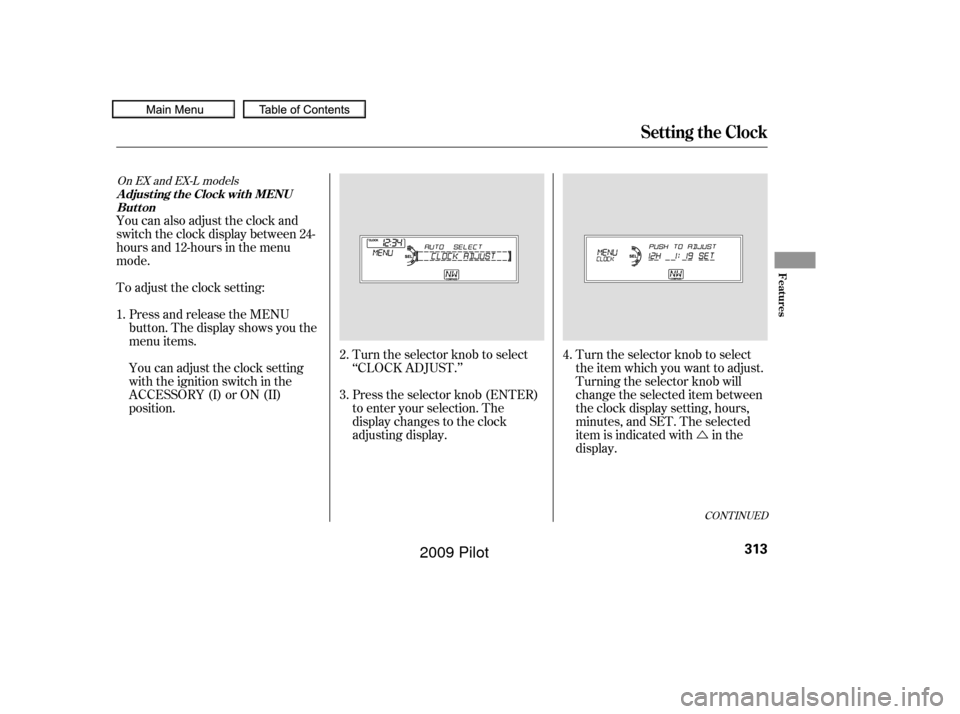
Turn the selector knob to select
‘‘CLOCK ADJUST.’’
Press the selector knob (ENTER)
to enter your selection. The
display changes to the clock
adjusting display. Turn the selector knob to select
the item which you want to adjust.
Turning the selector knob will
change the selected item between
the clock display setting, hours,
minutes, and SET. The selected
item is indicated with in the
display.
You can also adjust the clock and
switch the clock display between 24-
hours and 12-hours in the menu
mode.
To adjust the clock setting:
Press and release the MENU
button. The display shows you the
menu items.
You can adjust the clock setting
with the ignition switch in the
ACCESSORY (I) or ON (II)
position.
1.
2.
3.4.
CONT INUED
On EX and EX-L models
Setting the Clock
Adjusting the Clock with MENU
Button
Features
313
�����—�����—�
���y�
���������
���y���
�(�/���������y�����
���y
2009 Pilot
Page 318 of 578

To set the time, turn the selector
knob and select the hours or the
minutes, then press the knob to
enter your selection. The display
changes to the setting display.
Turn the selector knob up or down
to count the numbers up or down.
Press the selector knob (ENTER)
to enter your selection. The
display will return to the clock
adjusting display.While setting the clock, pressing
the RETURN button will go back
to the previous display.
Pressing the MENU button again
will cancel this setting mode.
Turn the selector knob to change
the setting between 12H and 24H.
Press the selector knob (ENTER)
to enter your selection. The
display will return to the clock
adjusting display. To enter the clock setting, turn
the selector knob to select ‘‘SET,’’
then press the knob. The display
will return to the menu item
display.
Press either the RETURN or
MENUbuttontogobacktothe
normal display.
5.
6.
7.
8.
9.10.
11.
Setting the Clock
314
MINUTE SETTING
�����—�����—�
���y�
�������������y���
�(�/���������y�����
���y
2009 Pilot
Page 349 of 578
CONT INUED
Auxiliary input jacks and headphone
connectors f or the rear
entertainment system are on the
back of the center console
compartment.
Remove the battery. Install the new
battery in the earpiece as shown in
the diagram next to the battery slot.
Slide the cover back into place on the
earpiece, then press down on the
back edge to lock it in place.
Each headphone uses one AAA
battery. The battery is under the
cover on the lef t earpiece. To
remove the cover, insert a coin in the
slot and twist it slightly to pry the
cover away f rom the earpiece. Pull
the cover outward, and pivot it out of
the way.
An improperly disposed of battery
can hurt the environment.
Always conf irm local regulations f or
battery disposal.
Rear Entertainment System
Replacing Bat t eriesAuxiliary Input Jacks
Features
345
COVER
BATTERY
TAB
�����—�����—�
���y�
����
��������y���
�(�/���������y���������y
2009 Pilot
Page 351 of 578

The security system automatically
sets 15 seconds after you lock the
doors, the hood, the tailgate, and the
glass hatch. For the system to
activate, you must lock the doors,
thetailgateandtheglasshatchfrom
the outside with the key, driver’s
lock tab, door lock master switch, or
remote transmitter. The security
system indicator on the instrument
panel starts blinking immediately to
show you the system is setting itself . The security system helps to protect
your vehicle and valuables f rom thef t.
The horn sounds and a combination
of headlights, parking lights, side
marker lights and taillights f lashes if
someone attempts to break into your
vehicle or remove the audio unit.
This alarm continues for two
minutes, then the system resets. To
reset an alarming system bef ore the
two minutes have elapsed, unlock
the driver’s door with the key or the
remote transmitter.Once the security system is set,
opening any door, the tailgate, the
glass hatch, or the hood without
using the key or the remote
transmitter will cause the alarm to
sound. It will also sound if the radio
is removed f rom the dashboard or
the wiring is cut.The security system will not set if
the hood, the tailgate, the glass
hatch, or any door is not f ully closed.
If the system will not set, check that
thedoors,thetailgateandthehood
are f ully closed.
Do not attempt to alter this system
or add other devices to it.
Except LX models
Security System
Features
347
SECURITY SYSTEM INDICATOR
�����—�����—�
���y�
����
��������y���
�(�/���������y���������y
2009 Pilot
Page 360 of 578

�µIf you are training the second or
third buttons, go directly to step 1.
Holdtheendof thegaragedoor
opener remote transmitter 1 to 3
inches f rom HomeLink. Make
sure you are not blocking your
view of the red indicator in
HomeLink.
Refer to the safety information that
came with your garage door opener
to test that the safety features are
f unctioning properly. If you do not
have this information, contact the
manuf acturer of the equipment.
Bef ore programming HomeLink to a
garage door or gate opener, make
sure that people and objects are out
of thewayof thedevicetoprevent
potential injury or damage.
When programming a garage door
opener, park just outside the garage. If you just
received your vehicle and have not
trained any of the buttons in
HomeLink bef ore, you should erase
any previously learned codes bef ore
training the f irst button.
Todothis,pressandholdthetwo
outside buttons on the HomeLink
transceiver for about 20 seconds,
until the red indicator f lashes.
Release the buttons, then proceed to
step 1. 1.
HomeL inkUniversal Transceiver
Important Saf ety Precautions T raining HomeL ink
Bef ore you begin
356
RED INDICATOR
�����—�����—�
���y�
����
������
�y���
�(�/���������y�������
�y
2009 Pilot
Page 370 of 578

Many commands can be spoken
together. For example, you can
say, ‘‘Dial
123-456-7891.’’
To enter a string of numbers in a
Call or Dial command, you can say
them all at once, or you can
separate them in blocks of 3, 4, 7,
10, and 11.
To skip a voice prompt, press the
Talk button while the HFL is
speaking. The HFL will then begin
listening f or your next command. To go back one step in a command
process, say, ‘‘Go back,’’ or press
the Back button.
If nothing is said while the HFL is
listening f or a command, the HFL
will time out and stop its voice
recognition. The next time you
press the Talk button, the HFL
begins listening f rom the point at
which it timed out.
To end a command sequence at
any time, press and hold the Back
button, or press and release the
Talk button, wait f or the beep, and
say, ‘‘Cancel.’’ The next time you
press the Talk button, the HFL
begins f rom its main menu.
When you f inish a command
sequence, the HFL goes back to
its main menu. For example, when
you store the name, ‘‘Eric,’’ the
HFL response is, ‘‘Eric has been
stored.’’ The next time you press
the Talk button, you will be at the
main menu.
To hear a list of available options
at any time, press the Talk button,
wait f or the beep, and say, ‘‘Hands
f ree help.’’
BluetoothHandsFreeL ink
366
�����—�����—�
���y�
����
����
���y���
�(�/���������y�������
�y
2009 Pilot