Page 6 of 532
�Î�Î
�Î
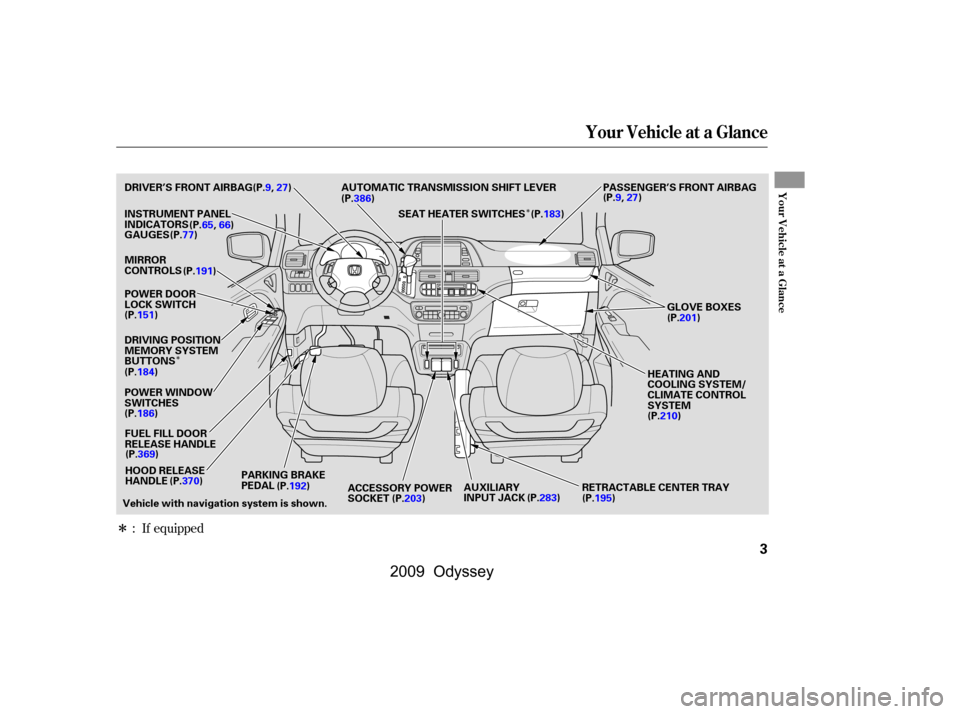
: If equipped
Your Vehicle at a Glance
Your Vehicle at a Glance
3
PASSENGER’S FRONT AIRBAG
(P.9,27)
(P.65,66)
(P.77)
DRIVER’S FRONT AIRBAG
INSTRUMENT PANEL
INDICATORS
GAUGES
MIRROR
CONTROLS
POWER DOOR
LOCK SWITCH
FUEL FILL DOOR
RELEASE HANDLE
POWER WINDOW
SWITCHES GLOVE BOXES
HEATING AND
COOLING SYSTEM/
CLIMATE CONTROL
SYSTEM
PARKING BRAKE
PEDAL RETRACTABLE CENTER TRAY
AUXILIARY
INPUT JACK
(P.191)
(P.151)
DRIVING POSITION
MEMORY SYSTEM
BUTTONS
(P.184)
(P.186) AUTOMATIC TRANSMISSION SHIFT LEVER
(P.201)
(P.210)
ACCESSORY POWER
SOCKET (P.195)
(P.283)
(P.203)
HOOD RELEASE
HANDLE
Vehicle with navigation system is shown. (P.192) (P.9,27)
SEAT HEATER SWITCHES (P.183)
(P.386)
(P.369) (P.370)
�����—�����—���
�y�
�
��
��������y���
�(�����������y���������y
2009 Odyssey
Page 7 of 532

�Î
�Î
�Î
�Î
�Î
�Î
�Î
�Î
�Î�Î �Î
�Î
�Î
�Î
�Î
�Î
To use the horn, press the center pad of the steering wheel.
Only on vehicles equipped with navigation system. Ref er to the navigation system manual.
1:
2:
If equipped
3:
Your Vehicle at a Glance
4
VEHICLE STABILITY
ASSIST (VSA) OFF
SWITCH WINDSHIELD WIPERS/WASHERS
PASSENGER
AIRBAG OFF
INDICATOR
CRUISE CONTROL
BUTTONS
HAZARD WARNING
BUTTONREAR WINDOW
DEFOGGER
BUTTON
HORN (P.35)
NAVIGATION
SYSTEM
BUTTONS
VEHICLE STABILITY
ASSIST (VSA) OFF
SWITCH
STEERING WHEEL
ADJUSTMENTLIGHT
CONTROL
SWITCH
REAR WINDOW WIPER/WASHER
(P.162)
(P.282) (P.141) (P.134)
(P.135)
(P.319)
(P.140) (P.140)
(P.221,285)
(P.205)
PEDAL POSITION
ADJUSTMENT SWITCH
POWER SLIDING
DOOR SWITCH
MOONROOF
SWITCH
PARKING SENSOR
SYSTEM SWITCH
REMOTE AUDIO
CONTROL BUTTONS
AUDIO SYSTEM/
REAR
ENTERTAINMENT
SYSTEM
CLOCK
HEADLIGHTS/TURN SIGNAL/
FOG LIGHTS
(P.193)
(P.189) (P.281)
(P.135,138)
MULTI-INFORMATION
BUTTONS (P.82)
POWER TAILGATE
SWITCH (P.158)/
(P.395)
(P.361) (P.395) BLUETOOTH
HANDSFREELINKBUTTONS(P.327)
1
2
3
3
3
33 3
3
3
3
3
3
�\f���—�\f���—���
�y�
�
��
����\f�
�y���
�(���������\f�y�\f�\f�\f���y
2009 Odyssey
Page 19 of 532

The f ront seats and second row seats
have adjustable seat belt anchors. To
adjust the height of an anchor,
squeeze the two release buttons, and
slide the anchor up or down as
needed (it has f our positions).This could cause
very serious injuries in a crash.
If a seat belt does not seem to work
as it should, it may not protect the
occupant in a crash.
Using a seat
belt that is not working properly can
result in serious injury or death.
Have your dealer check the belt as
soon as possible.
See page f or additional
inf ormation about your seat belts
and how to take care of them.
Pull out the anchor latch and the
latch plate from the holding slots in
the ceiling, and pull out the seat belt
to extend it.
Theplus-oneseatthatcanbe
installed in the center seating
position of the second row also has a
detachable seat belt.
21
Except U.S. LX and Canadian DX
models
Using t he L ap/Shoulder Belt in t he
Cent er Posit ion of t he T hird Row
Never place t he shoulder port ion of a
lap/shoulder belt under your arm orbehind your back.
No one should sit in a seat wit h aninoperat ive seat belt .
Protecting A dults and Teens
16
RELEASE
BUTTONS LATCH
PLATE
ANCHOR
LATCH
�\f���—�\f���—���
�y�
�
��
��������y���
�(���������\f�y�\f�\f���
�y
2009 Odyssey
Page 67 of 532
�Î
�Î�Î
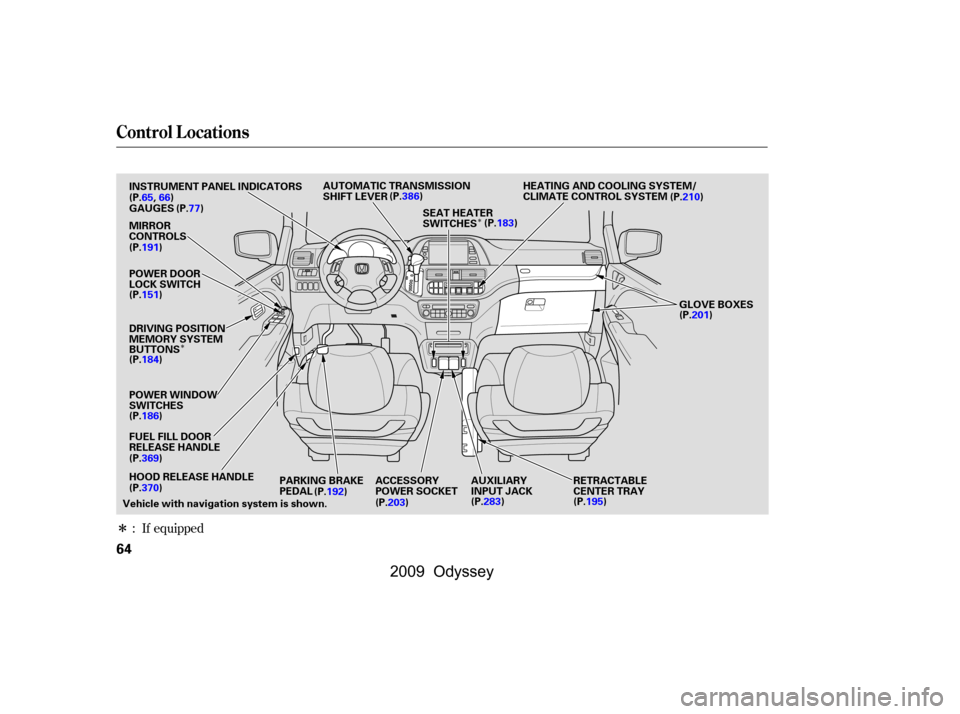
: If equipped
Control L ocations
64
RETRACTABLE
CENTER TRAY
PARKING BRAKE
PEDAL ACCESSORY
POWER SOCKETAUXILIARY
INPUT JACK
Vehicle with navigation system is shown. (P.192)
(P.203) (P.283)
(P.195)
AUTOMATIC TRANSMISSION
SHIFT LEVER
(P.183) (P.210)
INSTRUMENT PANEL INDICATORS
(P.65,66)
GAUGES
MIRROR
CONTROLS
(P.191)
POWER DOOR
LOCK SWITCH
(P.151)
DRIVING POSITION
MEMORY SYSTEM
BUTTONS
(P.184)
POWER WINDOW
SWITCHES
(P.186)
FUEL FILL DOOR
RELEASE HANDLE
HOOD RELEASE HANDLE (P.77)
GLOVE BOXES
(P.201)
HEATING AND COOLING SYSTEM/
CLIMATE CONTROL SYSTEM
(P.386)
(P.369)
(P.370) SEAT HEATER
SWITCHES
�\f���—�\f���—���
�y�
�
�������
���y���
�(���������\f�y�\f�\f�����y
2009 Odyssey
Page 84 of 532

When you unlock and open the
driver’s door with the remote
transmitter, the display shows
‘‘Welcome DRIVER 1’’ or ‘‘Welcome
DRIVER 2’’ depending on which
remote transmitter you use. The
driver’s ‘‘ID’’ is detected by the
transmitter. For more information
about driver’s ‘‘ID’’, see page .If you use the key to unlock the
driver’s door, the display only shows
‘‘Welcome.’’ This means the system
cannot recognize either ‘‘DRIVER 1’’
or ‘‘DRIVER 2.’’ In this case, you
cannot use the customized settings
on the multi-information display (see
page ).
When you turn the ignition switch to
the ACCESSORY (I) position, the
display shows ‘‘Goodbye.’’
The multi-inf ormation display in the
instrument panel displays various
inf ormation and messages when the
ignition switch is in the ON (II)
position. Some of the messages help
you operate your vehicle more
comf ortably. Others help to keep
you aware of the periodic
maintenance your vehicle needs f or
continued trouble-f ree driving.
You can also customize some vehicle
control settings to your liking with
the multi-inf ormation display and the
two buttons on the steering wheel
(see page ).
101
149
101
CONT INUED
On Touring modelsNormal Display Messages
Multi-Inf ormation Display
Inst rument s and Cont rols
81
�\f���—�\f���—���
�y�
�
�����������y���
�(���������\f�y�\f�\f�����y
2009 Odyssey
Page 136 of 532

�Î�Î
�Î
�Î �Î
�Î �Î �Î�Î
�Î
�Î
�Î
�Î
�Î
�Î
�ÎOnly on vehicles equipped with navigation system. Ref er to the navigation system manual.
To use the horn, press the center pad of the steering wheel.
1:
2:
3: If equipped
Controls Near the Steering Wheel
Inst rument s and Cont rols
133
HAZARD WARNING
BUTTON
WINDSHIELD WIPERS/WASHERS
REAR WINDOW WIPER/WASHER
CRUISE CONTROL
BUTTONS
VEHICLE STABILITY
ASSIST (VSA) OFF
SWITCH PASSENGER
AIRBAG OFF
INDICATOR
LIGHT CONTROL
SWITCH
STEERING WHEEL
ADJUSTMENT (P.35)
NAVIGATION
SYSTEM
BUTTONS HORN
(P.193)
(P.189) (P.282)
(P.352) (P.141) (P.134)
(P.135)
(P.319)
(P.281)
(P.140)
(P.221,285)
(P.205) REAR WINDOW
DEFOGGER BUTTON
(P.140)
PEDAL POSITION
ADJUSTMENT SWITCH
POWER SLIDING DOOR
SWITCH
MOONROOF SWITCH
POWER TAILGATE
SWITCHPARKING SENSOR
SYSTEM SWITCH MULTI-INFORMATION
BUTTONSAUDIO SYSTEM/
REAR
ENTERTAINMENT
SYSTEM
CLOCK
HEADLIGHTS/TURN SIGNAL/
FOG LIGHTS
(P.162)
(P.158)/
(P.82)
(P.135,138)
REMOTE AUDIO
CONTROL BUTTONS (P.395)
VEHICLE STABILITY
ASSIST (VSA) OFF
SWITCH (P.395) BLUETOOTH
HANDSFREELINKBUTTONS (P.327)
2 1
3
3 3
3 3 33
3
3
3
3
�\f���—�\f���—���
�y�
�
����
������y���
�(���������\f�y�\f�
�����y
2009 Odyssey
Page 152 of 532

Avoid dropping or throwing the
transmitter.
Protect the transmitter from
extreme temperature.
Do not immerse the transmitter in
any liquid.
If you lose a transmitter, the
replacement needs to be
reprogrammed by your dealer.
Each remote transmitter activates
the driver’s seat position memory
system (see page ) and
customized vehicle control settings
(see page ). When you open the
driver’s door af ter unlocking it with
the remote transmitter, the driver’s
seat and outside mirrors move to the
positions stored in memory. You will
hear two beeps when the movement is completed.
The driving position memory
activation (Driver 1, Driver 2) is
shownonthebackof each
transmitter. Make sure you store
your seat and outside mirror
positions in the memory that is
activated by the transmitter you
normally carry.
You can turn off this system
activation with the remote
transmitter. Press and hold the
LOCK and UNLOCK buttons at the
same time. The LED in the remote
transmitter will blink twice. Then
release the buttons, and press the
LOCK or UNLOCK button.
To turn the keyless memory settings
back on, repeat this procedure. The
LED will come on f or 1 second to
indicate the feature has been turned
on.
184
101
On Touring models
Recalling a Memorized Seat
Position Remote Transmitter Care
Remote Transmitter
Inst rument s and Cont rols
149
With Driver 2
With Driver 1
�����—�����—���
�y�
�
�����������y���
�(�����������y���
�����y
2009 Odyssey
Page 180 of 532
Both seats can be removed to give
more cargo capacity.
Toinstallthefloormatinanouter
position or the center position, insert
thetabsintotheslitsonthefloor,
then snap the two buttons in place.
Ref er to the illustrations above.
Do not remove the seats while
driving.
To remove a second row seat:
Pull up the seat-back angle
adjustment lever, and fold the
seat-back forward.
1.
CONT INUED
Removing the Bucket Seats in the
Second Row
Seats
Inst rument s and Cont rols
177
SLITS
Outer position
SLIT
Center position
SEAT-BACK LEVER
TABS
TAB TABS
BUTTONS
BUTTONSTAB
LOCK RELEASE LEVER
�\f���—�\f���—���
�y�
�
�������\f���y���
�(���������\f�y�\f�
�����y
2009 Odyssey