Page 6 of 532
�Î�Î
�Î
: If equipped
Your Vehicle at a Glance
Your Vehicle at a Glance
3
PASSENGER’S FRONT AIRBAG
(P.9,27)
(P.65,66)
(P.77)
DRIVER’S FRONT AIRBAG
INSTRUMENT PANEL
INDICATORS
GAUGES
MIRROR
CONTROLS
POWER DOOR
LOCK SWITCH
FUEL FILL DOOR
RELEASE HANDLE
POWER WINDOW
SWITCHES GLOVE BOXES
HEATING AND
COOLING SYSTEM/
CLIMATE CONTROL
SYSTEM
PARKING BRAKE
PEDAL RETRACTABLE CENTER TRAY
AUXILIARY
INPUT JACK
(P.191)
(P.151)
DRIVING POSITION
MEMORY SYSTEM
BUTTONS
(P.184)
(P.186) AUTOMATIC TRANSMISSION SHIFT LEVER
(P.201)
(P.210)
ACCESSORY POWER
SOCKET (P.195)
(P.283)
(P.203)
HOOD RELEASE
HANDLE
Vehicle with navigation system is shown. (P.192) (P.9,27)
SEAT HEATER SWITCHES (P.183)
(P.386)
(P.369) (P.370)
�����—�����—���
�y�
�
��
��������y���
�(�����������y���������y
2009 Odyssey
Page 7 of 532

�Î
�Î
�Î
�Î
�Î
�Î
�Î
�Î
�Î�Î �Î
�Î
�Î
�Î
�Î
�Î
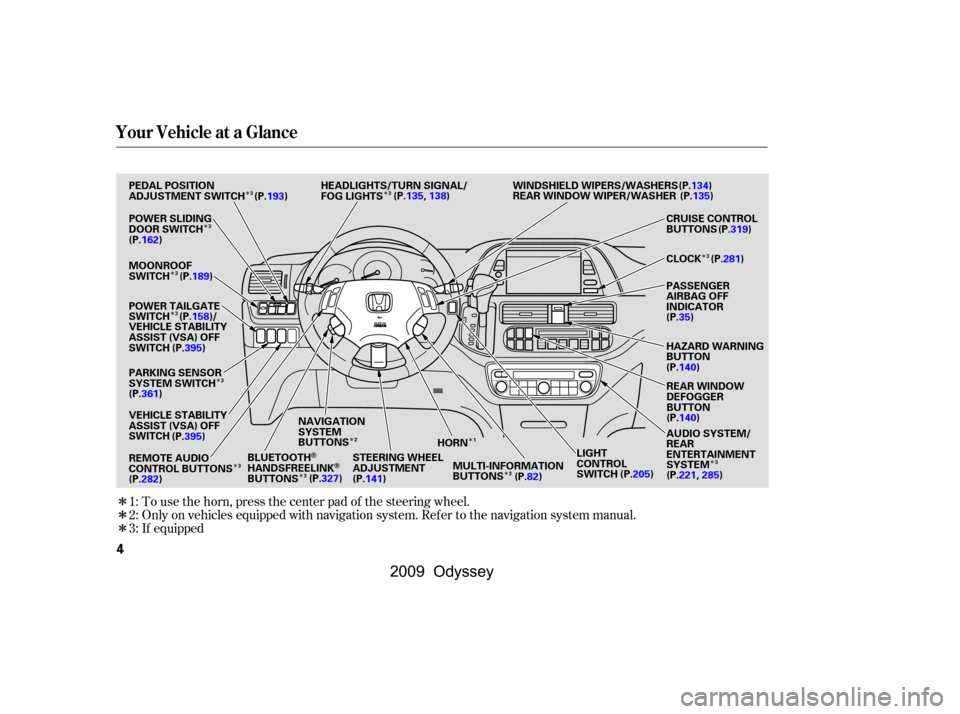
To use the horn, press the center pad of the steering wheel.
Only on vehicles equipped with navigation system. Ref er to the navigation system manual.
1:
2:
If equipped
3:
Your Vehicle at a Glance
4
VEHICLE STABILITY
ASSIST (VSA) OFF
SWITCH WINDSHIELD WIPERS/WASHERS
PASSENGER
AIRBAG OFF
INDICATOR
CRUISE CONTROL
BUTTONS
HAZARD WARNING
BUTTONREAR WINDOW
DEFOGGER
BUTTON
HORN (P.35)
NAVIGATION
SYSTEM
BUTTONS
VEHICLE STABILITY
ASSIST (VSA) OFF
SWITCH
STEERING WHEEL
ADJUSTMENTLIGHT
CONTROL
SWITCH
REAR WINDOW WIPER/WASHER
(P.162)
(P.282) (P.141) (P.134)
(P.135)
(P.319)
(P.140) (P.140)
(P.221,285)
(P.205)
PEDAL POSITION
ADJUSTMENT SWITCH
POWER SLIDING
DOOR SWITCH
MOONROOF
SWITCH
PARKING SENSOR
SYSTEM SWITCH
REMOTE AUDIO
CONTROL BUTTONS
AUDIO SYSTEM/
REAR
ENTERTAINMENT
SYSTEM
CLOCK
HEADLIGHTS/TURN SIGNAL/
FOG LIGHTS
(P.193)
(P.189) (P.281)
(P.135,138)
MULTI-INFORMATION
BUTTONS (P.82)
POWER TAILGATE
SWITCH (P.158)/
(P.395)
(P.361) (P.395) BLUETOOTH
HANDSFREELINKBUTTONS(P.327)
1
2
3
3
3
33 3
3
3
3
3
3
�\f���—�\f���—���
�y�
�
��
����\f�
�y���
�(���������\f�y�\f�\f�\f���y
2009 Odyssey
Page 19 of 532

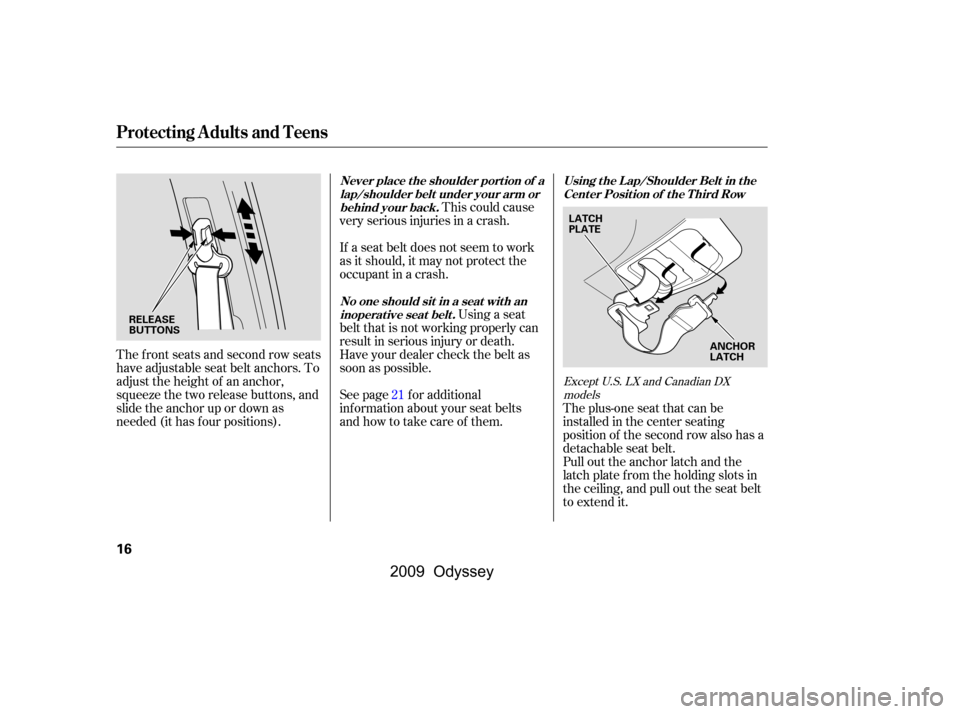
The f ront seats and second row seats
have adjustable seat belt anchors. To
adjust the height of an anchor,
squeeze the two release buttons, and
slide the anchor up or down as
needed (it has f our positions).This could cause
very serious injuries in a crash.
If a seat belt does not seem to work
as it should, it may not protect the
occupant in a crash.
Using a seat
belt that is not working properly can
result in serious injury or death.
Have your dealer check the belt as
soon as possible.
See page f or additional
inf ormation about your seat belts
and how to take care of them.
Pull out the anchor latch and the
latch plate from the holding slots in
the ceiling, and pull out the seat belt
to extend it.
Theplus-oneseatthatcanbe
installed in the center seating
position of the second row also has a
detachable seat belt.
21
Except U.S. LX and Canadian DX
models
Using t he L ap/Shoulder Belt in t he
Cent er Posit ion of t he T hird Row
Never place t he shoulder port ion of a
lap/shoulder belt under your arm orbehind your back.
No one should sit in a seat wit h aninoperat ive seat belt .
Protecting A dults and Teens
16
RELEASE
BUTTONS LATCH
PLATE
ANCHOR
LATCH
�\f���—�\f���—���
�y�
�
��
��������y���
�(���������\f�y�\f�\f���
�y
2009 Odyssey
Page 25 of 532

All seat belts have an emergency
locking retractor. In normal driving,
the retractor lets you move f reely in
your seat while it keeps some
tension on the belt. During a collision
or sudden stop, the retractor
automatically locks the belt to help
restrain your body.
The seat belts in all positions except
the driver’s have a lockable retractor
that must be activated to secure a
child seat (see page ).
The lap/shoulder belt goes over
your shoulder, across your chest,
and across your hips.
To fasten the belt, insert the latch
plate into the buckle, then tug on the
belt to make sure the buckle is
latched (see page f or how to
properly position the belt).
If the indicator comes on or the
beeper sounds when the driver’s seat
belt is latched and there is no f ront
seat passenger and no items on the
front seat, something may be
interf ering with the monitoring
system. Look f or and remove:
To unlock the belt, press the red
PRESSbuttononthebuckle.Guide
the belt across your body so that it
retracts completely. Af ter exiting the
vehicle, be sure the belt is out of the
way and will not get closed in the
door.
Any items under the f ront
passenger’s seat.
Any object(s) hanging on the seat
or in the seat-back pocket.
If no obstructions are f ound, have
your vehicle checked by a dealer. Any objects, such as a f olded-down
second row seat, that is touching
the rear of the seat-back.
52
15
L ap/Shoulder Belt
Additional Inf ormation About Your Seat Belts
22
�����—�����—���
�y�
�
��
����
���y���
�(�����������y���������y
2009 Odyssey
Page 51 of 532

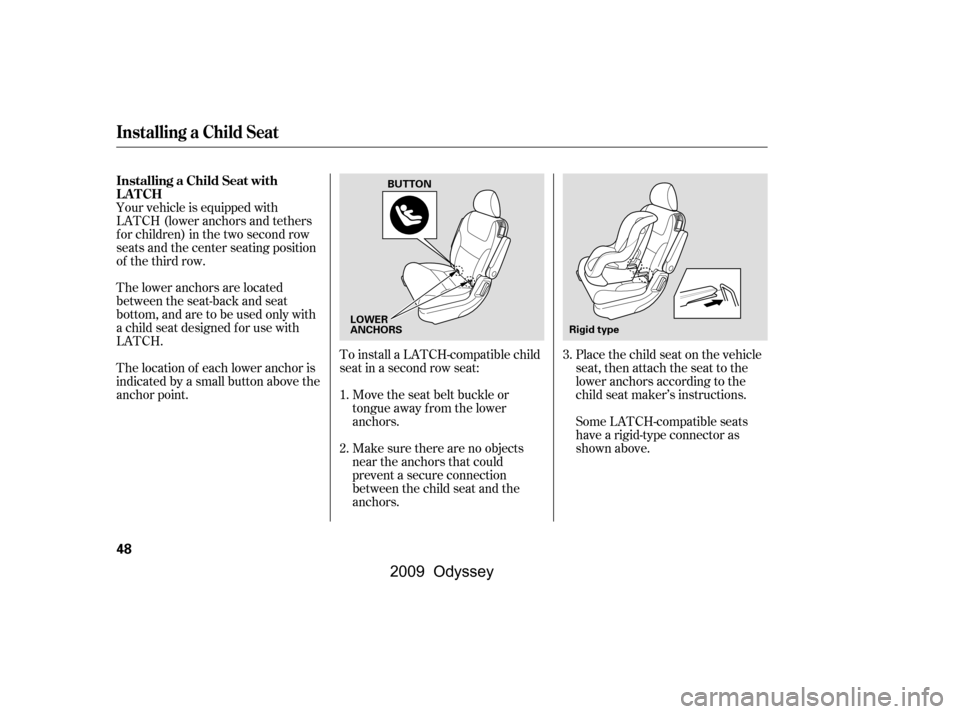
Place the child seat on the vehicle
seat, then attach the seat to the
lower anchors according to the
child seat maker’s instructions.
The lower anchors are located
between the seat-back and seat
bottom, and are to be used only with
a child seat designed f or use with
LATCH.
The location of each lower anchor is
indicated by a small button above the
anchor point.
Some LATCH-compatible seats
have a rigid-type connector as
shown above.
To install a LATCH-compatible child
seat in a second row seat:
Make sure there are no objects
near the anchors that could
prevent a secure connection
between the child seat and the
anchors.
Move the seat belt buckle or
tongue away f rom the lower
anchors.
Your vehicle is equipped with
LATCH (lower anchors and tethers
f or children) in the two second row
seats and the center seating position
of the third row.
1.
2.3.
Installing a Child Seat with
LATCH
Installing a Child Seat
48
LOWER
ANCHORS BUTTON
Rigid type
�\f���—�\f���—���
�y�
�
��
��������y���
�(���������\f�y�\f�\f�����y
2009 Odyssey
Page 53 of 532
To install a LATCH-compatible child
seat in the center seating position of
the third row:Unlatch the detachable seat belt
anchor latch and retract the seat
belt all the way into the ceiling.
Place the latch plate and anchor
latch in their holding slots (see
page ).
The location of each lower anchor is
indicated by a small button above the
anchor point.Followsteps1through4of the
second row installation on pages and . The center seating position of the
third row has an anchorage point on
the tailgate sill.
Slide the anchor cover to open it.
1.
2.3.
4849
16
Installing a Child Seat
50
ANCHORAGE POINT
BUTTON
LOWER ANCHORS
�\f���—�\f���—���
�y�
�
����\f��\f���y���
�(���������\f�y�\f�\f�����y
2009 Odyssey
Page 66 of 532

This section gives inf ormation about
the controls and displays that
contribute to the daily operation of
your vehicle. All the essential
controls are within easy reach............................
Control Locations .64
............................
Instrument Panel .65
..........
Instrument Panel Indicators .67
.............................................
Gauges .77
.............
Multi-Inf ormation Display .81
Controls Near the Steering
.........................................
Wheel .133Windshield Wipers and
.................................
Washers .134
Rear Window Wiper and ...................................
Washer .135
.........
Turn Signal and Headlights .135
......
Instrument Panel Brightness .139
...............
Hazard Warning Button .140
...............
Rear Window Def ogger .140
........
Steering Wheel Adjustment .141
.............................
Keys and Locks .142
......................
Immobilizer System .143
..............................
Ignition Switch .144
.....................
Remote Transmitter .145
Opening or Closing the Power .........................
Sliding Doors .148
Opening or Closing the Power ..................................
Tailgate .148
....................................
Door Locks .151
....................
Power Door Locks .151
Auto Door Locking/
..............................
Unlocking .152
............
Childproof Door Locks .157
..........................................
Tailgate .157
..........................
Power Tailgate .158
.................................
Sliding Doors .161
...............................................
Seats .167..................................
Seat Heaters .183
Driving Position Memory ........................................
System .184
............................
Power Windows .186
.......................................
Moonroof .189
...........................................
Mirrors .190
...............................
Parking Brake .192
.
Adjustable Driver’s Foot Pedals .193
.........
Interior Convenience Items .194
..........
Retractable Center Tray .195
.....................
Beverage Holders .195
................
Integrated Sunshade .197
....................
Sunglasses Holder .197
................
Conversation Mirror .198
...................................
Sun Visor .198
............................
Vanity Mirror .199
...................
Rear Compartment .199
................
Second Row Console .199
...............
In-Floor Storage Area .200
..............................
Glove Boxes .201
...........................
Center Pocket .202
...............................
Coin Pocket .202
........
Accessory Power Sockets .203
.......................
AC Power Outlet .203
...............................
Interior Lights .205
Instruments and Controls
Inst rument s and Cont rols
63
�\f���—�\f���—���
�y�
�
�������\f���y���
�(���������\f�y�\f�\f�����y
2009 Odyssey
Page 67 of 532
�Î
�Î�Î
: If equipped
Control L ocations
64
RETRACTABLE
CENTER TRAY
PARKING BRAKE
PEDAL ACCESSORY
POWER SOCKETAUXILIARY
INPUT JACK
Vehicle with navigation system is shown. (P.192)
(P.203) (P.283)
(P.195)
AUTOMATIC TRANSMISSION
SHIFT LEVER
(P.183) (P.210)
INSTRUMENT PANEL INDICATORS
(P.65,66)
GAUGES
MIRROR
CONTROLS
(P.191)
POWER DOOR
LOCK SWITCH
(P.151)
DRIVING POSITION
MEMORY SYSTEM
BUTTONS
(P.184)
POWER WINDOW
SWITCHES
(P.186)
FUEL FILL DOOR
RELEASE HANDLE
HOOD RELEASE HANDLE (P.77)
GLOVE BOXES
(P.201)
HEATING AND COOLING SYSTEM/
CLIMATE CONTROL SYSTEM
(P.386)
(P.369)
(P.370) SEAT HEATER
SWITCHES
�\f���—�\f���—���
�y�
�
�������
���y���
�(���������\f�y�\f�\f�����y
2009 Odyssey