Page 373 of 532
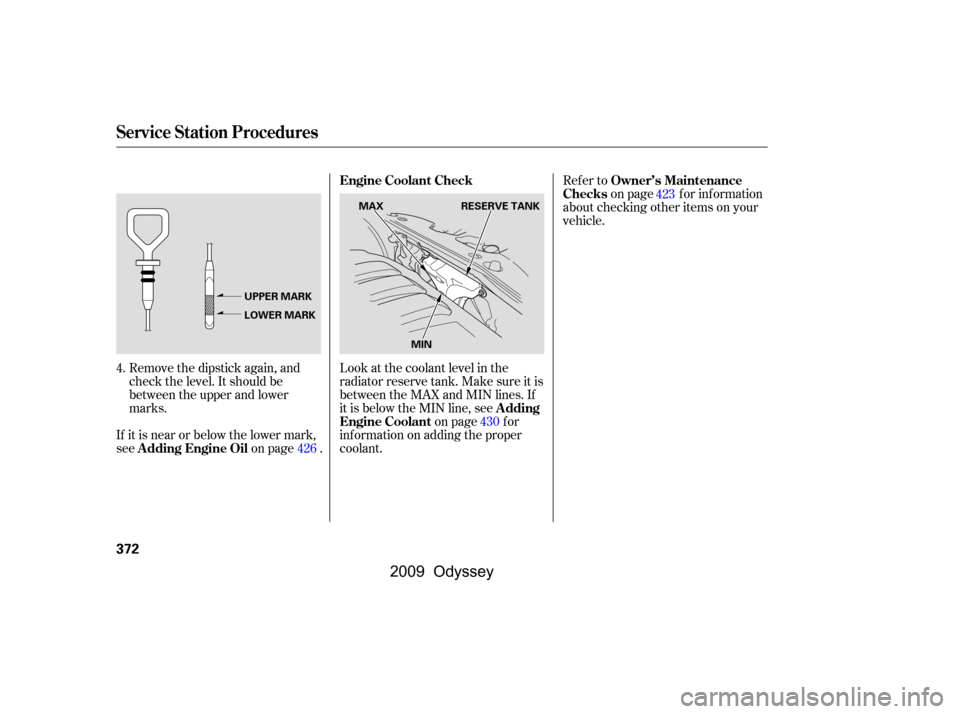
Park the vehicle, and set the
parking brake. Pull the hood
release handle located under the
lower lef t corner of the dashboard.
The hood will pop up slightly.
Screw the f uel f ill cap back on
until it clicks at least once.
Stop f illing the tank af ter the f uel
nozzle automatically clicks of f . Do
not try to ‘‘top off’’ the tank. This
leaves some room in the f uel tank
for the fuel to expand with
temperature changes.
If you do not properly tighten the
cap, you will see a ‘‘CHECK FUEL
CAP’’ message on the inf ormation
display (see page ).
even
though the tank is not full, there may
be a problem with your vehicle’s f uel
vapor recovery system. The system
helps keep f uel vapor f rom going
into the atmosphere. Try f illing at
another pump. If this does not f ix the
problem, consult your dealer. If you do not properly tighten the
cap, you will see a ‘‘TIGHTEN
FUEL CAP’’ message on the multi-
inf ormation display (see page
).
Push the f uel f ill door closed until
it latches. 1.
6.
5.
4.
80
92
If the f uel nozzle keeps clicking of f On LX, EX, EX-L and Canadian DX
models
On Touring models
Service Station Procedures
Opening and Closing the Hood
370
HOOD RELEASE HANDLE
Pull
�\f���—�\f���—���
�y�
����\f��������y���
�(���������\f�y�\f�������y
2009 Odyssey
Page 374 of 532
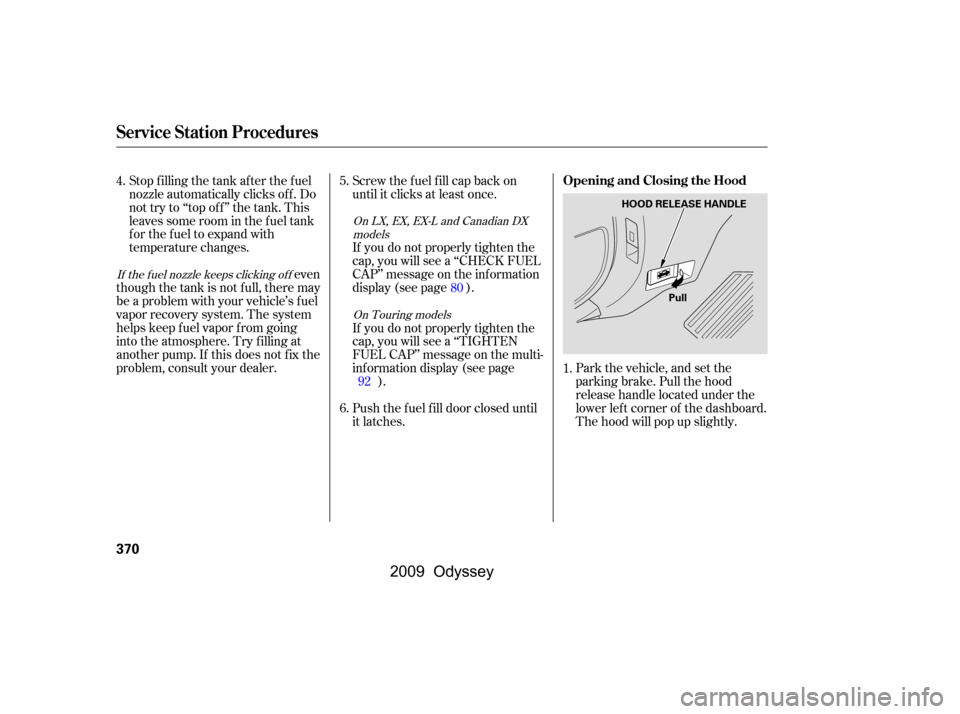
Park the vehicle on a level surf ace.
Holding the grip, pull the support
rod out of its clip. Insert the end
into the designated hole in the
hood.
To close the hood, lif t it up slightly to
remove the support rod f rom the
hole. Put the support rod back into
its holding clip. Lower the hood to
about a f oot (30 cm) above the
f ender, then let it drop. Make sure it
is securely latched.
Put your f ingers under the f ront
edge of the hood. The hood latch
handle is above the ‘‘H’’ logo. Pull
this handle until it releases the
hood, then lif t the hood.
If the hood latch handle moves stif f ly,
or you can open the hood without
lif ting the handle, the mechanism
should be cleaned and lubricated. Wait a f ew minutes af ter turning the
engine of f bef ore you check the oil.
Remove the dipstick (orange loop).
Wipe of f the dipstick with a clean
cloth or paper towel.
Insert the dipstick all the way back
into its hole.
1.
3.
2.
3.
2.
CONT INUED
Service Station Procedures
Oil Check
Bef ore Driving
371
DIPSTICK
SUPPORT ROD
GRIP
LATCH
�\f���—�\f���—���
�y�
����\f��������y���
�(���������\f�y�\f�������y
2009 Odyssey
Page 375 of 532
Refer toon page f or inf ormation
about checking other items on your
vehicle.
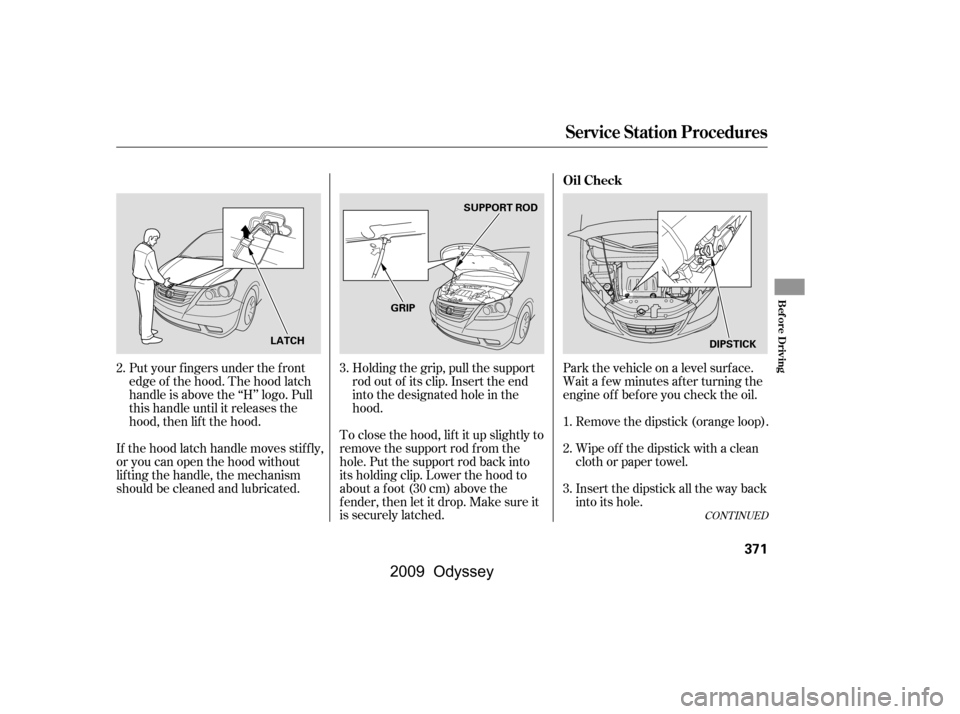
Look at the coolant level in the
radiator reserve tank. Make sure it is
between the MAX and MIN lines. If
it is below the MIN line, see on page f or
inf ormation on adding the proper
coolant.
Remove the dipstick again, and
check the level. It should be
between the upper and lower
marks.
If it is near or below the lower mark,
see on page . 4.
426 430423
Service Station Procedures
Owner’s Maintenance
Checks
A dding
Engine Coolant Engine Coolant Check
A dding Engine Oil
372
MAX RESERVE TANK
MIN
UPPER MARK
LOWER MARK
�����—�����—���
�y�
�������������y���
�(�����������y���������y
2009 Odyssey
Page 377 of 532

�µ�µ�µ �µ
�µ �µ
�µ
Aggressive driving (hard
acceleration and braking)
Excessive idling, accelerating and
braking in stop-and-go traf f ic
Cold engine operation (engines
aremoreefficientwhenwarmed
up)
Driving with a heavy load or the
air conditioner running
Improperly inf lated tires
An underinf lated tire increases
‘‘rolling resistance,’’ which reduces
f uel economy.
It puts a heavier
load on the engine, increasing f uel
consumption. In
particular, a build-up of snow or
mud on your vehicle’s underside
adds weight and rolling resistance.
Frequent cleaning helps your f uel
economy.
The f ollowing f actors can lower your
vehicle’s f uel economy:
A properly maintained vehicle
maximizes f uel economy. Poor
maintenance can signif icantly reduce
f uel economy. Always maintain your
vehicle according to the maintenance
messages displayed on the multi-
inf ormation display (see
on page ).
For example: Idling
results in 0 miles per gallon. If your vehicle has a
manual transmission, you can
boost your f uel economy by up
shif ting as early as possible.
Aerodynamic drag has a big ef f ect
on f uel mileage at speeds above 45
mph (75 km/h). Reduce your
speed and you reduce the drag.
Trailers, car top carriers, roof
racks and bike racks are also big
contributors to increased drag.
Rapid
acceleration, abrupt cornering,
and hard braking increase fuel
consumption.
423
Fuel Economy Factors
Use the recommended viscosity
motor oil, displaying the A PI
Certif ication Seal (see page ).
Maintain proper tire inf lation
A void carrying excess weight in
your vehicle
K eep your vehicle clean
Improving Fuel Economy
Owner’s
Maintenance Checks Avoid excessive idling
Always drive in the highest gear
possible
Observe the speed limit
Drive moderately 426
Drive Ef f icient ly
Vehicle Maint enance
Fuel Economy
374
�\f���—�\f���—���
�y�
����\f����
���y���
�(���������\f�y�\f�������y
2009 Odyssey
Page 378 of 532
�µ�µ
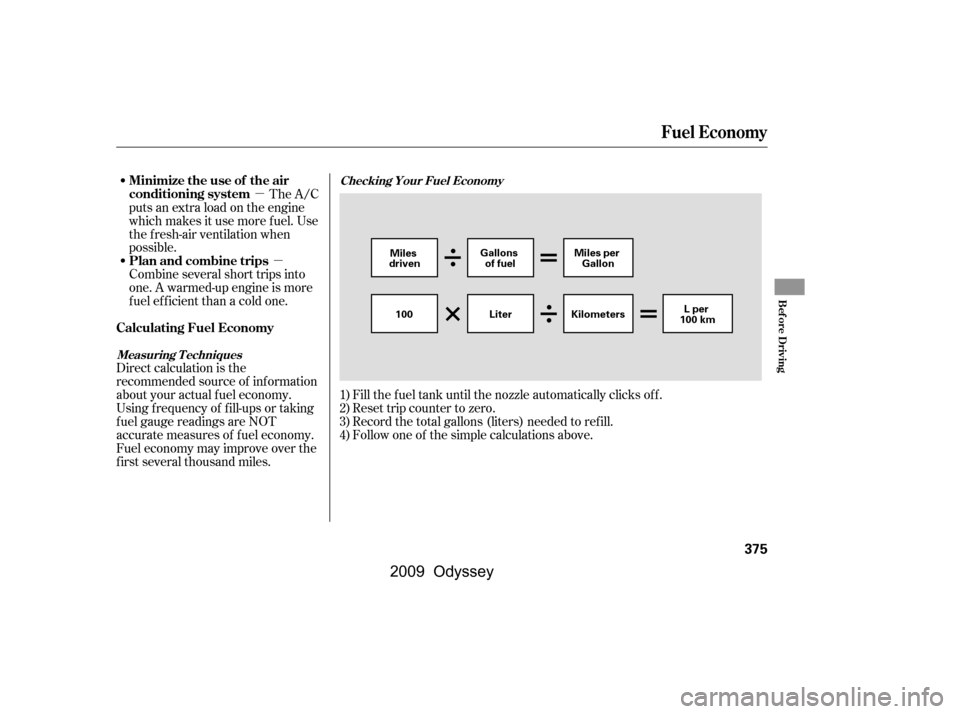
Fill the f uel tank until the nozzle automatically clicks of f .
Reset trip counter to zero.
Record the total gallons (liters) needed to ref ill.
Follow one of the simple calculations above.
Direct calculation is the
recommended source of inf ormation
about your actual f uel economy.
Using f requency of f ill-ups or taking
f uel gauge readings are NOT
accurate measures of f uel economy.
Fuel economy may improve over the
f irst several thousand miles. The A/C
puts an extra load on the engine
which makes it use more f uel. Use
the f resh-air ventilation when
possible.
Combine several short trips into
one. A warmed-up engine is more
f uel ef f icient than a cold one.
1)
2)
3)
4)
Checking Your Fuel Economy
Measuring T echniques
Calculating Fuel Economy Minimize the use of the air
conditioning system
Plan and combine trips
Fuel Economy
Bef ore Driving
375
Miles
driven Gallons
of fuel Miles per
Gallon
100 KilometersLper
100 km
Liter
�\f���—�\f���—���
�y�
����\f��������y���
�(���������\f�y�\f�����\f�y
2009 Odyssey
Page 387 of 532
Youshoulddothefollowingchecks
and adjustments bef ore you drive
your vehicle.Make sure all windows, mirrors,
and outside lights are clean and
unobstructed. Remove f rost, snow,
or ice.
Check that the hood is f ully closed.
Check that any items you may be
carrying are stored properly or
f astened down securely. Check the seat adjustment (see
page ).
Check the adjustment of the
inside and outside mirrors (see
page ).
Check the steering wheel
adjustment (see page ).
Make sure the doors and the
tailgate are securely closed and
locked.
Visually check the tires. If a tire
looks low, use a gauge to check its
pressure (see page ). Fasten your seat belt. Check that
your passengers have f astened
their seat belts (see page ).
When you start the engine, check
the gauges and indicators in the
instrument panel, and the
messages on the inf ormation
display or multi-inf ormation
display (depending on models)
(seepages,,,and
).
3. 2.
1.
4. 5.
6.
7.
8. 9.
10. 15
65 66 77
87
169
190 141
451
Preparing to Drive
384
�����—�����—���
�y�
�������������y���
�(�����������y���������y
2009 Odyssey
Page 389 of 532
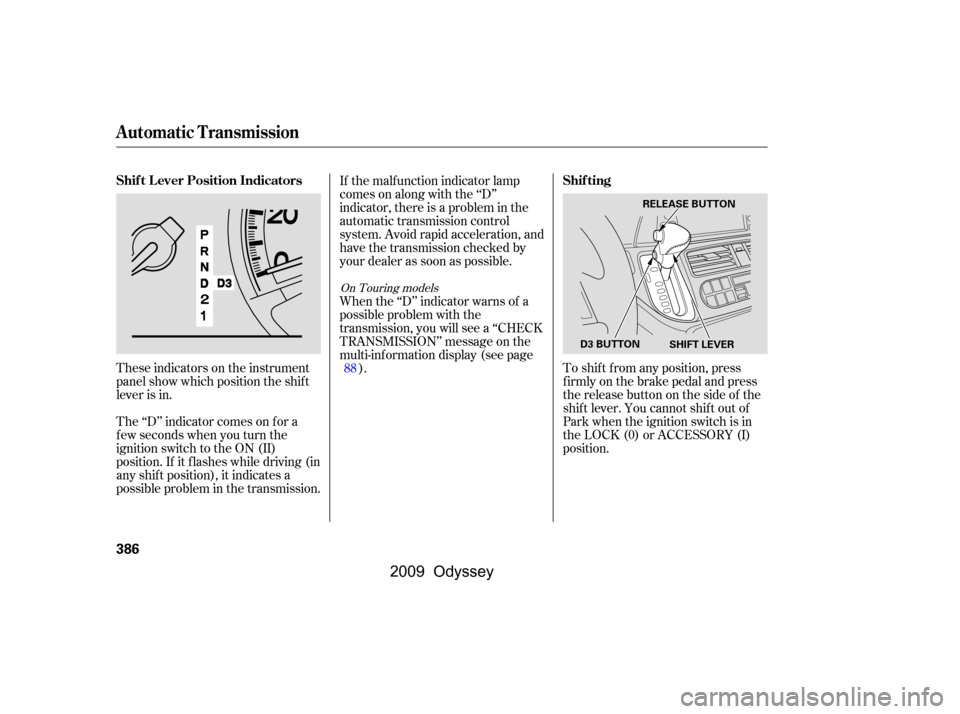
These indicators on the instrument
panel show which position the shif t
lever is in.
The ‘‘D’’ indicator comes on f or a
f ew seconds when you turn the
ignition switch to the ON (II)
position. If it f lashes while driving (in
any shif t position), it indicates a
possible problem in the transmission.If the malf unction indicator lamp
comes on along with the ‘‘D’’
indicator, there is a problem in the
automatic transmission control
system. Avoid rapid acceleration, and
have the transmission checked by
your dealer as soon as possible.
To shif t f rom any position, press
f irmly on the brake pedal and press
the release button on the side of the
shiftlever.Youcannotshiftoutof
Park when the ignition switch is in
the LOCK (0) or ACCESSORY (I)
position.
When the ‘‘D’’ indicator warns of a
possible problem with the
transmission, you will see a ‘‘CHECK
TRANSMISSION’’ message on the
multi-inf ormation display (see page
).
88
On Touring models
Automatic Transmission
Shif t L ever Position Indicators Shif ting
386
SHIFT LEVER
RELEASE BUTTON
D3 BUTTON
�\f���—�\f���—���
�y�
����\f����\f�\f�y���
�(���������\f�y�\f�����
�y
2009 Odyssey
Page 392 of 532
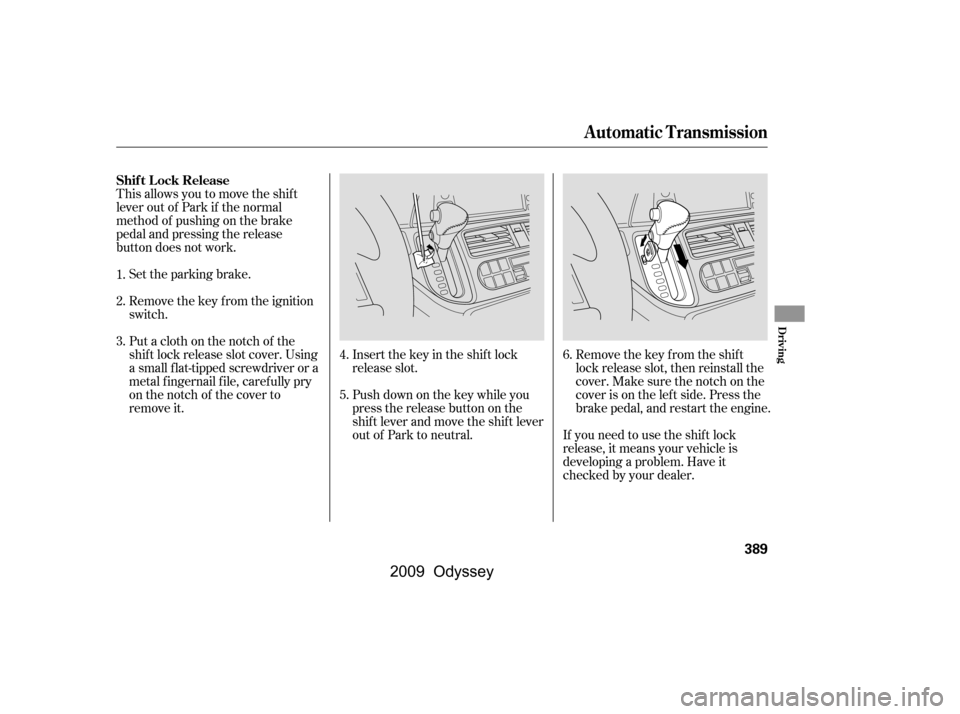
This allows you to move the shif t
lever out of Park if the normal
method of pushing on the brake
pedal and pressing the release
button does not work.Remove the key from the ignition
switch.
Set the parking brake.
Putaclothonthenotchof the
shif t lock release slot cover. Using
a small f lat-tipped screwdriver or a
metal f ingernail f ile, caref ully pry
on the notch of the cover to
remove it. Insert the key in the shift lock
release slot.
Push down on the key while you
pressthereleasebuttononthe
shif t lever and move the shif t lever
out of Park to neutral.Remove the key from the shift
lock release slot, then reinstall the
cover. Make sure the notch on the
cover is on the lef t side. Press the
brake pedal, and restart the engine.
If you need to use the shif t lock
release, it means your vehicle is
developing a problem. Have it
checked by your dealer.
5.
6.
4.
1.
2.
3.
Automatic Transmission
Shif t L ock Release
Driving
389
�\f���—�\f���—���
�y�
����\f��������y���
�(���������\f�y�\f�������y
2009 Odyssey