Page 299 of 532
�Ý�Û�Ý
�Û�Ý�Û
�Ý�Û
Subtitle Angle
To turn the subtitle on and of f , select
‘‘Subtitle’’ f rom the setup menu by
pressing the or button. You will
see submenu ‘‘OFF’’ or ‘‘ON.’’ Select
‘‘OFF’’ or ‘‘ON’’ by pressing the or
button. If more than one subtitle language is
available, you will see the language
currently selected when you select
‘‘ON’’ in the previous step.
Select the desired subtitle language
by pressing the or button.
Press the RETURN or ENT button
to go back to the play mode setup
menu. On some DVDs, the scenes are
recorded by more than one camera,
giving dif f erent viewpoints of the
same scene. To change the angle,
select ‘‘Angle’’ f rom the setup menu.
Youwillseeasubmenuif thereare
dif f erent angles available.
Select the number on the submenu
by pressing the or button.
Press the RETURN or ENT button
to go back to the play mode setup
menu.
Rear Entertainment System
296
�\f���—�\f���—���
�y�
�
�����������y���
�(���������\f�y�\f���\f�
�y
2009 Odyssey
Page 301 of 532
Num Input
A numerical command can be issued
to a DVD by inputting a two digit
number, and a button number can be
selected on the screen.Select and enter the second digit
number the same way. The cursor
will automatically move to the ‘‘ENT’’
icon when you press the ENT button.
Press the ENT button to enter the
number command. To go back to the
DVD screen, press the RETURN
button.
Select the f irst digit number using
the , , , or
button, and enter it by pressing
the ENT button. If you want to
change the number, select ‘‘DEL,’’
and press the ENT button, then
select and enter the new number.
Select the ‘‘Num Input’’ f rom the play
mode setup menu. The screen will
change as shown above. If you select
the ‘‘Move Key’’ using the ,
, , or button, and
press the ENT button, the Num
Input display on the screen will changefromtheleftsidetoright
side or right to lef t.
Rear Entertainment System
298
�\f���—�\f���—���
�y�
�
�������
���y���
�(���������\f�y�\f���\f���y
2009 Odyssey
Page 305 of 532
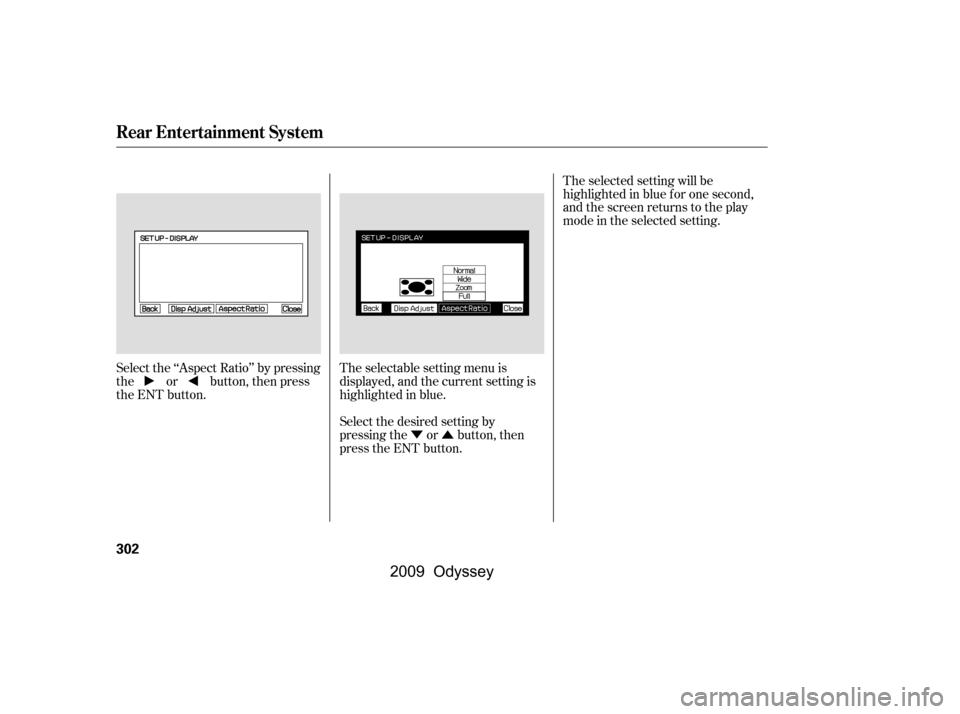
�Ý�Û
Select the ‘‘Aspect Ratio’’ by pressing
the or button, then press
the ENT button.
The selectable setting menu is
displayed, and the current setting is
highlighted in blue.
Select the desired setting by
pressing the or button, then
press the ENT button.The selected setting will be
highlighted in blue f or one second,
and the screen returns to the play
mode in the selected setting.
Rear Entertainment System
302
�\f���—�\f���—���
�y�
�
�����������y���
�(���������\f�y�\f���\f���y
2009 Odyssey
Page 308 of 532

�Ý�Û
Audio Language
If you select ‘‘Yes,’’ the display
changes to the language code input
mode. Select the f irst number digit
usingthe,,,or button, and press the ENT
button to enter it. Repeat this until all
f our digits are f illed. When the
f ourth digit is entered, the cursor
automatically moves to ‘‘ENT’’ on the
display. Press the ENT button on the
control panel to enter the new
language code. If you made a mistake entering a
number digit, select ‘‘DEL’’ on the
display with the , , ,
or button, and press the ENT
buttononthecontrolpanel.Then
select and enter the correct number
digit as described. The display
returns to the initial ‘‘Language’’
menu screen.
You can select the dubbed language
bef ore playing DVDs.
Select ‘‘Audio Language’’ by pressing
the or button. You will see the
submenu next to ‘‘Audio Language.’’
Follow the same instructions you
used to set the menu language.
CONT INUED
Rear Entertainment System
Features
305
�\f���—�\f���—���
�y�
�
�������\f���y���
�(���������\f�y�\f���
�\f�y
2009 Odyssey
Page 321 of 532

Once the security system is set,
opening any door, the tailgate, or the
hood without using the key or the
remote transmitter, will cause it to
alarm. It also alarms if the audio unit
is removed f rom the dashboard or
the wiring is cut.The alarm will also be activated if a
passenger inside the locked vehicle
turns the ignition switch on.
The security system will not set if
the hood, tailgate, or any door is not
f ully closed. Bef ore you leave the
vehicle, make sure the doors,
tailgate, and hood are securely
closed.
To see if the system is set
af ter you exit the vehicle, press the
LOCK button on the remote
transmitter within 5 seconds. If the
system is set, the horn will beep
once.
Do not attempt to alter this system
or add other devices to it.
The security system automatically
sets 15 seconds after you lock the
doors, hood, and the tailgate. For the
system to activate, you must lock the
doorsandthetailgatefromthe
outside with the key, driver’s lock
tab, door lock master switch, or
remote transmitter. The security
system indicator on the instrument
panel starts blinking immediately to
show you the system is setting itself .
The security system helps to protect
your vehicle and valuables f rom thef t.
The horn sounds and a combination
of headlights, parking lights, side
marker lights, and taillights f lashes if
someone attempts to break into your
vehicleorremovetheradio.This
alarm continues f or 2 minutes, then
the system resets. To reset an
activated system before the 2
minutes have elapsed, unlock the
driver’s door with the key or the
remote transmitter.
On EX, EX-L and Touring models
Security System
318
NOTE:SECURITY SYSTEM INDICATOR
�\f���—�\f���—���
�y�
�
�����������y���
�(���������\f�y�\f�������y
2009 Odyssey
Page 325 of 532

�·�µ
The HomeLink
Universal
Transceiver built into your vehicle
canbeprogrammedtooperateupto
three remote controlled devices
around your home, such as garage
doors, lighting, or home security
systems.
Bef ore programming your
HomeLink to operate a garage door
opener, conf irm that the opener has
an external entrapment protection
system, such as an ‘‘electronic eye,’’
or other saf ety and reverse stop
f eatures.
If your garage door was
manuf actured bef ore April 1, 1982,
you may not be able to program
HomeLink to operate it. These units
do not have safety features that
cause the motor to stop and reverse
it if an obstacle is detected during
closing, increasing the risk of injury. Do not use HomeLink with any
garage door opener that lacks saf ety
stop and reverse f eatures.
Units manuf actured between April 1,
1982 and January 1, 1993 may be
equipped with saf ety stop and
reverse f eatures. If your unit does
not have an external entrapment
protection system, an easy test to
conf irm the f unction and
perf ormance of the saf ety stop and
reverse f eature is to lay a 2 4
under the closing door. The door
should stop and reverse upon
contacting the piece of wood.
As an additional safety feature,
garage door openers manuf actured
af ter January 1, 1993 are required to
have external entrapment protection
systems, such as an electronic eye,
which detect an object obstructing
the door.
Refer to the safety information thatcame with your garage door opener
to test that the safety features are
f unctioning properly. If you do not
have this information, contact the
manuf acturer of the equipment.
Bef ore programming HomeLink to a
garage door or gate opener, make
sure that people and objects are out
of thewayof thedevicetoprevent
potential injury or damage.
When programming a garage door
opener, park just outside the garage.
If you just
received your vehicle and have not
trained any of the buttons in
HomeLink bef ore, you should erase
any previously learned codes bef ore
training the first button. To do this,
press and hold the two outside
buttons on the HomeLink
transceiver for about 20 seconds,
until the red indicator f lashes.
Release the buttons, then proceed to
step 1.
On EX, EX-L and Touring models
HomeL inkUniversal Transceiver
General Inf ormation
Important Saf ety PrecautionsT raining HomeL ink
Bef ore you begin
322
�\f���—�\f���—���
�y�
�
�������
�\f�y���
�(���������\f�y�\f�������y
2009 Odyssey
Page 328 of 532
.
HFL uses Bluetooth
technology to
link your cell phone to your vehicle.
With HFL, you can place and receive
calls through your vehicle�")
Your vehicle is equipped with the
Bluetooth
HandsFreeLink(HFL).
HFL uses Bluetooth
technology to
link your cell phone to your vehicle.
With HFL, you can place and receive
calls through your vehicle’s audio
system, without the distraction of
handling your cell phone. To use this
f eature, you need a Bluetooth-
compatible cell phone with the
Hands Free Prof ile. For more
inf ormation, and a list of compatible
cell phones, visit , or call (888) 528-7876. In
Canada, visit , or call
(888) 9-HONDA-9. Here are the main features of HFL.
Instructions f or using HFL begin on
page .
HFL recognizes simple voice
commands, such as phone numbers
and names. It uses these commands
to automatically dial, receive, and
store numbers. For more
inf ormation on voice control, see
UsingVoiceControlonpage .
The Bluetooth
name and logos are
registered trademarks owned by
Bluetooth SIG, Inc. and any use of
such marks by Honda Motor Co.,
Ltd. is under license. Other
trademarks and trade names
are those of their respective owners. Bluetooth is the wireless technology
that links your phone to HFL. HFL
uses a Class 2 Bluetooth, which
means the maximum range between
yourphoneandvehicleis30feet(10
meters).
To use HFL, your phone must have
approved Bluetooth capability along
with the Hands Free Profile. This
type of phone is available through
many phone makers and cellular
carriers. You can also find an
approved phone by visiting
, or by calling
the HandsFreeLink
consumer
support at (888) 528-7876. In Canada,
visit , or call (888) 9-
HONDA-9.
The HFL is available in English on
U.S. models, and in both English and
French on Canadian models. To
change the language, see page .
The voice of HFL is set to f emale. 359329
329
handsf reelink.honda.
com www.honda.ca handsf reelink.honda.com
www.honda.ca
BluetoothHandsFreeL ink
On models wit h navigat ion syst em
BluetoothWireless Technology
Voice Control HFL
Features
325
�����—�����—���
�y�
�
�����������y���
�(�����������y���������y
2009 Odyssey
Page 330 of 532

Ensure that you use the HFL
buttons, not the NAVI buttons, to
give HFL voice commands.
To operate HFL, use the HFL Talk
and Back buttons on the left side of
the steering wheel.
When HFL is in use, the sound
comes through the vehicle’s f ront
audio system speakers. If the audio
system is in use while operating
either of the HFL buttons or making
a call, HFL overrides the audio
system. To change the volume level,
use the audio system volume knob or
the steering wheel volume controls.
The HFL microphone is on the
ceiling, between the f ront map lights
and the HomeLink buttons. On
models with navigation system, the
microphone is shared with the
navigation system.
HFL and the navigation system have
separate voice recognition systems.
When HFL is in use, a voice
command f or the navigation system
will not be recognized even if you
press the navigation Talk button. In
this case, you will hear two short
beeps, and the HFL system has no
prompt.
BluetoothHandsFreeL ink
HFL Buttons
Audio System
Microphone
Features
327
NOTE:
HFL BACK
BUTTON
HFL TALK
BUTTON
NAVI VOICE CONTROL BUTTONS
�\f���—�\f���—���
�y�
�
���������
�y���
�(���������\f�y�\f�������y
2009 Odyssey