Page 76 of 352
Windshield Wipers1. MIST
2. OFF
3. INT-Intermittent
4. LO -Low speed
5. HI -High speed
6. Windshield washers
Push the right lever up or down to
select a position.
MIST
- The wipers run at high
speed until you release the lever.
OFF
- The wipers are not activated.
INT
- The wipers operate every
few seconds.
LO
-
The wipers run at low speed.
HI
-The wipers run at high speed.
Windshield
Washers
- Pull the wiper control
lever toward you, and
hold it. The washers
spray until you release
the lever. The wipers
run at low speed, then
complete one more
sweep after you release
the lever. Rear Window Wiper and Washer
1. OFF
When you turn the wiper switch to
the ‘‘OFF ’’position, the wiper will
return to its parked position.
2. Rotate the switch clockwise to turn the rear window wiper ON.
3. Hold past ON to turn the rear window wiper on and to spray the
rear window washer.
CONTINUED
Windshield Wipers and Washers
73
Instruments and Controls
2009 Fit
Page 112 of 352

The heating and air conditioning
system in your vehicle provides a
comfortable driving environment in
all weather conditions.
The standard audio system has many
features. This section describes
those features and how to use them.
Your vehicle has an anti-theft audio
system that requires a code number
to enable it.
The security system helps to
discourage vandalism and theft of
your vehicle.Vents, Heating, and A/C
.............
110
Playing the FM/AM Radio (Models without navigationsystem)
...............................
115
Playing a Disc (Models without navigation system)
..................
122
Disc Player Error Messages (Models without navigationsystem)
...............................
128
Playing an iPod
®(Models without
navigation system)
..................
129
iPod
®Error Messages (Models
without navigation system)
.....
135
Playing a USB Flash Memory Device (Models without
navigation system)
..............
136
USB Flash Memory Device Error
Messages (Models withoutnavigation system)
..............
142
Playing the AM/FM Radio
(Models with navigationsystem)
...............................
143
Playing a Disc (Models with
navigation system)
..................
149 Disc Player Error Messages
(Models with navigationsystem)
...............................
157
Playing a PC card (Models with
navigation system)
..................
158
Playing an iPod
®(Models with
navigation system)
..................
170
iPod
®Error Messages (Models
with navigation system)
..........
176
Playing a USB Flash Memory Device (Models withnavigation system)
..............
177
USB Flash Memory Device Error Messages (Models withnavigation system)
..............
183
FM/AM Radio Reception
............
184
Protecting Your Discs
.................
186
Remote Audio Controls
...............
189
Auxiliary Input Jack
....................
190
Radio Theft Protection
................
191
Setting the Clock
.........................
192
Security System
..........................
193
Cruise Control
............................
194
Features
109
Features
2009 Fit
Page 114 of 352

Airflow Controls
Fan Control Dial
Turn this dial to increase or decrease
the fan speed and airflow.
Temperature Control Dial
Turning this dial clockwise increases
the temperature of the airflow.
Air Conditioning (A/C) ButtonIf equippedThis button turns the air
conditioning on and off. The
indicator in the button is on when the
A/C is on.
Fresh Air/Recirculation Lever
This lever controls the source of the
air going into the system. When you
slide the lever to the
side, air is
brought in from outside the vehicle
(fresh air mode). When you select
the
side, air from the vehicle's
interior is sent through the system
again (recirculation mode). The outside air intakes for the
heating and cooling system are at the
base of the windshield. Keep this
area clear of leaves and other debris.
The system should be left in fresh air
mode under almost all conditions.
Keeping the system in recirculation
mode, particularly with the A/C off,
can cause the windows to fog up.
Switch to recirculation mode when
driving through dusty or smoky
conditions, then return to fresh air
mode.
Rear Window Defogger Button
/
This button turns the rear window
defogger on and off (see page76).
On some models, this button also
operates the heated outside mirrors
(see page102).
Mode Control Dial
Use the mode control dial to select
the vents the air flows from. Some air
will flow from the dashboard corner
vents in all modes.
Air flows from the center and
corner vents in the dashboard.Airflow is divided between the
vents in the dashboard and the floor
vents.Air flows from the floor vents.Airflow is divided between the
floor vents and defroster vents at the
base of the windshield.Air flows from the defroster
vents at the base of the windshield.
CONTINUED
Vents, Heating, and A/C
111
Features
2009 Fit
Page 195 of 352

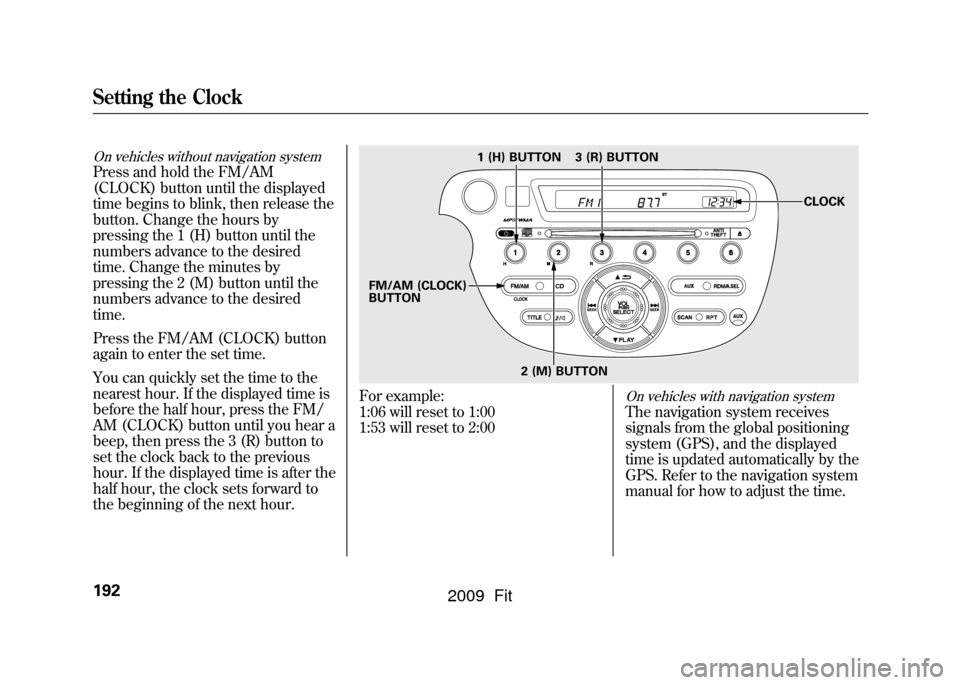
On vehicles without navigation systemPress and hold the FM/AM
(CLOCK) button until the displayed
time begins to blink, then release the
button. Change the hours by
pressing the 1 (H) button until the
numbers advance to the desired
time. Change the minutes by
pressing the 2 (M) button until the
numbers advance to the desired
time.
Press the FM/AM (CLOCK) button
again to enter the set time.
You can quickly set the time to the
nearest hour. If the displayed time is
before the half hour, press the FM/
AM (CLOCK) button until you hear a
beep, then press the 3 (R) button to
set the clock back to the previous
hour. If the displayed time is after the
half hour, the clock sets forward to
the beginning of the next hour.
For example:
1:06 will reset to 1:00
1:53 will reset to 2:00
On vehicles with navigation systemThe navigation system receives
signals from the global positioning
system (GPS), and the displayed
time is updated automatically by the
GPS. Refer to the navigation system
manual for how to adjust the time.
1 (H) BUTTON
FM/AM (CLOCK)
BUTTON 3 (R) BUTTON
CLOCK
2 (M) BUTTON
Setting the Clock192
2009 Fit
Page 243 of 352
Only remove the fuses after you have
performed the transmission shifting
procedure, and the key is in the
ACCESSORY (I) position. Store the
fuses in an obvious location (center
pocket, etc) as a reminder to re-
install the fuses before driving the
vehicle.On vehicles without navigation systemIf the radio fuse is removed, the
audio system will disable itself. The
next time you turn on the radio you
will see‘‘ENTER CODE ’’in the
frequency display. Use the preset
buttons to enter the code (see page
191).
When the audio system is disabled,
the clock setting in the audio system
will be canceled. You will need to
reset the clock (see page 192).
On vehicles with navigation systemThe navigation system will also
disable itself. The next time you turn
on the ignition switch, the system
will require you to enter‘‘ENTER
CODE ’’before it can be used. Refer
to the navigation system manual.
ACCESSORY SOCKET FUSE
RADIO FUSETowing Your Vehicle Behind a Motorhome240
2009 Fit
Page 260 of 352
1. Make sure the engine and radiatorare cool.
2. Relieve any pressure in the cooling system by turning the radiator cap
counterclockwise, without
pressing down.
3. Remove the radiator cap by pushing down and turning
counterclockwise.
4. The coolant level should be up tothe base of the filler neck. Add
coolant if it is low.
Pour the coolant slowly and
carefully so you do not spill any.
Clean up any spill immediately; it
could damage components in the
engine compartment.
5. Put the radiator cap back on, and tighten it fully. 6. Pour coolant into the reserve tank.
Fill it halfway between the MAX
and MIN marks. Put the cap back
on the reserve tank.
Do not add any rust inhibitors or
other additives to your vehicle's
cooling system. They may not be
compatible with the coolant or
engine components.
RADIATOR CAP
RESERVE TANK
Engine Coolant
257
Maintenance
2009 Fit
Page 266 of 352

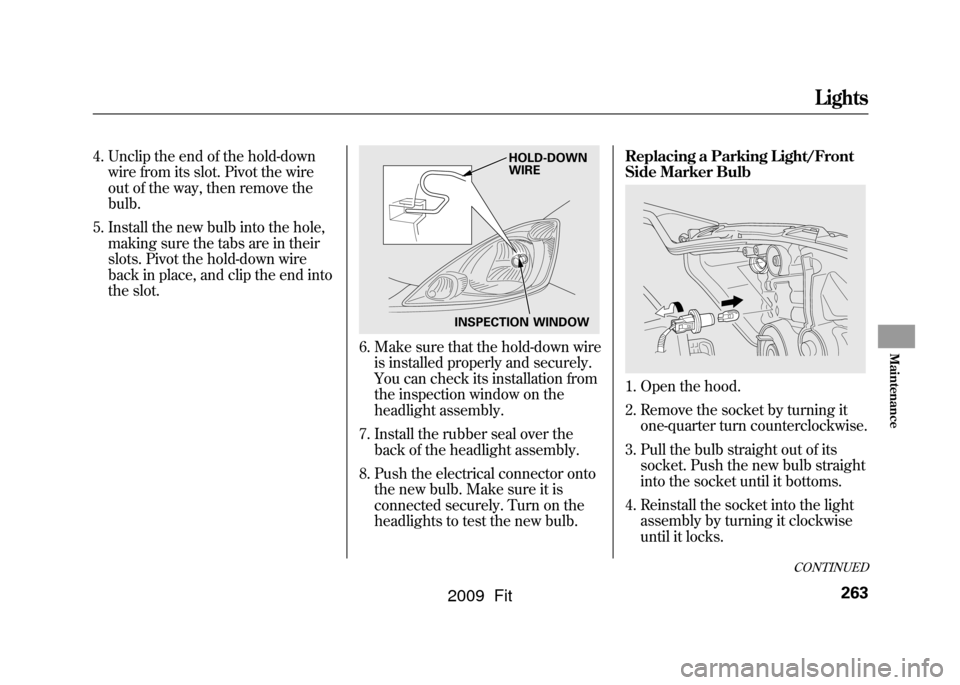
4. Unclip the end of the hold-downwire from its slot. Pivot the wire
out of the way, then remove the
bulb.
5. Install the new bulb into the hole, making sure the tabs are in their
slots. Pivot the hold-down wire
back in place, and clip the end into
the slot.
6. Make sure that the hold-down wireis installed properly and securely.
You can check its installation from
the inspection window on the
headlight assembly.
7. Install the rubber seal over the back of the headlight assembly.
8. Push the electrical connector onto the new bulb. Make sure it is
connected securely. Turn on the
headlights to test the new bulb. Replacing a Parking Light/Front
Side Marker Bulb
1. Open the hood.
2. Remove the socket by turning it
one-quarter turn counterclockwise.
3. Pull the bulb straight out of its socket. Push the new bulb straight
into the socket until it bottoms.
4. Reinstall the socket into the light assembly by turning it clockwise
until it locks.
INSPECTION WINDOW HOLD-DOWN
WIRE
CONTINUED
Lights
263
Maintenance
2009 Fit
Page 267 of 352
5. Turn on the lights to make surethe new bulb is working.
Replacing a Front Turn Signal
Light Bulb1. Open the hood.
2. Remove the socket by turning it one-quarter turn counterclockwise.
3. Remove the bulb from the socket by pushing the bulb in and turning
it counterclockwise until it unlocks.
4. Install the new bulb in the socket. Turn it clockwise to lock it in place. 5. Reinstall the socket into the light
assembly by turning it clockwise
until it locks.
6. Turn on the lights to make sure the new bulb is working.
Lights264
2009 Fit