Page 284 of 384

Your vehicle is not designed to tow a
trailer. Attempting to do so can void
your warranties.
If the ABS indicator and the brake
system indicator come on together,
and the parking brake is f ully
released, the EBD system may also
be shut down.
It only helps with steering
control during braking.
such as trying to take a
corner too f ast or making a sudden
lane change. Always drive at a safe
speed f or the road and weather
conditions.
Always steer moderately
when you are braking hard. Severe
or sharp steering wheel movement
can still cause your vehicle to veer
into oncoming traffic or off the road.
on loose or
uneven surf aces, such as gravel or
snow, than a vehicle without anti-
lock.
Test your brakes as instructed on
page . If the brakes f eel normal,
drive slowly and have your vehicle
repaired by your dealer as soon as
possible. Avoid sudden hard braking
which could cause the rear wheels to
lock up and possibly lead to a loss of
control.
The VSA indicator will come on
alongwiththeABSindicator.
338
Anti-Lock Brakes (ABS), Towing a Trailer
Towing a Trailer
Important Saf ety Reminders
A BS does not reduce the time or
distance it takes to stop the
vehicle.
A BS will not prevent a skid that
results f rom changing direction
abruptly,
A BS cannot prevent a loss of
stability.
A vehicle with A BS may require a
longer distance to stop
Driving
281
�\f���—�\f���—�
���y�
�\f��\f��������y���
�(�#�������\f�y�\f�������y
2009 Civic Hybrid
Page 302 of 384

Refill the engine with the
recommended oil.
Engine oil change capacity
(including f ilter):
Let the engine run f or several
minutes, then check the drain bolt
and oil f ilter f or leaks.
Put a new washer on the drain bolt,
then reinstall the drain bolt.
Tighten the drain bolt to:
Install a new oil f ilter according to
the instructions that come with it. Reinstall the engine oil f ill cap.
Start the engine. The oil pressure
indicator should go out within 5
seconds. If it does not, turn of f the
engine, and check your work.
Remove the oil drain bolt and
washer from the bottom of the
engine. Drain the oil into an
appropriate container.
Remove the oil f ilter, and let the
remaining oil drain. A special
wrench (available from your
dealer) is required.
Make sure the oil f ilter gasket is
not stuck to the engine block. If it
is, remove it bef ore installing a
new oil f ilter.7.
8.
9.
4.
5.
6.10.
CONT INUED
Changing the Oil and Filter
Maint enance
299
DRAIN BOLT
WASHER OIL FILTER
3.4 US qt (3.2)
29 lbf·ft (39 N·m , 4.0 kgf·m)
�\f���—�\f���—�
���y�
�\f��\f����\f���y���
�(�#�������\f�y�\f���\f���y
2009 Civic Hybrid
Page 303 of 384

Turn of f the engine, let it sit f or
several minutes, then check the oil
level on the dipstick. If necessary,
add more oil.
Put the under-cover back in place
and reinstall the nine holding clips.
Locktheclipssecurelybypushing
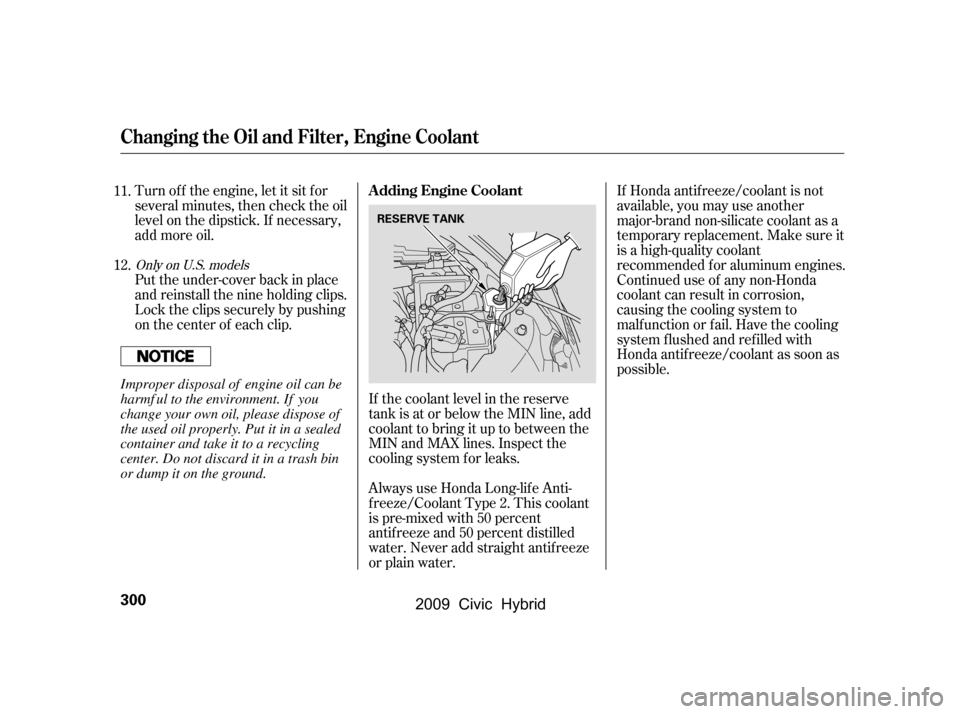
on the center of each clip.If the coolant level in the reserve
tank is at or below the MIN line, add
coolant to bring it up to between the
MIN and MAX lines. Inspect the
cooling system f or leaks. If Honda antif reeze/coolant is not
available, you may use another
major-brand non-silicate coolant as a
temporaryreplacement.Makesureit
is a high-quality coolant
recommended f or aluminum engines.
Continued use of any non-Honda
coolant can result in corrosion,
causingthecoolingsystemto
malf unction or f ail. Have the cooling
system f lushed and ref illed with
Honda antif reeze/coolant as soon as
possible.
Always use Honda Long-lif e Anti-
f reeze/Coolant Type 2. This coolant
is pre-mixed with 50 percent
antif reeze and 50 percent distilled
water. Never add straight antif reeze
or plain water.
11.
12.
Only on U.S. models
A dding Engine Coolant
Changing the Oil and Filter, Engine Coolant
300
RESERVE TANK
Improper disposal of engine oil can be
harmf ul to the environment. If you
change your own oil, please dispose of
the used oil properly. Put it in a sealed
container and take it to a recycling
center. Do not discard it in a trash bin
or dump it on the ground.
�\f���—�\f���—�
���y�
�\f��\f����
���y���
�(�#�������\f�y�\f���\f���y
2009 Civic Hybrid
Page 304 of 384

If the reserve tank is completely
empty, you should also check the
coolant level in the radiator.The coolant level should be up to
the base of the f iller neck. Add
coolant if it is low.
Do not add any rust inhibitors or
other additives to your vehicle’s
cooling system. They may not be
compatible with the coolant or
engine components. Pour coolant into the reserve tank.
Fill it to half way between the MAX
and MIN marks. Put the cap back
on the reserve tank.
Pourthecoolantslowlyand
caref ully so you do not spill any.
Clean up any spill immediately; it
could damage components in the
engine compartment.
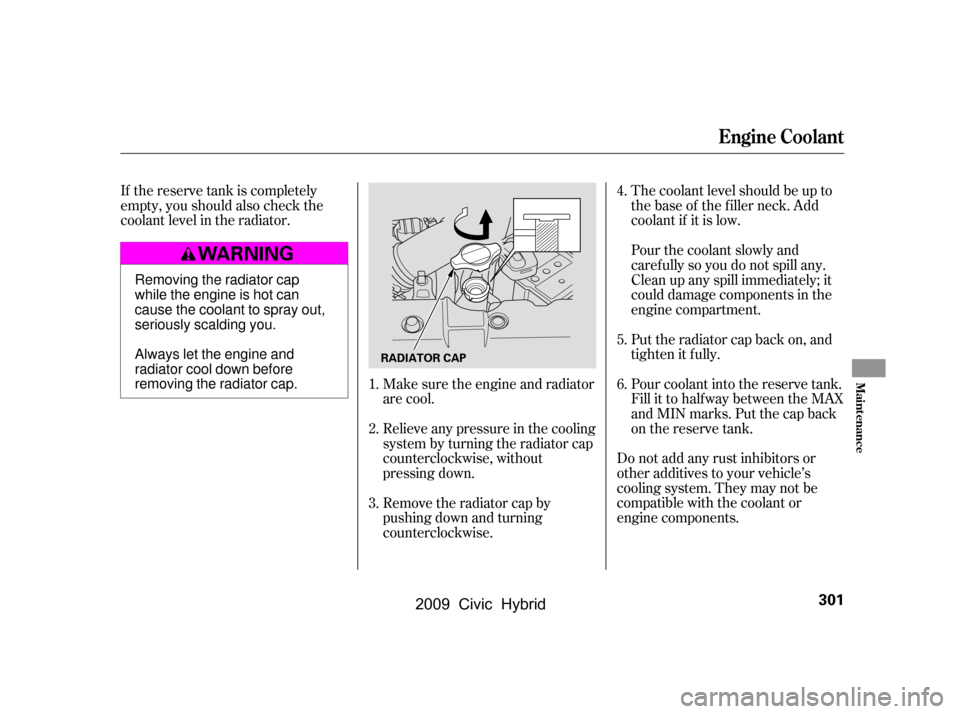
Make sure the engine and radiator
are cool.
Relieve any pressure in the cooling
system by turning the radiator cap
counterclockwise, without
pressing down.
Remove the radiator cap by
pushing down and turning
counterclockwise. Put the radiator cap back on, and
tighten it fully.
1.
2.
3. 4.
5.
6.
Engine Coolant
Maint enance
301
RADIATOR CAP
Removing the radiator cap
while the engine is hot can
cause the coolant to spray out,
seriously scalding you.
Always let the engine and
radiator cool down before
removing the radiator cap.
�\f���—�\f���—�
���y�
�\f��\f��������y���
�(�#�������\f�y�\f���\f���y
2009 Civic Hybrid
Page 309 of 384

If youreplacedaheadlightbulbon
the driver’s side, reinstall the
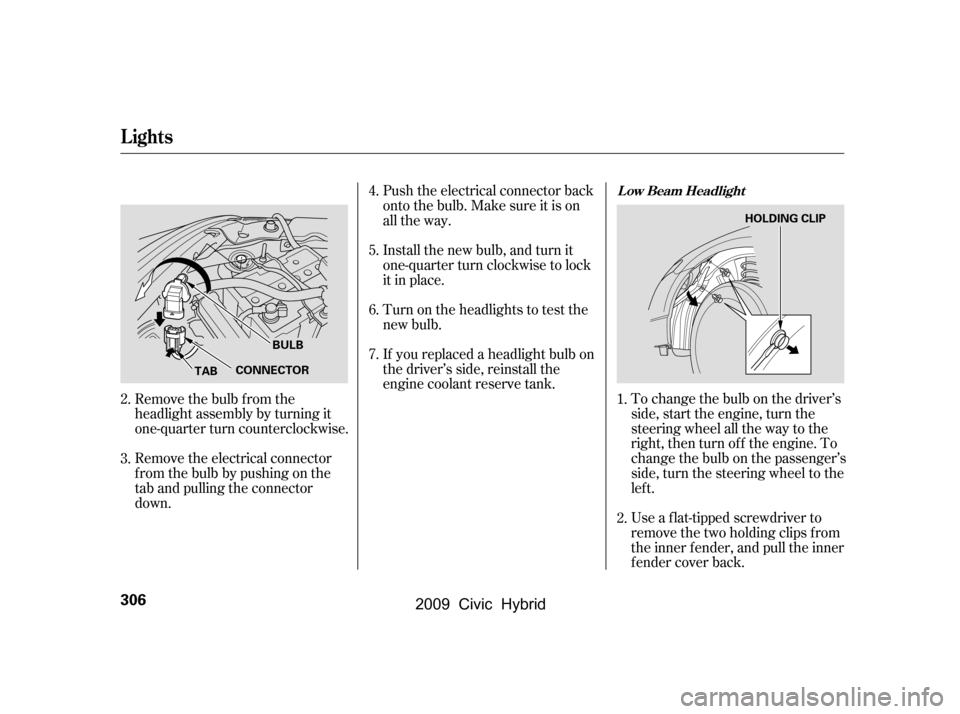
engine coolant reserve tank.To change the bulb on the driver’s
side, start the engine, turn the
steering wheel all the way to the
right, then turn of f the engine. To
change the bulb on the passenger’s
side, turn the steering wheel to the
lef t.
Use a f lat-tipped screwdriver to
remove the two holding clips f rom
the inner f ender, and pull the inner
f ender cover back.
Push the electrical connector back
onto the bulb. Make sure it is on
all the way.
Install the new bulb, and turn it
one-quarter turn clockwise to lock
it in place.
Turn on the headlights to test the
new bulb.
Remove the electrical connector
f rom the bulb by pushing on the
tab and pulling the connector
down.
Remove the bulb f rom the
headlight assembly by turning it
one-quarter turn counterclockwise.
2.
3.
2.
4.
5.
6.
7.
1.
L ow Beam Headlight
Lights
306
TABCONNECTORBULB HOLDING CLIP
�\f���—�\f���—�
���y�
�\f��\f����\f���y���
�(�#�������\f�y�\f���
�
�y
2009 Civic Hybrid
Page 310 of 384
To change the bulb on the driver’s
side, start the engine, turn the
steering wheel all the way to the
right, then turn of f the engine. To
change the bulb on the passenger’s
side, turn the steering wheel to the
lef t.
Remove the bulb f rom the
headlight assembly by turning it
one-quarter turn counterclockwise. Install the new bulb, and turn it
one-quarter turn clockwise to lock
it in place.
Push the electrical connector back
onto the bulb. Make sure it is on
all the way.
Turn on the headlights to test the
new bulb.
Reinstall the inner f ender cover.
Then reinstall the holding clips,
andlocktheminplacebypushing
on their centers.
Remove the electrical connector
f rom the bulb by pushing on the
tab and pulling the connector
down. 5.
6.
1.
7.
8.
3.
4.
CONT INUED
Lights
Replacing the Front Side Marker/
Turn Signal Light Bulb
Maint enance
307
TAB
BULB
HOLDING CLIP
�\f���—�\f���—�
���y�
�\f��\f����
���y���
�(�#�������\f�y�\f���
���y
2009 Civic Hybrid
Page 311 of 384

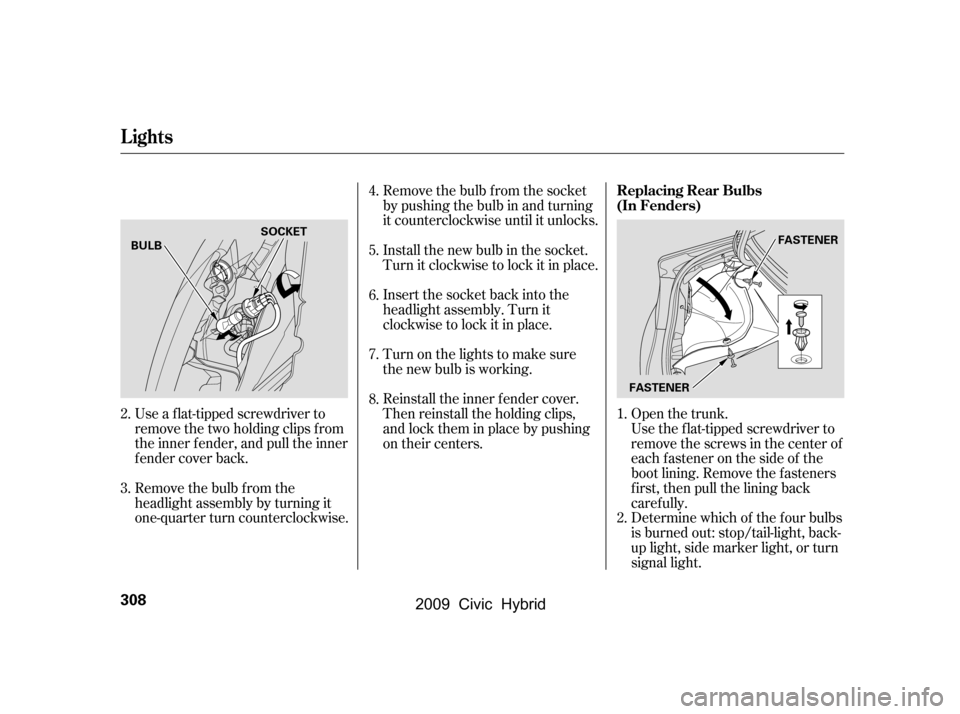
Open the trunk.
Use a f lat-tipped screwdriver to
remove the two holding clips f rom
the inner f ender, and pull the inner
f ender cover back. Remove the bulb f rom the socket
by pushing the bulb in and turning
it counterclockwise until it unlocks.
Install the new bulb in the socket.
Turn it clockwise to lock it in place.
Insert the socket back into the
headlight assembly. Turn it
clockwise to lock it in place.
Reinstall the inner f ender cover.
Then reinstall the holding clips,
andlocktheminplacebypushing
on their centers.
Turn on the lights to make sure
the new bulb is working.
Remove the bulb f rom the
headlight assembly by turning it
one-quarter turn counterclockwise. Use the f lat-tipped screwdriver to
remove the screws in the center of
each f astener on the side of the
boot lining. Remove the f asteners
first, then pull the lining back
caref ully.
Determine which of the f our bulbs
is burned out: stop/tail-light, back-
up light, side marker light, or turn
signal light.
1.
4.
5.
6.
7.
8.
3.
2.
2.
Replacing Rear Bulbs
(In Fenders)
Lights
308
FASTENER
BULB
SOCKET
FASTENER
�\f���—�\f���—�
���y�
�\f��\f��������y���
�(�#�������\f�y�\f���
���y
2009 Civic Hybrid
Page 312 of 384
Remove the socket by turning it
one-quarter turn counterclockwise.
Pull the bulb straight out of its
socket. Push the new bulb straight
into the socket until it bottoms.
Reinstall the socket into the light
assembly by turning it clockwise
until it locks.Put the f asteners into the holes on
the side of the trunk lining.
Reinstall the screws.
Reinstall the trunk lining. Make
sure it is installed under the edge
of the trunk seal.
Turn on the lights to make sure
the new bulb is working.
Open the trunk.
Use the Phillips-head screwdriver to
remove the screws in the center of
each f astener on the back of the boot
lid. Remove the f asteners f irst, then
pull the lining back caref ully.
1.
4.
5. 6.
7.
8.
3.
CONT INUED
Replacing Rear Bulbs
(in T runk L id)
Lights
Maint enance
309
BULBS
SOCKETS SOCKETS
BULB
BULB FASTENER
�\f���—�\f���—�
���y�
�\f��\f��������y���
�(�#�������\f�y�\f���
���y
2009 Civic Hybrid