Page 1 of 24

Congratulations on your purchase of a GMC Sierra. Please read this information about your vehicle’s features and
your Owner Manual to ensure an outstanding ownership experience. Note that your vehicle may not include all the
features described in this booklet. Keep this booklet with your Owner Manual for easy reference.
DRIVER INFORMATION
Instrument Panels . . . . . . . . . . . . .2
Instrument Panel Cluster . . . . . . .4
Voltmeter Operation . . . . . . . . . . . .5
Driver Information Center . . . . . .5
SAFETY & SECURITY
Remote Keyless Entry . . . . . . . . . .7
Content Theft-Deterrent System . .7
OnStar
® . . . . . . . . . . . . . . . . . . . . . .7
COMFORT
Power Seat Controls . . . . . . . . . . .8
Heated Seats . . . . . . . . . . . . . . . . . .8
Heated and Cooled Seats . . . . . . .8
Memory Settings . . . . . . . . . . . . . .8
Adjustable Pedals . . . . . . . . . . . . .9
Automatic Climate Controls . . . . .9
ENTERTAINMENT
Audio System Features . . . . . . . .10
Multiple-Disc CD Player . . . . . . . .13
Touch Screen Navigation
Entertainment System . . . . . . . . .13XM
®Radio . . . . . . . . . . . . . . . . . . .13
Rear Seat Audio and DVD Rear
Seat Entertainment Systems . . .14
Audio Steering Wheel Controls .14
Bluetooth
®System . . . . . . . . . . . .15
CONVENIENCE
Remote Vehicle Start . . . . . . . . . .15
Cruise Control . . . . . . . . . . . . . . .16
Rainsense™ II Windshield
Wipers . . . . . . . . . . . . . . . . . . . . . .16
Heated Windshield Washer
Fluid . . . . . . . . . . . . . . . . . . . . . . . .17
Automatic Headlamp System
and Interior Lamps . . . . . . . . . . . .17
Sunroof . . . . . . . . . . . . . . . . . . . . .18
Power Sliding Rear Window . . . .18
Ultrasonic Rear Parking Assist .18
Universal Home Remote . . . . . . .19
Automatic Dimming Rearview
Mirror . . . . . . . . . . . . . . . . . . . . . . .19
Power Foldaway Mirrors . . . . . . .19Rear Vision Camera . . . . . . . . . . .20
Trailer-Tow Mirrors . . . . . . . . . . . .20
Folding the Rear Seat . . . . . . . . .20
Cargo Management System . . . .20
PERFORMANCE & MAINTENANCE
6-Speed Automatic
Transmission Controls . . . . . . . .21
StabiliTrak
®– Stability Control
System . . . . . . . . . . . . . . . . . . . . .21
Tire Pressure Monitor . . . . . . . . .21
Integrated Trailer Brake Control
System . . . . . . . . . . . . . . . . . . . . .22
Tighten Gas Cap Message . . . . .22
FlexFuel (E85) – Yellow Gas Cap 22
Resetting the Oil Life
System . . . . . . . . . . . . . . . . . . . . .23
OWNER INFORMATION
Sierra Accessories . . . . . . . . . . . .23
Roadside Assistance . . . . . . . . . .24
My GMLink . . . . . . . . . . . . . . . . . .24
Page 2 of 24

C. Turn Signal/Multifunction Lever
D. Outside Tempe")
Getting to Know Your Sierra2
The main features of the instrument
panel include:
A. Air Outlets
B. Driver Information Center Controls
(if equipped)
C. Turn Signal/Multifunction Lever
D. Outside Temperature/Compass
(if equipped)
E. Instrument Panel Cluster
F. Range Selection Mode Button
(6-Speed Automatic Transmission,
if equipped)
G. Shift Lever
H. Tow/Haul Selector Button (if equipped)
I. Audio System/Navigation
Entertainment System (if equipped)
J. Upper Storage Compartment
K. Exterior Lamps Control
L. Dome Lamp Off Button/Fog Lamp
Button/Instrument Panel Brightness
Knob
See Section 3 of your Owner Manual.
DRIVER INFORMATION
Instrument Panel (Pure Pickup model)
M. Integrated Trailer Brake Control
(if equipped)
N. Cruise Control Buttons
O. Tilt Steering Wheel Lever
P. Horn
Q. Audio Steering Wheel Controls
(if equipped)
R. Transfer Case Control
(if equipped)
S. Accessory Power Outlets
T. Adjustable Pedals Switch
(if equipped)
U. Ultrasonic Rear Parking Assist
Button (if equipped)
V. StabiliTrak Button
(if equipped)
W. Heated Windshield Washer Fluid
Button (if equipped)
X. Climate Controls
Y. Glove Box
ABEFHAI
KLMOPQRST
A
U
CJ
VWXS
A
Y
D
N
G
Page 3 of 24

D. Instrument P")
3
See Section 3 of your Owner Manual.
The main features of the instrument
panel include:
A. Air Outlets
B. Turn Signal/Multifunction Lever
C. Outside Temperature/Compass
(if equipped)
D. Instrument Panel Cluster
E. Range Selection Mode Button
(6-Speed Automatic Transmission,
if equipped)
F. Shift Lever
G. Tow/Haul Selector Button (if equipped)
H. Driver Information Center Controls
I. Audio System/Navigation
Entertainment System (if equipped)
J. Exterior Lamps Control
K. Dome Lamp Off Button/Fog Lamp
Button/Instrument Panel Brightness
Knob
Instrument Panel (Premium model)
ABEGHAAIC
JKLOPQRSXTUVWRN
L. Transfer Case Control (if equipped)
M. Integrated Trailer Brake Control
(if equipped)
N. Cruise Control Buttons
O. Tilt Steering Wheel Lever
P. Horn
Q. Audio Steering Wheel Controls
R. Accessory Power Outlets
S. Adjustable Pedals Switch
(if equipped)
T. Ultrasonic Rear Parking Assist
Button (if equipped)
U. StabiliTrak Button (if equipped)
V. Heated Windshield Washer Fluid
Button (if equipped)
W. Climate Controls
X. Glove Box
D
M
F
Page 4 of 24

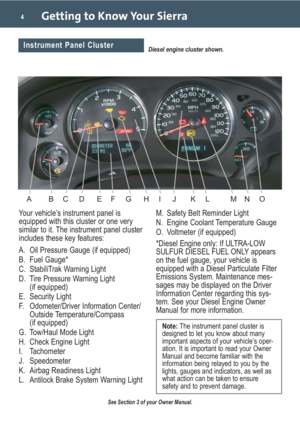
Getting to Know Your Sierra4
Your vehicle’s instrument panel is
equipped with this cluster or one very
similar to it. The instrument panel cluster
includes these key features:
A. Oil Pressure Gauge (if equipped)
B. Fuel Gauge*
C. StabiliTrak Warning Light
D. Tire Pressure Warning Light
(if equipped)
E. Security Light
F. Odometer/Driver Information Center/
Outside Temperature/Compass
(if equipped)
G. Tow/Haul Mode Light
H. Check Engine Light
I. Tachometer
J. Speedometer
K. Airbag Readiness Light
L. Antilock Brake System Warning LightM. Safety Belt Reminder Light
N. Engine Coolant Temperature Gauge
O. Voltmeter (if equipped)
*Diesel Engine only: If ULTRA-LOW
SULFUR DIESEL FUEL ONLY appears
on the fuel gauge, your vehicle is
equipped with a Diesel Particulate Filter
Emissions System. Maintenance mes-
sages may be displayed on the Driver
Information Center regarding this sys-
tem. See your Diesel Engine Owner
Manual for more information.
See Section 3 of your Owner Manual.
Note:The instrument panel cluster is
designed to let you know about many
important aspects of your vehicle’s oper-
ation. It is important to read your Owner
Manual and become familiar with the
information being relayed to you by the
lights, gauges and indicators, as well as
what action can be taken to ensure
safety and to prevent damage.
Diesel engine cluster shown.Instrument Panel Cluster
ABDFGHEIKLJNOMC
Page 5 of 24

5
Voltmeter Operation
The voltmeter shows the condition of the
vehicle’s charging system. The system
is designed to regulate voltage output to
help improve fuel economy and extend
battery life. Normal system operation
readings may fluctuate (as indicated by
the blue area in the illustration above)
based on vehicle operation, including
the number of electrical accessories
being operated and engine speed.
See Section 3 of your Owner Manual.
Driver Information Center
Your vehicle’s Driver Information Center
(DIC) provides vehicle information, vehi-
cle feature customization (if equipped),
and vehicle warning messages. The DIC
messages will be shown on the instru-
ment panel cluster display.
DIC Controls (if equipped)
The following DIC
controls are locat-
ed on the left or
right side (depend-
ing on model) of
the instrument
panel cluster:
(Trip/Fuel):
Press this button
to display the following trip and fuel
information:
• Outside Temperature/Compass
• Odometer
• Trip Odometer
• Fuel Range
• Average Economy
• Fuel Used
• Timer
• Transmission Temperature
• Instantaneous Economy (if equipped)
• Active Fuel Management
™
(if equipped)
(Vehicle Information):Press this
button to display the following vehicle
information:
• Oil Life
• Display Units (English/Metric)
• Tire Pressure (if equipped)
• Trailer Gain and Output (if equipped)
• Engine Hours
• Tire Pressure System Programming
(if equipped)
• Remote Keyless Entry Programming
• Compass Zone Setting
• Compass Calibration
Page 6 of 24
:Press this button
to scroll through the following custom-
ization features:
• Display Language
• Auto Door Lock
• Auto Door Unlock
• Remote Door Lo")
Getting to Know Your Sierra6
(Customization):Press this button
to scroll through the following custom-
ization features:
• Display Language
• Auto Door Lock
• Auto Door Unlock
• Remote Door Lock
• Remote Door Unlock
• Delay Door Lock
• Exit Lighting
• Approach Lighting
• Chime Volume
• Park Tilt Mirrors (if equipped)
• Easy Exit Seat Recall (if equipped)
• Easy Exit Seat Setup (if equipped)
• Memory Seat Recall (if equipped)
• Remote Start (if equipped)
• Factory Settings
• Exit Feature Settings
(Set/Reset):Press this button to set
or reset DIC information while it is dis-
played or to acknowledge a warning
message.
Customization Settings
To customize features:
1. With the vehicle in Park, turn on the
ignition.
2. Press the (Customization) button
to display available customization
features.
3. With the desired customization
feature displayed, press the
(Set/Reset) button to access the
feature settings.
4. Press the button to scroll through
the available settings.5. With the desired setting displayed,
press the button to select it.
6. Press the button to scroll to the
next feature.
7. To exit the Feature Settings menu,
press the button until EXIT
FEATURE SETTINGS is displayed
and then press the button; or
press the button or the
button.
Compass Operation
To adjust for compass variance when
traveling on a long-distance trip or to
calibrate the compass, refer to your
Owner Manual.
Warnings and Messages
The DIC provides a variety of vehicle
warning messages (depending on
optional equipment) if a problem is
sensed in a vehicle system. To acknowl-
edge a message and clear it from the
display, press the (Set/Reset) button.
Some urgent messages cannot be
cleared from the DIC display.
If you have a current OnStar subscrip-
tion, and a warning message appears,
you can press the OnStar button and
speak to an OnStar Advisor. In many
vehicles, OnStar Advisors can access
certain diagnostic information and can
tell you how serious the problem is and
what you should do about it.
See Section 3 of your Owner Manual.
Note: Your vehicle’s warnings and mes-
sages provide critical information that
can prevent damage to your vehicle.
Review your Owner Manual to become
familiar with the information displayed
and the action required.
Page 7 of 24

SAFETY & SECURITY
The Remote
Keyless Entry (RKE)
transmitter includes
the following
functions:
(Remote
Vehicle Start)
(if equipped): This
feature can be used to s")
7
Remote Keyless Entry
(if equipped)
SAFETY & SECURITY
The Remote
Keyless Entry (RKE)
transmitter includes
the following
functions:
(Remote
Vehicle Start)
(if equipped): This
feature can be used to start the engine
from outside the vehicle. (See Remote
Vehicle Start.)
(Lock):Press this button to lock all
the doors. RKE feedback (light flash
and/or horn chirp) can be programmed
using the DIC.
(Unlock):Press this button to unlock
the driver’s door. Press it again within
five seconds to unlock all remaining
doors. RKE feedback (light flash) can
be programmed using the DIC.
(Vehicle Locator/Panic Alarm):
Press this button to locate your vehicle.
The turn signal lamps will flash and the
horn will sound three times.
Press and hold the button to activate the
panic alarm. The turn signal lamps will
flash and the horn will sound for 30 sec-
onds. Press the button again or turn the
ignition to Run to cancel the alarm.
See Section 2 of your Owner Manual.
Content Theft-Deterrent System
(if equipped with RKE)
To arm the content theft-deterrent
alarm system, lock the doors using the
Remote Keyless Entry (RKE) transmit-
ter. The security light on the instrument
panel cluster will flash for approximately
30 seconds to indicate the alarm is acti-
vated. To disarm the system, unlock the
doors using the RKE transmitter.
The alarm system will not be armed or
disarmed if the doors are locked or
unlocked with a key or the manual
door lock.
See Section 2 of your Owner Manual.
Your vehicle may feature the OnStar
Safe & Sound Plan or the uplevel
OnStar Directions & Connections Plan,
with one year of OnStar service from the
date you purchased your new vehicle.
OnStar offers a variety of capabilities,
such as Remote Door Unlock, Automatic
Notification of Airbag Deployment, and
Hands-Free Calling. In addition, most
vehicles can get driving directions using
Turn-by-Turn Navigation or Destination
Download. OnStar Advisors can send a
planned route to your vehicle and, as
you approach a turn, instructions play
over your vehicle speakers or are
displayed on the navigation screen
(if equipped). Press the OnStar button to
ask an OnStar Advisor about the service
plan you have or to upgrade your plan.
For more information, refer to your
OnStar Owner’s Guide, call
1-888-4-ONSTAR (1-888-466-7827),
or visit onstar.com.
See Section 2 of your Owner Manual.
OnStar®(if equipped)
Page 8 of 24
 to move the seat fo")
Getting to Know Your Sierra8
The following power seat controls are
located on the outboard side of the
driver and front passenger seats:
Power Seat: Use the horizontal control
(A) to move the seat forward/rearward
and up/down as well as to raise/lower
the front or rear of the seat cushion.
Power Recline(if equipped): Use the
vertical control (B) to recline/raise the
seatback.
Power Lumbar(if equipped): Use the
round control (C) to increase/decrease
lumbar support.
See Section 1 of your Owner Manual.
Power Seat Controls
(if equipped)
COMFORT
A
B
C
The following
heated seat
controls are
located on the
front doors:
(Heated
Seatback):
Press the top
button to turn
on the heated seatback.
Heated Seats (if equipped)
Memory Settings (if equipped)
The memory buttons are located on the
driver’s door next to the heated seat
controls. Settings can be programmed
for the driver’s seat, the outside mirrors
and the adjustable pedals (if equipped)
for two drivers.(Heated Seat/Seatback):Press the
bottom button to turn on the heated seat
and seatback.
Continue to press the desired button to
cycle through the temperature settings
of High (three indicator lights), Medium
(two indicator lights), Low (one indicator
light) and Off (all indicator lights are off).
Heated seat operation is canceled each
time the ignition is turned off.
See Section 1 of your Owner Manual.
The following heated and cooled front
seat controls are located on the front
doors:
(Heated Seat): Press the bottom
button to turn on the heated seat.
(Cooled Seat):Press the top button
to turn on the cooled seat.
Continue to press the desired button to
cycle through the temperature settings
of High (three indicator lights), Medium
(two indicator lights), Low (one indicator
light), and Off (no indicator lights).
See Section 1 of your Owner Manual.
Heated and Cooled Seats
(if equipped)