2009 GMC SAVANA PASSENGER tire size
[x] Cancel search: tire sizePage 82 of 406

Adding Equipment to Your
Airbag-Equipped Vehicle
Q:Is there anything I might add to or change
about the vehicle that could keep the airbags
from working properly?
A:Yes. If you add things that change the vehicle’s
frame, bumper system, height, front end or side
sheet metal, they may keep the airbag system from
working properly. Changing or moving any parts
of the front seats, safety belts, the airbag sensing
and diagnostic module, steering wheel, instrument
panel, roof-rail airbag modules, ceiling headliner
or pillar garnish trim, front sensors, or airbag wiring
can affect the operation of the airbag system.
In addition, the vehicle may have a passenger
sensing system for the right front passenger
position, which includes sensors that are part of the
passenger seat. The passenger sensing system
may not operate properly if the original seat trim is
replaced with non-GM covers, upholstery or
trim, or with GM covers, upholstery or trim designed
for a different vehicle. Any object, such as an
aftermarket seat heater or a comfort enhancing pad
or device, installed under or on top of the seat
fabric, could also interfere with the operation of the
passenger sensing system. This could eitherprevent proper deployment of the passenger
airbag(s) or prevent the passenger sensing system
from properly turning off the passenger airbag(s).
SeePassenger Sensing System on page 1-71.
If you have any questions about this, you should
contact Customer Assistance before you modify the
vehicle. The phone numbers and addresses for
Customer Assistance are in Step Two of the
Customer Satisfaction Procedure in this manual.
SeeCustomer Satisfaction Procedure on page 7-2.
If the vehicle has rollover roof-rail airbags, see
Different Size Tires and Wheels on page 5-75for
additional important information.
Q:Because I have a disability, I have to get my
vehicle modi�ed. How can I �nd out whether
this will affect my airbag system?
A:If you have questions, call Customer Assistance.
The phone numbers and addresses for Customer
Assistance are in Step Two of the Customer
Satisfaction Procedure in this manual. See
Customer Satisfaction Procedure on page 7-2.
In addition, your dealer/retailer and the service manual
have information about the location of the airbag
sensors, sensing and diagnostic module and airbag
wiring.
1-78
Page 204 of 406
Your Driving, the Road, and
the Vehicle
Driving for Better Fuel Economy
Driving habits can affect fuel mileage. Here are some
driving tips to get the best fuel economy possible.
•Avoid fast starts and accelerate smoothly.
•Brake gradually and avoid abrupt stops.
•Avoid idling the engine for long periods of time.
•When road and weather conditions are appropriate,
use cruise control, if equipped.
•Always follow posted speed limits or drive more
slowly when conditions require.
•Keep vehicle tires properly inflated.
•Combine several trips into a single trip.
•Replace the vehicle’s tires with the same TPC Spec
number molded into the tire’s sidewall near
the size.
•Follow recommended scheduled maintenance.
Defensive Driving
Defensive driving means “always expect the
unexpected.” The first step in driving defensively is to
wear your safety belt — SeeSafety Belts: They Are for
Everyone on page 1-10.
{CAUTION:
Assume that other road users (pedestrians,
bicyclists, and other drivers) are going to be
careless and make mistakes. Anticipate what they
might do and be ready. In addition:
•Allow enough following distance between you
and the driver in front of you.
•Focus on the task of driving.
Driver distraction can cause collisions resulting in
injury or possible death. These simple defensive
driving techniques could save your life.
4-2
Page 221 of 406
Tire and Loading Information Label
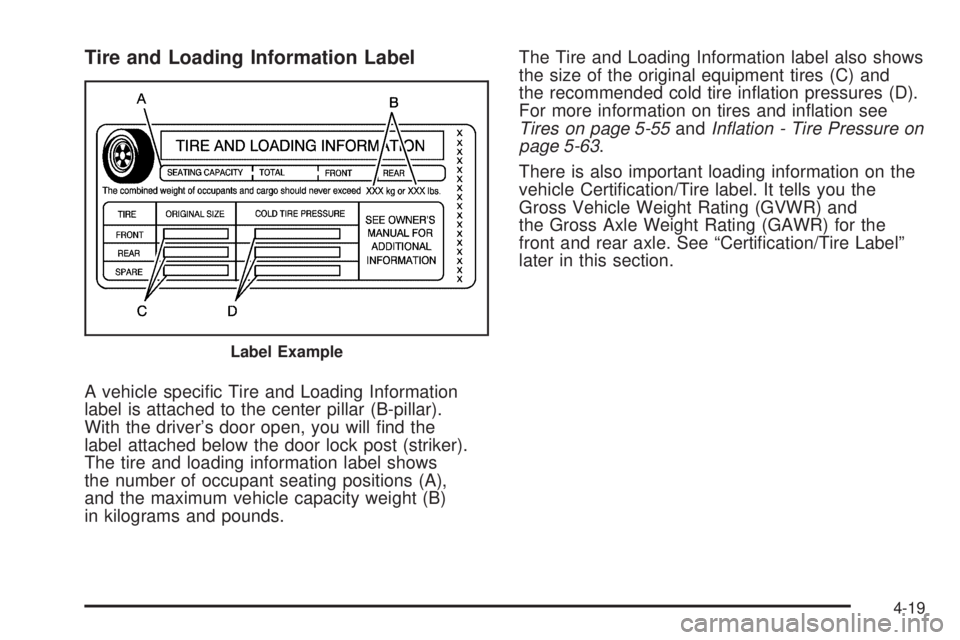
A vehicle specific Tire and Loading Information
label is attached to the center pillar (B-pillar).
With the driver’s door open, you will find the
label attached below the door lock post (striker).
The tire and loading information label shows
the number of occupant seating positions (A),
and the maximum vehicle capacity weight (B)
in kilograms and pounds.The Tire and Loading Information label also shows
the size of the original equipment tires (C) and
the recommended cold tire inflation pressures (D).
For more information on tires and inflation see
Tires on page 5-55andInflation - Tire Pressure on
page 5-63.
There is also important loading information on the
vehicle Certification/Tire label. It tells you the
Gross Vehicle Weight Rating (GVWR) and
the Gross Axle Weight Rating (GAWR) for the
front and rear axle. See “Certification/Tire Label”
later in this section.
Label Example
4-19
Page 224 of 406
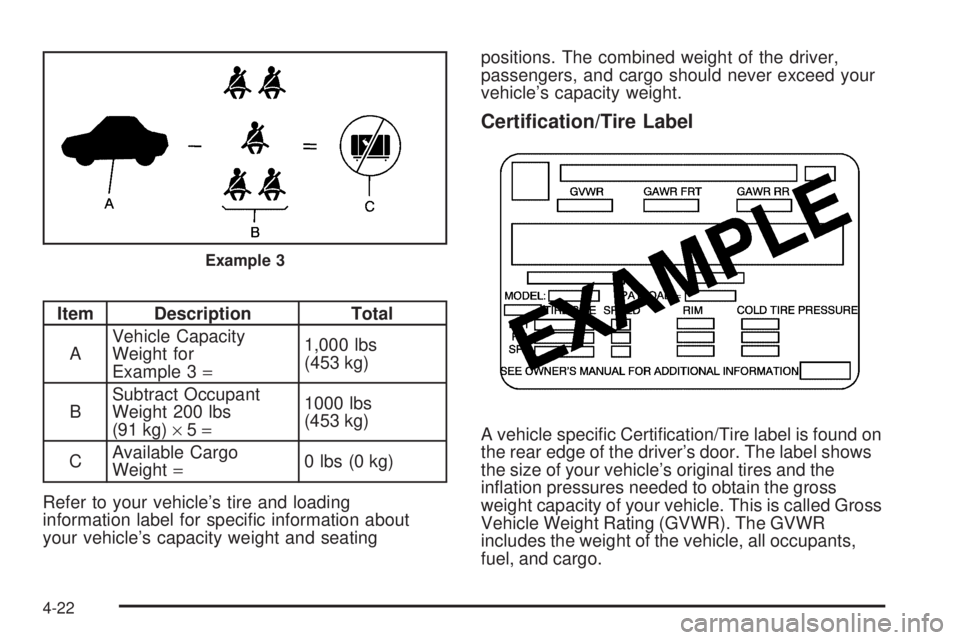
Item Description Total
AVehicle Capacity
Weight for
Example 3=1,000 lbs
(453 kg)
BSubtract Occupant
Weight 200 lbs
(91 kg)×5=1000 lbs
(453 kg)
CAvailable Cargo
Weight=0 lbs (0 kg)
Refer to your vehicle’s tire and loading
information label for specific information about
your vehicle’s capacity weight and seatingpositions. The combined weight of the driver,
passengers, and cargo should never exceed your
vehicle’s capacity weight.
Certi�cation/Tire Label
A vehicle specific Certification/Tire label is found on
the rear edge of the driver’s door. The label shows
the size of your vehicle’s original tires and the
inflation pressures needed to obtain the gross
weight capacity of your vehicle. This is called Gross
Vehicle Weight Rating (GVWR). The GVWR
includes the weight of the vehicle, all occupants,
fuel, and cargo.
Example 3
4-22
Page 244 of 406
Tires..............................................................5-55
Tire Sidewall Labeling...................................5-56
Tire Terminology and Definitions.....................5-60
Inflation - Tire Pressure.................................5-63
Dual Tire Operation.......................................5-64
Tire Pressure Monitor System.........................5-65
Tire Pressure Monitor Operation.....................5-66
Tire Inspection and Rotation...........................5-70
When It Is Time for New Tires.......................5-72
Buying New Tires.........................................5-73
Different Size Tires and Wheels......................5-75
Uniform Tire Quality Grading..........................5-75
Wheel Alignment and Tire Balance..................5-77
Wheel Replacement......................................5-77
Tire Chains..................................................5-78
If a Tire Goes Flat........................................5-79
Changing a Flat Tire.....................................5-80
Removing the Spare Tire and Tools................5-81
Removing the Flat Tire and Installing the
Spare Tire................................................5-84
Secondary Latch System...............................5-91
Storing a Flat or Spare Tire and Tools............5-94
Spare Tire...................................................5-95
Appearance Care............................................5-96
Interior Cleaning...........................................5-96
Fabric/Carpet...............................................5-97Instrument Panel, Vinyl, and Other Plastic
Surfaces..................................................5-98
Care of Safety Belts......................................5-98
Weatherstrips...............................................5-98
Washing Your Vehicle...................................5-99
Cleaning Exterior Lamps/Lenses.....................5-99
Finish Care................................................5-100
Windshield and Wiper Blades.......................5-100
Aluminum Wheels.......................................5-101
Tires.........................................................5-101
Sheet Metal Damage...................................5-101
Finish Damage...........................................5-102
Underbody Maintenance...............................5-102
Chemical Paint Spotting...............................5-102
Vehicle Identi�cation.....................................5-103
Vehicle Identification Number (VIN)................5-103
Service Parts Identification Label...................5-103
Electrical System..........................................5-103
Add-On Electrical Equipment.........................5-103
Headlamp Wiring........................................5-104
Windshield Wiper Fuses...............................5-104
Fuses and Circuit Breakers..........................5-104
Floor Console Fuse Block............................5-104
Engine Compartment Fuse Block...................5-106
Capacities and Speci�cations........................5-110
Section 5 Service and Appearance Care
5-2
Page 298 of 406
Tire Sidewall Labeling
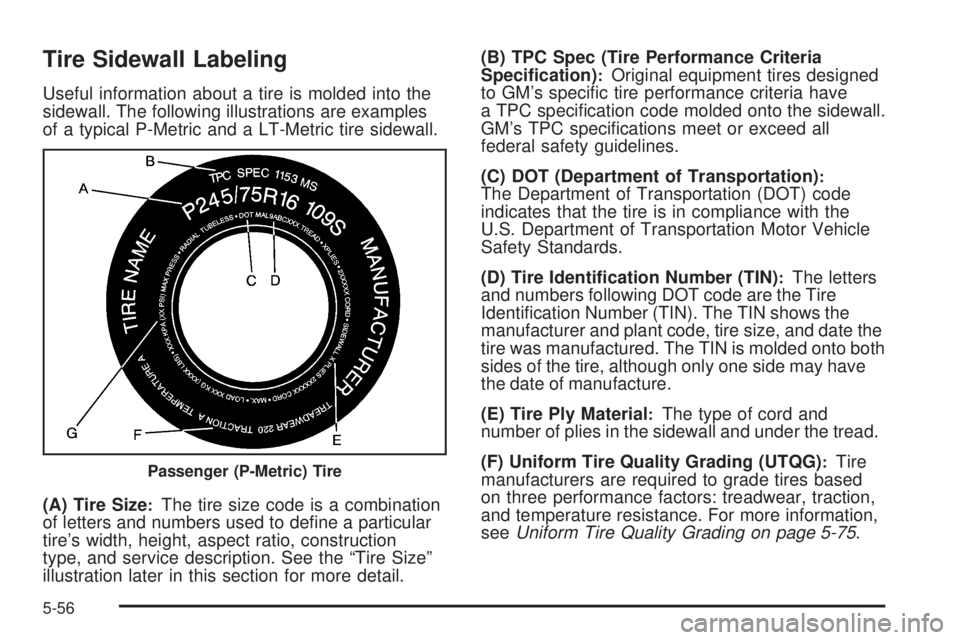
Useful information about a tire is molded into the
sidewall. The following illustrations are examples
of a typical P-Metric and a LT-Metric tire sidewall.
(A) Tire Size
:The tire size code is a combination
of letters and numbers used to define a particular
tire’s width, height, aspect ratio, construction
type, and service description. See the “Tire Size”
illustration later in this section for more detail.(B) TPC Spec (Tire Performance Criteria
Speci�cation)
:Original equipment tires designed
to GM’s specific tire performance criteria have
a TPC specification code molded onto the sidewall.
GM’s TPC specifications meet or exceed all
federal safety guidelines.
(C) DOT (Department of Transportation)
:The Department of Transportation (DOT) code
indicates that the tire is in compliance with the
U.S. Department of Transportation Motor Vehicle
Safety Standards.
(D) Tire Identi�cation Number (TIN)
:The letters
and numbers following DOT code are the Tire
Identification Number (TIN). The TIN shows the
manufacturer and plant code, tire size, and date the
tire was manufactured. The TIN is molded onto both
sides of the tire, although only one side may have
the date of manufacture.
(E) Tire Ply Material
:The type of cord and
number of plies in the sidewall and under the tread.
(F) Uniform Tire Quality Grading (UTQG)
:Tire
manufacturers are required to grade tires based
on three performance factors: treadwear, traction,
and temperature resistance. For more information,
seeUniform Tire Quality Grading on page 5-75.Passenger (P-Metric) Tire
5-56
Page 299 of 406
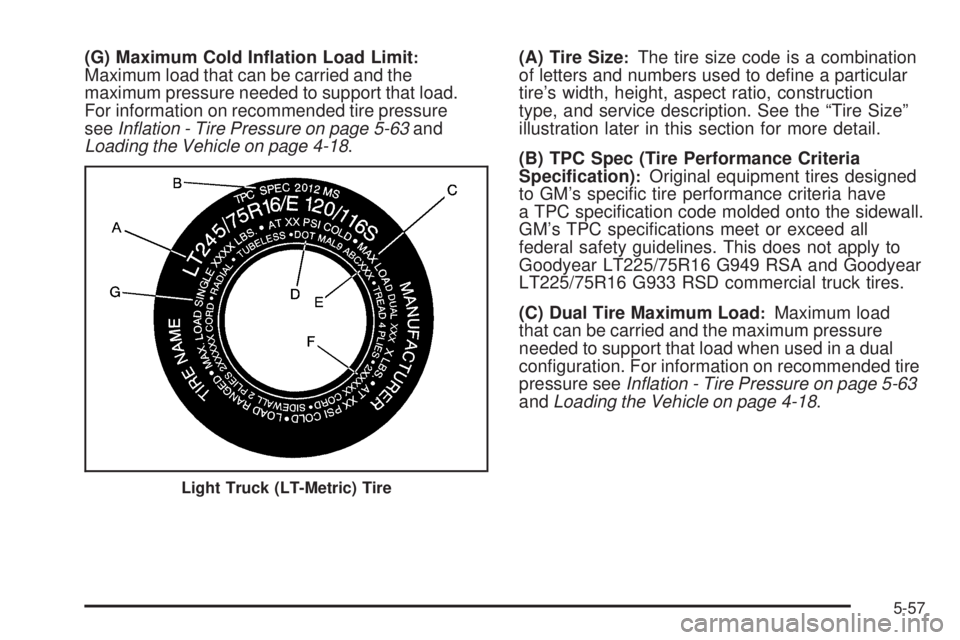
(G) Maximum Cold In�ation Load Limit:Maximum load that can be carried and the
maximum pressure needed to support that load.
For information on recommended tire pressure
seeInflation - Tire Pressure on page 5-63and
Loading the Vehicle on page 4-18.(A) Tire Size:The tire size code is a combination
of letters and numbers used to define a particular
tire’s width, height, aspect ratio, construction
type, and service description. See the “Tire Size”
illustration later in this section for more detail.
(B) TPC Spec (Tire Performance Criteria
Speci�cation)
:Original equipment tires designed
to GM’s specific tire performance criteria have
a TPC specification code molded onto the sidewall.
GM’s TPC specifications meet or exceed all
federal safety guidelines. This does not apply to
Goodyear LT225/75R16 G949 RSA and Goodyear
LT225/75R16 G933 RSD commercial truck tires.
(C) Dual Tire Maximum Load
:Maximum load
that can be carried and the maximum pressure
needed to support that load when used in a dual
configuration. For information on recommended tire
pressure seeInflation - Tire Pressure on page 5-63
andLoading the Vehicle on page 4-18.
Light Truck (LT-Metric) Tire
5-57
Page 300 of 406
(D) DOT (Department of Transportation):The Department of Transportation (DOT) code
indicates that the tire is in compliance with the
U.S. Department of Transportation Motor Vehicle
Safety Standards.
(E) Tire Identi�cation Number (TIN)
:The letters
and numbers following DOT code are the Tire
Identification Number (TIN). The TIN shows the
manufacturer and plant code, tire size, and date the
tire was manufactured. The TIN is molded onto both
sides of the tire, although only one side may have
the date of manufacture.
(F) Tire Ply Material
:The type of cord and
number of plies in the sidewall and under the tread.
(G) Single Tire Maximum Load
:Maximum load
that can be carried and the maximum pressure
needed to support that load when used as a single.
For information on recommended tire pressure see
Inflation - Tire Pressure on page 5-63andLoading
the Vehicle on page 4-18.
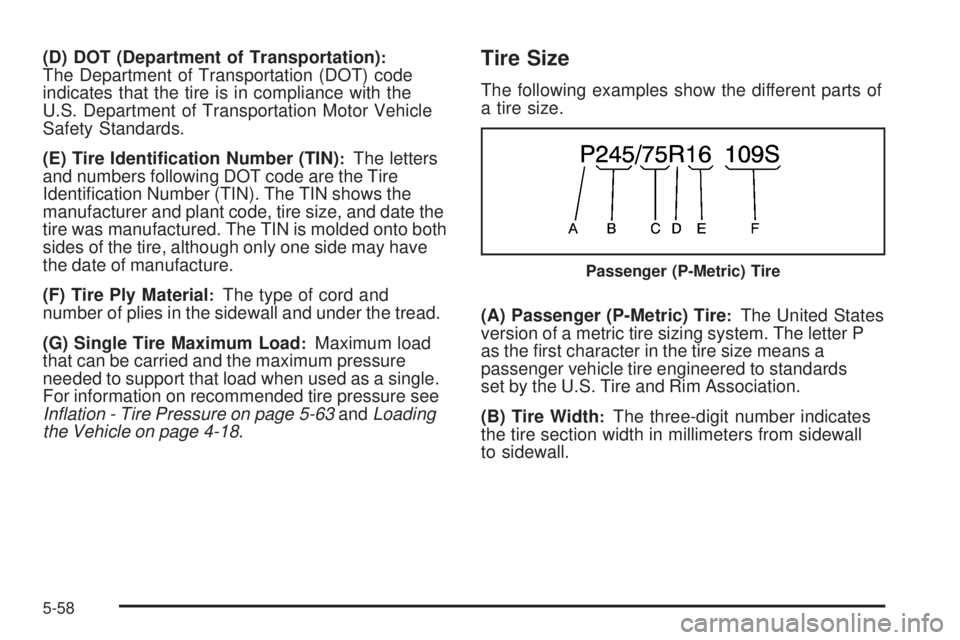
Tire Size
The following examples show the different parts of
a tire size.
(A) Passenger (P-Metric) Tire
:The United States
version of a metric tire sizing system. The letter P
as the first character in the tire size means a
passenger vehicle tire engineered to standards
set by the U.S. Tire and Rim Association.
(B) Tire Width
:The three-digit number indicates
the tire section width in millimeters from sidewall
to sidewall.
Passenger (P-Metric) Tire
5-58