2009 GMC SAVANA PASSENGER low beam
[x] Cancel search: low beamPage 4 of 406

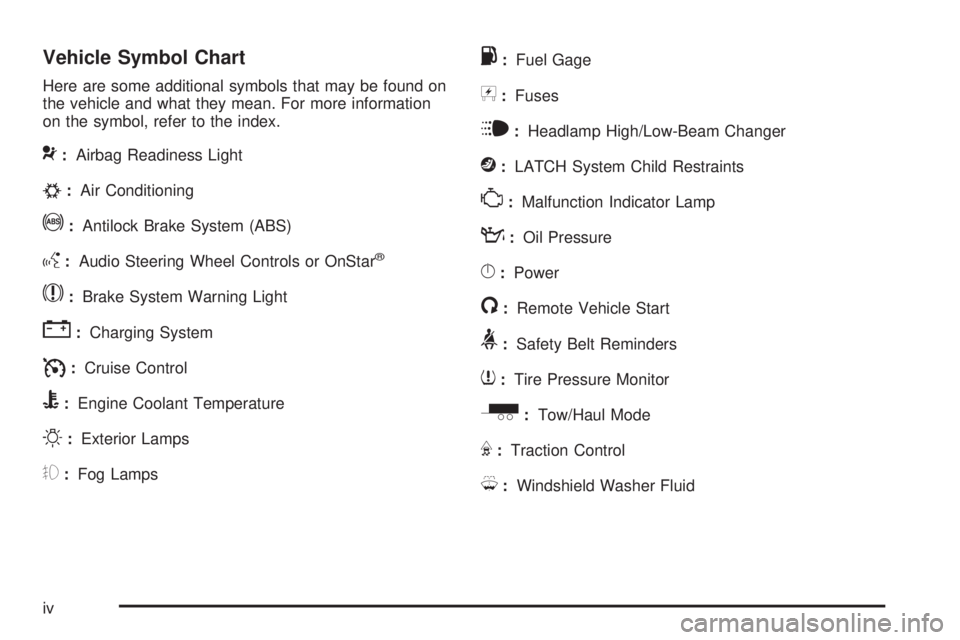
Vehicle Symbol Chart
Here are some additional symbols that may be found on
the vehicle and what they mean. For more information
on the symbol, refer to the index.
9:Airbag Readiness Light
#:Air Conditioning
!:Antilock Brake System (ABS)
g:Audio Steering Wheel Controls or OnStar®
$:Brake System Warning Light
":Charging System
I:Cruise Control
B:Engine Coolant Temperature
O:Exterior Lamps
#:Fog Lamps
.:Fuel Gage
+:Fuses
i:Headlamp High/Low-Beam Changer
j:LATCH System Child Restraints
*:Malfunction Indicator Lamp
::Oil Pressure
}:Power
/:Remote Vehicle Start
>:Safety Belt Reminders
7:Tire Pressure Monitor
_:Tow/Haul Mode
F:Traction Control
M:Windshield Washer Fluid
iv
Page 119 of 406

Instrument Panel Overview...............................3-4
Hazard Warning Flashers................................3-6
Horn .............................................................3-6
Tilt Wheel.....................................................3-6
Turn Signal/Multifunction Lever.........................3-7
Turn and Lane-Change Signals........................3-7
Headlamp High/Low-Beam Changer..................3-8
Flash-to-Pass.................................................3-8
Windshield Wipers..........................................3-8
Windshield Washer.........................................3-9
Cruise Control................................................3-9
Exterior Lamps.............................................3-12
Headlamps on Reminder................................3-13
Daytime Running Lamps (DRL).......................3-14
Automatic Headlamp System..........................3-14
Instrument Panel Brightness...........................3-15
Dome Lamps ...............................................3-15
Dome Lamp Override....................................3-15
Entry/Exit Lighting.........................................3-16
Reading Lamps............................................3-16
Electric Power Management...........................3-16
Battery Run-Down Protection..........................3-17
Accessory Power Outlet(s).............................3-17
Ashtray(s) and Cigarette Lighter......................3-18Climate Controls............................................3-18
Climate Control System.................................3-18
Outlet Adjustment.........................................3-20
Rear Heating System....................................3-21
Rear Air Conditioning and Heating System.......3-22
Warning Lights, Gages, and Indicators............3-23
Instrument Panel Cluster................................3-24
Speedometer and Odometer...........................3-25
Trip Odometer..............................................3-25
Safety Belt Reminders...................................3-26
Airbag Readiness Light
..................................3-27
Airbag Off Light............................................3-28
Passenger Airbag Status Indicator...................3-29
Charging System Light..................................3-30
Voltmeter Gage............................................3-31
Brake System Warning Light..........................3-31
Antilock Brake System (ABS) Warning Light.....3-32
StabiliTrak
®Indicator Light.............................3-33
Engine Coolant Temperature Gage..................3-33
Tire Pressure Light.......................................3-34
Malfunction Indicator Lamp.............................3-34
Oil Pressure Gage........................................3-37
Oil Pressure Light.........................................3-38
Section 3 Instrument Panel
3-1
Page 125 of 406

Turn Signal/Multifunction Lever
The lever on the left side of the steering column
includes the following:
G:Turn and Lane Change Signals.
53:Headlamp High/Low-Beam Changer.
N:Windshield Wipers.
L:Windshield Washer.
Flash-to-Pass Feature.
Information for these features is on the pages following.
Turn and Lane-Change Signals
G:An arrow on the instrument panel cluster flashes
in the direction of the turn or lane change.
To signal a turn, move the lever all the way up or down.
To signal a lane change, raise or lower the lever until
the arrow starts to flash. The turn signal automatically
flashes three times and if the tow-haul mode is active it
flashes six times. Holding the turn signal lever for
more than one second causes the turn signals to flash
continually until the lever is released.
The lever returns to its starting position when released.
If after signaling a turn or lane change the arrow
flashes rapidly or does not come on, a signal bulb may
be burned out.
Have the bulbs replaced. If the bulb is not burned out,
check the fuse. SeeFuses and Circuit Breakers on
page 5-104.
Turn Signal On Chime
If the turn signal is left on for more than 3/4 of a mile
(1.2 km), a chime sounds at each flash of the turn signal
and the message TURN SIGNAL ON also appears in
the Driver Information Center (DIC). SeeDIC Warnings
and Messages on page 3-48. To turn off the chime
and message, move the turn signal lever to the
off position.
3-7
Page 126 of 406

Headlamp High/Low-Beam Changer
23(Headlamp High/Low-Beam Changer):Pull the
turn signal lever all the way toward you to change the
headlamps from low to high beam. Then release it.
This instrument panel cluster light comes on when the
high beam headlamps are on.
Flash-to-Pass
This feature is used to signal to the vehicle ahead that
you want to pass.
If the headlamps are off or in the low-beam position,
pull the turn signal lever toward you to momentarily
switch to high-beams.
Release the lever to turn the high-beam headlamps off.
Windshield Wipers
The windshield wiper control is located on the
multifunction lever on the left side of the steering wheel.
Turn the band with
Non it to the following positions:
8(Mist):For a single wiping cycle, hold the band
on mist until the wipers start, then let go. The wipers will
stop after one wipe. If more wipes are needed, hold
the band on mist longer.
6Delay:Turn the band to adjust the delay time between
wipes. The closer to the top of the lever, the shorter
the delay.
d(Low Speed):For steady wiping at low speed.
a(High Speed):For steady wiping at high speed.
9(Off):Turns the wipers off.
When driving during the day and the wipers are
activated, the head lamps automatically turn on after
completing eight wipe cycles.
Be sure to clear ice and snow from the wiper blades
before using them. If they are frozen to the windshield,
carefully loosen or thaw them. If the blades become
damaged, get new blades or blade inserts.
3-8
Page 131 of 406

For vehicles first sold in Canada, the off position only
works for vehicles that are shifted into the P (Park)
position.
AUTO (Automatic):Turns on the headlamps
automatically at normal brightness, together with the
following:
•Parking Lamps
•Instrument Panel Lights
•Taillamps
•License Plate Lamps
;(Parking Lamps):Turns on the parking lamps
together with the following:
•Instrument Panel Lights
•Taillamps
•License Plate Lamps
2(Headlamps):Turns on the headlamps together
with the following lamps listed below.
•Parking Lamps
•Instrument Panel Lights
•Taillamps
•License Plate LampsIf the headlamps are turned on while the vehicle is on,
the headlamps turn off automatically 10 minutes
after the ignition is turned off. If the headlamps are
turned on while the vehicle is off, the headlamps will
continue to stay on. To prevent the battery from
being drained, turn the control to the
9position.
A warning chime sounds if the driver door is opened
while the ignition switch is off and the headlamps are on.
To change the headlamps from low beam to high
beam, push the turn signal/multifunction lever toward
the instrument panel.
Headlamps on Reminder
If a door is open, a reminder chime sounds when the
headlamps or parking lamps are manually turned on and
the key is out of the ignition. To turn off the chime,
turn the headlamp switch to off or auto and then back
on, or close and re-open the door. In the auto mode, the
headlamps turn off once the ignition is in LOCK/OFF
or may remain on until the headlamp delay ends,
if enabled in the Driver Information Center (DIC). See
“Exit Lighting” underDIC Vehicle Customization on
page 3-57.
3-13
Page 134 of 406

Entry/Exit Lighting
The vehicle has an illuminated entry/exit feature.
The dome lamps come on if the dome override button is
in the out position, when a door is opened or the key
is removed from the ignition.
Reading Lamps
For vehicles with reading lamps, press the button
located next to each lamp to turn it on or off.
The vehicle may also have reading lamps in other
locations. The lamps cannot be adjusted.
Electric Power Management
The vehicle has Electric Power Management (EPM) that
estimates the battery’s temperature and state of
charge. It then adjusts the voltage for best performance
and extended life of the battery.
When the battery’s state of charge is low, the voltage is
raised slightly to quickly bring the charge back up.
When the state of charge is high, the voltage is lowered
slightly to prevent overcharging. If the vehicle has a
voltmeter gage or a voltage display on the Driver
Information Center (DIC), you may see the voltage move
up or down. This is normal. If there is a problem, an
alert will be displayed.The battery can be discharged at idle if the electrical
loads are very high. This is true for all vehicles. This is
because the generator (alternator) may not be
spinning fast enough at idle to produce all the power
that is needed for very high electrical loads.
A high electrical load occurs when several of the
following are on, such as: headlamps, high beams, fog
lamps, rear window defogger, climate control fan at
high speed, heated seats, engine cooling fans, trailer
loads, and loads plugged into accessory power outlets.
EPM works to prevent excessive discharge of the
battery. It does this by balancing the generator’s output
and the vehicle’s electrical needs. It can increase
engine idle speed to generate more power, whenever
needed. It can temporarily reduce the power demands of
some accessories.
Normally, these actions occur in steps or levels, without
being noticeable. In rare cases at the highest levels of
corrective action, this action may be noticeable to the
driver. If so, a Driver Information Center (DIC) message
might be displayed, such as BATTERY SAVER ACTIVE,
BATTERY VOLTAGE LOW, or LOW BATTERY. If this
message is displayed, it is recommended that the driver
reduce the electrical loads as much as possible. SeeDIC
Warnings and Messages on page 3-48.
3-16
Page 157 of 406

This light comes on briefly while starting the engine.
If it does not, have the vehicle serviced by your
dealer/retailer. If the system is working normally the
indicator light then goes off.
If the light comes on and stays on, it means that oil is
not flowing through the engine properly. The vehicle
could be low on oil and it might have some other system
problem.
Security Light
For information regarding
this light and the vehicle’s
security system, see
PASS-Key
®III+ Electronic
Immobilizer Operation
on page 2-17.
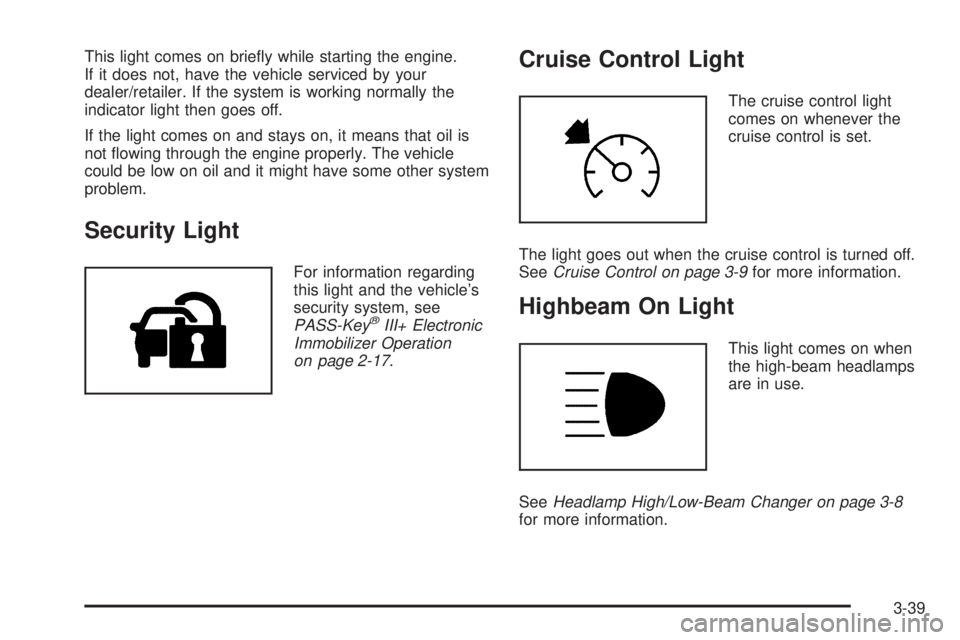
Cruise Control Light
The cruise control light
comes on whenever the
cruise control is set.
The light goes out when the cruise control is turned off.
SeeCruise Control on page 3-9for more information.
Highbeam On Light
This light comes on when
the high-beam headlamps
are in use.
SeeHeadlamp High/Low-Beam Changer on page 3-8
for more information.
3-39
Page 295 of 406

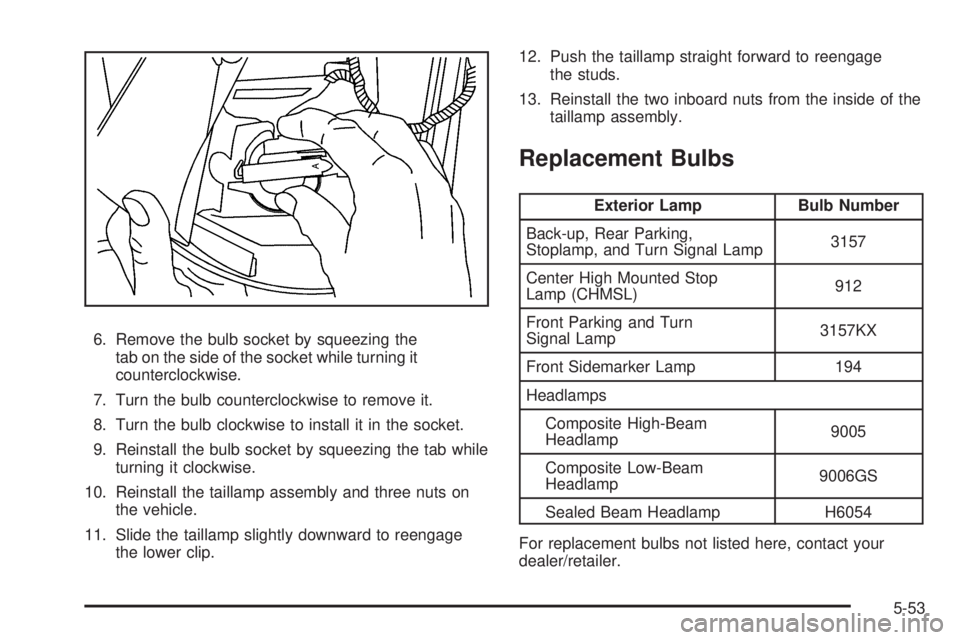
6. Remove the bulb socket by squeezing the
tab on the side of the socket while turning it
counterclockwise.
7. Turn the bulb counterclockwise to remove it.
8. Turn the bulb clockwise to install it in the socket.
9. Reinstall the bulb socket by squeezing the tab while
turning it clockwise.
10. Reinstall the taillamp assembly and three nuts on
the vehicle.
11. Slide the taillamp slightly downward to reengage
the lower clip.12. Push the taillamp straight forward to reengage
the studs.
13. Reinstall the two inboard nuts from the inside of the
taillamp assembly.
Replacement Bulbs
Exterior Lamp Bulb Number
Back-up, Rear Parking,
Stoplamp, and Turn Signal Lamp3157
Center High Mounted Stop
Lamp (CHMSL)912
Front Parking and Turn
Signal Lamp3157KX
Front Sidemarker Lamp 194
Headlamps
Composite High-Beam
Headlamp9005
Composite Low-Beam
Headlamp9006GS
Sealed Beam Headlamp H6054
For replacement bulbs not listed here, contact your
dealer/retailer.
5-53