2009 GMC SAVANA PASSENGER change time
[x] Cancel search: change timePage 2 of 406

GENERAL MOTORS, GM, the GM Emblem, GMC, the
GMC Truck Emblem, and the name SAVANA are
registered trademarks of General Motors Corporation.
This manual includes the latest information at the time it
was printed. GM reserves the right to make changes after
that time without further notice. For vehicles first sold in
Canada, substitute the name “General Motors of Canada
Limited” for GMC wherever it appears in this manual.
This manual describes features that may or may not be
on your specific vehicle.
If the vehicle has the DURAMAX
®Diesel engine, refer to
the DURAMAX®Diesel supplement for additional and
specific information on this engine.
Read this manual from beginning to end to learn about
the vehicle’s features and controls. Pictures, symbols,
and words work together to explain vehicle operation.
Keep this manual in the vehicle for quick reference.
Canadian Owners
A French language copy of this manual can be obtained
from your dealer/retailer or from:
Helm, Incorporated
P.O. Box 07130
Detroit, MI 48207
1-800-551-4123
www.helminc.com
Propriétaires Canadiens
On peut obtenir un exemplaire de ce guide en français
auprès de concessionnaire ou à l’adresse suivante:
Helm, Incorporated
P.O. Box 07130
Detroit, MI 48207
1-800-551-4123
www.helminc.com
Index
To quickly locate information about the vehicle, use the
index in the back of the manual. It is an alphabetical
list of what is in the manual and the page number where
it can be found.
Litho in U.S.A.
Part No. 25776481 B Second Printing
©2008 General Motors Corporation. All Rights Reserved.
ii
Page 38 of 406

Infants and Young Children
Everyone in a vehicle needs protection! This includes
infants and all other children. Neither the distance
traveled nor the age and size of the traveler changes
the need, for everyone, to use safety restraints. In fact,
the law in every state in the United States and in
every Canadian province says children up to some age
must be restrained while in a vehicle.
{CAUTION:
Children can be seriously injured or strangled if a
shoulder belt is wrapped around their neck and
the safety belt continues to tighten. Never leave
children unattended in a vehicle and never allow
children to play with the safety belts.
Airbags plus lap-shoulder belts offer protection for adults
and older children, but not for young children and infants.
Neither the vehicle’s safety belt system nor its airbagsystem is designed for them. Every time infants and
young children ride in vehicles, they should have the
protection provided by appropriate child restraints.
Children who are not restrained properly can strike other
people, or can be thrown out of the vehicle.
{CAUTION:
Never do this.
Never hold an infant or a child while riding in a
vehicle. Due to crash forces, an infant or a child
will become so heavy it is not possible to hold it
during a crash. For example, in a crash at only
25 mph (40 km/h), a 12 lb (5.5 kg) infant will
suddenly become a 240 lb (110 kg) force on a
person’s arms. An infant should be secured in an
appropriate restraint.
1-34
Page 101 of 406

This device complies with RSS-210 of Industry Canada.
Operation is subject to the following two conditions:
1. This device may not cause interference.
2. This device must accept any interference received,
including interference that may cause undesired
operation of the device.
Changes or modifications to this system by other than
an authorized service facility could void authorization to
use this equipment.
PASS-Key III+ uses a radio frequency transponder in
the key that matches a decoder in the vehicle.
PASS-Key®III+ Electronic
Immobilizer Operation
Your vehicle is equipped with the PASS-Key®III+
(Personalized Automotive Security System)
theft-deterrent system. PASS-Key
®III+ is a passive
theft deterrent system.
The system is automatically armed when the key is
removed from the ignition.
You do not have to manually arm or disarm the system.
The security light will come on if there is a problem
with arming or disarming the theft-deterrent system.When the PASS-Key
®III+ system senses that someone
is using the wrong key, it shuts down the vehicle’s
starter and fuel systems. The starter will not work and
fuel will stop being delivered to the engine. Anyone
using a trial-and-error method to start the vehicle will be
discouraged because of the high number of electrical
key codes.
If the engine does not start and the security message
comes on, the key may have a damaged transponder.
Turn the ignition off and try again.
If the engine still does not start, and the key appears to
be undamaged, try another ignition key. At this time,
you may also want to check the instrument panel PASS
KEY fuse. If the engine still does not start with the
other key, your vehicle needs service. If your vehicle
does start, the first key may be faulty. See your
dealer/retailer or a locksmith who can service the
PASS-Key
®III+ to have a new key made. SeeFuses
and Circuit Breakers on page 5-104.
It is possible for the PASS-Key
®III+ decoder to learn
the transponder value of a new or replacement key. Up
to 10 keys may be programmed for the vehicle. This
procedure is for learning additional keys only. If all the
currently programmed keys are lost or do not operate,
you must see your dealer/retailer or a locksmith who can
service PASS-Key
®III+ to have keys made and
programmed to the system.
2-17
Page 119 of 406

Instrument Panel Overview...............................3-4
Hazard Warning Flashers................................3-6
Horn .............................................................3-6
Tilt Wheel.....................................................3-6
Turn Signal/Multifunction Lever.........................3-7
Turn and Lane-Change Signals........................3-7
Headlamp High/Low-Beam Changer..................3-8
Flash-to-Pass.................................................3-8
Windshield Wipers..........................................3-8
Windshield Washer.........................................3-9
Cruise Control................................................3-9
Exterior Lamps.............................................3-12
Headlamps on Reminder................................3-13
Daytime Running Lamps (DRL).......................3-14
Automatic Headlamp System..........................3-14
Instrument Panel Brightness...........................3-15
Dome Lamps ...............................................3-15
Dome Lamp Override....................................3-15
Entry/Exit Lighting.........................................3-16
Reading Lamps............................................3-16
Electric Power Management...........................3-16
Battery Run-Down Protection..........................3-17
Accessory Power Outlet(s).............................3-17
Ashtray(s) and Cigarette Lighter......................3-18Climate Controls............................................3-18
Climate Control System.................................3-18
Outlet Adjustment.........................................3-20
Rear Heating System....................................3-21
Rear Air Conditioning and Heating System.......3-22
Warning Lights, Gages, and Indicators............3-23
Instrument Panel Cluster................................3-24
Speedometer and Odometer...........................3-25
Trip Odometer..............................................3-25
Safety Belt Reminders...................................3-26
Airbag Readiness Light
..................................3-27
Airbag Off Light............................................3-28
Passenger Airbag Status Indicator...................3-29
Charging System Light..................................3-30
Voltmeter Gage............................................3-31
Brake System Warning Light..........................3-31
Antilock Brake System (ABS) Warning Light.....3-32
StabiliTrak
®Indicator Light.............................3-33
Engine Coolant Temperature Gage..................3-33
Tire Pressure Light.......................................3-34
Malfunction Indicator Lamp.............................3-34
Oil Pressure Gage........................................3-37
Oil Pressure Light.........................................3-38
Section 3 Instrument Panel
3-1
Page 125 of 406

Turn Signal/Multifunction Lever
The lever on the left side of the steering column
includes the following:
G:Turn and Lane Change Signals.
53:Headlamp High/Low-Beam Changer.
N:Windshield Wipers.
L:Windshield Washer.
Flash-to-Pass Feature.
Information for these features is on the pages following.
Turn and Lane-Change Signals
G:An arrow on the instrument panel cluster flashes
in the direction of the turn or lane change.
To signal a turn, move the lever all the way up or down.
To signal a lane change, raise or lower the lever until
the arrow starts to flash. The turn signal automatically
flashes three times and if the tow-haul mode is active it
flashes six times. Holding the turn signal lever for
more than one second causes the turn signals to flash
continually until the lever is released.
The lever returns to its starting position when released.
If after signaling a turn or lane change the arrow
flashes rapidly or does not come on, a signal bulb may
be burned out.
Have the bulbs replaced. If the bulb is not burned out,
check the fuse. SeeFuses and Circuit Breakers on
page 5-104.
Turn Signal On Chime
If the turn signal is left on for more than 3/4 of a mile
(1.2 km), a chime sounds at each flash of the turn signal
and the message TURN SIGNAL ON also appears in
the Driver Information Center (DIC). SeeDIC Warnings
and Messages on page 3-48. To turn off the chime
and message, move the turn signal lever to the
off position.
3-7
Page 126 of 406

Headlamp High/Low-Beam Changer
23(Headlamp High/Low-Beam Changer):Pull the
turn signal lever all the way toward you to change the
headlamps from low to high beam. Then release it.
This instrument panel cluster light comes on when the
high beam headlamps are on.
Flash-to-Pass
This feature is used to signal to the vehicle ahead that
you want to pass.
If the headlamps are off or in the low-beam position,
pull the turn signal lever toward you to momentarily
switch to high-beams.
Release the lever to turn the high-beam headlamps off.
Windshield Wipers
The windshield wiper control is located on the
multifunction lever on the left side of the steering wheel.
Turn the band with
Non it to the following positions:
8(Mist):For a single wiping cycle, hold the band
on mist until the wipers start, then let go. The wipers will
stop after one wipe. If more wipes are needed, hold
the band on mist longer.
6Delay:Turn the band to adjust the delay time between
wipes. The closer to the top of the lever, the shorter
the delay.
d(Low Speed):For steady wiping at low speed.
a(High Speed):For steady wiping at high speed.
9(Off):Turns the wipers off.
When driving during the day and the wipers are
activated, the head lamps automatically turn on after
completing eight wipe cycles.
Be sure to clear ice and snow from the wiper blades
before using them. If they are frozen to the windshield,
carefully loosen or thaw them. If the blades become
damaged, get new blades or blade inserts.
3-8
Page 132 of 406

Daytime Running Lamps (DRL)
Daytime Running Lamps (DRL) can make it easier for
others to see the front of your vehicle during the
day. Fully functional daytime running lamps are required
on all vehicles first sold in Canada.
The DRL system comes on in daylight when the
following conditions are met:
•The ignition is on.
•The exterior lamps control is in the AUTO position.
•The shift lever is not in P (Park).
•The light sensor determines it is daytime.
When the DRL are on, the taillamps, sidemarker,
instrument panel and other lamps will not be on.
The automatic headlamp system automatically switches
from DRL to the headlamps depending on the
darkness of the surroundings.
To turn off the DRL, turn the exterior lamp control to the
off position and then release it. For vehicles first sold
in Canada, the transmission must be in the P (Park)
position, before the DRL can be turned off.
Automatic Headlamp System
When it is dark enough outside and the headlamp
switch is in AUTO, the automatic headlamp system turns
on the headlamps, along with the taillamps, sidemarker,
parking lamps, roof marker lamps, and the instrument
panel lights. The radio lights will also be dim.
To turn off the automatic headlamp system, turn the
exterior lamps switch to the off position and then
release. For vehicles first sold in Canada, the
transmission must be in the P (Park) position, before
the automatic headlamp system can be turned off.
The vehicle has a light sensor located on the top of the
instrument panel. Do not cover the sensor or the
system will come on whenever the ignition is on.
The system may also turn on the headlamps when
driving through a parking garage or tunnel.
There is a delay in the transition between the daytime
and nighttime operation of the Daytime Running
Lamps (DRL) and the automatic headlamp systems so
that driving under bridges or bright overhead street
lights does not affect the system. The DRL and
automatic headlamp system is only affected when the
light sensor sees a change in lighting lasting longer than
the delay.
3-14
Page 137 of 406

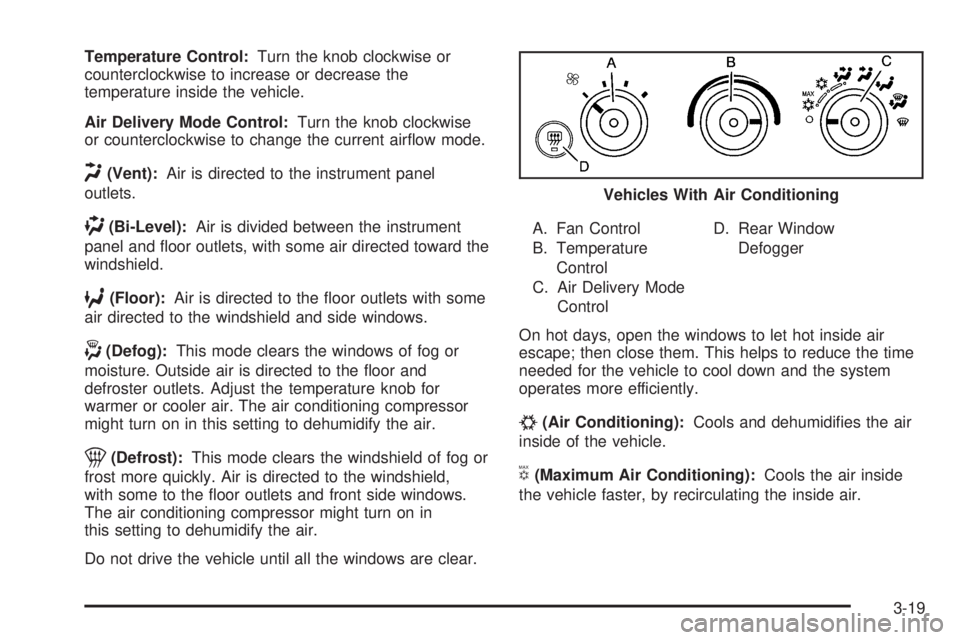
Temperature Control:Turn the knob clockwise or
counterclockwise to increase or decrease the
temperature inside the vehicle.
Air Delivery Mode Control:Turn the knob clockwise
or counterclockwise to change the current airflow mode.
H(Vent):Air is directed to the instrument panel
outlets.
)(Bi-Level):Air is divided between the instrument
panel and floor outlets, with some air directed toward the
windshield.
6(Floor):Air is directed to the floor outlets with some
air directed to the windshield and side windows.
-(Defog):This mode clears the windows of fog or
moisture. Outside air is directed to the floor and
defroster outlets. Adjust the temperature knob for
warmer or cooler air. The air conditioning compressor
might turn on in this setting to dehumidify the air.
1(Defrost):This mode clears the windshield of fog or
frost more quickly. Air is directed to the windshield,
with some to the floor outlets and front side windows.
The air conditioning compressor might turn on in
this setting to dehumidify the air.
Do not drive the vehicle until all the windows are clear.A. Fan Control
B. Temperature
Control
C. Air Delivery Mode
ControlD. Rear Window
Defogger
On hot days, open the windows to let hot inside air
escape; then close them. This helps to reduce the time
needed for the vehicle to cool down and the system
operates more efficiently.
#(Air Conditioning):Cools and dehumidifies the air
inside of the vehicle.
V(Maximum Air Conditioning):Cools the air inside
the vehicle faster, by recirculating the inside air.Vehicles With Air Conditioning
3-19