2009 FIAT SEDICI brake
[x] Cancel search: brakePage 221 of 270
220
15A
15A
10A
10A
15A
15A
30A
30A
10A
15A
10A
10A
10A
20A
15A
10A
15A
10A
10A
15A
30A
15A
10A
79J093
79J011
Rear wiper
Ignition coil
Back-up light
Meter
Accessory
Accessory 2
Power window
Wiper
IG1 SIG
Air bag
Anti-lock brake system
Tail light
Stop light
Door lock
4WD light
ST SIG
Seat heater
IG 2 SIG
Rear fog light
Dome
Rear defogger
Horn / Hazard
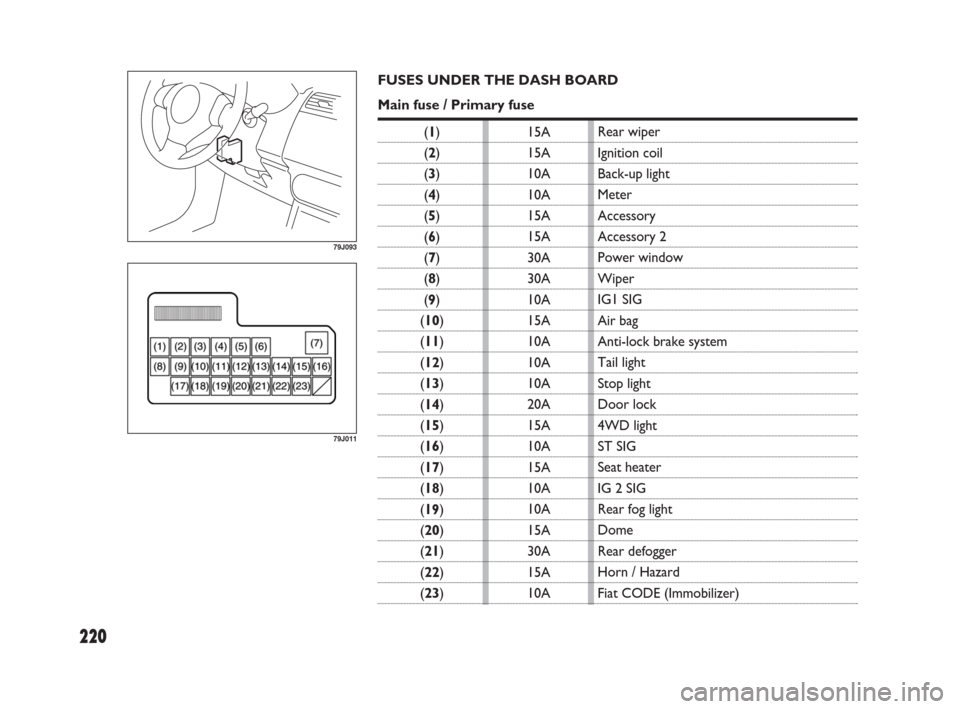
Fiat CODE (Immobilizer) FUSES UNDER THE DASH BOARD
Main fuse / Primary fuse
(1)
(2)
(3)
(4)
(5)
(6)
(7)
(8)
(9)
(10)
(11)
(12)
(13)
(14)
(15)
(16)
(17)
(18)
(19)
(20)
(21)
(22)
(23)
183-230 SEDICI LUM FL GB 1E 19-06-2009 11:00 Pagina 220
Page 233 of 270
232
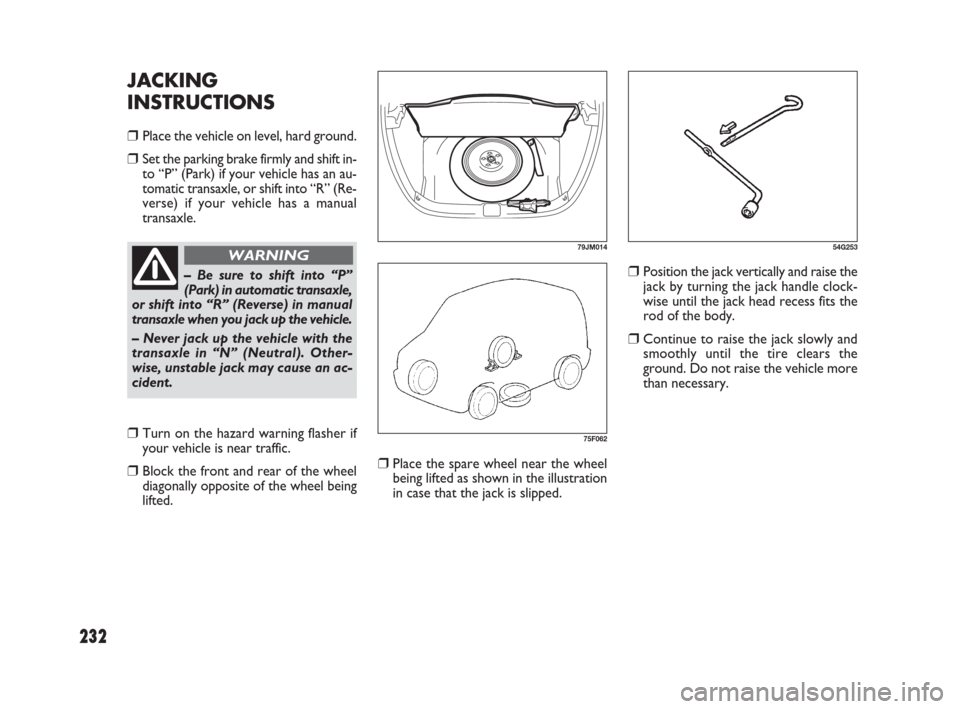
❒Place the spare wheel near the wheel
being lifted as shown in the illustration
in case that the jack is slipped.
❒Position the jack vertically and raise the
jack by turning the jack handle clock-
wise until the jack head recess fits the
rod of the body.
❒Continue to raise the jack slowly and
smoothly until the tire clears the
ground. Do not raise the vehicle more
than necessary.
JACKING
INSTRUCTIONS
❒Place the vehicle on level, hard ground.
❒Set the parking brake firmly and shift in-
to “P” (Park) if your vehicle has an au-
tomatic transaxle, or shift into “R” (Re-
verse) if your vehicle has a manual
transaxle.
79JM014
75F062
– Be sure to shift into “P”
(Park) in automatic transaxle,
or shift into “R” (Reverse) in manual
transaxle when you jack up the vehicle.
– Never jack up the vehicle with the
transaxle in “N” (Neutral). Other-
wise, unstable jack may cause an ac-
cident.
WARNING
❒Turn on the hazard warning flasher if
your vehicle is near traffic.
❒Block the front and rear of the wheel
diagonally opposite of the wheel being
lifted.
54G253
231-238 SEDICI LUM FL GB 1E 19-06-2009 11:06 Pagina 232
Page 235 of 270
234
❒Turn off all vehicle accessories, except
those necessary for safety reasons (for
example, headlights or hazard lights).
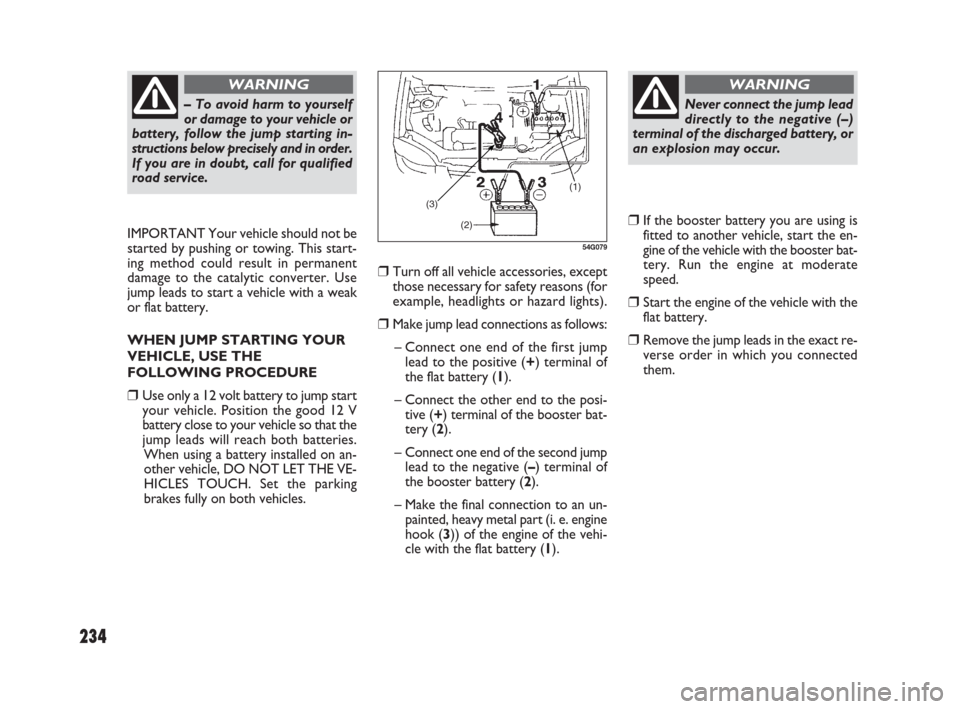
❒Make jump lead connections as follows:
– Connect one end of the first jump
lead to the positive (+) terminal of
the flat battery (1).
– Connect the other end to the posi-
tive (+) terminal of the booster bat-
tery (2).
– Connect one end of the second jump
lead to the negative (–) terminal of
the booster battery (2).
– Make the final connection to an un-
painted, heavy metal part (i. e. engine
hook (3)) of the engine of the vehi-
cle with the flat battery (1).
❒If the booster battery you are using is
fitted to another vehicle, start the en-
gine of the vehicle with the booster bat-
tery. Run the engine at moderate
speed.
❒Start the engine of the vehicle with the
flat battery.
❒Remove the jump leads in the exact re-
verse order in which you connected
them. IMPORTANT Your vehicle should not be
started by pushing or towing. This start-
ing method could result in permanent
damage to the catalytic converter. Use
jump leads to start a vehicle with a weak
or flat battery.
WHEN JUMP STARTING YOUR
VEHICLE, USE THE
FOLLOWING PROCEDURE
❒Use only a 12 volt battery to jump start
your vehicle. Position the good 12 V
battery close to your vehicle so that the
jump leads will reach both batteries.
When using a battery installed on an-
other vehicle, DO NOT LET THE VE-
HICLES TOUCH. Set the parking
brakes fully on both vehicles.
– To avoid harm to yourself
or damage to your vehicle or
battery, follow the jump starting in-
structions below precisely and in order.
If you are in doubt, call for qualified
road service.
WARNING
(1)
(3)
(2)
54G079
Never connect the jump lead
directly to the negative (–)
terminal of the discharged battery, or
an explosion may occur.
WARNING
231-238 SEDICI LUM FL GB 1E 19-06-2009 11:06 Pagina 234
Page 236 of 270
235
2-WHEEL DRIVE (2WD)
MANUAL TRANSAXLE
Manual transaxle vehicles may be towed
using either of the following methods.
❒From the front, with the front wheels
lifted and the rear wheels on the
ground. Before towing, make sure that
the parking brake is released.
❒From the rear, with the rear wheels lift-
ed and the front wheels on the ground,
provided the steering and drivetrain are
in operational condition. Before tow-
ing, make sure that transaxle is in neu-
tral, the steering wheel is unlocked (the
ignition key should be in the “ACC” po-
sition), and the steering wheel is se-
cured with a clamping device designed
for towing service.
IMPORTANT The steering column is not
strong enough to withstand shocks trans-
mitted from the front wheels during tow-
ing. Always unlock the steering wheel be-
fore towing.
TOWING
If you need to have your vehicle towed,
contact a professional service. Your deal-
er can provide you with detailed towing
instructions.
IMPORTANT To help avoid damage to
your vehicle during towing, proper equip-
ment and towing procedures must be
used.
2- WHEEL DRIVE (2WD)
AUTOMATIC TRANSAXLE
Automatic transaxle vehicles may be
towed using either of the following meth-
ods.
❒From the front, with the front wheels
lifted and the rear wheels on the
ground. Before towing, make sure that
the parking brake is released.
❒From the rear, with the rear wheels lift-
ed and a dolly under the front wheels.
IMPORTANT Towing your vehicle with
the front wheels on the ground can result
in damage to the automatic transaxle.4-WHEEL DRIVE (4WD)
Your vehicle should be towed under one
of the following conditions:
❒With all four wheels on a flat-bed truck.
❒With the front or rear wheels lifted and
a dolly under the other wheels.
❒If you can shift the 2WD/4WD switch
to the “2WD” mode, and if the steer-
ing and drive train are in good condi-
tion and the engine can be started, the
vehicle may also be towed according to
the instructions in the “Towing Your
Vehicle (recreational towing)” section.
IMPORTANT Towing your vehicle with
front and/or rear wheels on the ground
can result in damage to the automatic
transaxle and/or the 4WD drive system.
231-238 SEDICI LUM FL GB 1E 19-06-2009 11:06 Pagina 235
Page 239 of 270
238
(1)
68KM037
(1)
68KM038
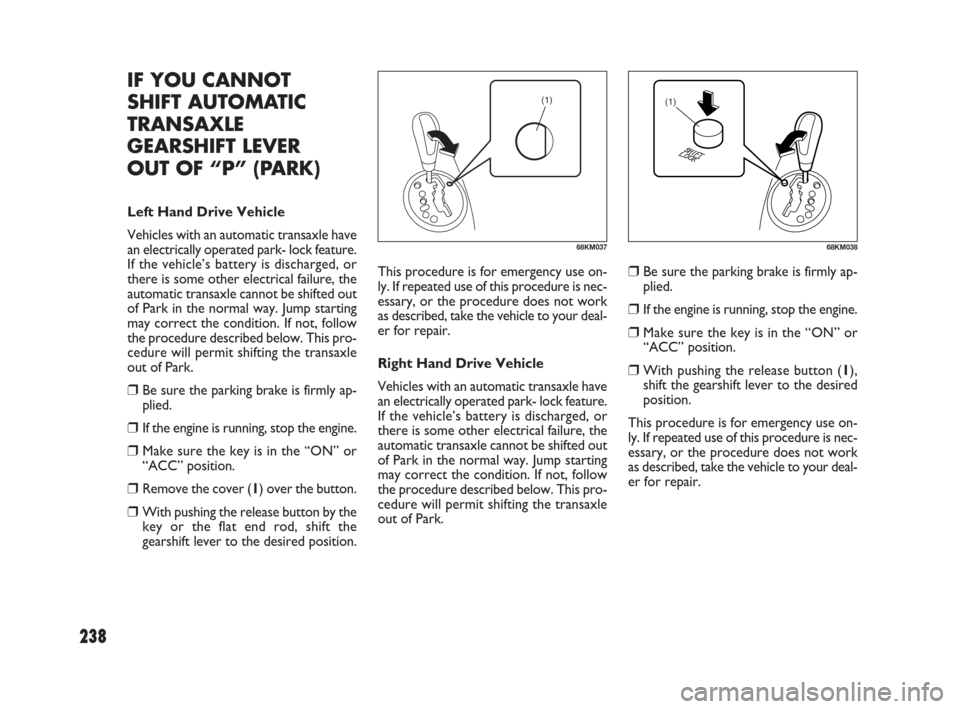
IF YOU CANNOT
SHIFT AUTOMATIC
TRANSAXLE
GEARSHIFT LEVER
OUT OF “P” (PARK)
Left Hand Drive Vehicle
Vehicles with an automatic transaxle have
an electrically operated park- lock feature.
If the vehicle’s battery is discharged, or
there is some other electrical failure, the
automatic transaxle cannot be shifted out
of Park in the normal way. Jump starting
may correct the condition. If not, follow
the procedure described below. This pro-
cedure will permit shifting the transaxle
out of Park.
❒Be sure the parking brake is firmly ap-
plied.
❒If the engine is running, stop the engine.
❒Make sure the key is in the “ON” or
“ACC” position.
❒Remove the cover (1) over the button.
❒With pushing the release button by the
key or the flat end rod, shift the
gearshift lever to the desired position.This procedure is for emergency use on-
ly. If repeated use of this procedure is nec-
essary, or the procedure does not work
as described, take the vehicle to your deal-
er for repair.
Right Hand Drive Vehicle
Vehicles with an automatic transaxle have
an electrically operated park- lock feature.
If the vehicle’s battery is discharged, or
there is some other electrical failure, the
automatic transaxle cannot be shifted out
of Park in the normal way. Jump starting
may correct the condition. If not, follow
the procedure described below. This pro-
cedure will permit shifting the transaxle
out of Park.
❒Be sure the parking brake is firmly ap-
plied.
❒If the engine is running, stop the engine.
❒Make sure the key is in the “ON” or
“ACC” position.
❒With pushing the release button (1),
shift the gearshift lever to the desired
position.
This procedure is for emergency use on-
ly. If repeated use of this procedure is nec-
essary, or the procedure does not work
as described, take the vehicle to your deal-
er for repair.
231-238 SEDICI LUM FL GB 1E 19-06-2009 11:06 Pagina 238
Page 244 of 270
243
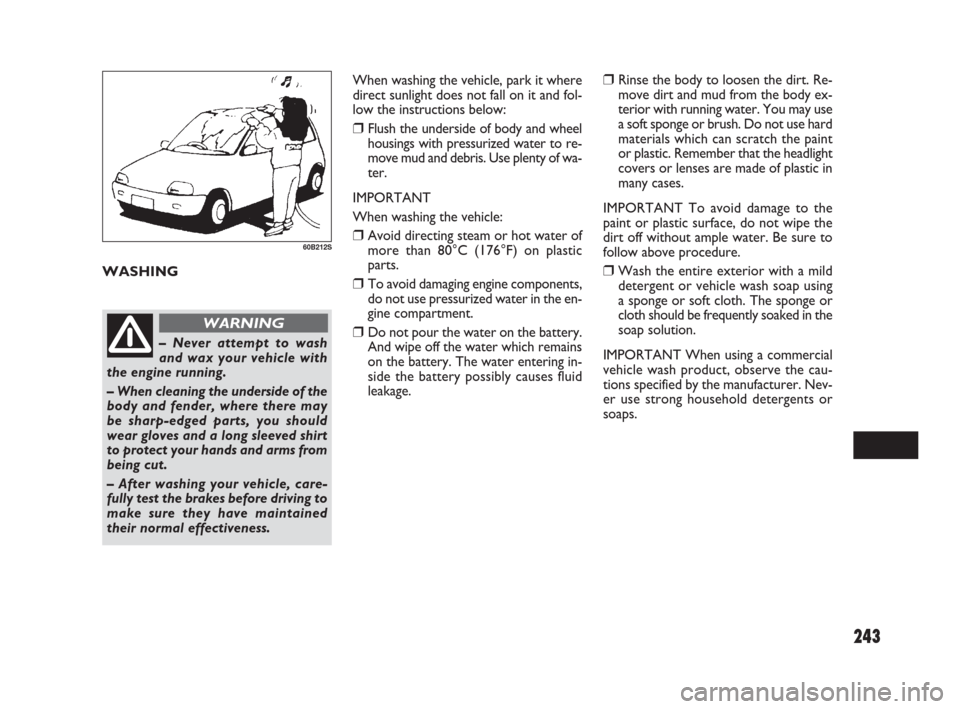
When washing the vehicle, park it where
direct sunlight does not fall on it and fol-
low the instructions below:
❒Flush the underside of body and wheel
housings with pressurized water to re-
move mud and debris. Use plenty of wa-
ter.
IMPORTANT
When washing the vehicle:
❒Avoid directing steam or hot water of
more than 80°C (176°F) on plastic
parts.
❒To avoid damaging engine components,
do not use pressurized water in the en-
gine compartment.
❒Do not pour the water on the battery.
And wipe off the water which remains
on the battery. The water entering in-
side the battery possibly causes fluid
leakage.
❒Rinse the body to loosen the dirt. Re-
move dirt and mud from the body ex-
terior with running water. You may use
a soft sponge or brush. Do not use hard
materials which can scratch the paint
or plastic. Remember that the headlight
covers or lenses are made of plastic in
many cases.
IMPORTANT To avoid damage to the
paint or plastic surface, do not wipe the
dirt off without ample water. Be sure to
follow above procedure.
❒Wash the entire exterior with a mild
detergent or vehicle wash soap using
a sponge or soft cloth. The sponge or
cloth should be frequently soaked in the
soap solution.
IMPORTANT When using a commercial
vehicle wash product, observe the cau-
tions specified by the manufacturer. Nev-
er use strong household detergents or
soaps.
– Never attempt to wash
and wax your vehicle with
the engine running.
– When cleaning the underside of the
body and fender, where there may
be sharp-edged parts, you should
wear gloves and a long sleeved shirt
to protect your hands and arms from
being cut.
– After washing your vehicle, care-
fully test the brakes before driving to
make sure they have maintained
their normal effectiveness.
WARNING
60B212S
WASHING
239-244 SEDICI LUM FL GB 1E 19-06-2009 11:08 Pagina 243
Page 250 of 270
249
T T
E E
C C
H H
N N
I I
C C
A A
L L
S S
P P
E E
C C
I I
F F
I I
C C
A A
T T
I I
O O
N N
S S
ENGINE................................................................................... 250
FUEL FEED – IGNITION..................................................... 250
ELECTRICAL COMPONENTS.......................................... 251
BULBS...................................................................................... 251
TRANSMISSION.................................................................... 252
BRAKES................................................................................... 252
SUSPENSIONS....................................................................... 252
STEERING ............................................................................... 252
WHEELS.................................................................................. 253
DIMENSIONS......................................................................... 253
WEIGHTS............................................................................... 254
PERFORMANCE................................................................... 254
CAPACITIES ........................................................................... 254
12
249-254 SEDICI LUM FL GB 1E 19-06-2009 11:09 Pagina 249
Page 252 of 270
251
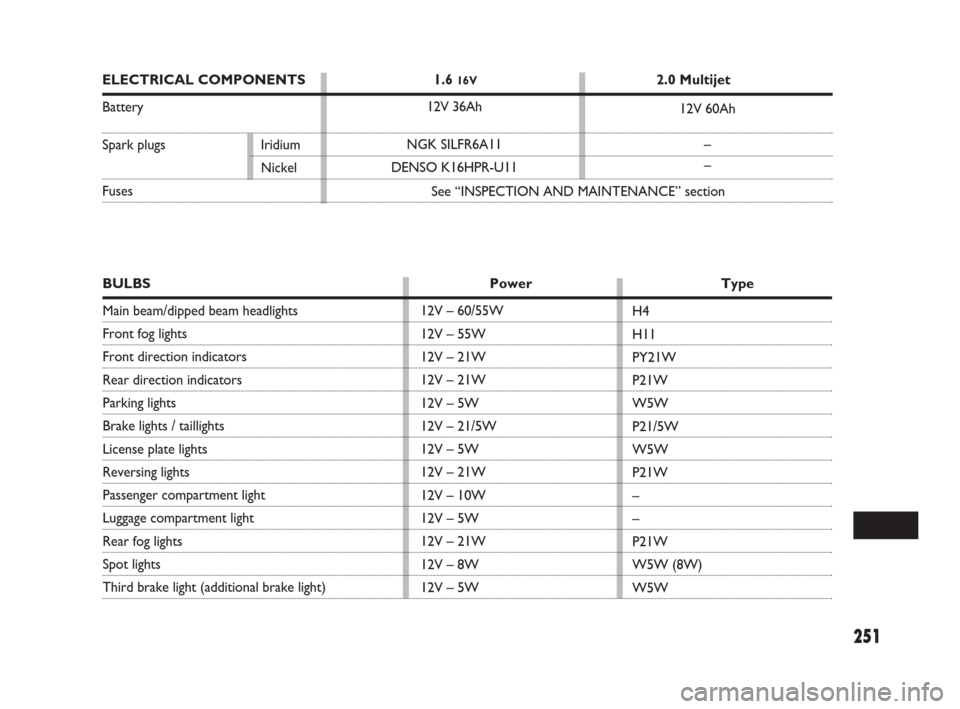
12V – 60/55W
12V – 55W
12V – 21W
12V – 21W
12V – 5W
12V – 21/5W
12V – 5W
12V – 21W
12V – 10W
12V – 5W
12V – 21W
12V – 8W
12V – 5WH4
H11
PY21W
P21W
W5W
P21/5W
W5W
P21W
–
–
P21W
W5W (8W)
W5W
BULBS Power Type
Main beam/dipped beam headlights
Front fog lights
Front direction indicators
Rear direction indicators
Parking lights
Brake lights / taillights
License plate lights
Reversing lights
Passenger compartment light
Luggage compartment light
Rear fog lights
Spot lights
Third brake light (additional brake light)
ELECTRICAL COMPONENTS 1.6 16V2.0 Multijet
Battery
Spark plugs Iridium
Nickel
Fuses12V 36Ah
NGK SILFR6A11
DENSO K16HPR-U1112V 60Ah
–
–
See “INSPECTION AND MAINTENANCE” section
249-254 SEDICI LUM FL GB 1E 19-06-2009 11:10 Pagina 251