Page 174 of 532
Plastic Grocery Bag Retainers — If EquippedRetainer hooks which will hold plastic grocery bag
handles are built into the back panel of the cab, behind
the rear seat.
REAR WINDOW FEATURES
Rear Window Defroster and Heated Outside
Mirrors — If Equipped
The rear window defroster button is located on the
climate control panel. Press this button to turn on
the rear window defroster and the heated outside mirrors
(if equipped). An indicator in the button will illuminate
when the rear window defroster is on. The rear window
defroster automatically turns off after approximately
10 minutes. For an additional five minutes of operation,
press the button a second time.
NOTE: To prevent excessive battery drain, use the rear
window defroster only when the engine is operating.
Grocery Bag Hooks
172 UNDERSTANDING THE FEATURES OF YOUR VEHICLE
Page 175 of 532
CAUTION!
Failure to follow these cautions can cause damage to
the heating elements:•
Use care when washing the inside of the rear
window. Do not use abrasive window cleaners on
the interior surface of the window. Use a soft cloth
and a mild washing solution, wiping parallel to
the heating elements. Labels can be peeled off
after soaking with warm water.
•
Do not use scrapers, sharp instruments, or abra-
sive window cleaners on the interior surface of the
window.
•
Keep all objects a safe distance from the window.
Power Sliding Rear Window — If EquippedThe power sliding rear window switch is located on the
instrument panel below the climate controls. Press the
right side of the switch to open the glass and the left side
of the switch to close the glass.
Power Sliding Rear Window Switch
UNDERSTANDING THE FEATURES OF YOUR VEHICLE 173
3
Page 176 of 532
Sliding Rear Window — If EquippedA locking device in the center of the window helps to
prevent entry from the rear of the vehicle. Squeeze the
lock to release the window.FOLD FLAT LOAD FLOOR — IF EQUIPPEDQuad Cab�models with a 60/40 rear seat may be
equipped with a folding load floor.
WARNING!
Do not operate the vehicle with loose items stored on
the load floor. While driving or in an accident you
may experience abrupt stopping, rapid acceleration,
or sharp turns. Loose objects stored on the load floor
may move around with force and strike occupants,
resulting in serious or fatal injury. Unfolding the Load Floor
1. Lift the 60/40 seat cushion(s) to the upward position.
Unfolding The Load Floor
174 UNDERSTANDING THE FEATURES OF YOUR VEHICLE
Page 209 of 532
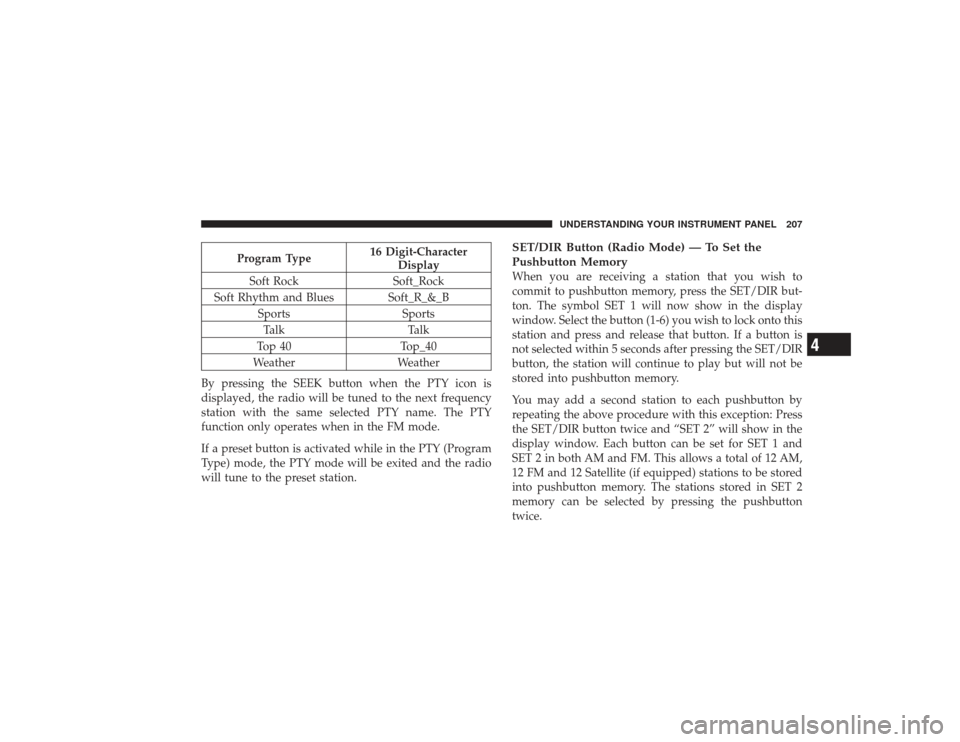
Program Type16 Digit-Character
Display
Soft Rock Soft_Rock
Soft Rhythm and Blues Soft_R_&_B Sports SportsTalk Talk
Top 40 Top_40
Weather Weather
By pressing the SEEK button when the PTY icon is
displayed, the radio will be tuned to the next frequency
station with the same selected PTY name. The PTY
function only operates when in the FM mode.
If a preset button is activated while in the PTY (Program
Type) mode, the PTY mode will be exited and the radio
will tune to the preset station.
SET/DIR Button (Radio Mode) — To Set the
Pushbutton MemoryWhen you are receiving a station that you wish to
commit to pushbutton memory, press the SET/DIR but-
ton. The symbol SET 1 will now show in the display
window. Select the button (1-6) you wish to lock onto this
station and press and release that button. If a button is
not selected within 5 seconds after pressing the SET/DIR
button, the station will continue to play but will not be
stored into pushbutton memory.
You may add a second station to each pushbutton by
repeating the above procedure with this exception: Press
the SET/DIR button twice and “SET 2” will show in the
display window. Each button can be set for SET 1 and
SET 2 in both AM and FM. This allows a total of 12 AM,
12 FM and 12 Satellite (if equipped) stations to be stored
into pushbutton memory. The stations stored in SET 2
memory can be selected by pressing the pushbutton
twice.
UNDERSTANDING YOUR INSTRUMENT PANEL 207
4
Page 221 of 532
AM/FM Button (Radio Mode)Press the button to select AM or FM modes.Setting the Tone, Balance, and FadePress the rotary TUNE control, and “BASS” will display.
Turn the TUNE control to the right or left to increase or
decrease the Bass tones.
Press the rotary TUNE control a second time and “MID”
will display. Turn the TUNE control to the right or left to
increase or decrease the Mid-Range tones.
Press the rotary TUNE control a third time and “TREB”
will display. Turn the TUNE control to the right or left to
increase or decrease the Treble tones.
Press the rotary TUNE control a fourth time and “BAL”
will display. Turn the TUNE control to the right or left to
adjust the sound level from the right or left side speakers.Press the rotary TUNE control a fifth time and “FADE”
will display. Turn the TUNE control to the left or right to
adjust the sound level between the front and rear speak-
ers.
Press the TUNE control again or wait five seconds to exit
setting tone, balance, and fade.
RND/SET Button (Radio Mode) To Set The
Pushbutton MemoryWhen you are receiving a station that you wish to
commit to pushbutton memory, press the SET button.
The symbol SET 1 will now show in the display window.
Select the button (1-6) you wish to lock onto this station
and press and release that button. If a button is not
selected within five seconds after pressing the SET but-
ton, the station will continue to play but will not be
stored into pushbutton memory.
You may add a second station to each pushbutton by
repeating the above procedure with this exception: Press
UNDERSTANDING YOUR INSTRUMENT PANEL 219
4
Page 222 of 532
the SET button twice and “SET 2” will show in the
display window. Each button can be set for SET 1 and
SET 2 in both AM and FM. This allows a total of 12 AM,
12 FM, and 12 Satellite (if equipped) stations to be stored
into pushbutton memory. The stations stored in SET 2
memory can be selected by pressing the pushbutton
twice.
Every time a preset button is used, a corresponding
button number will display.Preset Buttons1-6(Radio Mode)These buttons tune the Radio to the stations that you
commit to pushbutton memory, 12 AM, 12 FM, and 12
Satellite (if equipped) stations.Operating Instructions - CD ModeNOTE:The ignition switch must be in the ON or ACC
position to operate the radio.
Inserting The Compact Disc (Single CD Player)Gently insert one CD into the CD player with the CD
label facing up. The CD will automatically be pulled into
the CD player and the CD icon will illuminate on the
radio display.
If the volume control is ON, the unit will switch to CD
mode and begin to play. The display will show the track
number and play time in minutes and seconds. Play will
begin at the start of track one.
NOTE:•
On some vehicles, you may insert or eject a disc with
the radio or ignition switch OFF.
•
If you insert a disc with the ignition ON and the radio
OFF, the CD will automatically be pulled into the CD
player.
•
This radio does not play discs with MP3 tracks.
220 UNDERSTANDING YOUR INSTRUMENT PANEL
Page 241 of 532
Defrost
Outside air is primarily directed to the windshield
through the defroster outlets located at the base of
the windshield, and the demister outlets located at the
edge of each side of the instrument panel, and the air
conditioning may be on.
NOTE: The air conditioning compressor operates in
both Mix and Defrost or a blend of these modes, even if
the A/C button has not been pressed. This dehumidifies
the air to help dry the windshield.
Blower Control
The rotary knob on the left of the
control panel is the blower control.
Turn the knob clockwise to one of the
four positions to obtain the blower
speed you desire. To turn the blower
off, turn the knob to the far left
position.
Temperature Control
The rotary knob at the center of the
control panel controls the temperature
of the interior air. You can choose your
degree of comfort by rotating the
knob. The coldest temperature setting
is to the extreme left (blue region) and
the warmest setting is to the extreme
right (red region) of the rotation.
CirculationThe cab is designed with features to promote outside air
circulation. There are grilles in the cab back panel. These
are air exhausters that provide the means for regular
exchange of cab air.
Side window demisters direct airflow specifically to the
window glass to help prevent interior fogging of the
glass. They are located in the extreme outside upper
UNDERSTANDING YOUR INSTRUMENT PANEL 239
4
Page 242 of 532
edges of the instrument panel. The demisters also pro-
vide extra air ducts for circulation. They are in operation
whenever the Floor, Mix or Defrost modes are in use. To
remove frost from the side windows, it is best to use the
full defrost mode.
NOTE:When you turn off the engine you may hear a
hissing sound from under the hood for a short period of
time. This is a normal condition that occurs if the air
conditioning system has been on. It is not an indication of
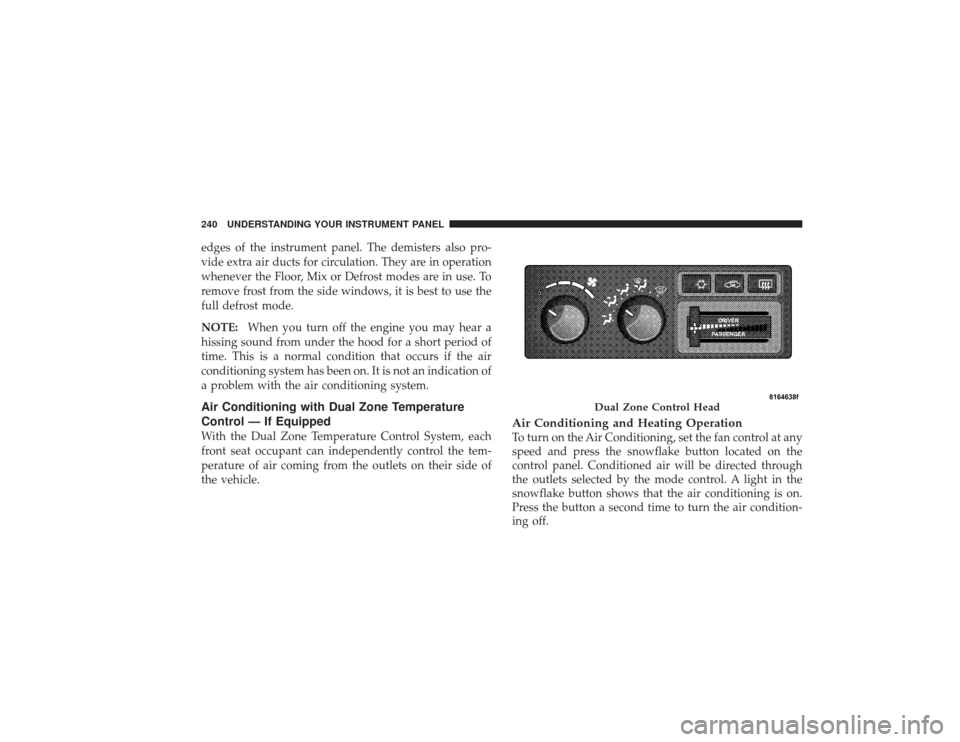
a problem with the air conditioning system.Air Conditioning with Dual Zone Temperature
Control — If EquippedWith the Dual Zone Temperature Control System, each
front seat occupant can independently control the tem-
perature of air coming from the outlets on their side of
the vehicle.
Air Conditioning and Heating OperationTo turn on the Air Conditioning, set the fan control at any
speed and press the snowflake button located on the
control panel. Conditioned air will be directed through
the outlets selected by the mode control. A light in the
snowflake button shows that the air conditioning is on.
Press the button a second time to turn the air condition-
ing off.
Dual Zone Control Head
240 UNDERSTANDING YOUR INSTRUMENT PANEL