2009 DODGE RAM 3500 DIESEL wheel size
[x] Cancel search: wheel sizePage 49 of 532
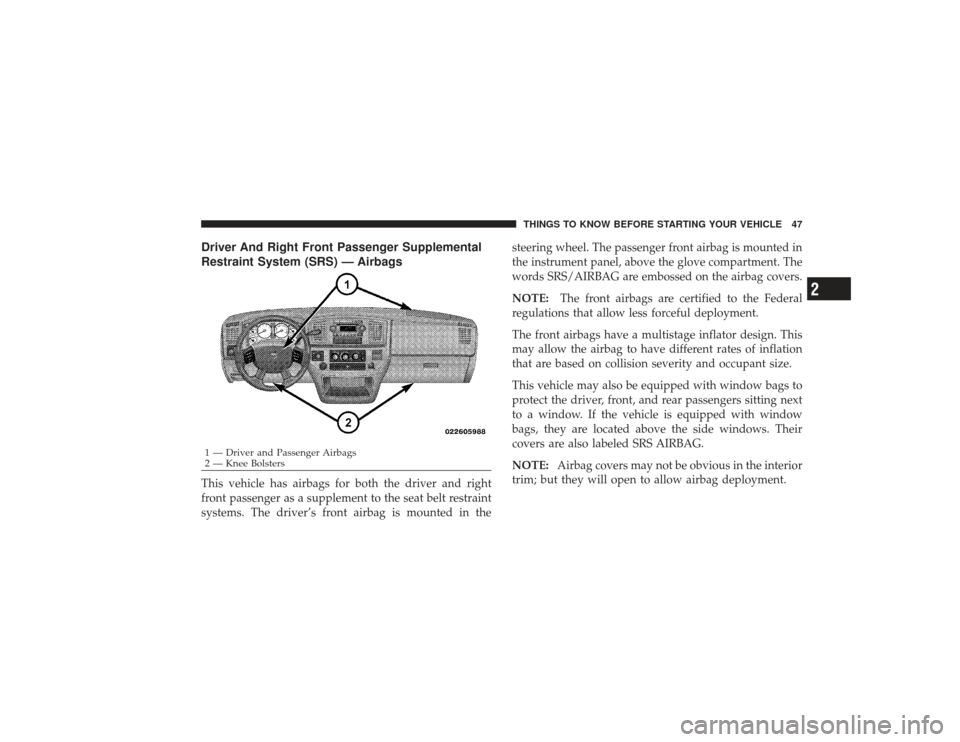
Driver And Right Front Passenger Supplemental
Restraint System (SRS) — AirbagsThis vehicle has airbags for both the driver and right
front passenger as a supplement to the seat belt restraint
systems. The driver’s front airbag is mounted in thesteering wheel. The passenger front airbag is mounted in
the instrument panel, above the glove compartment. The
words SRS/AIRBAG are embossed on the airbag covers.
NOTE:
The front airbags are certified to the Federal
regulations that allow less forceful deployment.
The front airbags have a multistage inflator design. This
may allow the airbag to have different rates of inflation
that are based on collision severity and occupant size.
This vehicle may also be equipped with window bags to
protect the driver, front, and rear passengers sitting next
to a window. If the vehicle is equipped with window
bags, they are located above the side windows. Their
covers are also labeled SRS AIRBAG.
NOTE: Airbag covers may not be obvious in the interior
trim; but they will open to allow airbag deployment.1 — Driver and Passenger Airbags
2 — Knee Bolsters THINGS TO KNOW BEFORE STARTING YOUR VEHICLE 47
2
Page 55 of 532
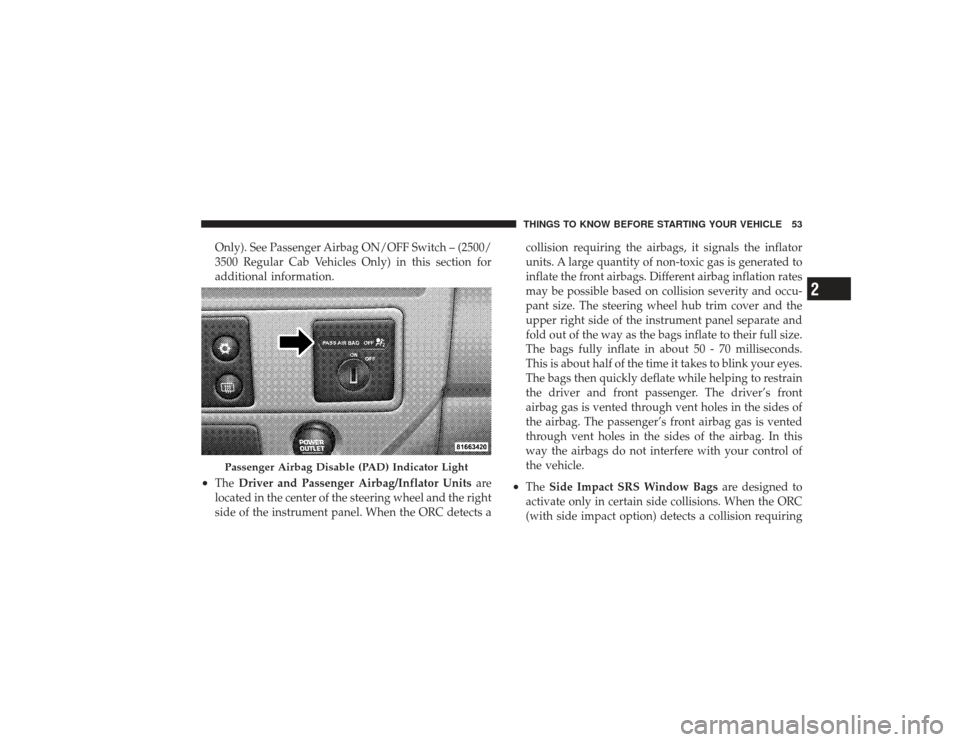
Only). See Passenger Airbag ON/OFF Switch – (2500/
3500 Regular Cab Vehicles Only) in this section for
additional information.
•
TheDriver and Passenger Airbag/Inflator Units are
located in the center of the steering wheel and the right
side of the instrument panel. When the ORC detects a collision requiring the airbags, it signals the inflator
units. A large quantity of non-toxic gas is generated to
inflate the front airbags. Different airbag inflation rates
may be possible based on collision severity and occu-
pant size. The steering wheel hub trim cover and the
upper right side of the instrument panel separate and
fold out of the way as the bags inflate to their full size.
The bags fully inflate in about 50 - 70 milliseconds.
This is about half of the time it takes to blink your eyes.
The bags then quickly deflate while helping to restrain
the driver and front passenger. The driver’s front
airbag gas is vented through vent holes in the sides of
the airbag. The passenger’s front airbag gas is vented
through vent holes in the sides of the airbag. In this
way the airbags do not interfere with your control of
the vehicle.
•
The
Side Impact SRS Window Bags are designed to
activate only in certain side collisions. When the ORC
(with side impact option) detects a collision requiring
Passenger Airbag Disable (PAD) Indicator Light
THINGS TO KNOW BEFORE STARTING YOUR VEHICLE 53
2
Page 201 of 532

CAUTION!
The TPMS has been optimized for the original
equipment tires and wheels. TPMS pressures and
warning have been established for the tire size
equipped on your vehicle. Undesirable system opera-
tion or sensor damage may result when using re-
placement equipment that is not of the same size,
type, and/or style. Aftermarket wheels can cause
sensor damage. Do not use tire sealant from a can, or
balance beads if your vehicle is equipped with a
TPMS, as damage to the sensors may result.
26. Electronic Stability Program (ESP) Indicator Light/
Traction Control System (TCS) Indicator Light — If
Equipped If this indicator light flashes during accelera-
tion, apply as little throttle as possible. While
driving, ease up on the accelerator. Adapt your speed and driving to the prevailing road conditions, and
do not switch off the Electronic Stability Program (ESP),
or Traction Control System (TCS).
27. Transmission Temperature Indicator (Automatic
Transmissions Only)
This light indicates that there is excessive trans-
mission fluid temperature that might occur
with severe usage such as trailer towing. It may
also occur when operating the vehicle in a high
torque converter slip condition, such as 4-wheel-drive
operation (e.g., snow plowing, off- road operation). If this
light comes on, stop the vehicle and run the engine at idle
or faster, with the transmission in NEUTRAL until the
light goes off.
28. Odometer/Trip Odometer Button
Press this button to toggle between the odometer and the
trip odometer display. Holding the button in resets the
trip odometer reading when in trip mode.
UNDERSTANDING YOUR INSTRUMENT PANEL 199
4
Page 263 of 532
This transfer case is intended to be driven in the 2H
position for normal street and highway conditions such
as dry, hard surfaced roads.
When additional traction is required, the 4H and 4L
positions can be used to lock the front and rear drive-
shafts together and force the front and rear wheels to
rotate at the same speed. This is accomplished by simply
moving the shift lever to the desired positions. The 4H
and 4L positions are intended for loose, slippery road
surfaces only. Driving in the 4H and 4L positions on dry,
hard surfaced roads may cause increased tire wear and
damage to the driveline components.The “Transfer Case Position Indicator Light” in the instru-
ment cluster will alert the driver that the vehicle is in
four-wheel drive and that the front and rear driveshafts
are locked together. This light will illuminate when the
transfer case is shifted into either the 4H or 4L position.
There is no light for the 2H or NEUTRAL positions.
When operating your vehicle in 4L, the engine speed is
approximately three times that of the 2H or 4H positions
at a given road speed. Take care not to overspeed the
engine and do not exceed 25 mph (40 km/h).
Proper operation of four-wheel drive vehicles depends
on tires of equal size, type and circumference on each
wheel. Any difference will adversely affect shifting and
can cause damage to the transfer case.
NOTE:Do not attempt to make a shift while only the
front or rear wheels are spinning. The transfer case is not
equipped with a synchronizer and therefore the front and
rear driveshaft speeds must be equal for the shift to take
place. Shifting while only the front or rear wheels are
spinning can cause damage to the transfer case.
Because four-wheel drive provides improved traction,
there is a tendency to exceed safe turning and stopping
speeds. Do not go faster than road conditions permit.
STARTING AND OPERATING 261
5
Page 270 of 532
When operating your vehicle in 4WD LOW, the engine
speed is approximately three times that of the 2WD, 4WD
AUTO or 4WD LOCK positions at a given road speed.
Take care not to overspeed the engine and do not exceed
25 mph (40 km/h).
Proper operation of four-wheel drive vehicles depends
on tires of equal size, type and circumference on each
wheel. Any difference in tire size can cause damage to the
transfer case.
Because four-wheel drive provides improved traction,
there is a tendency to exceed safe turning and stopping
speeds. Do not go faster than road conditions permit.
WARNING!
You or others could be injured if you leave the
vehicle unattended with the transfer case in the
NEUTRAL position without first fully engaging the
parking brake. The transfer case NEUTRAL position
disengages both the front and rear driveshafts from
the powertrain and will allow the vehicle to move
regardless of the transmission position. The parking
brake should always be applied when the driver is
not in the vehicle.
For additional information on the appropriate use of each
transfer case mode position, see the information below:
2WD
Rear Wheel Drive High Range - This range is for normal
street and highway driving on dry hard surfaced roads.
268 STARTING AND OPERATING
Page 277 of 532
NOTE:Do not attempt to make a shift while only the
front or rear wheels are spinning, as this can cause
damage to driveline components.
When operating your vehicle in 4WD LOW, the engine
speed is approximately three times that of the 2WD or
4WD LOCK positions at a given road speed. Take care
not to overspeed the engine and do not exceed 25 mph
(40 km/h).
Proper operation of four-wheel drive vehicles depends
on tires of equal size, type and circumference on each
wheel. Any difference in tire size can cause damage to the
transfer case.
Because four-wheel drive provides improved traction,
there is a tendency to exceed safe turning and stopping
speeds. Do not go faster than road conditions permit.
WARNING!
You or others could be injured if you leave the
vehicle unattended with the transfer case in the
NEUTRAL position without first fully engaging the
parking brake. The transfer case NEUTRAL position
disengages both the front and rear driveshafts from
the powertrain and will allow the vehicle to move
regardless of the transmission position. The parking
brake should always be applied when the driver is
not in the vehicle.
STARTING AND OPERATING 275
5
Page 362 of 532

WARNING!
•
DO NOT use a tire, wheel size or rating other than
that specified for your vehicle. Some combinations
of unapproved tires and wheels may change sus-
pension dimensions and performance characteris-
tics, resulting in changes to steering, handling, and
braking of your vehicle. This can cause unpredict-
able handling and stress to steering and suspen-
sion components. You could lose control and have
an accident resulting in serious injury or death.
Use only the tire and wheel sizes with load ratings
approved for your vehicle.
•
NEVER use a tire with a smaller load index or
capacity, other than what was originally equipped
on your vehicle. Using a tire with a smaller load
index could result in tire overloading and failure.
You could lose control and have an accident.(Continued)
WARNING! (Continued)
•
Failure to equip your vehicle with tires having
adequate speed capability can result in sudden tire
failure and loss of vehicle control.
CAUTION!
Replacing original tires with tires of a different size
may result in false speedometer and odometer read-
ings.SUPPLEMENTAL TIRE PRESSURE
INFORMATION — IF EQUIPPEDA light load vehicle condition is defined as two passen-
gers [150 lbs (68 kg) each] plus 200 lbs (91 kg) of cargo.
Cold tire inflation pressures for a lightly loaded vehicle
will be found on the face of the driver’s door.
360 STARTING AND OPERATING
Page 363 of 532
TIRE CHAINSUse “Class U” chains on 2500/3500 model trucks, or
other traction aids that meet SAE Type “U” specifica-
tions.
NOTE:Chains must be the proper size for the vehicle,
as recommended by the chain manufacturer.
CAUTION!
To avoid damage to your vehicle, tires or chains,
observe the following precautions:•
Because of limited chain clearance between tires
and other suspension components, it is important
that only chains in good condition are used. Bro-
ken chains can cause serious vehicle damage. Stop
the vehicle immediately if noise occurs that could
suggest chain breakage. Remove the damaged
parts of the chain before further use.
(Continued)
CAUTION! (Continued)
•
Install chains as tightly as possible and then
retighten after driving about 0.5 mile (0.8 km).
•
Do not exceed 45 mph (72 km/h).
•
Drive cautiously and avoid severe turns and large
bumps, especially with a loaded vehicle.
•
Do not install tire chains on front wheels of 4x2
vehicles.
•
Do not drive for a prolonged period on dry pave-
ment.
•
Observe the tire chain manufacturer’s instructions
on method of installation, operating speed, and
conditions for usage. Always use the lower sug-
gested operating speed of the chain manufacturer
if different than the speed recommended by the
manufacturer.
STARTING AND OPERATING 361
5