Page 134 of 532

LIGHTSThe headlight switch is located on instrument panel to
the left of the steering wheel.Interior LightsCourtesy and dome lights are turned on when the front
doors are opened, when the dimmer control (rotatingwheel on the right side of the switch) is rotated to the
upward detent position, or by pressing the UNLOCK
button on the Remote Keyless Entry (RKE) transmitter (if
equipped).
When a door is open and the interior lights are on,
rotating the dimmer control all the way down to the off
detent will cause all the interior lights to go out. This is
also known as the
�Party�mode because it allows the
doors to stay open for extended periods of time without
discharging the vehicle’s battery.
The brightness of the instrument panel lighting can be
regulated by rotating the dimmer control up (brighter) or
down (dimmer). When the headlights are on you can
supplement the brightness of the odometer, trip odom-
eter, radio and overhead console by rotating the control
up until you hear a click. This feature is termed the
“Parade” mode and is useful when headlights are re-
quired during the day.
Headlight Switch Location
132 UNDERSTANDING THE FEATURES OF YOUR VEHICLE
Page 136 of 532

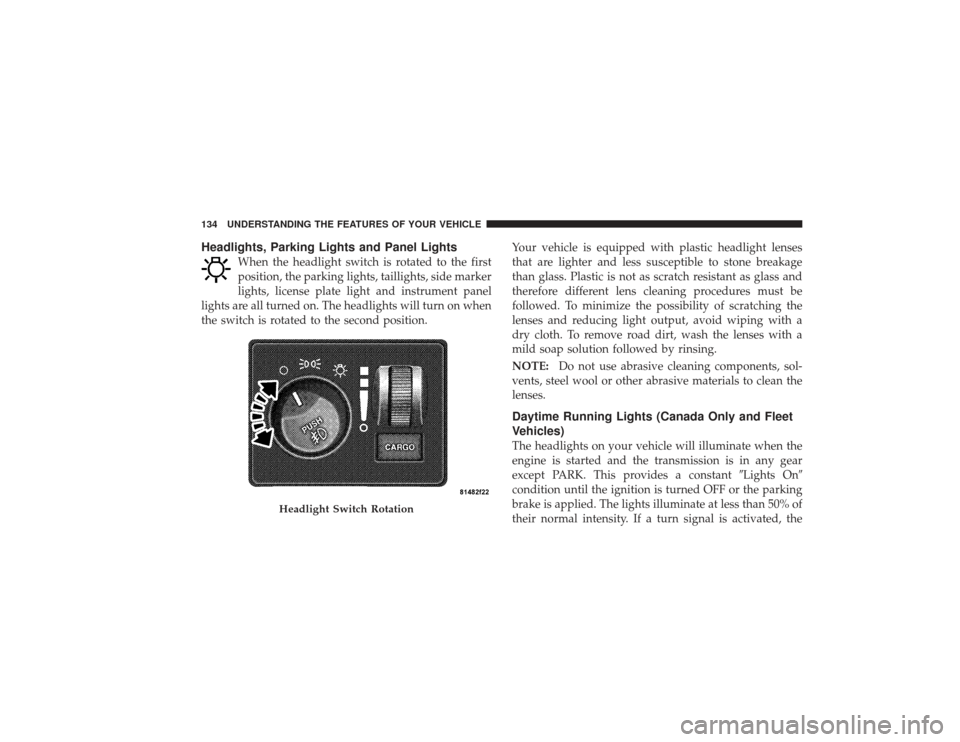
Headlights, Parking Lights and Panel Lights
When the headlight switch is rotated to the first
position, the parking lights, taillights, side marker
lights, license plate light and instrument panel
lights are all turned on. The headlights will turn on when
the switch is rotated to the second position. Your vehicle is equipped with plastic headlight lenses
that are lighter and less susceptible to stone breakage
than glass. Plastic is not as scratch resistant as glass and
therefore different lens cleaning procedures must be
followed. To minimize the possibility of scratching the
lenses and reducing light output, avoid wiping with a
dry cloth. To remove road dirt, wash the lenses with a
mild soap solution followed by rinsing.
NOTE:
Do not use abrasive cleaning components, sol-
vents, steel wool or other abrasive materials to clean the
lenses.
Daytime Running Lights (Canada Only and Fleet
Vehicles)The headlights on your vehicle will illuminate when the
engine is started and the transmission is in any gear
except PARK. This provides a constant �Lights On�
condition until the ignition is turned OFF or the parking
brake is applied. The lights illuminate at less than 50% of
their normal intensity. If a turn signal is activated, the
Headlight Switch Rotation
134 UNDERSTANDING THE FEATURES OF YOUR VEHICLE
Page 142 of 532
TILT STEERING COLUMNThis feature allows you to tilt the steering column
upward or downward. The tilt control lever is located on
the left-side of the steering column, just below the
multifunction lever.
Pull the lever toward the steering wheel to unlock the
steering column. Move the steering column up or down
as desired, and push the lever toward the instrument
panel to lock the column firmly in place.
WARNING!
Tilting the steering column while the vehicle is
moving is dangerous. Without a stable steering col-
umn, you could lose control of the vehicle and have
an accident. Adjust the column only while the ve-
hicle is stopped. Be sure it is locked before driving.
Tilt Steering Control Lever
140 UNDERSTANDING THE FEATURES OF YOUR VEHICLE
Page 164 of 532
Sunroof MaintenanceUse only a non-abrasive cleaner and a soft cloth to clean
the glass panel.Sunroof Fully ClosedPress the switch forward and release to ensure that the
sunroof is fully closed.ELECTRICAL POWER OUTLETSThe auxiliary electrical power outlet can provide power
for in-cab accessories designed for use with the standard
“cigar lighter” plug. The power outlet is located in the
instrument panel, below and to the right of the climate
control panel. A cap is attached to the outlet base
indicating “Power Outlet” 12-Volt/20 A.There is an additional power outlet inside the center
console of vehicle’s equipped with 40-20-40, or bucket
front seats.
Front Power Outlet
162 UNDERSTANDING THE FEATURES OF YOUR VEHICLE
Page 166 of 532

CAUTION!
•
Many accessories that can be plugged in draw
power from the vehicle’s battery, even when not in
use (i.e., cellular phones, etc.). Eventually, if
plugged in long enough, the vehicle’s battery will
discharge sufficiently to degrade battery life
and/or prevent the engine from starting.
•
Accessories that draw higher power (i.e., coolers,
vacuum cleaners, lights, etc.), will discharge the
battery even more quickly. Only use these inter-
mittently and with greater caution.
•
After the use of high power draw accessories, or
long periods of the vehicle not being started (with
accessories still plugged in), the vehicle must be
driven a sufficient length of time to allow the
generator to recharge the vehicle’s battery.
CIGAR LIGHTER AND ASH RECEIVERThe removable ash receiver is located in the instrument
panel cupholder tray.
The cigar lighter is located on the instrument panel,
above and to the left of the ash receiver.
As a child safety precaution, the lighter only operates
with the ignition switch ON. It heats when pushed in and
pops out automatically when ready for use.To preserve
the heating element, do not hold the lighter in the
heating position.
164 UNDERSTANDING THE FEATURES OF YOUR VEHICLE
Page 167 of 532
CUPHOLDERS
Front Instrument Panel Cupholders (40–20–40
Seats) — Automatic TransmissionLocated in the front center stack of the instrument panel
are two adjustable cupholders.To access the cupholders pull on the cupholder door
handle located on the instrument panel.
Each opening in the cupholder is adjustable and will hold
cups and mugs of various sizes.
Ash Receiver
Cupholder Door Handle
UNDERSTANDING THE FEATURES OF YOUR VEHICLE 165
3
Page 168 of 532
To secure the cup, place the cup to be held into one of the
cup wells and then push the cupholder arm toward the
cup until it is held stable.
Front Instrument Panel Cupholders (Bucket
Seats)If your vehicle is equipped with bucket seats there are
three cupholders located on the front of the center
console.
Cupholders
Cupholders Bucket Seat
166 UNDERSTANDING THE FEATURES OF YOUR VEHICLE
Page 175 of 532
CAUTION!
Failure to follow these cautions can cause damage to
the heating elements:•
Use care when washing the inside of the rear
window. Do not use abrasive window cleaners on
the interior surface of the window. Use a soft cloth
and a mild washing solution, wiping parallel to
the heating elements. Labels can be peeled off
after soaking with warm water.
•
Do not use scrapers, sharp instruments, or abra-
sive window cleaners on the interior surface of the
window.
•
Keep all objects a safe distance from the window.
Power Sliding Rear Window — If EquippedThe power sliding rear window switch is located on the
instrument panel below the climate controls. Press the
right side of the switch to open the glass and the left side
of the switch to close the glass.
Power Sliding Rear Window Switch
UNDERSTANDING THE FEATURES OF YOUR VEHICLE 173
3