Page 207 of 532
Pressing the Rewind/Fast Forward button causes the
tuner to search for the next frequency in the direction of
the arrows. This feature operates in either AM, FM or
Satellite (if equi")
RW/FF (Radio Mode)Pressing the Rewind/Fast Forward button causes the
tuner to search for the next frequency in the direction of
the arrows. This feature operates in either AM, FM or
Satellite (if equipped) frequencies.TUNE Control (Radio Mode)Turn the right side rotary TUNE control clockwise to
increase or counter-clockwise to decrease the channel
number.AM/FM Button (Radio Mode)Press the button to select AM or FM modes.Setting the Tone, Balance, and FadePress the rotary TUNE control and “BASS” will display.
Turn the TUNE control to the right or left to increase or
decrease the Bass tones.Press the rotary TUNE control a second time and “MID”
will display. Turn the TUNE control to the right or left to
increase or decrease the Mid Range tones.
Press the rotary TUNE control a third time and
“TREBLE” will display. Turn the TUNE control to the
right or left to increase or decrease the Treble tones.
Press the rotary TUNE control a fourth time and “BAL-
ANCE” will display. Turn the TUNE control to the right
or left to adjust the sound level from the right or left side
speakers.
Press the rotary TUNE control a fifth time and “FADE”
will display. Turn the TUNE control to the left or right to
adjust the sound level between the front and rear speak-
ers.
Press the rotary TUNE control again to exit setting tone,
balance and fade.
UNDERSTANDING YOUR INSTRUMENT PANEL 205
4
Page 209 of 532

Program Type16 Digit-Character
Display
Soft Rock Soft_Rock
Soft Rhythm and Blues Soft_R_&_B Sports SportsTalk Talk
Top 40 Top_40
Weather Weather
By pressing the SEEK button when the PTY icon is
displayed, the radio will be tuned to the next frequency
station with the same selected PTY name. The PTY
function only operates when in the FM mode.
If a preset button is activated while in the PTY (Program
Type) mode, the PTY mode will be exited and the radio
will tune to the preset station.
SET/DIR Button (Radio Mode) — To Set the
Pushbutton MemoryWhen you are receiving a station that you wish to
commit to pushbutton memory, press the SET/DIR but-
ton. The symbol SET 1 will now show in the display
window. Select the button (1-6) you wish to lock onto this
station and press and release that button. If a button is
not selected within 5 seconds after pressing the SET/DIR
button, the station will continue to play but will not be
stored into pushbutton memory.
You may add a second station to each pushbutton by
repeating the above procedure with this exception: Press
the SET/DIR button twice and “SET 2” will show in the
display window. Each button can be set for SET 1 and
SET 2 in both AM and FM. This allows a total of 12 AM,
12 FM and 12 Satellite (if equipped) stations to be stored
into pushbutton memory. The stations stored in SET 2
memory can be selected by pressing the pushbutton
twice.
UNDERSTANDING YOUR INSTRUMENT PANEL 207
4
Page 210 of 532
These buttons tune the radio to the stations that you
commit to pushbutton memory {12 AM, 12 FM")
Every time a preset button is used a corresponding
button number will be displayed.Buttons1-6(Radio Mode)These buttons tune the radio to the stations that you
commit to pushbutton memory {12 AM, 12 FM, and 12
Satellite (if equipped) stations}.Operation Instructions - (CD Mode for CD Audio
Play)NOTE:•
The ignition switch must be in the ON or ACC
position to operate the radio.
•
Note: This radio is capable of playing compact discs
(CD), recordable compact discs (CD-R), rewritable
compact discs (CD-RW) compact discs with MP3
tracks and multisession compact discs with CD and
MP3 tracks.
Inserting Compact Disc(s)Gently insert one CD into the CD player with the CD
label facing up. The CD will automatically be pulled into
the CD player and the CD icon will illuminate on the
radio display.
CAUTION!
This CD player will accept 4 3/4 inch (12 cm) discs
only. The use of other sized discs may damage the
CD player mechanism.
You may eject a disc with the radio OFF.
If you insert a disc with the ignition ON and the radio
ON, the unit will switch from radio to CD mode and
begin to play when you insert the disc. The display will
show the disc number, the track number, and index time
in minutes and seconds. Play will begin at the start of
track 1.
208 UNDERSTANDING YOUR INSTRUMENT PANEL
Page 218 of 532
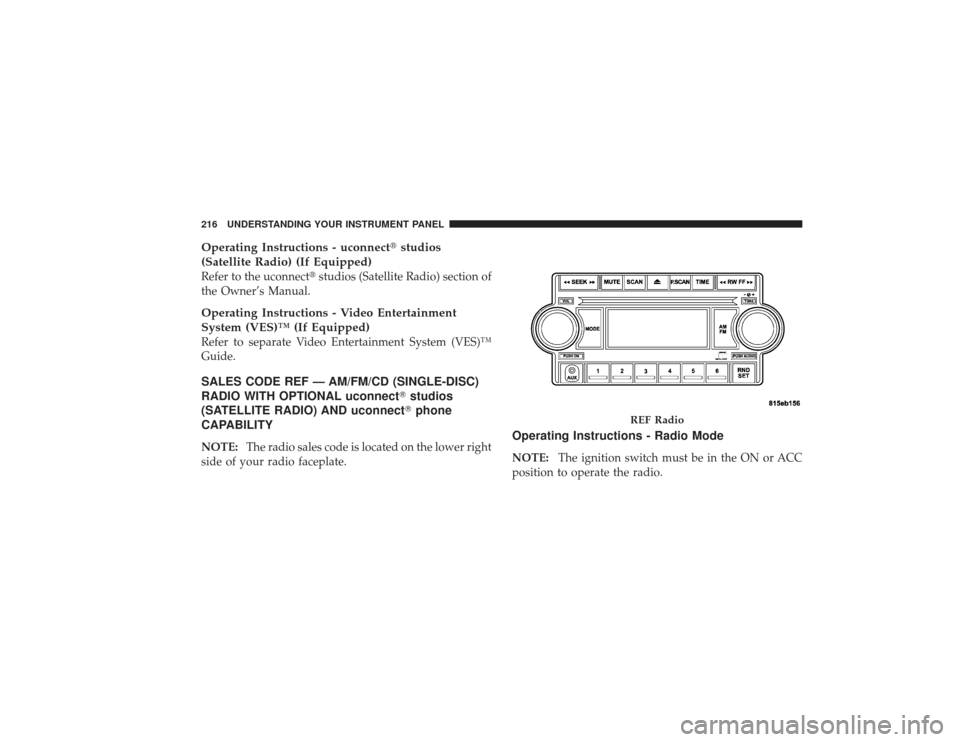
Operating Instructions - uconnect�studios
(Satellite Radio) (If Equipped)Refer to the uconnect� studios (Satellite Radio) section of
the Owner’s Manual.Operating Instructions - Video Entertainment
System (VES)™ (If Equipped)Refer to separate Video Entertainment System (VES)™
Guide.SALES CODE REF — AM/FM/CD (SINGLE-DISC)
RADIO WITH OPTIONAL uconnect �studios
(SATELLITE RADIO) AND uconnect �phone
CAPABILITYNOTE: The radio sales code is located on the lower right
side of your radio faceplate.
Operating Instructions - Radio ModeNOTE: The ignition switch must be in the ON or ACC
position to operate the radio.
REF Radio
216 UNDERSTANDING YOUR INSTRUMENT PANEL
Page 219 of 532
Push the ON/VOL control to turn the radio ON. Push the
ON/VOL a second time to turn OFF the radio.Electronic Volume ControlThe electronic volume control turns conti")
Power Switch/Volume Control (Rotary)Push the ON/VOL control to turn the radio ON. Push the
ON/VOL a second time to turn OFF the radio.Electronic Volume ControlThe electronic volume control turns continuously (360–
degrees) in either direction without stopping. Turning the
volume control to the right increases the volume and to
the left decreases it.
When the audio system is turned on, the sound will be
set at the same volume level as last played.
For your convenience, the volume can be turned down,
but not up, when the audio system is OFF and the
ignition is ON.MODE Button (Radio Mode)Press the MODE button repeatedly to select between the
CD player and Satellite Radio (if equipped).
SEEK Button (Radio Mode)Press and release the SEEK button to search for the next
listenable station in either AM/FM or Satellite (if
equipped) mode. Press the right side of the button to seek
up and the left side to seek down. The radio will remain
tuned to the new station until you make another selec-
tion. Holding the button will bypass stations without
stopping until you release it.MUTE Button (Radio Mode)Press the MUTE button to cancel the sound from the
speakers. “MUTE” will display. Press the MUTE button a
second time and the sound from the speakers will return.
Rotating the volume control, turning the radio ON/OFF,
or turning the ignition ON/OFF, will cancel the MUTE
feature.
NOTE:In Hands-Free Phone (if equipped) mode, the
MUTE button mutes the microphone.
UNDERSTANDING YOUR INSTRUMENT PANEL 217
4
Page 220 of 532
Pressing the SCAN button causes the tuner to search for
the next listenable station in either, AM, FM, or Satellite
(if equipped) frequencies, pausing for five seconds at
each")
SCAN Button (Radio Mode)Pressing the SCAN button causes the tuner to search for
the next listenable station in either, AM, FM, or Satellite
(if equipped) frequencies, pausing for five seconds at
each listenable station before continuing to the next. To
stop the search, press SCAN a second time.PSCAN Button (Radio Mode)Pressing the PSCAN button causes the tuner to scan
through preset stations in either AM, FM, or Satellite (if
equipped) frequencies, pausing for five seconds at each
preset station before continuing to the next. To stop the
search, press PSCAN a second time.TIME ButtonPress the TIME button and the time of day will display
for five seconds.Clock Setting Procedure1. Press and hold the TIME button until the hours blink.2. Adjust the hours by turning the TUNE/AUDIO con-
trol.
3. After the hours are adjusted, press the TUNE/AUDIO
control to set the minutes. The minutes will begin to
blink.
4. Adjust the minutes using the TUNE/AUDIO control.
5. To exit, press any button/knob or wait five seconds.
RW/FF (Radio Mode)Pressing the Rewind/Fast Forward button causes the
tuner to search for the next frequency in the direction of
the arrows. This feature operates in either AM, FM or
Satellite (if equipped) frequencies.TUNE Control (Radio Mode)Turn the rotary TUNE control clockwise to increase or
counterclockwise to decrease the frequency.
218 UNDERSTANDING YOUR INSTRUMENT PANEL
Page 222 of 532
")
the SET button twice and “SET 2” will show in the
display window. Each button can be set for SET 1 and
SET 2 in both AM and FM. This allows a total of 12 AM,
12 FM, and 12 Satellite (if equipped) stations to be stored
into pushbutton memory. The stations stored in SET 2
memory can be selected by pressing the pushbutton
twice.
Every time a preset button is used, a corresponding
button number will display.Preset Buttons1-6(Radio Mode)These buttons tune the Radio to the stations that you
commit to pushbutton memory, 12 AM, 12 FM, and 12
Satellite (if equipped) stations.Operating Instructions - CD ModeNOTE:The ignition switch must be in the ON or ACC
position to operate the radio.
Inserting The Compact Disc (Single CD Player)Gently insert one CD into the CD player with the CD
label facing up. The CD will automatically be pulled into
the CD player and the CD icon will illuminate on the
radio display.
If the volume control is ON, the unit will switch to CD
mode and begin to play. The display will show the track
number and play time in minutes and seconds. Play will
begin at the start of track one.
NOTE:•
On some vehicles, you may insert or eject a disc with
the radio or ignition switch OFF.
•
If you insert a disc with the ignition ON and the radio
OFF, the CD will automatically be pulled into the CD
player.
•
This radio does not play discs with MP3 tracks.
220 UNDERSTANDING YOUR INSTRUMENT PANEL
Page 225 of 532
SCAN Button (Auxiliary Mode)No function.EJECT Button (Auxiliary Mode)
No function.
PSCAN Button (Auxiliary Mode)No function.TIME Button (Auxiliary Mode)Press this button to change the display from elapsed
playing time to time of day. The time of day will display
for five seconds.RW/FF (Auxiliary Mode)No function.
RND/SET Button (Auxiliary Mode)No function.MODE Button (Auxiliary Mode)Press the MODE button repeatedly to select between the
CD player and Satellite Radio (if equipped).Operating Instructions - uconnect�phone — If
EquippedRefer to the “uconnect� phone” section of this Owner’s
Manual.Operating Instructions - uconnect �studios
(Satellite Radio) — If EquippedRefer to the “uconnect� studios (Satellite Radio)” section
of this Owner’s Manual.
UNDERSTANDING YOUR INSTRUMENT PANEL 223
4
No function.EJECT Button (Auxiliary Mode)
No function.
PSCAN Button (Auxiliary Mode)No function.TIME Button (Auxiliary Mode)Press this button to change the display from ela")