Page 407 of 532
WHAT TO DO IN EMERGENCIES
CONTENTS�Hazard Warning Flasher ............... 406
� Jacking Instructions ................... 407
▫ Jack Location ...................... 407
▫ Removing The Spare Tire ............. 408
▫ Tire Changing Procedure .............. 409
▫ Preparations ....................... 409
▫ Instructions ....................... 410
▫ Hub Caps/Wheel Covers ............. 414�
Hoisting ........................... 418
� Jump-Starting Procedures ............... 419
� Freeing A Stuck Vehicle ................ 421
� Emergency Tow Hooks — If Equipped ..... 422
� Towing A Disabled Vehicle .............. 422
▫ 4-Wheel Drive Vehicles ............... 423
▫ 2–Wheel Drive Vehicles ............... 423
6
Page 409 of 532
JACKING INSTRUCTIONS
WARNING!
•
Being under a jacked-up vehicle is dangerous. The
vehicle could slip off the jack and fall on you. You
could be crushed. Never put any part of your body
under a vehicle that is on a jack. Never start or run
the engine while the vehicle is on a jack. If you
need to get under a raised vehicle, take it to an
authorized service center where it can be raised on
a lift.
•
The jack is designed to use as a tool for changing
tires only. The jack should not be used to lift the
vehicle for service purposes. The vehicle should
be jacked on a firm level surface only. Avoid ice or
slippery areas.
Jack LocationThe jack and jack tools are stored under the front
passenger seat. Lift the flap on the side of the seat for
access.
Remove the jack and tools by removing the wing bolt and
sliding the assembly from under the seat.
Jack LocationWHAT TO DO IN EMERGENCIES 407
6
Page 412 of 532

3. Place the shift lever into PARK. On four-wheel drive
vehicles, shift the transfer case to the 4L position.
4. Turn the ignition OFF.
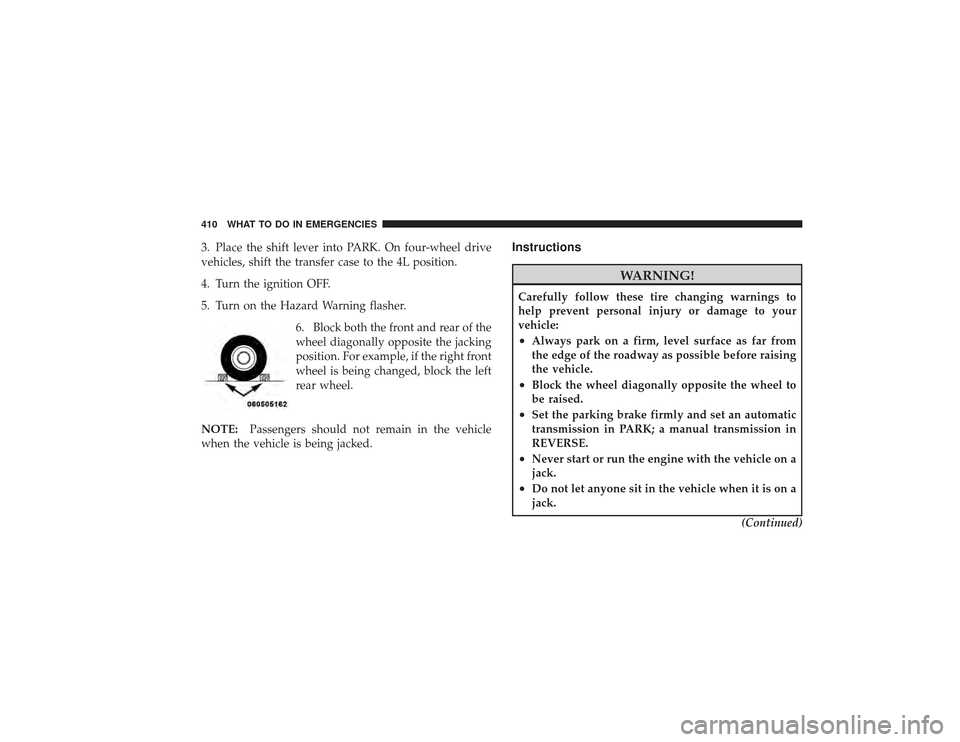
5. Turn on the Hazard Warning flasher.6. Block both the front and rear of the
wheel diagonally opposite the jacking
position. For example, if the right front
wheel is being changed, block the left
rear wheel.
NOTE: Passengers should not remain in the vehicle
when the vehicle is being jacked.
Instructions
WARNING!
Carefully follow these tire changing warnings to
help prevent personal injury or damage to your
vehicle:•
Always park on a firm, level surface as far from
the edge of the roadway as possible before raising
the vehicle.
•
Block the wheel diagonally opposite the wheel to
be raised.
•
Set the parking brake firmly and set an automatic
transmission in PARK; a manual transmission in
REVERSE.
•
Never start or run the engine with the vehicle on a
jack.
•
Do not let anyone sit in the vehicle when it is on a
jack.
(Continued)
410 WHAT TO DO IN EMERGENCIES
Page 413 of 532
WARNING! (Continued)
•
Do not get under the vehicle when it is on a jack.
•
Only use the jack in the positions indicated and
for lifting this vehicle during a tire change.
•
If working on or near a roadway, be extremely
careful of motor traffic.
•
To assure that spare tires, flat or inflated, are
securely stowed, spares must be stowed with the
valve stem facing the ground.
•
Turn on the Hazard Warning flasher.
1. Remove the spare wheel, jack, and tools from storage. 2. Using the wheel wrench, loosen, but do not remove,
the wheel nuts by turning them counterclockwise one
turn while the wheel is still on the ground.
3. Placement of the Jack:
•
For 2500/3500 4x2 series trucks, when changing a
front wheel, place the bottle jack under the frame
rail behind the wheel. Locate the jack as far forward
as possible on the straight part of the frame.
Jack Warning Label
4x2 Jacking Location
WHAT TO DO IN EMERGENCIES 411
6
Page 414 of 532
•
Operate the jack using the jack drive tube and the
wheel wrench. The tube extension, may be used, but
is not required.
•
For 2500/3500 4x4 series trucks, when changing the
front wheel, assemble the jack drive tube to the jack
and connect the drive tube to the extension tube.
Place the jack under the axle as close to the tire as
possible with the drive tubes extending to the front.
Connect the jack tube extension and wheel wrench.
•
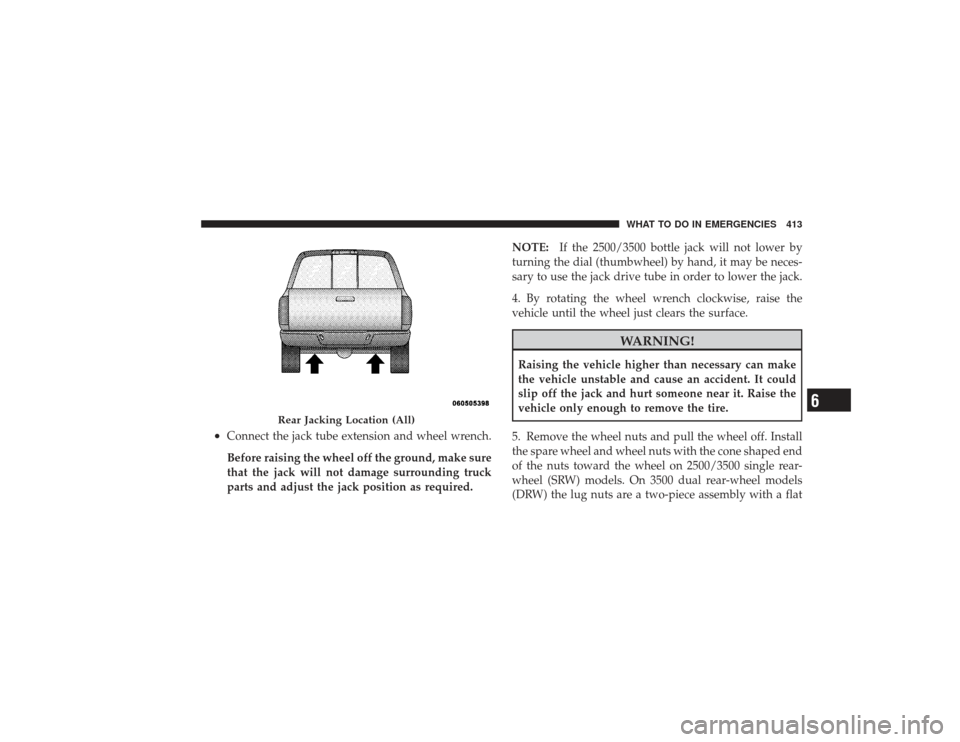
For all trucks, when changing a rear wheel, as-
semble the jack drive tube to the jack and connect
the drive tube to the extension tube. Place the jack
under the axle between the spring and the shock
absorber with the drive tubes extending to the rear.
4x4 Jacking Location
412 WHAT TO DO IN EMERGENCIES
Page 415 of 532

•
Connect the jack tube extension and wheel wrench.
Before raising the wheel off the ground, make sure
that the jack will not damage surrounding truck
parts and adjust the jack position as required.NOTE:
If the 2500/3500 bottle jack will not lower by
turning the dial (thumbwheel) by hand, it may be neces-
sary to use the jack drive tube in order to lower the jack.
4. By rotating the wheel wrench clockwise, raise the
vehicle until the wheel just clears the surface.
WARNING!
Raising the vehicle higher than necessary can make
the vehicle unstable and cause an accident. It could
slip off the jack and hurt someone near it. Raise the
vehicle only enough to remove the tire.
5. Remove the wheel nuts and pull the wheel off. Install
the spare wheel and wheel nuts with the cone shaped end
of the nuts toward the wheel on 2500/3500 single rear-
wheel (SRW) models. On 3500 dual rear-wheel models
(DRW) the lug nuts are a two-piece assembly with a flat
Rear Jacking Location (All)
WHAT TO DO IN EMERGENCIES 413
6
Page 420 of 532

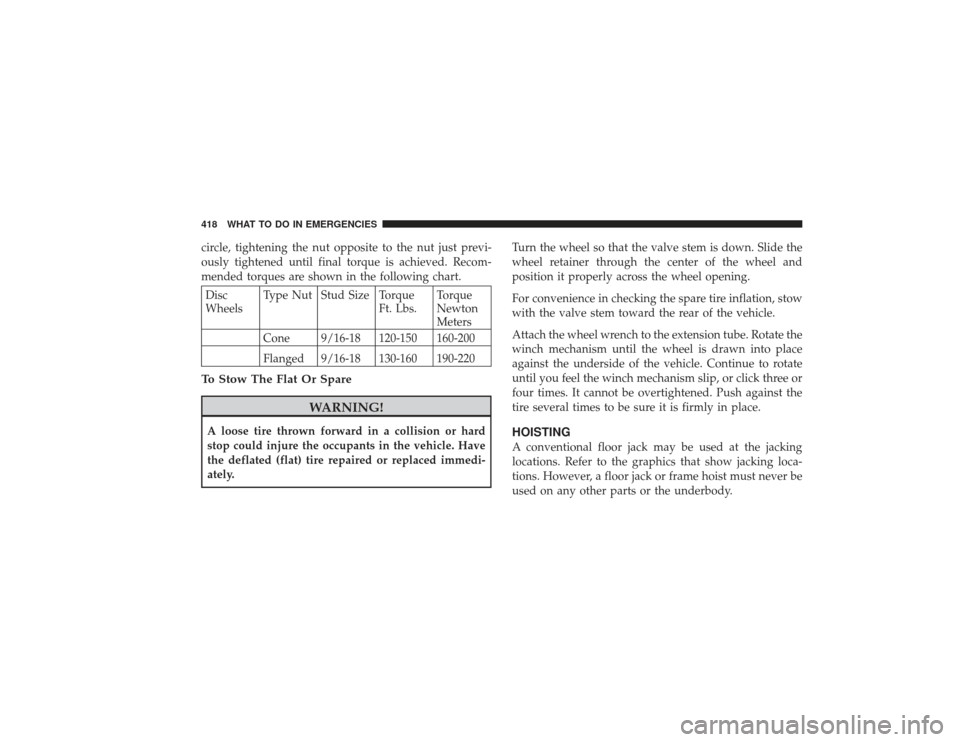
circle, tightening the nut opposite to the nut just previ-
ously tightened until final torque is achieved. Recom-
mended torques are shown in the following chart.Disc
WheelsType Nut Stud Size Torque
Ft. Lbs.Torque
Newton
Meters
Cone 9/16-18 120-150 160-200
Flanged 9/16-18 130-160 190-220To Stow The Flat Or Spare
WARNING!
A loose tire thrown forward in a collision or hard
stop could injure the occupants in the vehicle. Have
the deflated (flat) tire repaired or replaced immedi-
ately. Turn the wheel so that the valve stem is down. Slide the
wheel retainer through the center of the wheel and
position it properly across the wheel opening.
For convenience in checking the spare tire inflation, stow
with the valve stem toward the rear of the vehicle.
Attach the wheel wrench to the extension tube. Rotate the
winch mechanism until the wheel is drawn into place
against the underside of the vehicle. Continue to rotate
until you feel the winch mechanism slip, or click three or
four times. It cannot be overtightened. Push against the
tire several times to be sure it is firmly in place.
HOISTINGA conventional floor jack may be used at the jacking
locations. Refer to the graphics that show jacking loca-
tions. However, a floor jack or frame hoist must never be
used on any other parts or the underbody.
418 WHAT TO DO IN EMERGENCIES
Page 515 of 532

Dealer Service.......................... 430
Defroster, Rear Window ................... 172
Defroster, Windshield ................76,235,238
Delay (Intermittent) Wipers ................. 138
Differential, Limited-Slip .................. 304
Dipsticks Automatic Transmission ................. 450
Power Steering ........................ 328
Disposal Antifreeze (Engine Coolant) ............... 445
Door Locks ............................. 27
Door Opener, Garage ..................... 153
Driving Off-Pavement ......................... 284
Off-Road ............................ 284
Through Flowing, Rising, or Shallow Standing
Water .............................. 305
Dual Rear Wheels ..................... 365,416
DVD Player (Video Entertainment System™) .... 231Electric Rear Window Defrost
............... 172
Electrical Power Outlets ................... 162
Electronic Brake Control System ............. 333
Anti-Lock Brake System ................. 333
Brake Assist System .................... 335
Electronic Roll Mitigation ................ 339
Electronic Stability Program ............... 340
Traction Control System ................. 334
Electronic Roll Mitigation (ERM) ............. 339
Electronic Speed Control (Cruise Control) ...... 142
Electronic Stability Program (ESP) .........197,340
Electronically Shifted Transfer Case ........264,272
Emergency Brake ........................ 329
Emergency, In Case of Freeing Vehicle When Stuck ............... 421
Hazard Warning Flasher ................. 406
Jacking ............................. 409
Jump Starting ......................... 419
Tow Hooks .......................... 422
INDEX 513
10