2009 DODGE RAM 2500 DIESEL transmission oil
[x] Cancel search: transmission oilPage 194 of 532

15. Shift Lever Indicator (Automatic Transmission
Only)
This display indicator shows the automatic transmission
shift lever selection.
NOTE:You must apply the brakes before shifting from
PARK.
16. Odometer/Trip Odometer
The odometer shows the total distance the vehicle has
been driven. U.S. federal regulations require that upon
transfer of vehicle ownership, the seller certify to the
purchaser the correct mileage that the vehicle has been
driven. Therefore, if the odometer reading is changed
during repair or replacement, be sure to keep a record of
the reading before and after the service so that the correct
mileage can be determined.
The two trip odometers show individual trip mileage. To
switch from odometer to trip odometers, press and
release the Trip Odometer button. To reset a trip odometer, display the desired trip odom-
eter to be reset then push and hold the button until the
display resets (approximately two seconds).
Vehicle Warning Messages
When the appropriate conditions exist, messages such as
“door” (indicates that a door(s) may be ajar), “hood” (if
the hood is open or ajar, on vehicles with remote start),
“gASCAP” (indicates that your gas cap is possibly loose
or damaged), “LoW tirE” (indicates low tire pressure),
CHANgE OIL” (indicates that the engine oil should be
change), “LoWASH” (low washer fluid), “ESPOFF” (in-
dicates that ESP is turned off), and “noFUSE” (indicates
that the IOD fuse is removed from the Integrated Power
Module), will display in the odometer.
NOTE:
There is also an engine hour function. This
indicates the total number of hours the engine has been
running. To display the engine hours perform the follow-
ing: Place the ignition in RUN, but do not start the192 UNDERSTANDING YOUR INSTRUMENT PANEL
Page 247 of 532

Summer OperationAir conditioned vehicles must be protected with a high
quality antifreeze coolant during summer to provide
proper corrosion protection and to raise the boiling point
of the coolant for protection against overheating. A 50 %
concentration is recommended. For proper coolant type,
refer to “Recommended Fluids and Genuine Parts” in
Section 7.
When using the air conditioner in extremely heavy traffic
in hot weather, especially when towing a trailer, addi-
tional engine cooling may be required. If this situation is
encountered, operate the transmission in a lower gear to
increase engine RPM, coolant flow and fan speed. When
stopped in heavy traffic, it may be necessary to shift into
NEUTRAL and depress the accelerator slightly for fast
idle operation to increase coolant flow and fan speed.NOTE:
On models equipped with Diesel engines, the
idle speed will automatically increase to 1000 rpm at
elevated coolant temperatures to improve engine cooling.
Your air conditioning system is also equipped with an
automatic recirculation system. When the system senses
a heavy load or high heat conditions, it may use partial
Recirculation A/C mode to provide additional comfort.
Winter OperationWhen operating the system during the Winter months,
make sure the air intake, located directly in front of the
windshield, is free of ice, slush, snow, or other obstructions.
UNDERSTANDING YOUR INSTRUMENT PANEL 245
4
Page 297 of 532

sure the surface has good traction with firm and stable
soils. If possible transverse the incline at an angle
heading slightly up or down.
WARNING!
Driving across an incline increases the risk of a
rollover, which may result in severe injury.•
If You Stall Or Begin To Lose Headway– If you stall
or begin to lose headway while climbing a steep hill,
allow your vehicle to come to a stop and immediately
apply the brake. Restart the engine and shift into
REVERSE. Back slowly down the hill allowing the
compression braking of the engine and transmission to
help regulate your speed. If the brakes are required to
control vehicle speed, apply them lightly and avoid
locking or skidding the tires.
WARNING!
If the engine stalls or you lose headway or cannot
make it to the top of a steep hill or grade, never
attempt to turn around. To do so may result in
tipping and rolling the vehicle, which may result in
severe injury. Always back carefully straight down a
hill in REVERSE. Never back down a hill in NEU-
TRAL using only the vehicle brakes. Never drive
diagonally across a hill, always drive straight up or
down.Driving Through WaterExtreme care should be taken crossing any type of water.
Water crossings should be avoided if possible and only
be attempted when necessary, in a safe responsible
manner. You should only drive through areas which are
designated and approved. You should tread lightly and
avoid damage to the environment. You should know
STARTING AND OPERATING 295
5
Page 308 of 532

CAUTION!
•
Always check the depth of the standing water
before driving through it. Never drive through
standing water that is deeper than the bottom of
the tire rims mounted on the vehicle.
•
Determine the condition of the road or the path
that is under water and if there are any obstacles in
the way before driving through the standing wa-
ter.
•
Do not exceed 5 mph (8 km/h) when driving
through standing water. This will minimize wave
effects.(Continued)
CAUTION! (Continued)
•
Driving through standing water may cause dam-
age to your vehicle’s drivetrain components. Al-
ways inspect your vehicle’s fluids (i.e., engine oil,
transmission/transaxle, axle, etc.) for signs of con-
tamination (i.e., fluid that is milky or foamy in
appearance) after driving through standing water.
Do not continue to operate the vehicle if any fluid
appears contaminated, as this may result in further
damage. Such damage is not covered by the New
Vehicle Limited Warranty.
•
Getting water inside your vehicle’s engine can
cause it to lock up and stall out, and cause serious
internal damage to the engine. Such damage is not
covered by the New Vehicle Limited Warranty.
306 STARTING AND OPERATING
Page 398 of 532

Electronic Speed Control — If Equipped
�
Do not use in hilly terrain or with heavy loads.
�
When using the speed control, if you experience speed
drops greater than 10 mph (16 km/h), disengage until
you can get back to cruising speed.
�
Use speed control in flat terrain and with light loads to
maximize fuel efficiency.
Cooling SystemTo reduce potential for engine and transmission over-
heating, take the following actions:
NOTE: Engine power may be temporarily reduced in
order to maintain oil and coolant temperatures under
extreme trailer tow operating conditions.�
City Driving
When stopped for short periods of time, put transmission
in neutral and increase engine idle speed.
�
Highway Driving
Reduce speed.
�
Air Conditioning
Turn off temporarily.
SNOWPLOWSnowplow Prep Packages are available as a factory-
installed option. These packages include components
necessary to equip your vehicle with a snowplow.
NOTE: Before installation of a snowplow, it is highly
recommended that the owner/installer obtain and follow
the recommendations contained within the current
Dodge Body Builder’s Guide. See your authorized dealer,
installer or snowplow manufacturer for this information.
There are unique electrical systems that must be con-
nected to properly assure operator safety, and to prevent
overloading vehicle systems.
396 STARTING AND OPERATING
Page 429 of 532

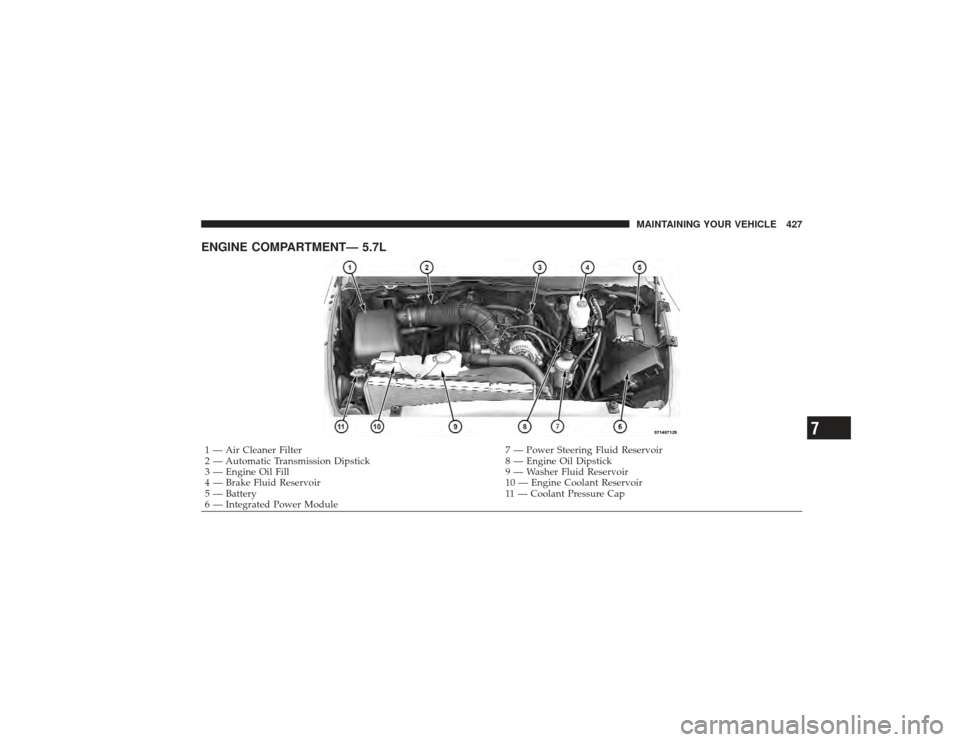
ENGINE COMPARTMENT— 5.7L1 — Air Cleaner Filter7 — Power Steering Fluid Reservoir
2 — Automatic Transmission Dipstick 8 — Engine Oil Dipstick
3 — Engine Oil Fill 9 — Washer Fluid Reservoir
4 — Brake Fluid Reservoir 10 — Engine Coolant Reservoir
5 — Battery 11 — Coolant Pressure Cap
6 — Integrated Power Module MAINTAINING YOUR VEHICLE 427
7
Page 451 of 532

NOTE:The presence of water in the gear lubricant will
result in corrosion and possible failure of differential
components. Operation of the vehicle in water, as may be
encountered in some off-highway types of service, will
require draining and refilling the axle to avoid damage.
2500/3500 Model Axles DO NOT REQUIREany limited
slip oil additive (friction modifiers).Transfer Case
Drain And RefillRefer to the “Maintenance Schedule” in Section 8 for the
proper maintenance intervals.Lubricant SelectionRefer to “Fluids, Lubricants, and Genuine Parts” in this
section for the correct fluid type.
Fluid Level CheckThis fluid level can be checked by removing the filler
plug. The fluid level should be to the bottom edge of the
filler plug hole with the vehicle in a level position.Automatic Transmission
Selection Of LubricantIt is important that the proper lubricant is used in the
transmission to assure optimum transmission perfor-
mance. Use only the manufacturer ’s recommended trans-
mission fluid. Refer to “Fluids, Lubricants, and Genuine
Parts” in this section for the correct fluid type. It is
important that the transmission fluid be maintained at
the prescribed level using the recommended fluid. No
chemical flushes should be used in any transmission;
only the approved lubricant may be used.
MAINTAINING YOUR VEHICLE 449
7
Page 453 of 532

3. Fully apply the parking brake and press the brake
pedal.
4. Place the shift lever momentarily into each gear posi-
tion ending with the lever in PARK.
5. Remove the dipstick, wipe it clean and reinsert it until
seated.
6. Remove the dipstick again and note the fluid level on
both sides. The fluid level should be between the “HOT”
(upper) reference holes on the dipstick at normal operat-
ing temperature. Verify that solid coating of oil is seen on
both sides of the dipstick. If the fluid is low, add as
required into the dipstick tube.Do not overfill.After
adding any quantity of oil through the oil fill tube, wait
a minimum of two minutes for the oil to fully drain into
the transmission before rechecking the fluid level.
NOTE: If it is necessary to check the transmission below
the operating temperature, the fluid level should be between the two “COLD” (lower) holes on the dipstick
with the fluid at approximately 70°F (21°C) (room tem-
perature). If the fluid level is correctly established at
room temperature, it should be between the “HOT”
(upper) reference holes when the transmission reaches
180°F (82°C). Remember it is best to check the level at the
normal operating temperature.
CAUTION!
Be aware that if the fluid temperature is below 50°F
(10°C) it may not register on the dipstick. Do not add
fluid until the temperature is elevated enough to
produce an accurate reading.
7. Check for leaks. Release parking brake.
To prevent dirt and water from entering the transmission
after checking or replenishing fluid, make certain that the
dipstick cap is properly reseated. It is normal for the
MAINTAINING YOUR VEHICLE 451
7