Page 257 of 449
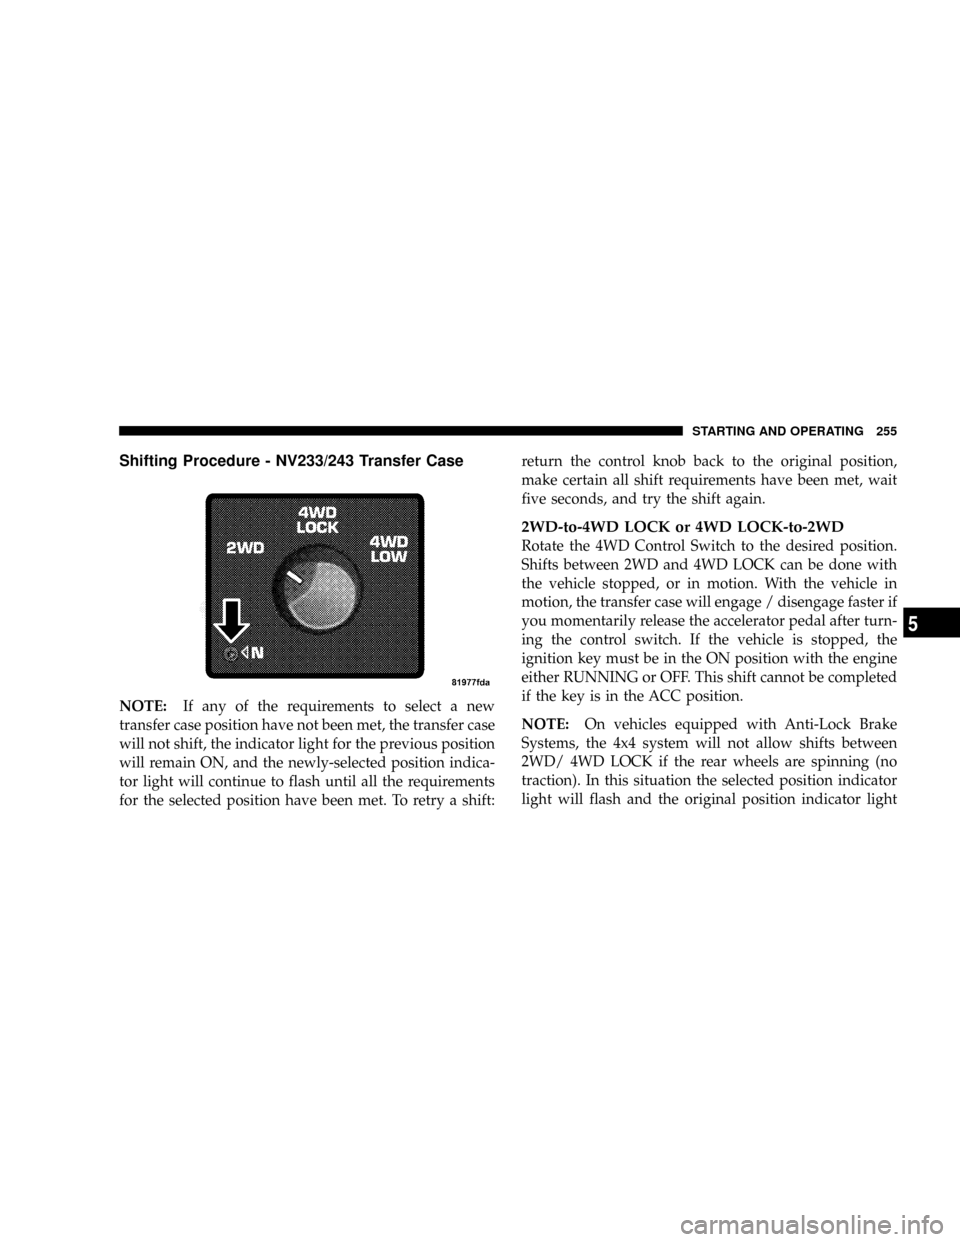
Shifting Procedure - NV233/243 Transfer Case
NOTE:If any of the requirements to select a new
transfer case position have not been met, the transfer case
will not shift, the indicator light for the previous position
will remain ON, and the newly-selected position indica-
tor light will continue to flash until all the requirements
for the selected position have been met. To retry a shift:return the control knob back to the original position,
make certain all shift requirements have been met, wait
five seconds, and try the shift again.
2WD-to-4WD LOCK or 4WD LOCK-to-2WD
Rotate the 4WD Control Switch to the desired position.
Shifts between 2WD and 4WD LOCK can be done with
the vehicle stopped, or in motion. With the vehicle in
motion, the transfer case will engage / disengage faster if
you momentarily release the accelerator pedal after turn-
ing the control switch. If the vehicle is stopped, the
ignition key must be in the ON position with the engine
either RUNNING or OFF. This shift cannot be completed
if the key is in the ACC position.
NOTE:On vehicles equipped with Anti-Lock Brake
Systems, the 4x4 system will not allow shifts between
2WD/ 4WD LOCK if the rear wheels are spinning (no
traction). In this situation the selected position indicator
light will flash and the original position indicator light
STARTING AND OPERATING 255
5
Page 261 of 449
WARNING!
Always engage the parking brake when powering
down the vehicle if the(SVC 4WD(light is illumi-
nated. Not engaging the parking brake may allow the
vehicle to roll, which may cause personal injury.
NOTE:Do not attempt to make a shift while only the
front or rear wheels are spinning. The NV 244 Generation
II transfer case is not equipped with a synchronizer and
therefore the front and rear driveshaft speeds must be
equal for the shift to take place. Shifting while only the
front or rear wheels are spinning can cause damage to the
transfer case.
When operating your vehicle in 4WD LOW, the engine
speed is approximately three times that of the 4WD or
4WD LOCK positions at a given road speed. Take care
not to overspeed the engine and do not exceed 25 mph
(40 km/h).Proper operation of 4-wheel drive vehicles depends on
tires of equal size, type and circumference on each wheel.
Any difference in tire size can cause damage to the
transfer case.
Because 4-wheel drive provides improved traction, there
is a tendency to exceed safe turning and stopping speeds.
Do not go faster than road conditions permit.
WARNING!
You or others could be injured if you leave the
vehicle unattended with the transfer case in the
NEUTRAL position without first fully engaging the
parking brake. The transfer case NEUTRAL position
disengages both the front and rear driveshafts from
the powertrain and will allow the vehicle to move,
regardless of the transmission position. The parking
brake should always be applied when the driver is
not in the vehicle.
STARTING AND OPERATING 259
5
Page 267 of 449
CAUTION! (Continued)
²Driving through standing water may cause dam-
age to your vehicle's drivetrain components. Al-
ways inspect your vehicle's fluids (i.e., engine oil,
transmission/transaxle, axle, etc.) for signs of con-
tamination (i.e., fluid that is milky or foamy in
appearance) after driving through standing water.
Do not continue to operate the vehicle if any fluid
appears contaminated, as this may result in further
damage. Such damage is not covered by the New
Vehicle Limited Warranty.
²Getting water inside your vehicle's engine can
cause it to lock up and stall out, and cause serious
internal damage to the engine. Such damage is not
covered by the New Vehicle Limited Warranty.
WARNING!
²Driving through standing water limits your vehi-
cle's traction capabilities. Do not exceed 5 mph
(8 km/h) when driving through standing water.
²Driving through standing water limits your vehi-
cle's braking capabilities, which increases stop-
ping distances. Therefore, after driving through
standing water, drive slowly and lightly press on
the brake pedal several times to dry the brakes.
²Getting water inside your vehicle's engine can
cause it to lock up and stall out, and leave you
stranded.
²Failure to follow these warnings may result in
injuries that are serious or fatal to you, your
passengers, and others around you.
STARTING AND OPERATING 265
5
Page 269 of 449
apparent, and/or the system is not functioning as antici-
pated. Coordinate inspection efforts through an autho-
rized dealer.
WARNING!
Fluid level should be checked on a level surface and
with the engine off to prevent injury from moving
parts and to ensure accurate fluid level reading. Do
not overfill. Use only manufacturers recommended
power steering fluid.
If necessary, add fluid to restore to the proper indicated
level. With a clean cloth, wipe any spilled fluid from all
surfaces. For correct fluid type, refer to ºPower Steering
Reservoirº under ªFluids, Lubricants, and Genuine
Partsº in this section.
PARKING BRAKE
The foot-operated parking brake is positioned below the
lower left corner of the instrument panel. To release the
parking brake, pull the parking brake release handle.
NOTE:The instrument cluster Brake Warning Light
indicates only that the parking brake is applied. You must
be sure the parking brake is fully applied before leaving
the vehicle.
STARTING AND OPERATING 267
5
Page 271 of 449
When parking on a hill, turn the front wheels toward the
curb on a downhill grade and away from the curb on an
uphill grade.
The parking brake should be applied whenever the
driver is not in the vehicle.
BRAKE SYSTEM
In the event power assist is lost for any reason (for
example, repeated brake applications with the engine
off), the brakes will still function. The effort required to
brake the vehicle will be significantly more than that
required with the power system operating.
If either the front or rear hydraulic system loses normal
capability, the remaining system will still function with
some loss of braking effectiveness. This will be evident by
increased pedal travel during application, greater pedal
force required to slow or stop, and activation of the Brake
Warning light and the ABS light during brake use.
Rear-Wheel Anti-Lock Brake System (ABS) ± If
Equipped
The Rear-Wheel ABS provides increased vehicle stability
and brake performance under most braking conditions.
The system automatically controls the operation of the
rear brakes to prevent rear wheel lockup.
The ABS remains operational in the 4-wheel drive mode.
The level of performance is reduced when the front
brakes are locked up. This will cause the rear brakes to
lock-up through the drivetrain, which may reduce the
effectiveness of the anti-lock system.
During severe braking conditions, particularly with
changing road surfaces, such as ice to concrete, a slight
drop or minor pulsation may be felt in the brake pedal.
STARTING AND OPERATING 269
5
Page 272 of 449
WARNING!
Both Anti-Lock Brake Systems contain sophisticated
electronic equipment. It may be susceptible to inter-
ference caused by improperly installed or high out-
put radio transmitting equipment. This interference
can cause possible loss of anti-lock braking capabil-
ity. Installation of such equipment should be done by
qualified professionals.
Four-Wheel Anti-Lock Brake System (ABS)
4-Wheel ABS is designed to aid the driver in maintaining
vehicle control under adverse braking conditions. The
system operates with a separate computer to modulate
hydraulic pressure, to prevent wheel lock-up and help
avoid skidding on slippery surfaces.The system's pump motor runs during an ABS stop to
provide regulated hydraulic pressure. The pump motor
makes a low humming noise during operation, which is
normal.
The ABS includes an amber ABS warning light. When the
light is illuminated, the ABS is not functioning. The
system reverts to standard non-anti-lock brakes. Turning
the ignition OFF and ON again may reset the ABS if the
fault detected was only momentary.WARNING!
Pumping of the Anti-Lock Brakes will diminish their
effectiveness and may lead to an accident. Pumping
makes the stopping distance longer. Just press firmly
on your brake pedal when you need to slow down or
stop.
270 STARTING AND OPERATING
Page 322 of 449
CAUTION!
If the trailer weighs more than 1,000 lbs (454 kg)
loaded, it should have its own brakes and they
should be of adequate capacity. Failure to do this
could lead to accelerated brake lining wear, higher
brake pedal effort, and longer stopping distances.
WARNING!
Do not connect trailer brakes to your vehicle's hy-
draulic brake lines. It can overload your brake sys-
tem and cause it to fail. You might not have brakes
when you need them and could have an accident.
Towing any trailer will increase your stopping dis-
tance. When towing you should allow for additional
space between your vehicle and the vehicle in front
of you. Failure to do so could result in an accident.
Towing Requirements Ð Trailer Lights and Wiring
Whenever you pull a trailer, regardless of the trailer size,
stop lights and turn signals on the trailer are required for
motoring safety.
The Trailer Tow Package may include a 4 and 7-pin
wiring harness. Use a factory approved trailer harness
and connector.
NOTE:Do not cut or splice wiring into the vehicle's
wiring harness.
The electrical connections are all complete to the vehicle
but you must mate the harness to a trailer connector.
Refer to the following illustrations:
320 STARTING AND OPERATING
Page 327 of 449
Recreational Towing Procedure
Use the following procedure to prepare your vehicle for
recreational towing.
CAUTION!
It is necessary to follow these steps to be certain that
the transfer case is fully in NEUTRAL before recre-
ational towing to prevent damage to internal parts.
1. Bring vehicle to a complete stop.
2. Shut engine OFF.
3. Turn the ignition key to the ON position but do not
start the engine.
4. Depress brake pedal.
5. Shift automatic transmission into NEUTRAL, or de-
press clutch on manual transmission.6. Using the point of a ballpoint pen or similar object,
depress the recessed transfer case NEUTRAL button for
4 seconds.
7. After shift is completed and the NEUTRAL light
comes on, release the NEUTRAL button.
8. Start engine.
STARTING AND OPERATING 325
5