Page 167 of 484
UNDERSTANDING YOUR INSTRUMENT PANEL
CONTENTS
�Instrument Panel Features ............... 169
� Instrument Cluster – Base ............... 170
� Instrument Cluster – Premium ............ 171
� Instrument Cluster Descriptions ........... 172
� Electronic Vehicle Information Center (EVIC) –
If Equipped .......................... 183
▫ Electronic Vehicle Information Center (EVIC)
Displays ........................... 185
▫ Oil Change Required .................. 186
▫ Trip Functions ...................... 187 ▫
Automatic All Wheel Drive (AWD) Displays
— If Equipped ...................... 189
▫ Compass Display .................... 190
▫ Driver-Selectable Surround Sound (DSS) – If
Equipped .......................... 192
▫ uconnect� gps (Navigation) — If Equipped . . 193
▫ Personal Settings (Customer-Programmable
Features) .......................... 193
� Sales Code REQ — AM/FM Stereo Radio And
6–Disc CD/DVD Changer (MP3/WMA AUX
Jack) ............................... 1974
Page 168 of 484

▫Operating Instructions - Radio Mode ...... 198
▫ Operation Instructions - (Disc Mode For CD
And MP3/WMA Audio Play, DVD-Video) . . . 206
▫ Notes On Playing MP3/WMA Files ....... 208
▫ List Button (Disc Mode For
MP3/WMA Play) .................... 210
▫ Info Button (Disc Mode For MP3/WMA
Play) ............................. 210
� AM/FM/CD/DVD Radio (RER/REN) – If
Equipped ............................ 213
▫ Operating Instructions — Voice Recognition
System (VR) — If Equipped ............. 213
▫ Operating Instructions — uconnect� phone
— If Equipped ...................... 213
▫ Clock Setting Procedure ............... 213 �
Sales Code RES — AM/FM Stereo Radio With
CD Player (MP3 AUX Jack) ............... 215
▫ Operating Instructions — Radio Mode ..... 216
▫ Operation Instructions — CD Mode For CD
And MP3 Audio Play ................. 219
▫ Notes On Playing MP3 Files ............ 221
▫ Operation Instructions - Auxiliary Mode .... 223
� Sales Code RES/RSC — AM/FM Stereo Radio
With CD Player (MP3 AUX Jack) And Sirius
Radio ............................... 224
▫ Operating Instructions — Radio Mode ..... 225
▫ Operation Instructions — CD Mode For CD
And MP3 Audio Play ................. 230
▫ Notes On Playing MP3 Files ............ 232
▫ List Button (CD Mode For MP3 Play) ...... 235
166 UNDERSTANDING YOUR INSTRUMENT PANEL
Page 199 of 484
“Turn-by-Turn Navigation” — If Equipped
When ON is selected, the turn-by-turn directions will
appear in the display as the vehicle approaches a desig-
nated turn within a programmed route. To make your
selection, press and release the FUNCTION SELECT
button until “ON” or “OFF” appears.
“Display Units of Measure in”
The EVIC, odometer, and uconnect�gps system (if
equipped) can be changed between English and Metric
units of measure. To make your selection, press and
release the FUNCTION SELECT button until “US” or
“METRIC” appears.
SALES CODE REQ — AM/FM STEREO RADIO
AND 6–DISC CD/DVD CHANGER (MP3/WMA AUX
JACK)
NOTE: The radio sales code is located on the lower right
side of the radio faceplate.
REQ Radio
UNDERSTANDING YOUR INSTRUMENT PANEL 197
4
Page 213 of 484

Press and hold the INFO button again for three seconds
to return to�elapsed time� display.
Operation Instructions - Auxiliary Mode
The auxiliary (AUX) jack is an audio input jack which
allows the user to plug in a portable device such as an
MP3/WMA player, cassette player, or microphone and
utilize the vehicle’s audio system to amplify the source
and play through the vehicle speakers.
Pressing the AUX button will change the mode to auxil-
iary device if the AUX jack is connected.
NOTE:The AUX device must be turned on and the
device’s volume set to the proper level. If the AUX audio
is not loud enough, turn the device’s volume up. If the
AUX audio sounds distorted, turn the device’s volume
down.
SEEK Button (Auxiliary Mode)
No function.
SCAN Button (Auxiliary Mode)
No function.
EJECT Button (Auxiliary Mode)
No function.
TIME Button (Auxiliary Mode)
Press the TIME button to change the display from
elapsed playing time to time of day. The time of day will
display for five seconds.
RW/FF (Auxiliary Mode)
No function.
SET Button (Auxiliary Mode)
No function.
UNDERSTANDING YOUR INSTRUMENT PANEL 211
4
Page 217 of 484
Changing the Time Zone
1. Turn on the radio.
2. Touch the screen where the time is displayed. The
clock setting menu will appear on the screen.
3. Touch the screen where the words “Set Time Zone” are
displayed. The time zone selection menu will appear on
the screen.
4. Select a time zone by touching the screen where your
selection appears. If you do not see a time zone that you
want to select, touch the screen where the word “Page” is
displayed to view additional time zones in the menu.
5. Touch the screen where the word “Save” is displayed.
SALES CODE RES — AM/FM STEREO RADIO
WITH CD PLAYER (MP3 AUX JACK)
NOTE:The radio sales code is located on the lower right
side of the radio faceplate.
RES Radio
UNDERSTANDING YOUR INSTRUMENT PANEL 215
4
Page 225 of 484

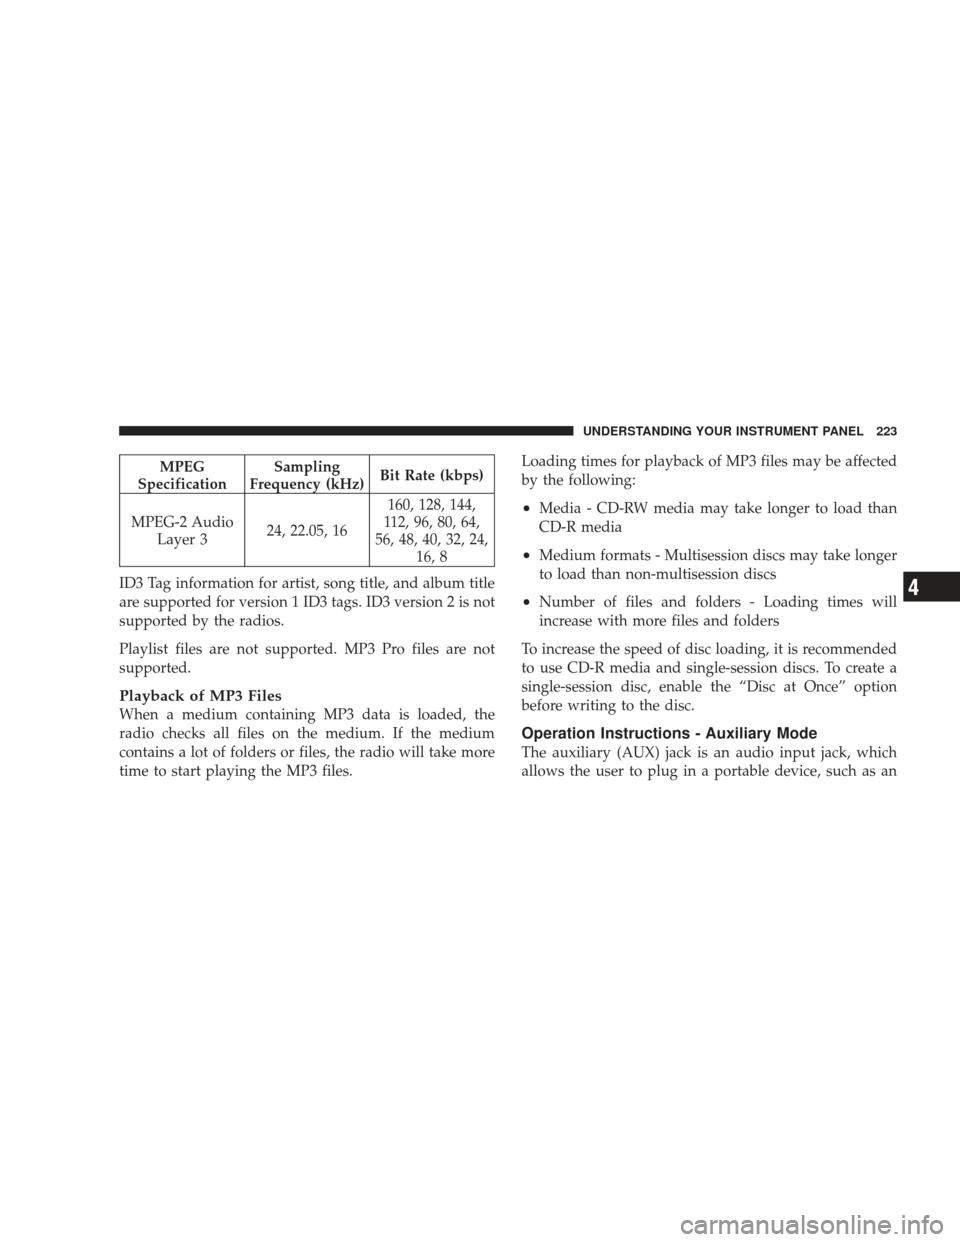
MPEG
Specification Sampling
Frequency (kHz) Bit Rate (kbps)
MPEG-2 Audio Layer 3 24, 22.05, 16 160, 128, 144,
112, 96, 80, 64,
56, 48, 40, 32, 24, 16, 8
ID3 Tag information for artist, song title, and album title
are supported for version 1 ID3 tags. ID3 version 2 is not
supported by the radios.
Playlist files are not supported. MP3 Pro files are not
supported.
Playback of MP3 Files
When a medium containing MP3 data is loaded, the
radio checks all files on the medium. If the medium
contains a lot of folders or files, the radio will take more
time to start playing the MP3 files. Loading times for playback of MP3 files may be affected
by the following:
•Media - CD-RW media may take longer to load than
CD-R media
•Medium formats - Multisession discs may take longer
to load than non-multisession discs
•Number of files and folders - Loading times will
increase with more files and folders
To increase the speed of disc loading, it is recommended
to use CD-R media and single-session discs. To create a
single-session disc, enable the “Disc at Once” option
before writing to the disc.
Operation Instructions - Auxiliary Mode
The auxiliary (AUX) jack is an audio input jack, which
allows the user to plug in a portable device, such as an
UNDERSTANDING YOUR INSTRUMENT PANEL 223
4
Page 226 of 484
MP3 player, or cassette player, and utilize the vehicle’s
audio system to amplify the source and play through the
vehicle speakers.
Pressing the DISC/AUX button will change the mode to
auxiliary device if the AUX jack is connected.
NOTE:The AUX device must be turned on and the
device’s volume set to proper level. If the AUX audio is
not loud enough, turn the device’s volume up. If the AUX
audio sounds distorted, turn the device’s volume down.
TIME Button (Auxiliary Mode)
Press this button to change the display to time of day. The
time of day will display for five seconds (when ignition is
OFF).
SALES CODE RES/RSC — AM/FM STEREO
RADIO WITH CD PLAYER (MP3 AUX JACK) AND
SIRIUS RADIO
NOTE: The radio sales code is located on the lower right
side of the radio faceplate.
RES/RSC Radio
224 UNDERSTANDING YOUR INSTRUMENT PANEL
Page 232 of 484

and 12 FM stations to be stored into pushbutton memory.
The stations stored in SET 2 memory can be selected by
pressing the pushbutton twice.
Every time a preset button is used, a corresponding
button number will display.
Buttons1-6
These buttons tune the radio to the stations that you
commit to pushbutton memory (12 AM and 12 FM
stations).
DISC/AUX Button
Pressing the DISC/AUX button will allow you to switch
from AM/FM modes to DISC/AUX mode.
Operation Instructions — CD MODE for CD and
MP3 Audio Play
NOTE:
•The ignition switch must be in the ON or ACC
position to operate the radio.
•This radio is capable of playing compact discs (CD),
recordable compact discs (CD-R), rewritable compact
discs (CD-RW), compact discs with MP3 tracks and
multisession compact discs with CD and MP3 tracks.
Inserting Compact Disc(s)
Gently insert one CD into the CD player with the CD
label facing up. The CD will automatically be pulled into
the CD player and the CD icon will illuminate on the
radio display. If a CD does not go into the slot more than
1.0 in (2.5 cm), a disc may already be loaded and must be
ejected before a new disc can be loaded.
If you insert a disc with the ignition ON and the radio
ON, the unit will switch from radio to CD mode and
begin to play when you insert the disc. The display will
show the track number, and index time in minutes and
seconds. Play will begin at the start of track 1.
230 UNDERSTANDING YOUR INSTRUMENT PANEL