Page 158 of 484
NOTE:If desired, the power outlet next to the ash
receiver tray (if equipped) can be converted by your
authorized dealer to provide power with the ignition
switch in the LOCK position. The center console outlet is powered directly from the
battery (power available at all times). Items plugged into
this outlet may discharge the battery and/or prevent
engine starting.
Front Power OutletCenter Console Power Outlet
156 UNDERSTANDING THE FEATURES OF YOUR VEHICLE
Page 164 of 484
WARNING!
•Be certain that the seatback is securely locked into
position. If the seatback is not securely locked into
position, the seat will not provide the proper
stability for child seats and/or passengers. An
improperly latched seat could cause serious injury.
•The cargo area in the rear of the vehicle (with the
rear seatbacks in the locked-up or folded down
position) should not be used as a play area by
children when the vehicle is in motion. They could
be seriously injured in an accident. Children
should be seated and using the proper restraint
system.(Continued)
WARNING! (Continued)
•To help protect against personal injury, passengers
should not be seated in the rear cargo area. The
rear cargo space is intended for load carrying
purposes only, not for passengers, who should sit
in seats and use seat belts.
WARNING!
The weight and position of cargo and passengers can
change the vehicle center of gravity and vehicle
handling. To avoid loss of control resulting in per-
sonal injury, follow these guidelines for loading your
vehicle:
•Always place cargo evenly on the cargo floor. Put
heavier objects as low and as far forward as
possible.(Continued)
162 UNDERSTANDING THE FEATURES OF YOUR VEHICLE
Page 168 of 484
▫Operating Instructions - Radio Mode ...... 198
▫ Operation Instructions - (Disc Mode For CD
And MP3/WMA Audio Play, DVD-Video) . . . 206
▫ Notes On Playing MP3/WMA Files ....... 208
▫ List Button (Disc Mode For
MP3/WMA Play) .................... 210
▫ Info Button (Disc Mode For MP3/WMA
Play) ............................. 210
� AM/FM/CD/DVD Radio (RER/REN) – If
Equipped ............................ 213
▫ Operating Instructions — Voice Recognition
System (VR) — If Equipped ............. 213
▫ Operating Instructions — uconnect� phone
— If Equipped ...................... 213
▫ Clock Setting Procedure ............... 213 �
Sales Code RES — AM/FM Stereo Radio With
CD Player (MP3 AUX Jack) ............... 215
▫ Operating Instructions — Radio Mode ..... 216
▫ Operation Instructions — CD Mode For CD
And MP3 Audio Play ................. 219
▫ Notes On Playing MP3 Files ............ 221
▫ Operation Instructions - Auxiliary Mode .... 223
� Sales Code RES/RSC — AM/FM Stereo Radio
With CD Player (MP3 AUX Jack) And Sirius
Radio ............................... 224
▫ Operating Instructions — Radio Mode ..... 225
▫ Operation Instructions — CD Mode For CD
And MP3 Audio Play ................. 230
▫ Notes On Playing MP3 Files ............ 232
▫ List Button (CD Mode For MP3 Play) ...... 235
166 UNDERSTANDING YOUR INSTRUMENT PANEL
Page 180 of 484
Unless reset, this message will continue to display each
time you turn the ignition switch to the ON position. To
turn off the message temporarily, press and release the
TRIP ODOMETER button on the instrument cluster. To
reset the oil change indicator system (after performing
the scheduled maintenance) perform the following pro-
cedure:1. Turn the ignition switch to the ON position. (Do not
start the engine).
2. Fully depress the accelerator pedal slowly three
times within 10 seconds.
3. Turn the ignition switch to the LOCK position.
NOTE: If the indicator message illuminates when you
start the vehicle, the oil change indicator system did not
reset. If necessary, repeat this procedure. On vehicles equipped with a Premium Instrument Clus-
ter, this display shows the Electronic Vehicle Information
Center (EVIC) messages when the appropriate conditions
exist.
Lo tirE
When the appropriate condition exists the odometer
display will toggle between Lo and tirE for three cycles.
Loose Fuel Filler Cap Message
If the vehicle diagnostic system determines that the fuel
filler cap is loose, improperly installed, or damaged, a
“Check Gascap” message will display in the EVIC.
Tighten the fuel filler cap properly and press the TRIP
ODOMETER button to turn off the message. If the
problem continues, the message will appear the next time
the vehicle is started.
A loose, improperly installed, or damaged fuel filler cap
may also turn on the Malfunction Indicator Light (MIL).
178 UNDERSTANDING YOUR INSTRUMENT PANEL
Page 181 of 484
Refer to “Electronic Vehicle Information Center (EVIC)”
in this section for more information.
20. Brake Warning LightThis light monitors various brake functions,
including brake fluid level and parking brake
application. If the brake light turns on, it may
indicate that the parking brake is applied, that
the brake fluid level is low, or that there is a problem with
the anti-lock brake system reservoir.
If the light remains on when the parking brake has been
disengaged, and the fluid level is at the full mark on the
master cylinder reservoir, it indicates a possible brake
hydraulic system malfunction or a problem with the
Brake Booster has been detected by the Anti-Lock Brake
System (ABS) / Electronic Stability Program (ESP) sys-
tem. In this case, the light will remain on until the
condition has been corrected. If the problem is related to the brake booster, the ABS pump will run when applying
the brake and a brake pedal pulsation may be felt during
each stop.
The dual brake system provides a reserve braking capac-
ity in the event of a failure to a portion of the hydraulic
system. A leak in either half of the dual brake system is
indicated by the Brake Warning Light which will turn on
when the brake fluid level in the master cylinder has
dropped below a specified level.
The light will remain on until the cause is corrected.
NOTE:
The light may flash momentarily during sharp
cornering maneuvers which change fluid level condi-
tions. The vehicle should have service performed, and
the brake fluid level checked.
If brake failure is indicated, immediate repair is neces-
sary.
UNDERSTANDING YOUR INSTRUMENT PANEL 179
4
Page 182 of 484
WARNING!
Driving a vehicle with the brake light on is danger-
ous. Part of the brake system may have failed. It will
take longer to stop the vehicle. You could have an
accident. Have the vehicle checked immediately.
Vehicles equipped with the Anti-Lock Brake System
(ABS), are also equipped with Electronic Brake Force
Distribution (EBD). In the event of an EBD failure, the
Brake Warning Light will turn on along with the ABS
Light. Immediate repair to the ABS system is required.
Operation of the Brake Warning Light can be checked by
turning the ignition switch from the OFF position to the
ON position. The light should illuminate for approxi-
mately two seconds. The light should then turn off unless
the parking brake is applied or a brake fault is detected.
If the light does not illuminate, have the light inspected
by an authorized dealer. The light also will turn on when the parking brake is
applied with the ignition switch in the ON position.
NOTE:
This light shows only that the parking brake is
applied. It does not show the degree of brake application.
21. Vehicle Security Light — If Equipped The Vehicle Security Light flashes rapidly
when the Vehicle Security Alarm is arming,
and slowly when the Vehicle Security Alarm is
armed.
22. Tire Pressure Monitoring Telltale Light
Each tire, including the spare (if provided),
should be checked monthly, when cold and
inflated to the inflation pressure recommended
by the vehicle manufacturer on the vehicle
placard or tire inflation pressure label. (If your vehicle has
tires of a different size than the size indicated on the
vehicle placard or tire inflation pressure label, you should
determine the proper tire inflation pressure for those tires.)
180 UNDERSTANDING YOUR INSTRUMENT PANEL
Page 184 of 484

CAUTION!
The TPMS has been optimized for the original
equipment tires and wheels. TPMS pressures and
warning have been established for the tire size
equipped on your vehicle. Undesirable system opera-
tion or sensor damage may result when using re-
placement equipment that is not of the same size,
type, and/or style. Aftermarket wheels can cause
sensor damage. Do not use tire sealant from a can, or
balance beads if your vehicle is equipped with a
TPMS, as damage to the sensors may result.
23. Anti-Lock Brake (ABS) Light — If Equipped This light monitors the Anti-Lock Brake System
(ABS). The light will turn on when the ignition
switch is turned to the ON position and may stay on for
as long as four seconds. If the ABS light remains on or turns on while driving,
then the Anti-Lock portion of the brake system is not
functioning and service is required. However, the con-
ventional brake system will continue to operate normally
if the BRAKE warning light is not on.
If the ABS light is on, the brake system should be serviced
as soon as possible to restore the benefits of Anti-Lock
brakes. If the ABS light does not turn on when the
ignition switch is turned to the ON position, have the
light inspected by an authorized dealer.
24. Low Fuel Indicator Light
This light will turn on and a single chime will
sound when the fuel level drops to 1/8 tank.
182 UNDERSTANDING YOUR INSTRUMENT PANEL
Page 185 of 484
25. Malfunction Indicator Light (MIL)The Malfunction Indicator Light (MIL) is part of
an onboard diagnostic system called OBD. The
OBD system monitors engine and automatic
transmission control systems. The MIL will turn on when
the key is in the ON position before engine start. If the
MIL does not come on when turning the key from LOCK
to ON, have the condition checked promptly.
Certain conditions such as a loose or missing gas cap,
poor fuel quality, etc., may illuminate the MIL after
engine start. The vehicle should be serviced if the MIL
stays on through several of your typical driving cycles. In
most situations, the vehicle will drive normally and will
not require towing.
The MIL flashes to alert you to serious conditions that
could lead to immediate loss of power or severe catalytic
converter damage. The vehicle should be serviced as
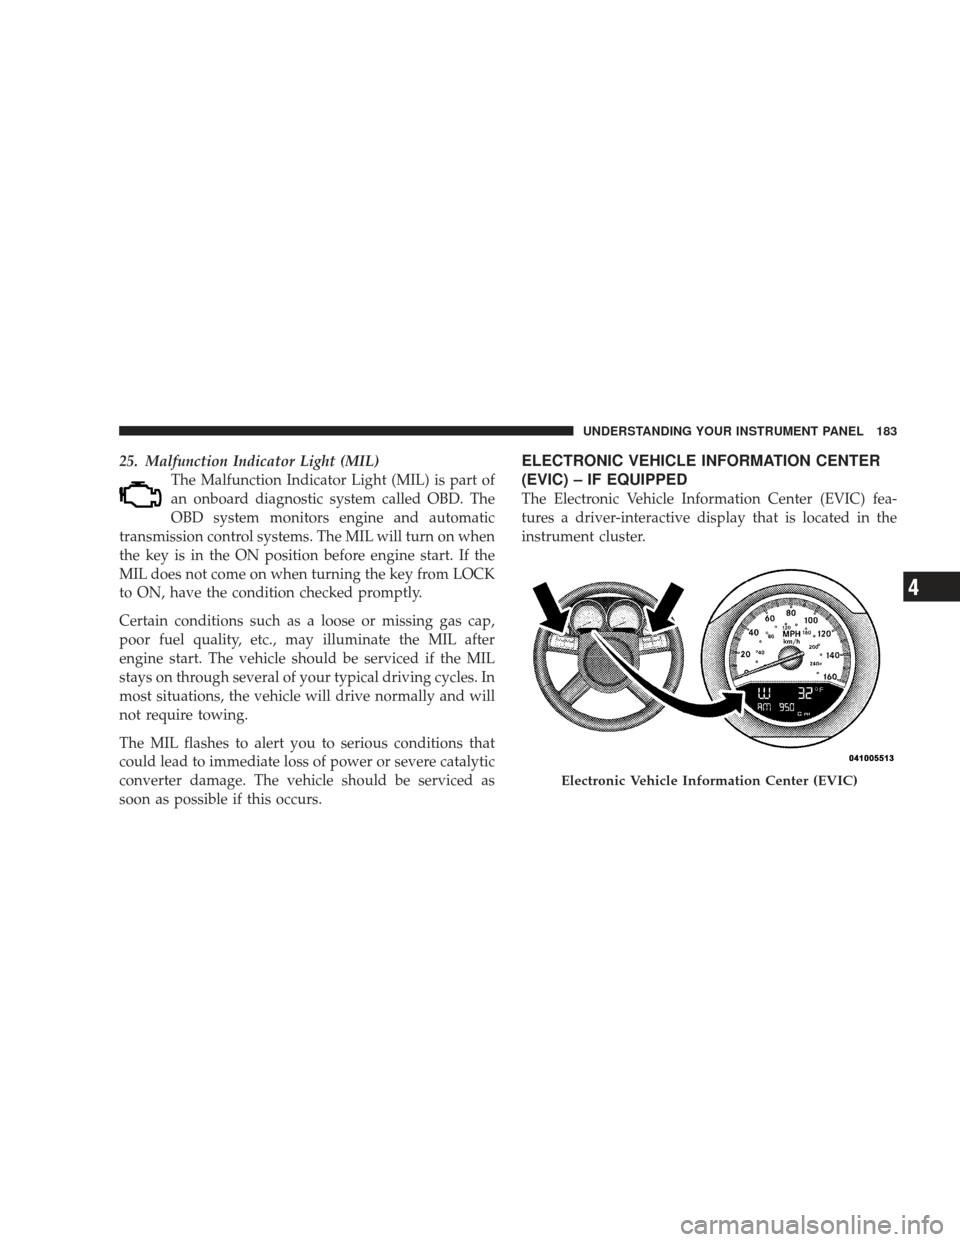
soon as possible if this occurs.ELECTRONIC VEHICLE INFORMATION CENTER
(EVIC) – IF EQUIPPED
The Electronic Vehicle Information Center (EVIC) fea-
tures a driver-interactive display that is located in the
instrument cluster.
Electronic Vehicle Information Center (EVIC)
UNDERSTANDING YOUR INSTRUMENT PANEL 183
4