Page 148 of 484
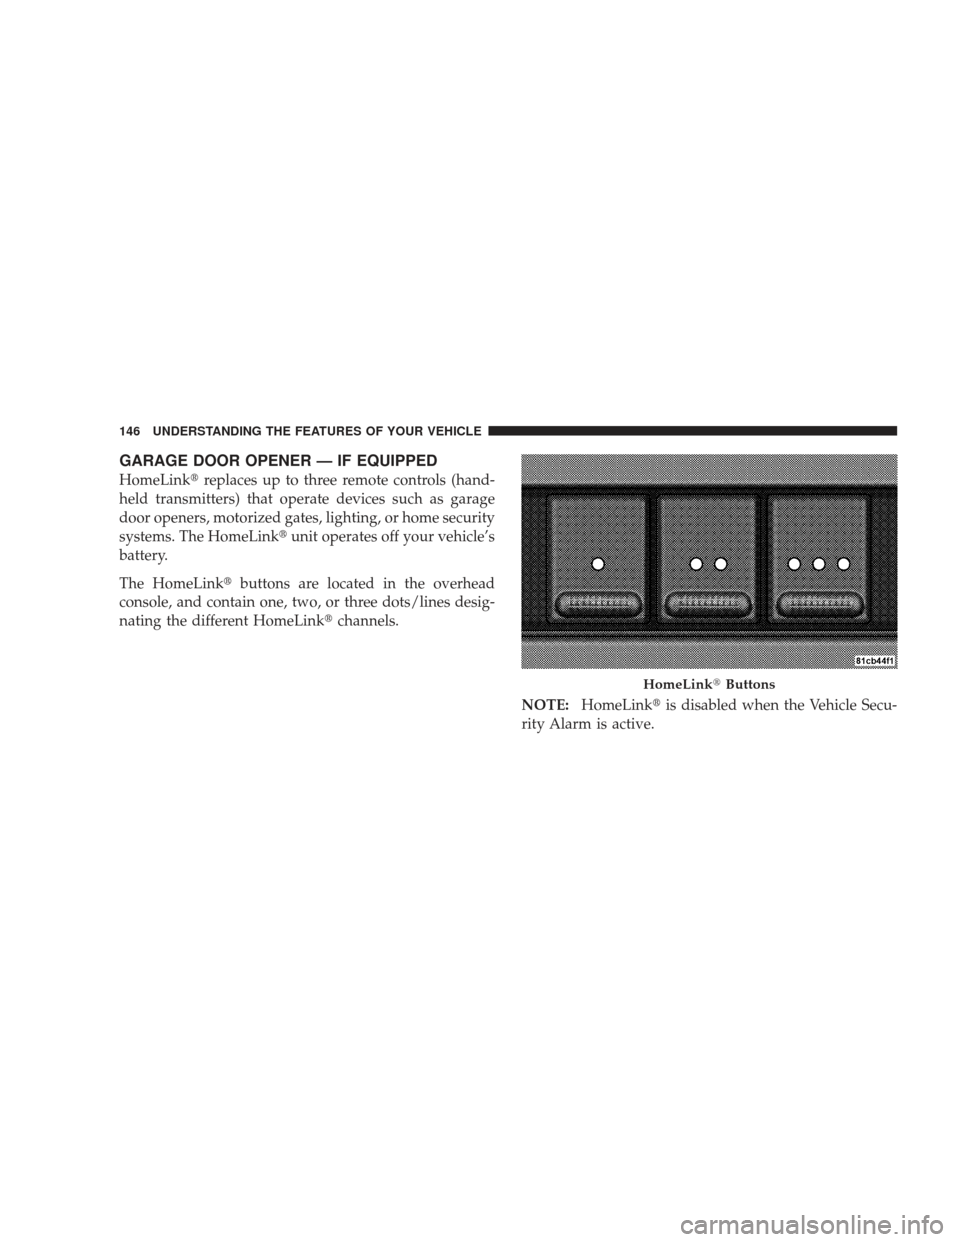
GARAGE DOOR OPENER — IF EQUIPPED
HomeLink�replaces up to three remote controls (hand-
held transmitters) that operate devices such as garage
door openers, motorized gates, lighting, or home security
systems. The HomeLink� unit operates off your vehicle’s
battery.
The HomeLink� buttons are located in the overhead
console, and contain one, two, or three dots/lines desig-
nating the different HomeLink� channels.
NOTE:HomeLink� is disabled when the Vehicle Secu-
rity Alarm is active.
HomeLink� Buttons
146 UNDERSTANDING THE FEATURES OF YOUR VEHICLE
Page 152 of 484
 after several seconds of
transmission – which may not be long enough for
Ho")
Gate Operator/Canadian Programming
Canadian radio-frequency laws require transmitter sig-
nals to “time-out” (or quit) after several seconds of
transmission – which may not be long enough for
HomeLink�to pick up the signal during programming.
Similar to this Canadian law, some U.S. gate operators are
designed to “time-out” in the same manner.
It may be helpful to unplug the device during the cycling
process to prevent possible overheating of the garage
door or gate motor.
If you are having difficulties programming a garage door
opener or a gate operator, replace “Programming
HomeLink” Step 3 with the following:
3. Continue to press and hold the HomeLink� button
while you press and release - every two seconds
(“cycle”) your hand-held transmitter until HomeLink �has successfully accepted the frequency signal. The
EVIC display will change from “CHANNEL # TRAIN-
ING” to “CHANNEL # TRAINED.”
If you unplugged the device for training, plug it back in
at this time.
Then proceed with Step 4 under “Programming
HomeLink�” earlier in this section.
Using HomeLink�
To operate, simply press and release the programmed
HomeLink�
button. Activation will now occur for the
trained device (i.e., garage door opener, gate operator,
security system, entry door lock, home/office lighting,
etc.) The hand-held transmitter of the device may also be
used at any time.
150 UNDERSTANDING THE FEATURES OF YOUR VEHICLE
Page 153 of 484

Reprogramming A Single HomeLink�Button
To reprogram a channel that has been previously trained,
follow these steps:
1. Turn the ignition switch to the ON/RUN position.
2. Press and hold the desired HomeLink� button for
20 seconds until the EVIC display states “CHANNEL #
TRAINING.” Do not release the button.
3. Without releasing the button, proceed with Program-
ming HomeLink� Step 2 and follow all remaining steps.
Security
It is advised to erase all channels before you sell or turn
in your vehicle.
To do this, press and hold the two outside buttons for
20 seconds until the EVIC message states “CHANNELS
CLEARED.” Note that all channels will be erased. Indi-
vidual channels cannot be erased. The HomeLink�
Universal Transceiver is disabled when
the Vehicle Security Alarm is active.
Troubleshooting Tips
If you are having trouble programming HomeLink�, here
are some of the most common solutions:
•Replace the battery in the original transmitter.
•Press the learn button on the garage door opener to
complete the training for rolling code.
•Did you unplug the device for training, and remember
to plug it back in?
If you are having any problems or require assistance,
please call toll-free 1–800–355–3515 or, on the Internet at
www.HomeLink.com for information or assistance.
UNDERSTANDING THE FEATURES OF YOUR VEHICLE 151
3
Page 155 of 484

WARNING!
•Never leave children in a vehicle with the key in
the ignition switch. Occupants, particularly unat-
tended children, can become entrapped by the
power sunroof while operating the power sunroof
switch. Such entrapment may result in serious
injury or death.
•In an accident, there is a greater risk of being
thrown from a vehicle with an open sunroof. You
could also be seriously injured or killed. Always
fasten your seat belt properly and make sure all
passengers are also properly secured.
•Do not allow small children to operate the sun-
roof. Never allow fingers or other body parts, or
any object, to project through the sunroof opening.
Injury may result.
Opening Sunroof — Express
Press the switch rearward and release, and the sunroof
will open automatically from any position. The sunroof
will open fully and then stop automatically. This is called
“Express Open”. During Express Open operation, any
movement of the sunroof switch will stop the sunroof.
Closing Sunroof — Express
Press the switch forward and release, and the sunroof
will close automatically from any position. The sunroof
will close fully and stop automatically. This is called
“Express Close”. During Express Close operation, any
movement of the sunroof switch will stop the sunroof.
Pinch Protect Feature
This feature will detect an obstruction in the opening of
the sunroof during Express Close operation. If an ob-
struction in the path of the sunroof is detected, the
UNDERSTANDING THE FEATURES OF YOUR VEHICLE 153
3
Page 164 of 484

WARNING!
•Be certain that the seatback is securely locked into
position. If the seatback is not securely locked into
position, the seat will not provide the proper
stability for child seats and/or passengers. An
improperly latched seat could cause serious injury.
•The cargo area in the rear of the vehicle (with the
rear seatbacks in the locked-up or folded down
position) should not be used as a play area by
children when the vehicle is in motion. They could
be seriously injured in an accident. Children
should be seated and using the proper restraint
system.(Continued)
WARNING! (Continued)
•To help protect against personal injury, passengers
should not be seated in the rear cargo area. The
rear cargo space is intended for load carrying
purposes only, not for passengers, who should sit
in seats and use seat belts.
WARNING!
The weight and position of cargo and passengers can
change the vehicle center of gravity and vehicle
handling. To avoid loss of control resulting in per-
sonal injury, follow these guidelines for loading your
vehicle:
•Always place cargo evenly on the cargo floor. Put
heavier objects as low and as far forward as
possible.(Continued)
162 UNDERSTANDING THE FEATURES OF YOUR VEHICLE
Page 182 of 484

WARNING!
Driving a vehicle with the brake light on is danger-
ous. Part of the brake system may have failed. It will
take longer to stop the vehicle. You could have an
accident. Have the vehicle checked immediately.
Vehicles equipped with the Anti-Lock Brake System
(ABS), are also equipped with Electronic Brake Force
Distribution (EBD). In the event of an EBD failure, the
Brake Warning Light will turn on along with the ABS
Light. Immediate repair to the ABS system is required.
Operation of the Brake Warning Light can be checked by
turning the ignition switch from the OFF position to the
ON position. The light should illuminate for approxi-
mately two seconds. The light should then turn off unless
the parking brake is applied or a brake fault is detected.
If the light does not illuminate, have the light inspected
by an authorized dealer. The light also will turn on when the parking brake is
applied with the ignition switch in the ON position.
NOTE:
This light shows only that the parking brake is
applied. It does not show the degree of brake application.
21. Vehicle Security Light — If Equipped The Vehicle Security Light flashes rapidly
when the Vehicle Security Alarm is arming,
and slowly when the Vehicle Security Alarm is
armed.
22. Tire Pressure Monitoring Telltale Light
Each tire, including the spare (if provided),
should be checked monthly, when cold and
inflated to the inflation pressure recommended
by the vehicle manufacturer on the vehicle
placard or tire inflation pressure label. (If your vehicle has
tires of a different size than the size indicated on the
vehicle placard or tire inflation pressure label, you should
determine the proper tire inflation pressure for those tires.)
180 UNDERSTANDING YOUR INSTRUMENT PANEL
Page 277 of 484

WARNING!
Unintended movement of a vehicle could injure
those in and near the vehicle. As with all vehicles,
you should never exit a vehicle while the engine is
running. Before exiting a vehicle, you should always
shift the transmission into PARK, remove the key
from the ignition, and apply the parking brake. Once
the key is removed from the ignition, the transmis-
sion shift lever is locked in the PARK position,
securing the vehicle against unwanted movement.
Furthermore, you should never leave unattended
children inside a vehicle.
Over-Temperature Mode
The transmission electronics constantly monitor the
transmission oil temperature. If the transmission exceeds
normal operating temperature, the transmission will
change the way it shifts to help control the condition.This may result in a slightly different feeling or response
during normal operation in DRIVE position. After the
transmission cools down, it will return to normal
operation.
Brake/Transmission Shift Interlock System
This vehicle is equipped with a Brake Transmission Shift
Interlock System (BTSI) that holds the shift lever in the
PARK position when the ignition switch is in the LOCK
position. To move the shift lever out of the PARK
position, the ignition switch must be turned to the
ON/RUN position, and the brake pedal must be
depressed.
Brake/Transmission Interlock Manual Override
There is an override for the BTSI that allows you to move
the shift lever out of the PARK position if an electrical
system malfunction occurs (i.e., dead battery). To access
the override, remove the rubber tray from the storage bin
STARTING AND OPERATING 275
5
Page 283 of 484

Transmission Limp Home Mode
The transmission is monitored for abnormal conditions.
If a condition is detected that could cause damage, the
transmission automatically shifts into second gear. The
transmission remains in second gear despite the forward
gear selected. PARK, REVERSE, and NEUTRAL will
continue to operate. This reset feature allows the vehicle
to be driven to an authorized dealer for service without
damaging the transmission.
If the problem has been momentary, the transmission can
be reset to regain all forward gears.
•Stop the vehicle and shift into PARK.
•Turn the key to LOCK, then start the engine.
•Shift into DRIVE and resume driving.
NOTE: Even if the transmission can be reset, we recom-
mend that you visit an authorized dealer at your earliest
possible convenience. Your authorized dealer has diag-
nostic equipment to determine if the problem could
recur.
If the transmission cannot be reset, authorized dealer
service is required.
STARTING AND OPERATING 281
5