Page 59 of 469

Child Restraint
Everyone in your vehicle needs to be buckled up all the
time, including babies and children")
•Traction/stability control status
•Tire Pressure Monitoring System status (if equipped)
Child Restraint
Everyone in your vehicle needs to be buckled up all the
time, including babies and children. Every state in the
United States and all Canadian provinces require that
small children ride in proper restraint systems. This is the
law, and you can be prosecuted for ignoring it.
Children 12 years and younger should ride properly
buckled up in a rear seat, if available. According to crash
statistics, children are safer when properly restrained in
the rear seats rather than in the front.
WARNING!
In a collision, an unrestrained child, even a tiny baby,
can become a projectile inside the vehicle. The force
required to hold even an infant on your lap could
become so great that you could not hold the child, no
matter how strong you are. The child and others
could be badly injured. Any child riding in your
vehicle should be in a proper restraint for the child’s
size.
There are different sizes and types of restraints for
children from newborn size to the child almost large
enough for an adult safety belt. Always check the child
seat Owner’s Manual to ensure you have the correct seat
for your child. Use the restraint that is correct for your
child.
2
THINGS TO KNOW BEFORE STARTING YOUR VEHICLE 57
Page 132 of 469

•Electronic Speed Control may not engage if a different
size tire is installed on one wheel, such as the compact
spare tire.
To Deactivate
The system will disable Electronic Speed Control without
erasing the memory if you:
•Softly tap the brake pedal.
•Press the brake pedal, or press the clutch pedal to the
floor (manual transmission).
•Pull the speed control lever toward you (CANCEL).
Pushing and releasing the ON/OFF button or turning the
ignition OFF erases the set speed from memory.
To Resume Speed
If you deactivated the Electronic Speed Control without
erasing the set speed from memory and your vehicle
speed is above 20 mph (32 km/h), you can resume theprevious set speed. To do so, push the lever upward to
RESUME ACCEL and release. Then remove your foot
from the accelerator pedal.
To Vary the Speed Setting
When the Electronic Speed Control is set, you can in-
crease speed by pushing up and holding the lever in
RESUME ACCEL. When the lever is released, a new set
speed will be established.
Tapping the lever to RESUME ACCEL once will result in
a 1 mph (1.6 km/h) speed increase. Each time the lever is
tapped speed increases, so tapping the lever three times
will increase speed by 3 mph (4.8 km/h), etc.
To decrease speed while Electronic Speed Control is set,
push down and hold the lever in SET DECEL. Release the
lever when the desired speed is reached, and a new set
speed will be established.
130 UNDERSTANDING THE FEATURES OF YOUR VEHICLE
Page 166 of 469

WARNING!
Driving a vehicle with the red brake light on is
dangerous. Part of the brake system may have failed.
It will take longer to stop the vehicle. You could have
an accident. Have the vehicle checked immediately.
Vehicles equipped with the Anti-Lock Brake System
(ABS), are also equipped with Electronic Brake Force
Distribution (EBD). In the event of an EBD failure, the
Brake Warning Light will turn on along with the ABS
Light. Immediate repair to the ABS system is required.
Operation of the Brake Warning Light can be checked by
turning the ignition switch from the OFF position to the
ON position. The light should illuminate for approxi-
mately two seconds. The light should then turn off unless
the parking brake is applied or a brake fault is detected.
If the light does not illuminate, have the light inspected
by an authorized dealer.The light also will turn on when the parking brake is
applied with the ignition switch in the ON position.
NOTE:This light shows only that the parking brake is
applied. It does not show the degree of brake application.
21. Vehicle Security Light — If Equipped
This light will flash at a fast rate for approxi-
mately 15 seconds, when the vehicle security
alarm is arming, and then will flash slowly
until the vehicle is disarmed.
22. Tire Pressure Monitoring Telltale Light
Each tire, including the spare (if provided),
should be checked monthly, when cold and
inflated to the inflation pressure recommended
by the vehicle manufacturer on the vehicle plac-
ard or tire inflation pressure label. (If your vehicle has tires
of a different size than the size indicated on the vehicle
placard or tire inflation pressure label, you should deter-
mine the proper tire inflation pressure for those tires.)
164 UNDERSTANDING YOUR INSTRUMENT PANEL
Page 168 of 469

CAUTION!
The TPMS has been optimized for the original
equipment tires and wheels. TPMS pressures and
warning have been established for the tire size
equipped on your vehicle. Undesirable system opera-
tion or sensor damage may result when using re-
placement equipment that is not of the same size,
type, and/or style. Aftermarket wheels can cause
sensor damage. Do not use tire sealant from a can, or
balance beads if your vehicle is equipped with a
TPMS, as damage to the sensors may result.
23. Anti-Lock Brake (ABS) Light
This light monitors the Anti-Lock Brake System
(ABS). The light will turn on when the ignition
switch is turned to the ON position and may stay on for
as long as four seconds.If the ABS light remains on or turns on while driving,
then the Anti-Lock portion of the brake system is not
functioning and service is required. However, the con-
ventional brake system will continue to operate normally
if the BRAKE warning light is not on.
If the ABS light is on, the brake system should be serviced
as soon as possible to restore the benefits of Anti-Lock
Brakes. If the ABS light does not turn on when the
ignition switch is turned to the ON position, have the
light inspected by an authorized dealer.
24. Low Fuel Light
This light will turn on and a single chime will
sound when the fuel level drops to 1/8 tank.
25. Malfunction Indicator Light (MIL)
The Malfunction Indicator Light (MIL) is part of
an onboard diagnostic system called OBD. The
OBD system monitors engine and automatic
transmission control systems. The MIL will turn on when
166 UNDERSTANDING YOUR INSTRUMENT PANEL
Page 281 of 469

•Pumping of the anti-lock brakes will diminish
their effectiveness and may lead to an accident.
Pumping makes the stopping distance longer. Just
press firmly on your brake pedal")
WARNING! (Continued)
•Pumping of the anti-lock brakes will diminish
their effectiveness and may lead to an accident.
Pumping makes the stopping distance longer. Just
press firmly on your brake pedal when you need
to slow down or stop.
•The Anti-Lock Brake System (ABS) cannot prevent
the natural laws of physics from acting on the
vehicle, nor can it increase braking or steering
efficiency beyond that afforded by the condition
of the vehicle brakes and tires or the traction
afforded.
•The Anti-Lock Brake System (ABS) cannot prevent
accidents, including those resulting from excessive
speed in turns, following another vehicle too
closely, or hydroplaning. Only a safe, attentive,
and skillful driver can prevent accidents.
(Continued)
WARNING! (Continued)
•The capabilities of an Anti-Lock Brake System
(ABS) equipped vehicle must never be exploited
in a reckless or dangerous manner, that could
jeopardize the user’s safety or the safety of others.
All vehicle wheels and tires must be the same size and
type and tires must be properly inflated to produce
accurate signals for the computer.
Anti-Lock Brake Warning Light
The “Anti-Lock Brake System (ABS) Warning Light”
monitors the Anti-Lock Brake System. The light will
come on when the ignition switch is turned to the ON
position and may stay on for as long as four seconds.
If the “ABS Warning Light” remains on or comes on
while driving, it indicates that the anti-lock portion of the
brake system is not functioning and that service is
5
STARTING AND OPERATING 279
Page 290 of 469
NOTE:
•The “ESP/TCS Indicator Light” and the “ESP/BAS
Malfunction Indicator Light” will turn on momen-
tarily each time the ignition switch is turned ON.
•Each time the ignition is turned ON, the ESP System
will be ON even if it was turned OFF previously.
•The ESP Control System will make buzzing or clicking
sounds when it is active. This is normal; the sounds
will stop when the ESP becomes inactive following the
maneuver that caused the ESP activation.
TIRE SAFETY INFORMATION
Tire Markings
1 — U.S. DOT Safety Stan-
dards Code (TIN)4 — Maximum Load
2 — Size Designation 5 — Maximum Pressure
3 — Service Description 6 — Treadwear, Traction and
Temperature Grades 288 STARTING AND OPERATING
Page 291 of 469
NOTE:
•P (Passenger) - Metric tire sizing is based on U.S.
design standards. P-Metric tires have the letter “P”
molded into the sidewall preceding the size designa-
tion. Example: P215/65R15 95H.
•European-Metric tire sizing is based on European
design standards. Tires designed to this standard have
the tire size molded into the sidewall beginning with
the section width. The letter�P�is absent from this tire
size designation. Example: 215/65R15 96H.
•Temporary spare tires are high-pressure compact
spares designed for temporary emergency use only.
Tires designed to this standard have the letter “T”
molded into the sidewall preceding the size designa-
tion. Example: T145/80D18 103M.
CAUTION!
Do not use two different size tires on the rear wheels,
as this can result in rear axle damage.
5
STARTING AND OPERATING 289
Page 292 of 469
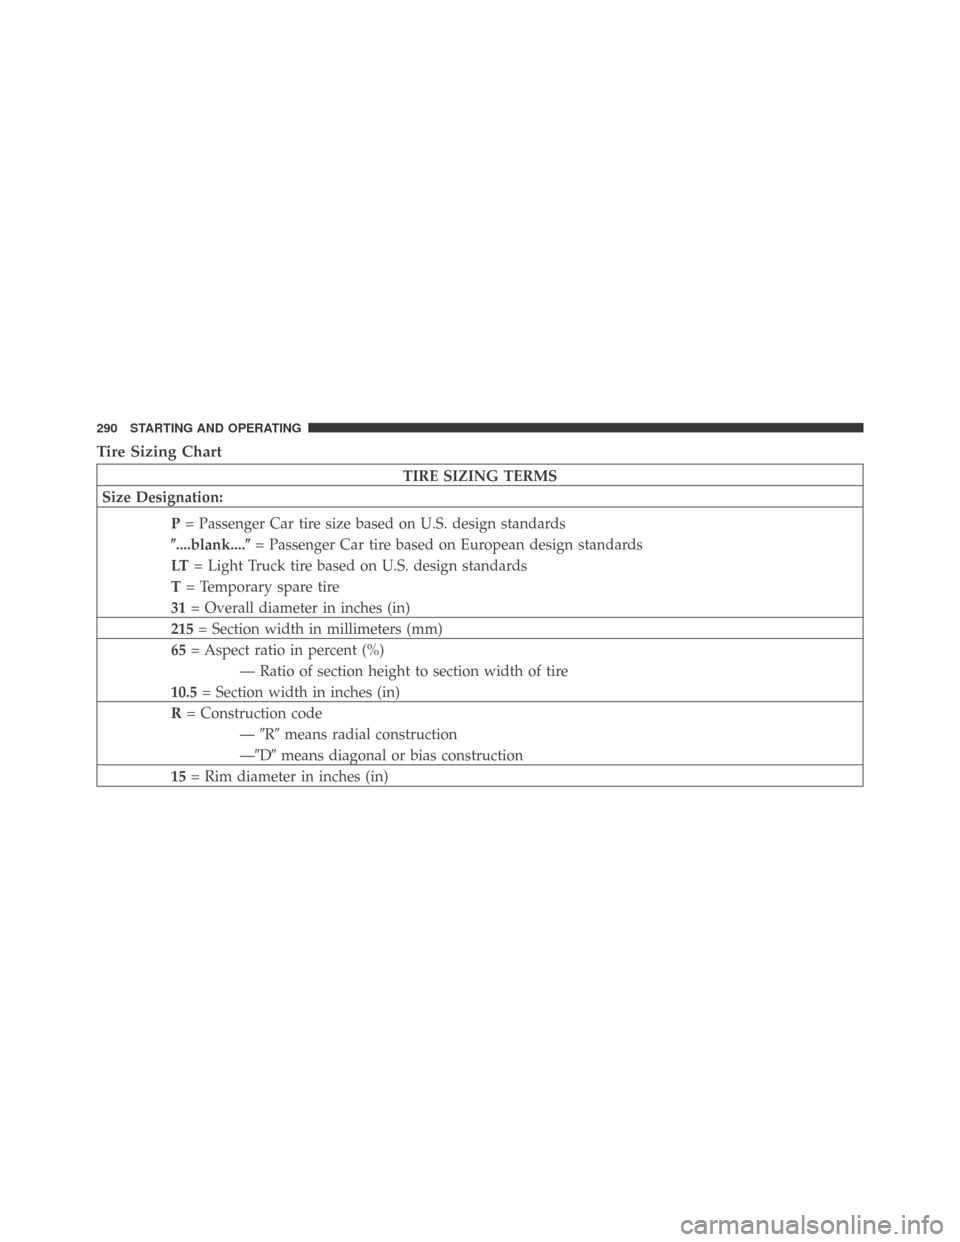
Tire Sizing Chart
TIRE SIZING TERMS
Size Designation:
P= Passenger Car tire size based on U.S. design standards
�....blank....�= Passenger Car tire based on European design standards
LT= Light Truck tire based on U.S. design standards
T= Temporary spare tire
31= Overall diameter in inches (in)
215= Section width in millimeters (mm)
65= Aspect ratio in percent (%)
— Ratio of section height to section width of tire
10.5= Section width in inches (in)
R= Construction code
—�R�means radial construction
—�D�means diagonal or bias construction
15= Rim diameter in inches (in)
290 STARTING AND OPERATING

 - Metric tire sizing is based on U.S.
design standards. P-Metric tires have the letter “P”
molded into the sidewall preceding the size designa-
tion. Example: P215/65R15 95H")