Page 71 of 469

Defroster
Check operation by selecting the defrost mode and place
the blower control on high speed. You should be able to
feel the air directed against the windshield. See your
authorized dealer for service if your defroster is
inoperable.
Periodic Safety Checks You Should Make Outside
the Vehicle
Tires
Examine tires for excessive tread wear and uneven wear
patterns. Check for stones, nails, glass, or other objects
lodged in the tread. Inspect the tread and sidewall for
cuts and cracks. Check the wheel nuts for tightness.
Check the tires (including spare) for proper pressure.
Lights
Have someone observe the operation of exterior lights
while you work the controls. Check turn signal and high
beam indicator lights on the instrument panel.
Door Latches
Check for positive closing, latching, and locking.
Fluid Leaks
Check area under vehicle after overnight parking for fuel,
engine coolant, oil, or other fluid leaks. Also, if gasoline
fumes are detected or if fuel, power steering fluid, or
brake fluid leaks are suspected, the cause should be
located and corrected immediately.
2
THINGS TO KNOW BEFORE STARTING YOUR VEHICLE 69
Page 132 of 469

•Electronic Speed Control may not engage if a different
size tire is installed on one wheel, such as the compact
spare tire.
To Deactivate
The system will disable Electronic Speed Control without
erasing the memory if you:
•Softly tap the brake pedal.
•Press the brake pedal, or press the clutch pedal to the
floor (manual transmission).
•Pull the speed control lever toward you (CANCEL).
Pushing and releasing the ON/OFF button or turning the
ignition OFF erases the set speed from memory.
To Resume Speed
If you deactivated the Electronic Speed Control without
erasing the set speed from memory and your vehicle
speed is above 20 mph (32 km/h), you can resume theprevious set speed. To do so, push the lever upward to
RESUME ACCEL and release. Then remove your foot
from the accelerator pedal.
To Vary the Speed Setting
When the Electronic Speed Control is set, you can in-
crease speed by pushing up and holding the lever in
RESUME ACCEL. When the lever is released, a new set
speed will be established.
Tapping the lever to RESUME ACCEL once will result in
a 1 mph (1.6 km/h) speed increase. Each time the lever is
tapped speed increases, so tapping the lever three times
will increase speed by 3 mph (4.8 km/h), etc.
To decrease speed while Electronic Speed Control is set,
push down and hold the lever in SET DECEL. Release the
lever when the desired speed is reached, and a new set
speed will be established.
130 UNDERSTANDING THE FEATURES OF YOUR VEHICLE
Page 166 of 469

WARNING!
Driving a vehicle with the red brake light on is
dangerous. Part of the brake system may have failed.
It will take longer to stop the vehicle. You could have
an accident. Have the vehicle checked immediately.
Vehicles equipped with the Anti-Lock Brake System
(ABS), are also equipped with Electronic Brake Force
Distribution (EBD). In the event of an EBD failure, the
Brake Warning Light will turn on along with the ABS
Light. Immediate repair to the ABS system is required.
Operation of the Brake Warning Light can be checked by
turning the ignition switch from the OFF position to the
ON position. The light should illuminate for approxi-
mately two seconds. The light should then turn off unless
the parking brake is applied or a brake fault is detected.
If the light does not illuminate, have the light inspected
by an authorized dealer.The light also will turn on when the parking brake is
applied with the ignition switch in the ON position.
NOTE:This light shows only that the parking brake is
applied. It does not show the degree of brake application.
21. Vehicle Security Light — If Equipped
This light will flash at a fast rate for approxi-
mately 15 seconds, when the vehicle security
alarm is arming, and then will flash slowly
until the vehicle is disarmed.
22. Tire Pressure Monitoring Telltale Light
Each tire, including the spare (if provided),
should be checked monthly, when cold and
inflated to the inflation pressure recommended
by the vehicle manufacturer on the vehicle plac-
ard or tire inflation pressure label. (If your vehicle has tires
of a different size than the size indicated on the vehicle
placard or tire inflation pressure label, you should deter-
mine the proper tire inflation pressure for those tires.)
164 UNDERSTANDING YOUR INSTRUMENT PANEL
Page 180 of 469

Press and release the MENU button until “SYSTEM
WARNINGS” displays in the EVIC. Then, press the
SCROLL button to display anyone of the following
cho")
System Warnings (Customer Information
Features)
Press and release the MENU button until “SYSTEM
WARNINGS” displays in the EVIC. Then, press the
SCROLL button to display anyone of the following
choices.
•Oil Temperature
Shows the actual oil temperature.
•Oil Pressure
Shows the actual oil pressure.
•Tire Pressure
Shows the actual tire pressure for each tire (EXCLUDING
THE SPARE TIRE).
Personal Settings (Customer-Programmable
Features)
Personal Settings allows the driver to set and recall
features when the transmission is in PARK.Press and release the MENU button until Personal Set-
tings displays in the EVIC.
Use the SCROLL button to display one of the following
choices.
Language
When in this display you may select one of three lan-
guages for all display nomenclature, including the trip
functions and the uconnect™ gps (if equipped). Press the
FUNCTION SELECT button while in this display to
select English, Espanol, or Francais. Then, as you con-
tinue, the information will display in the selected lan-
guage.
NOTE:The EVIC will not change the uconnect™ lan-
guage selection. Refer to “Language Selection” under
“uconnect™ phone” in Section 3.
178 UNDERSTANDING YOUR INSTRUMENT PANEL
Page 243 of 469
 — If
Equipped.......................... 284
▫Synchronizing ESP................... 287
▫ESP/BAS Malfunction Indicator Light And
ESP/TCS Indicator Light......")
▫ESP (Electronic Stability Program) — If
Equipped.......................... 284
▫Synchronizing ESP................... 287
▫ESP/BAS Malfunction Indicator Light And
ESP/TCS Indicator Light............... 287
�Tire Safety Information................. 288
▫Tire Markings....................... 288
▫Tire Loading And Tire Pressure.......... 293
�Tires — General Information............. 297
▫Tire Pressure....................... 297
▫Tire Inflation Pressures................ 298
▫Radial Ply Tires..................... 300
▫Compact Spare Tire — If Equipped....... 300
▫TireSpinning ....................... 301▫Tread Wear Indicators................. 302
▫LifeOfTire ........................ 303
▫Replacement Tires.................... 303
�Tire Chains.......................... 304
�Snow Tires.......................... 306
�Tire Rotation Recommendations........... 306
�Tire Pressure Monitor System (TPMS)....... 307
▫Base System........................ 310
▫Premium System — If Equipped......... 312
▫General Information.................. 316
�Fuel Requirements..................... 316
▫3.5L And 5.7L Engines (With Automatic
Transmission)....................... 316
5
STARTING AND OPERATING 241
Page 291 of 469
NOTE:
•P (Passenger) - Metric tire sizing is based on U.S.
design standards. P-Metric tires have the letter “P”
molded into the sidewall preceding the size designa-
tion. Example: P215/65R15 95H.
•European-Metric tire sizing is based on European
design standards. Tires designed to this standard have
the tire size molded into the sidewall beginning with
the section width. The letter�P�is absent from this tire
size designation. Example: 215/65R15 96H.
•Temporary spare tires are high-pressure compact
spares designed for temporary emergency use only.
Tires designed to this standard have the letter “T”
molded into the sidewall preceding the size designa-
tion. Example: T145/80D18 103M.
CAUTION!
Do not use two different size tires on the rear wheels,
as this can result in rear axle damage.
5
STARTING AND OPERATING 289
Page 292 of 469
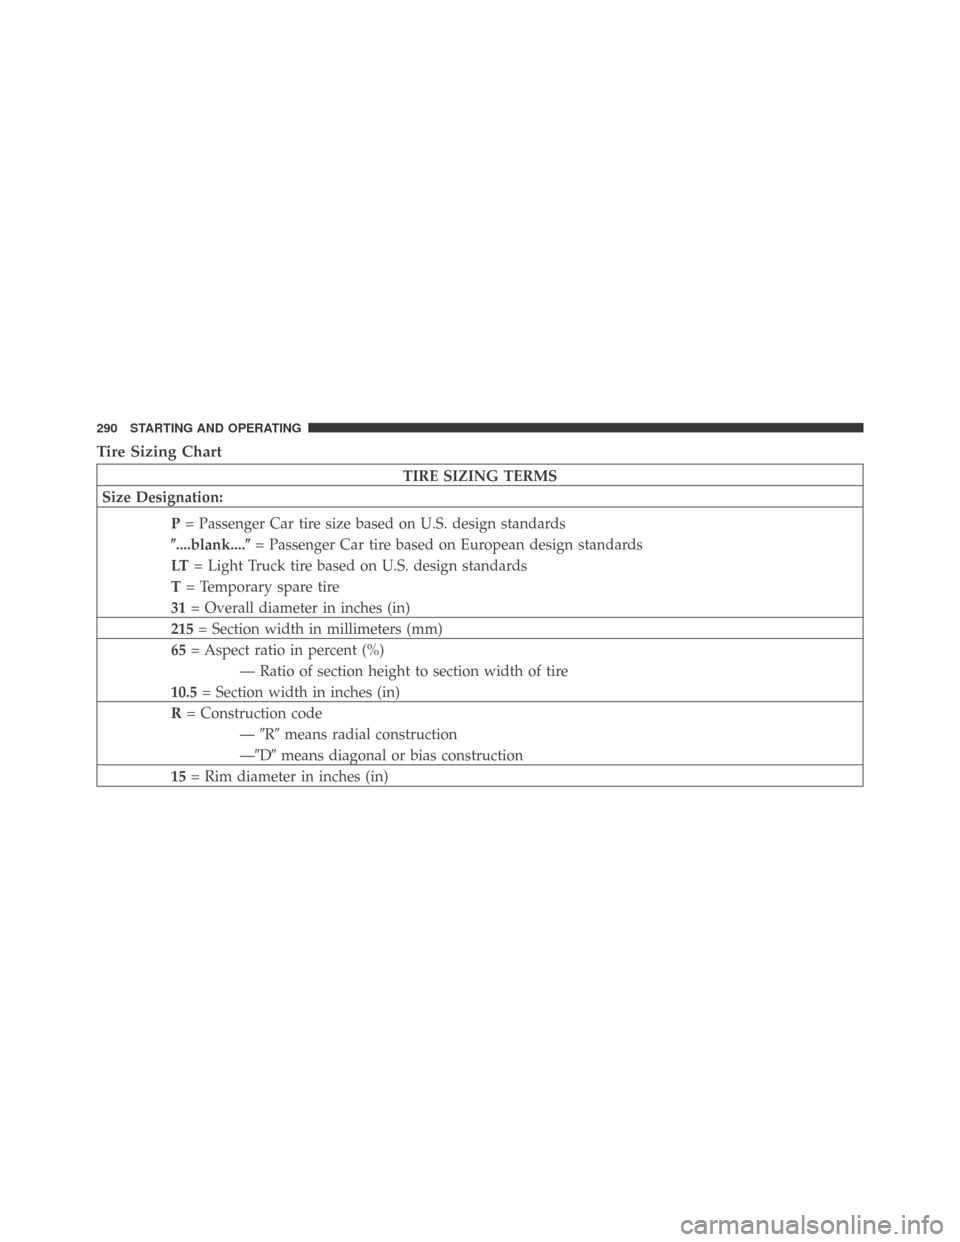
Tire Sizing Chart
TIRE SIZING TERMS
Size Designation:
P= Passenger Car tire size based on U.S. design standards
�....blank....�= Passenger Car tire based on European design standards
LT= Light Truck tire based on U.S. design standards
T= Temporary spare tire
31= Overall diameter in inches (in)
215= Section width in millimeters (mm)
65= Aspect ratio in percent (%)
— Ratio of section height to section width of tire
10.5= Section width in inches (in)
R= Construction code
—�R�means radial construction
—�D�means diagonal or bias construction
15= Rim diameter in inches (in)
290 STARTING AND OPERATING
Page 295 of 469
Tire Loading and Tire Pressure
Tire Placard Location
NOTE:The proper cold tire inflation pressure is listed
on the driver’s side B-Pillar.
Tire and Loading Information Placard
This placard tells you important information about
the:
1) number of people that can be carried in the vehicle
2) total weight your vehicle can carry
3) tire size designed for your vehicle
4) cold tire inflation pressures for the front, rear, and
spare tires.
Tire and Loading Information Placard
5
STARTING AND OPERATING 293
 - Metric tire sizing is based on U.S.
design standards. P-Metric tires have the letter “P”
molded into the sidewall preceding the size designa-
tion. Example: P215/65R15 95H")