Page 168 of 411

9. Seat Belt Reminder Light
When the ignition switch is first turned ON, this
light will turn on for five to eight seconds as a bulb
check. During the bulb check, if the driver’s seat
belt is unbuckled, a chime will sound. After the bulb
check or when driving, if the driver’s seat belt remains
unbuckled, the Seat Belt Reminder Light will illuminate
and the chime will sound. Refer to “Occupant Restraints”
in Section 2 for more information.
10. Oil Pressure Warning Light
This light indicates low engine oil pressure. The
light should turn on momentarily when the engine
is started. If the light turns on while driving, stop the
vehicle and shut off the engine as soon as possible. A
chime will sound for four minutes when this light turns
on.Do not operate the vehicle until the cause is corrected.
This light does not show how much oil is in the engine.
The engine oil level must be checked under the hood.
11. Engine Temperature Warning Light
This light warns of an overheated engine condi-
tion. As temperatures rise and the gauge ap-
proaches red (260°F/126.6°C), this indicator will
illuminate and a single chime will sound after reaching a
set threshold. Further overheating will cause the tem-
perature gauge to pass red (260°F/126.6°C), the indicator
will continuously flash and a continuous chime will
occur until the engine is allowed to cool.
166 UNDERSTANDING YOUR INSTRUMENT PANEL
Page 245 of 411

For maximum cooling select the
air direction to either the Panel or
Bi-Level position using the mode
control. Press the A/C button and
the Recirculation button so that
both")
Air Conditioning (MAX A/C)
For maximum cooling select the
air direction to either the Panel or
Bi-Level position using the mode
control. Press the A/C button and
the Recirculation button so that
both lamps are illuminated and
set the temperature control to its
coolest setting.
NOTE:
•Recirculation Mode will not operate in floor, mix or
defrost modes.
•See “Circulation Control” in this section, for proper or
extended use of this position.
Air Filtration System — If Equipped
An air filter is included in the optional Security Group.
Filter media includes a particle filtration layer and a
charcoal layer. The filter will reduce, but not eliminate,
diesel and agricultural smells. The filter acts only on air
coming from outside the vehicle; it does not filter air
inside the passenger compartment. See the maintenance
schedule for the filter change interval. The air filter
change interval coincides with engine oil and filter
change intervals. As with oil changes, the interval is
shorter for heavy duty service or dusty conditions. See
your authorized dealer for service.
UNDERSTANDING YOUR INSTRUMENT PANEL 243
4
Page 317 of 411
 until
having the tire repaired or replaced. F")
WARNING!
TIREFIT is not a permanent flat tire repair. Have the
tire inspected and repaired or replaced after using
TIREFIT. Do not exceed 55 mph (90 km/h) until
having the tire repaired or replaced. Failure to follow
this warning can result in injuries that are serious or
fatal to you, your passengers, and others around you.
(F) After Securing TIREFIT Sealant in the Tire:
1. Turn the Mode Select knob (4) to the Air
Mode position.
2. Uncoil the Black Air Pump Hose (6) and connect it to
the valve stem.
3. Check the pressure in the tire by reading the Pressure
Gauge (2).
•If the pressure is less than 19 psi (1.3 bar), the tire is
too badly damaged. Do not attempt to drive the
vehicle further. Call for assistance.
•If the pressure is equal to or greater than 19 psi
(1.3 bar), but less than the level indicated on the tire
pressure label, proceed to Step 4 of this procedure.
•If the pressure is at the level indicated on the tire
pressure label on the driver-side latch pillar, proceed
to Step 5 of this procedure.
4. Inflate the tire to the pressure indicated on the tire
pressure label on the driver-side latch pillar.
5. Disconnect the TIREFIT kit from the valve stem and
then reinstall the cap on the valve stem.
6. Place the TIREFIT kit in its proper storage area in the
vehicle.
WHAT TO DO IN EMERGENCIES 315
6
Page 331 of 411

DEALER SERVICE
Your authorized dealer has the qualified service person-
nel, special tools, and equipment to perform all service
operations in an expert manner. Service Manuals are
available which include detailed service information for
your vehicle. Refer to these manuals before attempting
any procedure yourself.
NOTE:Intentional tampering with emissions control
systems can result in civil penalties being assessed
against you.
WARNING!
You can be badly injured working on or around a
motor vehicle. Only do service work for which you
have the knowledge and the proper equipment. If
you have any doubt about your ability to perform a
service job, take your vehicle to a competent me-
chanic.
MAINTENANCE PROCEDURES
The pages that follow contain therequiredmaintenance
services determined by the engineers who designed your
vehicle.
Besides the maintenance items for which there are fixed
maintenance intervals, there are other items that should
operate satisfactorily without periodic maintenance.
However, if a malfunction of these items does occur, it
could adversely affect the engine or vehicle performance.
These items should be inspected if a malfunction is
observed or suspected.
Engine Oil
Checking Oil Level
To assure proper engine lubrication, the engine oil must
be maintained at the correct level. Check the oil level at
regular intervals, such as every fuel stop.
MAINTAINING YOUR VEHICLE 329
7
Page 332 of 411

The best time to check the engine oil level is about five
minutes after a fully warmed engine is shut off. Do not
check oil level before starting the engine after it has sat
overnight. Checking engine oil level when the engine is
cold will give you an incorrect reading.
Checking the oil while the vehicle is on level ground and
only when the engine is hot, will improve the accuracy of
the oil level readings. Maintain the oil level between the
range markings on the dipstick. The range markings will
consist of a crosshatch zone that says SAFE or a cross-
hatch zone that says MIN at the low end of the range and
MAX at the high end of the range. Adding 1 qt (1 L) of oil
when the reading is at the low end of the indicated range
will result in the oil level at the full end of the indicator
range.CAUTION!
Do not overfill the engine. Overfilling the engine as
indicated by the range markings, as described above,
on the engine oil dipstick will cause oil aeration,
which can lead to loss of oil pressure and an increase
in oil temperature. This could damage your engine.
Change Engine Oil
Refer to the “Maintenance Schedule” in Section 8 for the
proper maintenance intervals.
Engine Oil Selection
For best performance and maximum protection under all
types of operating conditions, the manufacturer only
recommends full synthetic engine oils that meet require-
ments of Chrysler Material Standard MS-10725.
The manufacturer recommends the use of a full synthetic
engine oil, such as Mobil 1�SAE 0W-40 or equivalent.
330 MAINTAINING YOUR VEHICLE
Page 339 of 411

avoid damaging the blade. Keep the blade rubber out of
contact with petroleum products such as engine oil,
gasoline, etc.
Adding Washer Fluid
The fluid reservoir for the windshield washers and the
rear window washer is shared. The fluid reservoir is
located in the engine compartment, be sure to check the
fluid level at regular intervals. Fill the reservoir with
windshield washer solvent only (not engine coolant
(antifreeze). When refilling the washer fluid reservoir,
take some washer fluid and apply it to a cloth or towel
and wipe clean the wiper blades, this will help blade
performance. To prevent freeze-up of your windshield
washer system in cold weather, select a solution or
mixture that meets or exceeds the temperature range of
your climate. This rating information can be found on
most washer fluid containers.The washer fluid reservoir will hold a full gallon of fluid
when the Low Washer Fluid Light illuminates.
WARNING!
Commercially available windshield washer solvents
are flammable. They could ignite and burn you. Care
must be exercised when filling or working around
the washer solution.
Exhaust System
The best protection against carbon monoxide entry into
the vehicle body is a properly maintained engine exhaust
system.
MAINTAINING YOUR VEHICLE 337
7
Page 348 of 411

WARNING!
Use of a brake fluid that may have a lower initial
boiling point or unidentified as to specification, may
result in sudden brake failure during hard prolonged
braking. You could have an accident.
CAUTION!
Use of improper brake fluids will affect overall
clutch system performance. Improper brake fluids
may damage the clutch system resulting in loss of
clutch function and the ability to shift the transaxle.
WARNING!
Overfilling the brake fluid reservoir can result in
spilling brake fluid on hot engine parts and the
brake fluid catching fire.Use only brake fluid that has been in a tightly closed
container to avoid contamination from foreign matter.
Do not allow petroleum based fluid to contaminate the
brake fluid as seal damage will result!
Manual Transaxle
Lubricant Selection
Use only the manufacturer’s recommended transmission
fluid. Refer to “Fluids, Lubricants, and Genuine Parts” in
this section for the correct fluid type.
Fluid Level Check
Check the fluid level by removing the fill plug. The fluid
level should be between the bottom of the fill hole and a
point not more that 3/16 in (4.7 mm) below the bottom of
the hole.
Add fluid, if necessary, to maintain the proper level.
346 MAINTAINING YOUR VEHICLE
Page 361 of 411
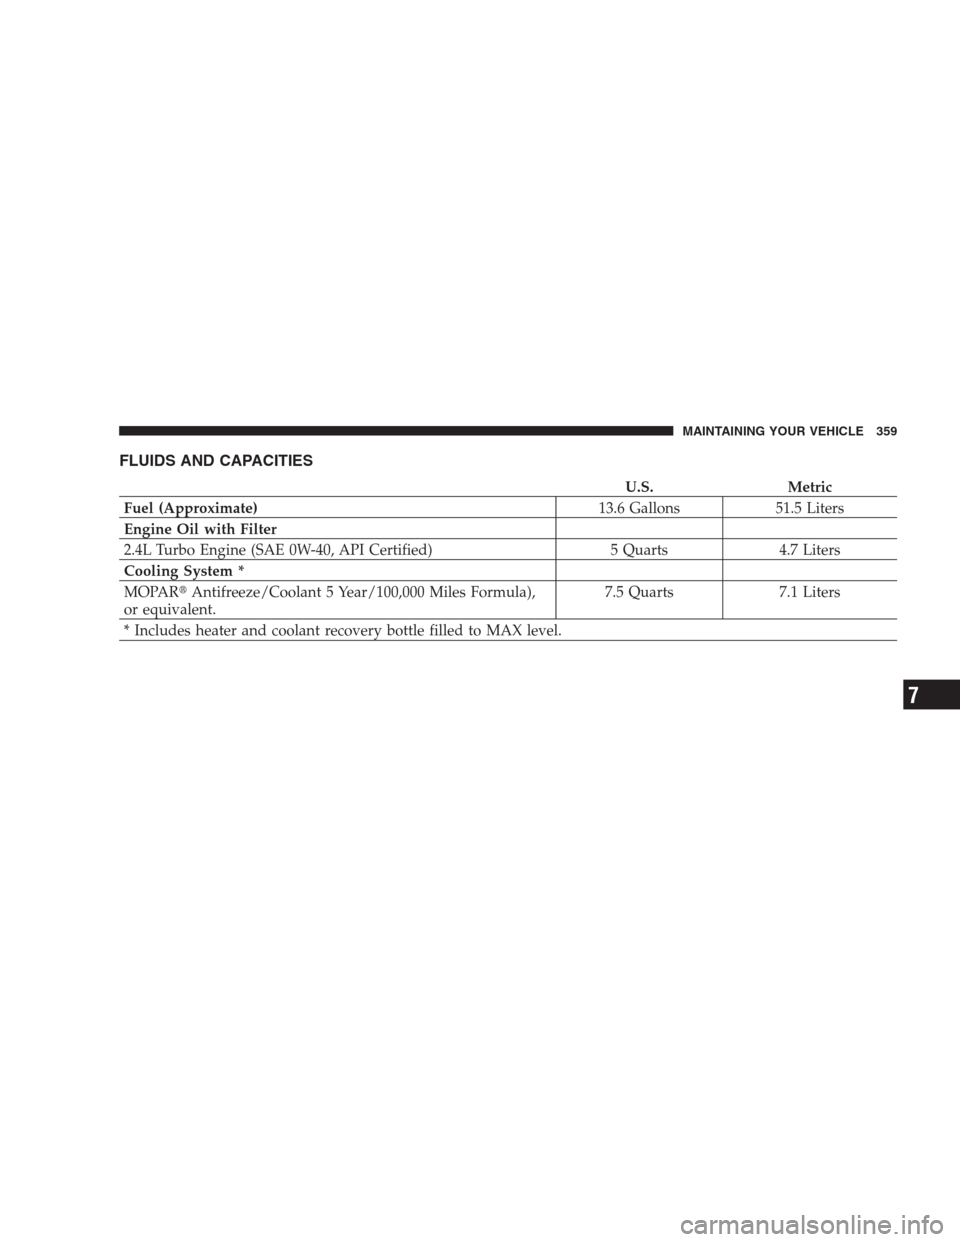
FLUIDS AND CAPACITIES
U.S. Metric
Fuel (Approximate)13.6 Gallons 51.5 Liters
Engine Oil with Filter
2.4L Turbo Engine (SAE 0W-40, API Certified) 5 Quarts 4.7 Liters
Cooling System *
MOPAR�Antifreeze/Coolant 5 Year/100,000 Miles Formula),
or equivalent.7.5 Quarts 7.1 Liters
* Includes heater and coolant recovery bottle filled to MAX level.
MAINTAINING YOUR VEHICLE 359
7