Page 306 of 543
•Dense tree coverage may interrupt reception in the
form of short audio mutes.
•Driving under wide bridges or along tall buildings can
cause intermittent reception.
•Placing objects over or too close to the antenna can
cause signal blockage.
Operating Instructions — uconnect�studios
(Satellite) Mode
NOTE: The ignition switch must be in the ON or ACC
position to operate the radio.
SEEK Buttons
Press and release the SEEK buttons to search for the next
channel in Satellite mode. Press the right switch to seek
up and the left switch to seek down. The radio will
remain tuned to the new channel until you make another
selection. Holding either button will bypass channels
without stopping until you release it.
SCAN Button (When Equipped)
Pressing the SCAN button causes the tuner to search for
the next channel, pausing for eight seconds before con-
tinuing to the next. To stop the search, press the SCAN
button a second time.
INFO Button — Except REU Radio
Pressing the INFO button will cycle the display informa-
tion between Artist, Song Title, and Composer (if avail-
able). Also, pressing and holding the INFO button for an
additional three seconds will make the radio display the
song title all of the time (press and hold again to return to
normal display).
INFO Button — REU Radio
Pressing the INFO button will display information about
Artist, Song Title, and Composer (if available). Pressing
the INFO button again will close the INFO screen.
304 UNDERSTANDING YOUR INSTRUMENT PANEL
Page 307 of 543
RW/FF
Pressing the RW (Rewind) or FF (Fast Forward) buttons
causes the tuner to search for the next channel in the
direction of the arrows.
TUNE Control (Rotary)
Turn the rotary TUNE/SCROLL control knob clockwise
to increase or counterclockwise to decrease the channel.
MUSIC TYPE Button — Except REU Radio
Pressing this button once will turn on the Music Type
mode for five seconds. Pressing the MUSIC TYPE button
or turning the TUNE/SCROLL control knob within five
seconds will allow the program format type to be se-
lected.
Toggle the MUSIC TYPE button again to select the music
type.By pressing the SEEK button when the Music Type
function is active, the radio will be tuned to the next
channel with the same selected Music Type name.
If a preset button is activated while in the Music Type
(Program Type) mode, the Music Type mode will be
exited and the radio will tune to the preset channel.
MUSIC TYPE Button — REU Radio
Pressing this button provides a Music Type list from
which you can make a selection. Once a selection is
made, you can seek up or down or scan the channels and
the radio will tune to the next station matching the
selected format. There is no time-out for this screen.
Pressing the MUSIC TYPE button again will close the
Music Type screen. Once closed, seek up, seek down, and
scan will no longer be based on your selection.
SETUP Button
Pressing the SETUP button allows you to select the
following items:
4
UNDERSTANDING YOUR INSTRUMENT PANEL 305
Page 312 of 543
The button located in the center of the left-hand switch
will tune to the next preset station that you have pro-
grammed in the radio preset pushbutton.
CD Player
Pressing the top of the switch once will go to the next
track on the CD. Pressing the bottom of the switch once
will go to the beginning of the current track, or to the
beginning of the previous track if it is within one second
after the current track begins to play.
If you press the switch up or down twice it plays the
second track; three times, it will play the third, etc.
The button in the center of the left-hand switch has no
function in this mode.
CD/DVD MAINTENANCE
To keep a CD/DVD in good condition, take the following
precautions:1. Handle the disc by its edge; avoid touching the
surface.
2. If the disc is stained, clean the surface with a soft cloth,
wiping from center to edge.
3. Do not apply paper or tape to the disc; avoid scratch-
ing the disc.
4. Do not use solvents such as benzene, thinner, cleaners,
or anti-static sprays.
5. Store the disc in its case after playing.
6. Do not expose the disc to direct sunlight.
7. Do not store the disc where temperatures may become
too high.
NOTE:
If you experience difficulty in playing a particu-
lar disc, it may be damaged (i.e., scratched, reflective
coating removed, a hair, moisture or dew on the disc)
310 UNDERSTANDING YOUR INSTRUMENT PANEL
Page 316 of 543
Defrost Mode
Air is directed through the windshield and side
window demist outlets. Use DEFROST mode with
maximum blower and temperature settings for best
windshield and side window defrosting.
NOTE: The air conditioning compressor operates in
MIX and DEFROST, or a blend of these modes even if the
A/C button is not pressed. This dehumidifies the air to
help dry the windshield. To improve fuel economy, use
these modes only when necessary.
Recirculation Control
Press this button to choose between outside air
intake or recirculation of the air inside the
vehicle. A lamp will illuminate when you are in
RECIRCULATION mode. Only use the RECIR-
CULATION mode to temporarily block out any outside
odors, smoke, or dust, and to cool the interior rapidly
upon initial start-up in very hot or humid weather. NOTE:
•If the RECIRCULATION button is pressed when the
system is in MIX, DEFROST, or FLOOR mode the
RECIRCULATION LED indicator will flash 3 times
and then turn off to indicate RECIRCULATION mode
is not allowed.
•Continuous use of the RECIRCULATION mode may
make the inside air stuffy and window fogging may
occur. Extended use of this mode is not recommended.
•In cold or damp weather, the use of the RECIRCULA-
TION mode will cause windows to fog on the inside
because of moisture buildup inside the vehicle. For
maximum defogging, select the outside air position.
•In order to prevent fogging, when the RECIRCULA-
TION button is pressed and the mode control is set to
PANEL, the A/C will engage automatically.
314 UNDERSTANDING YOUR INSTRUMENT PANEL
Page 317 of 543
•The A/C can be deselected manually without disturb-
ing the mode control selection.
Economy Mode
If ECONOMY mode is desired, press the A/C button to
turn off the indicator light and the A/C compressor.
Rotate the temperature control knob to the desired
temperature.
Air Conditioning Operation
Push on this button to engage the Air Condition-
ing (A/C). A light will illuminate when the A/C
System is engaged
NOTE: The air conditioning compressor will not engage
until the engine has been running for about 10 seconds.
Max A/C
For maximum cooling use the A/C and RECIRCULA-
TION mode buttons at the same time.
Three-Zone Temperature Control — If Equipped
With the Three-Zone Temperature Control System, each
front seat occupant can independently control the Heat-
ing, Ventilation, and Air Conditioning operations coming
from the outlets on their side of the vehicle.
4
UNDERSTANDING YOUR INSTRUMENT PANEL 315
Page 319 of 543
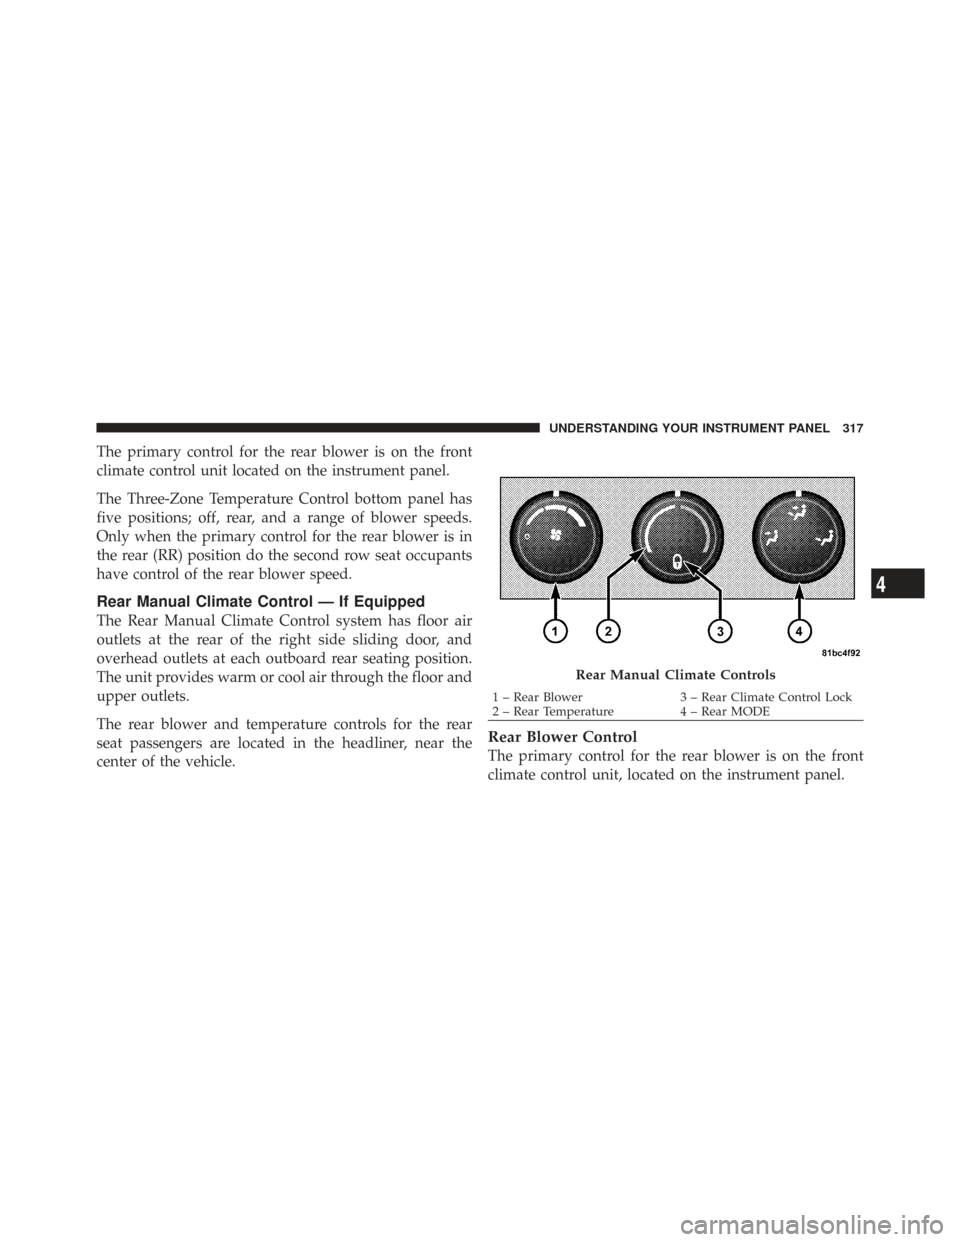
The primary control for the rear blower is on the front
climate control unit located on the instrument panel.
The Three-Zone Temperature Control bottom panel has
five positions; off, rear, and a range of blower speeds.
Only when the primary control for the rear blower is in
the rear (RR) position do the second row seat occupants
have control of the rear blower speed.
Rear Manual Climate Control — If Equipped
The Rear Manual Climate Control system has floor air
outlets at the rear of the right side sliding door, and
overhead outlets at each outboard rear seating position.
The unit provides warm or cool air through the floor and
upper outlets.
The rear blower and temperature controls for the rear
seat passengers are located in the headliner, near the
center of the vehicle.
Rear Blower Control
The primary control for the rear blower is on the front
climate control unit, located on the instrument panel.
Rear Manual Climate Controls
1 – Rear Blower3 – Rear Climate Control Lock
2 – Rear Temperature 4 – Rear MODE
4
UNDERSTANDING YOUR INSTRUMENT PANEL 317
Page 320 of 543
Only when the front control for the rear blower is in the
RRposition do the second row seat occupants have
control of the rear blower speed.
The rear blower control, located in the rear overhead
console, has an off position and a range of blower speeds.
This allows the second row seat occupants to control the
volume of air circulated in the rear of the vehicle.
CAUTION!
Interior air enters the Rear Manual Climate Control
system through an intake grille, located in the pas-
senger side trim panel behind the third row seats.
The heater outlets are located in the passenger side
trim panel, just behind the sliding door. Do not block
or place objects directly in front of the inlet grille or
heater outlets. The electrical system could overload,
causing damage to the blower motor.
Rear Temperature Control
When the blower knob on the front climate control unit is
set to any position other than the rear temperature
settings will be controlled by the rear temperature control
knob on the front climate control unit. The rear mode
selection RR,allows the settings to be controlled by the
rear mode control knob.
To change the temperature in the rear of the vehicle,
rotate the temperature control knob counterclockwise for
cold air, and clockwise for heated air.
When rear controls are locked by the front system, the
lock symbol on the temperature knob is illuminated, and
the rear overhead adjustments are inoperable.
The rear airflow modes will mirror the front unit opera-
tion. Rear PANEL mode is automatically selected when
the front control is in the PANEL mode. When the front
unit is in BI-LEVEL mode, airflow will be emitted from
both the upper and lower rear outlets. When the front
318 UNDERSTANDING YOUR INSTRUMENT PANEL
Page 326 of 543
The SNOWFLAKE mode, or A/C button, allows
the operator to manually activate or deactivate the
air conditioning system. When in SNOWFLAKE
mode, and the ATC display is on cool, dehumidified air
flows through the air outlets. If ECONOMY mode is
desired, press the SNOWFLAKE button to turn off the
SNOWFLAKE mode in the ATC display, and deactivate
the A/C system.
NOTE:
•If the system is in Mix or Defrost Mode, the SNOW-
FLAKE can be turned off, but the A/C system shall
remain active to prevent fogging of the windows.
•If fog or mist appears on the windshield or side glass,
select DEFROST mode and increase blower speed.
Recirculation Control
When outside air contains smoke, odors, or
high humidity, or if rapid cooling is desired,
you may wish to recirculate interior air by
pressing the RECIRCULATION mode control
button. RECIRCULATION mode should only be used
temporarily. The recirculation symbol will illuminate in
the display when this button is selected. Push the button
a second time to turn off the RECIRCULATION mode
LED and allow outside air into the vehicle.
NOTE: In cold weather, use of the RECIRCULATION
mode may lead to excessive window fogging. The RE-
CIRCULATION mode is not allowed in the FLOOR, MIX
and DEFROST modes to improve window clearing op-
eration. Recirculation will be disabled automatically if
these modes are selected.
324 UNDERSTANDING YOUR INSTRUMENT PANEL