Page 138 of 475

CAUTION!
Do not place any article under any seat as it may
cause damage to the seat controls.
WARNING!
•Adjusting a seat while the vehicle is moving is
dangerous. The sudden movement of the seat
could cause you to lose control. The seat belt might
not be properly adjusted and you could be injured.
Adjust the seat only while the vehicle is parked.
•Do not ride with the seatback reclined so that the
shoulder belt is no longer resting against your
chest. In a collision you could slide under the seat
belt and be seriously or even fatally injured. Use
the recliner only when the vehicle is parked.
Heated Seats — If Equipped
Heated seats provide comfort and warmth on cold days
and can help soothe sore muscles and backs. The driver
and front passenger seats are heated.
The controls for each heater are located in the instrument
panel switch bank above the climate controls. After
turning the ignition ON, you can choose from High, Off,
or Low heat settings. Amber indicator lights in each
switch indicate the level of heat in use. Two indicator
lights will illuminate for High, one for Low, and none for
Off.
136 UNDERSTANDING THE FEATURES OF YOUR VEHICLE
Page 141 of 475
WARNING!
•Adjusting a seat while the vehicle is moving is
dangerous. The sudden movement of the seat
could cause you to lose control. The seat belt might
not be properly adjusted and you could be injured.
Adjust the seat only while the vehicle is parked.
•Do not ride with the seatback reclined so that the
shoulder belt is no longer resting against your
chest. In a collision you could slide under the seat
belt and be seriously or even fatally injured. Use
the recliner only when the vehicle is parked.
Lumbar Support — If Equipped
This feature allows you to increase or decrease the
amount of lumbar support. The control lever is on the
inboard side of the seat. Turn the control lever downward
to increase and upward to decrease the desired amount
of lumbar support.
Lumbar Support
UNDERSTANDING THE FEATURES OF YOUR VEHICLE 139
3
Page 142 of 475
Easy Entry System
The Easy Entry lever is located on upper seat belt anchor
cover.On the passenger seat, pull the lever upward to move the
seat and seatback forward.
When returning the seat to its normal position, the
memory feature restores the seat position and seatback
recline position to their current settings.
On the driver seat, pull the lever upward to move the
seatback forward.
When returning the seatback to its normal position the
memory feature restores the seatback recline position to
its current setting.
Easy Entry Lever
140 UNDERSTANDING THE FEATURES OF YOUR VEHICLE
Page 185 of 475

9. Seat Belt Reminder Light
When the ignition switch is first turned ON, this
light will come on for about six seconds. A chime
will sound if you have not pulled the shoulder belt
out of the retractor. This is a reminder to “buckle up”. If
you do not buckle up, the light will remain on.
10. Oil Pressure Warning Light
This light indicates low engine oil pressure. The
light will come on and remain on when the
ignition switch is turned from the OFF to the ON
position, and the light will turn off after the engine is
started. If the bulb does not come on during starting,
have the system checked by an authorized dealer.
If the light comes on and remains on while driving, stop
the vehicle and shut off the engine.DO NOT OPERATE
THE VEHICLE UNTIL THE CAUSE IS CORRECTED.The light does not show the quantity of oil in the engine.
This can be determined using the procedure shown in
Section 7.
11. Engine Temperature Warning Light
This light warns of an overheated engine condi-
tion. If the engine is critically hot, a warning chime
will sound 10 times. After the chime turns off, the
engine will still be critically hot until the light goes out.
12. Tachometer
The silver area of the scale shows the permissible engine
revolutions-per-minute (rpm x 1000) for each gear range.
Before reaching the red area, ease up on the accelerator to
prevent engine damage.
13. Shift Lever Indicator
This display indicator shows the automatic transmission
shift lever selection.
UNDERSTANDING YOUR INSTRUMENT PANEL 183
4
Page 269 of 475

STARTING PROCEDURES
Before starting your vehicle, adjust your seat, adjust both
inside and outside mirrors, and fasten your seat belt.
Make sure all occupants have securely fastened their seat
belts.
WARNING!
•Never leave children alone in a vehicle. Leaving
children in a vehicle unattended is dangerous for a
number of reasons. A child or others could be
seriously or fatally injured. Do not leave the key in
the ignition. A child could operate power win-
dows, other controls, or move the vehicle.
•Do not leave animals or children inside parked
vehicles in hot weather; interior heat buildup may
cause serious injury or death.
(Continued)
WARNING! (Continued)
•Be sure to turn off the engine and remove the key
from the ignition switch if you want to rest or
sleep in your car. Accidents can be caused by
inadvertently moving the gear selection lever or
by pressing the accelerator pedal. This may cause
excessive heat in the exhaust system, resulting in
overheating and vehicle fire which may cause
serious or fatal injuries.
Normal Starting
The shift lever must be in the PARK or NEUTRAL
position before you can start the engine. Apply the brakes
before shifting to any driving gear.
NOTE:Normal starting of either a cold or a warm
engine does not require pumping or depressing the
accelerator pedal.
STARTING AND OPERATING 267
5
Page 365 of 475
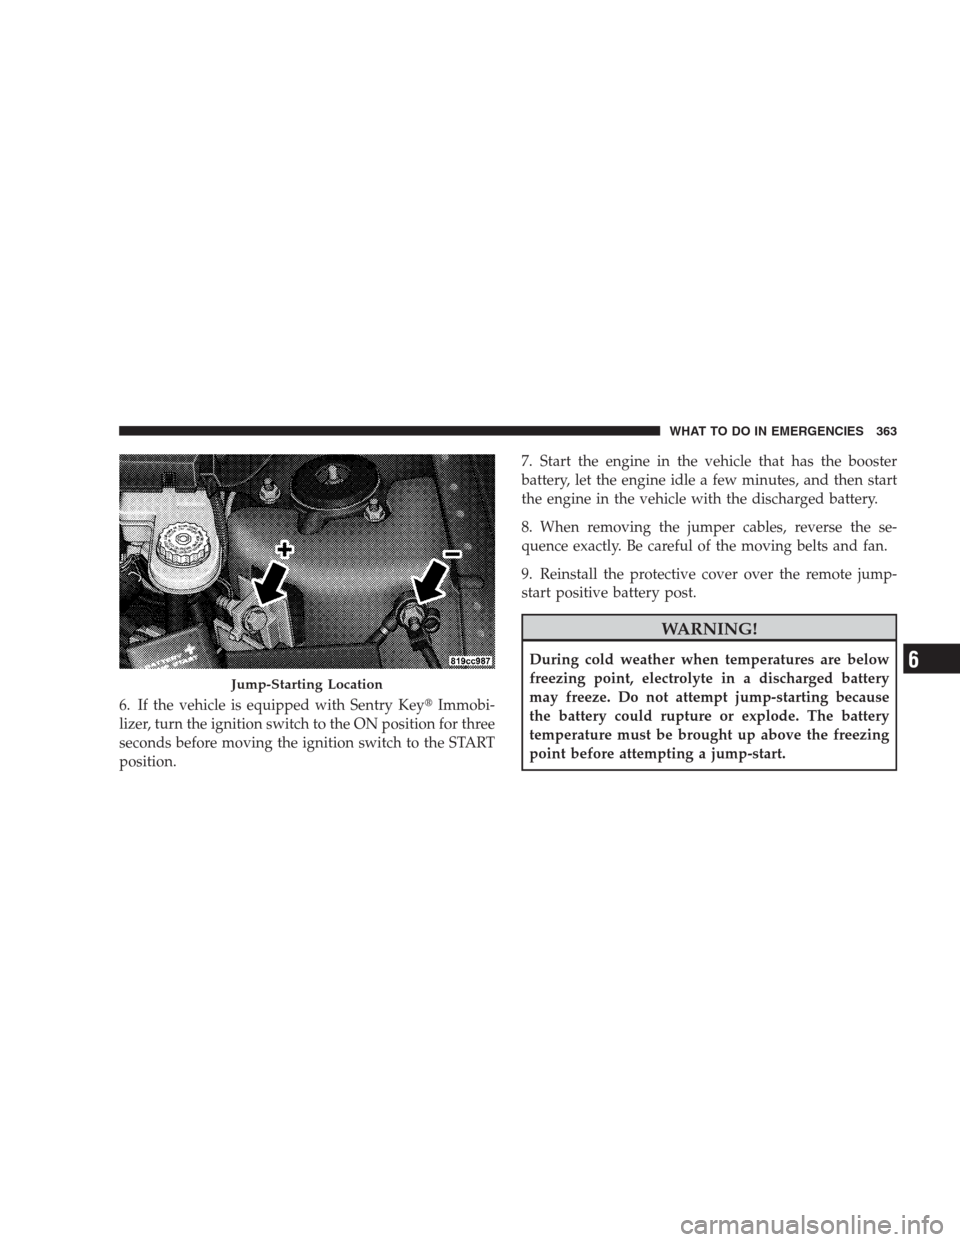
6. If the vehicle is equipped with Sentry Key�Immobi-
lizer, turn the ignition switch to the ON position for three
seconds before moving the ignition switch to the START
position.7. Start the engine in the vehicle that has the booster
battery, let the engine idle a few minutes, and then start
the engine in the vehicle with the discharged battery.
8. When removing the jumper cables, reverse the se-
quence exactly. Be careful of the moving belts and fan.
9. Reinstall the protective cover over the remote jump-
start positive battery post.
WARNING!
During cold weather when temperatures are below
freezing point, electrolyte in a discharged battery
may freeze. Do not attempt jump-starting because
the battery could rupture or explode. The battery
temperature must be brought up above the freezing
point before attempting a jump-start.
Jump-Starting Location
WHAT TO DO IN EMERGENCIES 363
6
Page 404 of 475

•For grease stains, apply MOPAR�Multi-Purpose
Cleaner to a clean, damp cloth and remove stain. Use
a fresh, damp towel to remove soap residue.
•Do not use any solvents or protectants on Yes Essen-
tials�products.
Glass Surfaces
All glass surfaces should be cleaned on a regular basis
with MOPAR�Glass Cleaner or any commercial
household-type glass cleaner. Never use an abrasive type
cleaner. Use caution when cleaning the inside rear win-
dow equipped with electric defrosters or the right rear
quarter window equipped with the radio antenna. Do
not use scrapers or other sharp instruments, which may
scratch the elements.
When cleaning the rear view mirror, spray cleaner on the
towel or rag that you are using. Do not spray cleaner
directly on the mirror.
Cleaning Plastic Instrument Cluster Lenses
The lenses in front of the instruments in this vehicle are
molded in clear plastic. When cleaning the lenses, care
must be taken to avoid scratching the plastic.
1. Clean with a wet, soft rag. A mild soap solution may
be used, but do not use high alcohol content or abrasive
cleaners. If soap is used, wipe clean with a clean damp
rag.
2. Dry with a soft tissue.
Seat Belt Maintenance
Do not bleach, dye, or clean the belts with chemical
solvents or abrasive cleaners. This will weaken the fabric.
Sun damage can also weaken the fabric.
If the belts need cleaning, use a mild soap solution or
lukewarm water. Do not remove the belts from the car to
wash them.
402 MAINTAINING YOUR VEHICLE
Page 405 of 475

Replace the belts if they appear frayed or worn or if the
buckles do not work properly.
Dry with a soft tissue.
Cleaning Center Console Cupholders
Removal
Grab the rubber portion of the cupholder and lift
upward.
Cleaning
Soak the rubber cupholder liner in a mixture of medium
hot tap water and one teaspoon of mild liquid dish soap.
Let soak for approximately one hour. After one hour pull
the liner from the water and dip it back into the water
about six times. This will loosen any remaining debris.
Rinse the liner thoroughly under warm running water.
Shake the excess water from the liner and dry the outer
surfaces with a clean soft cloth.
Installation
Align the liner in the cupholder and press down firmly.
Convertible Top Care
Immediate removal of any contaminant is recommended.
Regular washing of the top will enhance its life and
appearance, and make successive cleanings easier. Do not
subject the top to excessive heat. Frequently vacuum the
top and storage compartment.
Washing
Hand washing is highly recommended. Automatic car
washing equipment can damage the top material. If you
must use an automatic car wash, soft cloth systems are
preferred.
MAINTAINING YOUR VEHICLE 403
7