Page 354 of 475

HAZARD WARNING FLASHER
The Hazard Warning flasher switch is located in the
instrument panel switch bank above the climate controls.
Press the switch to turn on the Hazard
Warning flashers. When the Hazard
Warning flasher switch is activated, all
directional turn signals will flash on
and off to warn oncoming traffic of an
emergency. Press the switch a second
time to turn off flashers.
This is an emergency warning system and it should not
be used when the vehicle is in motion. Use it when your
vehicle is disabled and it is creating a safety hazard for
other motorists.
When you must leave the vehicle to seek assistance, the
Hazard Warning flasher will continue to operate even
though the ignition switch is in the LOCK position.NOTE:With extended use, the Hazard Warning flasher
may wear down your battery.
IF YOUR ENGINE OVERHEATS
In any of the following situations, you can reduce the
potential for overheating by taking the appropriate ac-
tion.
•On the highways — Slow down.
•In city traffic — While stopped, put transaxle in
NEUTRAL, but do not increase engine idle speed.
NOTE:There are steps that you can take to slow down
an impending overheat condition. If your air conditioner
is on, turn it off. The air conditioning system adds heat to
the engine cooling system and turning off the A/C
removes this heat. You can also turn the Temperature
control to maximum heat, the Mode control to floor, and
352 WHAT TO DO IN EMERGENCIES
Page 363 of 475
 tire in the cargo area,have the
tire repaired or replaced as soon as possible.
11. Check the spare tire pressure as soon as possible.
Correct pressure as required.
JUMP-S")
10. Place the deflated (flat) tire in the cargo area,have the
tire repaired or replaced as soon as possible.
11. Check the spare tire pressure as soon as possible.
Correct pressure as required.
JUMP-STARTING PROCEDURE
The battery is stored between the left front headlight
assembly and the left front wheel splash shield. Access is
through the splash shield.
Jump-starting remote battery terminals are located under
the hood.
WARNING!
•Take care to avoid the radiator cooling fan when-
ever the hood is raised. It can start anytime the
ignition switch is on. You can be hurt by the fan.
(Continued)
WARNING! (Continued)
•Do not attempt to push or tow your vehicle to get
it started. Vehicles equipped with an automatic
transaxle cannot be started this way. Unburned
fuel could enter the catalytic converter and once
the engine has started, ignite and damage the
converter and vehicle. If the vehicle has a dis-
charged battery, booster cables may be used to
obtain a start from another vehicle. This type of
start can be dangerous if done improperly, so
follow this procedure carefully.
•Do not use a booster battery or any other booster
source with an output that exceeds 12-Volts.
1. Wear eye protection and remove any metal jewelry
such as watchbands or bracelets that might make an
inadvertent electrical contact.
WHAT TO DO IN EMERGENCIES 361
6
Page 364 of 475

2. When boosting from a battery in another vehicle, park
that vehicle within booster cable reach, but without
allowing the vehicles to touch. Set the parking brake,
place the automatic transaxle in PARK and turn ignition
to LOCK for both vehicles.
WARNING!
Do not permit vehicles to touch each other as this
could establish a ground connection and personal
injury could result.
3. Turn off the heater, radio, and all unnecessary electri-
cal loads.4. Remove the protective cover over the remote jump-
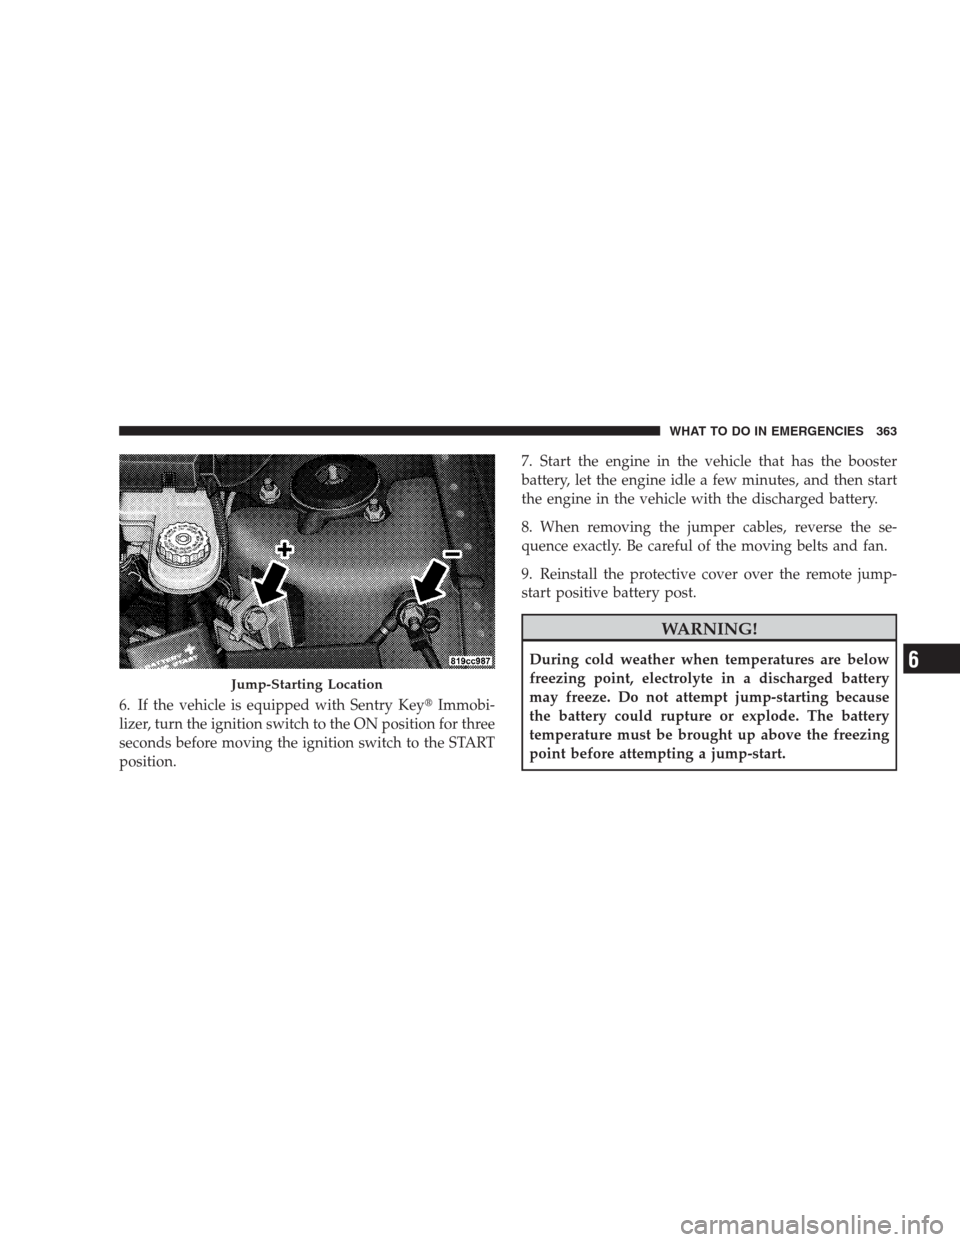
start positive battery post(+)in the engine compartment.
Connect one end of the jumper cable to the positive
battery post. Connect the other end of the same cable to
the positive terminal of the booster battery. Refer to the
following illustration for jump-starting connections.
5. Connect the other cable, first to the negative terminal
of the booster battery andthen to the engine ground (-)
of the vehicle with the discharged battery.Make sure
you have a good contact on the engine ground. Refer to
the following illustration for jump-starting connections.
362 WHAT TO DO IN EMERGENCIES
Page 365 of 475
6. If the vehicle is equipped with Sentry Key�Immobi-
lizer, turn the ignition switch to the ON position for three
seconds before moving the ignition switch to the START
position.7. Start the engine in the vehicle that has the booster
battery, let the engine idle a few minutes, and then start
the engine in the vehicle with the discharged battery.
8. When removing the jumper cables, reverse the se-
quence exactly. Be careful of the moving belts and fan.
9. Reinstall the protective cover over the remote jump-
start positive battery post.
WARNING!
During cold weather when temperatures are below
freezing point, electrolyte in a discharged battery
may freeze. Do not attempt jump-starting because
the battery could rupture or explode. The battery
temperature must be brought up above the freezing
point before attempting a jump-start.
Jump-Starting Location
WHAT TO DO IN EMERGENCIES 363
6
Page 366 of 475

NOTE:Refer to “Maintenance Procedures” in Section 7
of this manual for information on accessing the battery
for service or replacement.
WARNING!
Any procedure other than above could result in:
•Personal injury caused by electrolyte squirting out
the battery vent;
•Personal injury or property damage due to battery
explosion;
•Damage to charging system of booster vehicle or
of immobilized vehicle.
FREEING A STUCK VEHICLE
If your vehicle becomes stuck in mud, sand, or snow, it
can often be moved by a rocking motion. Turn your
steering wheel right and left to clear the area around the
front wheels. Then shift back and forth between RE-
VERSE and FIRST gear. Usually the least accelerator
pedal pressure to maintain the rocking motion without
spinning the wheels is most effective.
NOTE:
If your vehicle is equipped with Traction Con-
trol, turn the system to Partial OFF before
attempting to “rock” the vehicle. Refer to “Par-
tial Off Mode” under “Electronic Stability Pro-
gram (ESP)” in Section 5 of this manual.
364 WHAT TO DO IN EMERGENCIES
Page 369 of 475
MAINTAINING YOUR VEHICLE
CONTENTS
�Engine Compartment — 2.4L............. 369
�Engine Compartment — 2.7L............. 370
�Engine Compartment — 3.5L............. 371
�Onboard Diagnostic System — OBD II...... 372
▫Loose Fuel Filler Cap Message........... 373
�Emissions Inspection And Maintenance
Programs............................ 373
�Replacement Parts..................... 375
�Dealer Service........................ 375�Maintenance Procedures................. 376
▫Engine Oil......................... 376
▫Engine Oil Filter..................... 379
▫Engine Air Cleaner Filter............... 380
▫Maintenance-Free Battery.............. 380
▫Air Conditioner Maintenance............ 382
▫A/C Air Filter — If Equipped........... 383
▫Body Lubrication.................... 384
▫Adding Washer Fluid................. 385
7
Page 375 of 475

Loose Fuel Filler Cap Message
After fuel is added, the vehicle diagnostic system can
determine if the fuel filler cap is possibly loose or
improperly installed. A “GASCAP” message will be
displayed in the instrument cluster. Tighten the gas cap
until a�clicking�sound is heard. This is an indication that
the gas cap is properly tightened. Press the trip odometer
“Reset” button to turn off the message. If the problem
persists, the message will appear the next time the
vehicle is started. This might indicate a damaged cap. If
the problem is detected twice in a row, the system will
turn on the “Malfunction Indicator Light (MIL).” Resolv-
ing the problem will turn the MIL light off.
EMISSIONS INSPECTION AND MAINTENANCE
PROGRAMS
In some localities, it may be a legal requirement to pass
an inspection of your vehicle’s emissions control system.
Failure to pass could prevent vehicle registration.
For states that require an Inspection and Mainte-
nance (I/M), this check verifies the Malfunction
Indicator Light (MIL) is functioning and is not on
when the engine is running, and that the OBD II system
is ready for testing.
Normally, the OBD II system will be ready. The OBD II
system maynotbe ready if your vehicle was recently
serviced, recently had a dead battery or a battery replace-
ment. If the OBD II system should be determined not
ready for the I/M test, your vehicle may fail the test.
MAINTAINING YOUR VEHICLE 373
7
Page 376 of 475

Your vehicle has a simple ignition key-actuated test,
which you can use prior to going to the test station. To
check if your vehicle’s OBD II system is ready, you must
do the following:
1. Insert your ignition key into the ignition switch.
2. Turn the ignition to the ON position, but do not crank
or start the engine.
3. If you crank or start the engine, you will have to start
this test over.
4. As soon as you turn your key to the ON position, you
will see the MIL symbol come on as part of a normal bulb
check.
5. Approximately 15 seconds later, one of two things will
happen:
a. The MIL will flash for about 10 seconds and then
return to being fully illuminated until you turn OFFthe ignition or start the engine. This means that your
vehicle’s OBD II system isnot readyand you should
notproceed to the I/M station.
b. The MIL will not flash at all and will remain fully
illuminated until you turn OFF the ignition or start the
engine. This means that your vehicle’s OBD II system
isreadyand you can proceed to the I/M station.
If your OBD II system isnot ready,you should see your
authorized dealer or repair facility. If your vehicle was
recently serviced or had a battery failure or replacement,
you may need to do nothing more than drive your
vehicle as you normally would in order for your OBD II
system to update. A recheck with the above test routine
may then indicate that the system is now ready.
374 MAINTAINING YOUR VEHICLE