Page 363 of 475
 tire in the cargo area,have the
tire repaired or replaced as soon as possible.
11. Check the spare tire pressure as soon as possible.
Correct pressure as required.
JUMP-S")
10. Place the deflated (flat) tire in the cargo area,have the
tire repaired or replaced as soon as possible.
11. Check the spare tire pressure as soon as possible.
Correct pressure as required.
JUMP-STARTING PROCEDURE
The battery is stored between the left front headlight
assembly and the left front wheel splash shield. Access is
through the splash shield.
Jump-starting remote battery terminals are located under
the hood.
WARNING!
•Take care to avoid the radiator cooling fan when-
ever the hood is raised. It can start anytime the
ignition switch is on. You can be hurt by the fan.
(Continued)
WARNING! (Continued)
•Do not attempt to push or tow your vehicle to get
it started. Vehicles equipped with an automatic
transaxle cannot be started this way. Unburned
fuel could enter the catalytic converter and once
the engine has started, ignite and damage the
converter and vehicle. If the vehicle has a dis-
charged battery, booster cables may be used to
obtain a start from another vehicle. This type of
start can be dangerous if done improperly, so
follow this procedure carefully.
•Do not use a booster battery or any other booster
source with an output that exceeds 12-Volts.
1. Wear eye protection and remove any metal jewelry
such as watchbands or bracelets that might make an
inadvertent electrical contact.
WHAT TO DO IN EMERGENCIES 361
6
Page 364 of 475

2. When boosting from a battery in another vehicle, park
that vehicle within booster cable reach, but without
allowing the vehicles to touch. Set the parking brake,
place the automatic transaxle in PARK and turn ignition
to LOCK for both vehicles.
WARNING!
Do not permit vehicles to touch each other as this
could establish a ground connection and personal
injury could result.
3. Turn off the heater, radio, and all unnecessary electri-
cal loads.4. Remove the protective cover over the remote jump-
start positive battery post(+)in the engine compartment.
Connect one end of the jumper cable to the positive
battery post. Connect the other end of the same cable to
the positive terminal of the booster battery. Refer to the
following illustration for jump-starting connections.
5. Connect the other cable, first to the negative terminal
of the booster battery andthen to the engine ground (-)
of the vehicle with the discharged battery.Make sure
you have a good contact on the engine ground. Refer to
the following illustration for jump-starting connections.
362 WHAT TO DO IN EMERGENCIES
Page 365 of 475
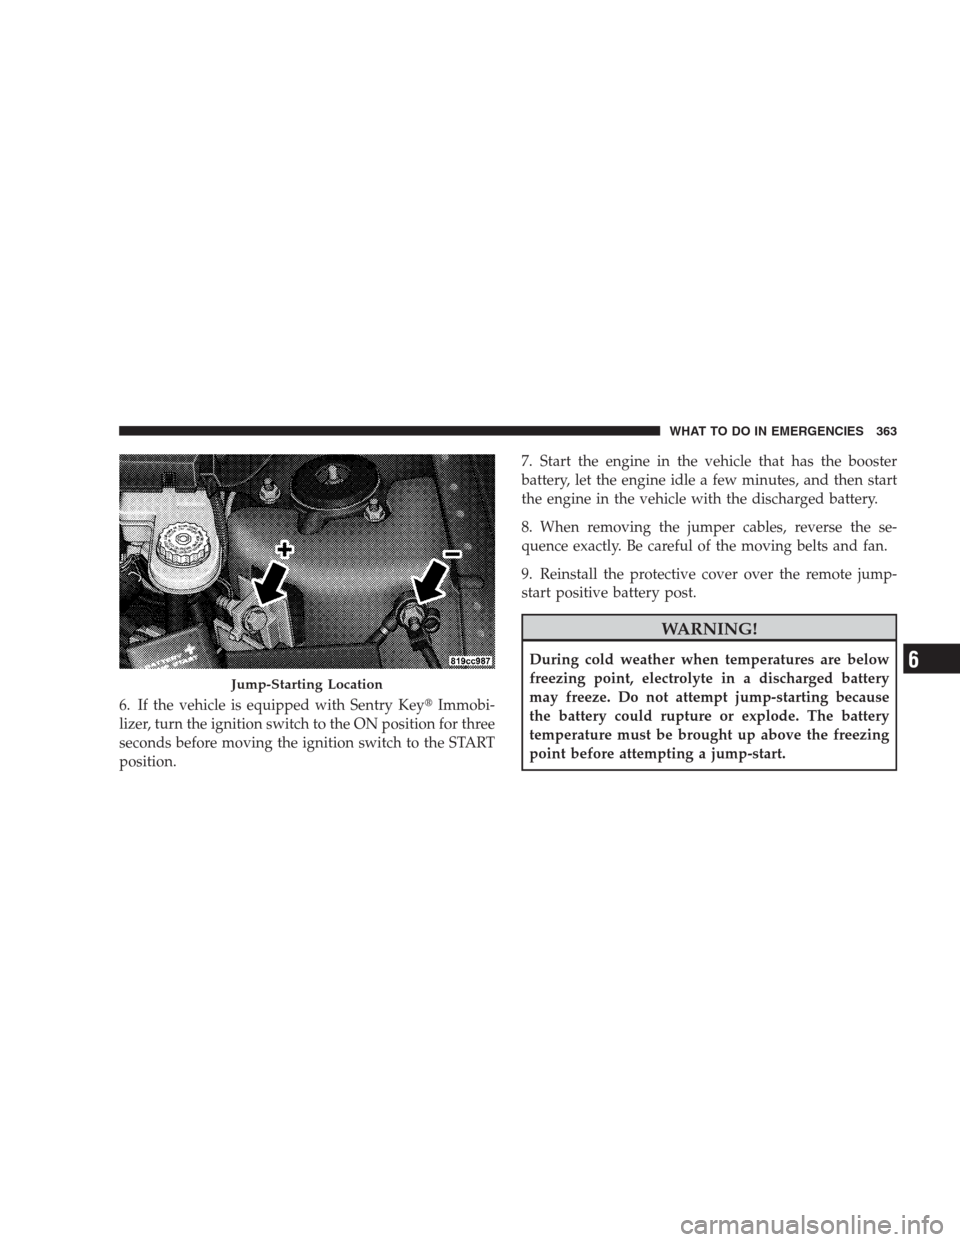
6. If the vehicle is equipped with Sentry Key�Immobi-
lizer, turn the ignition switch to the ON position for three
seconds before moving the ignition switch to the START
position.7. Start the engine in the vehicle that has the booster
battery, let the engine idle a few minutes, and then start
the engine in the vehicle with the discharged battery.
8. When removing the jumper cables, reverse the se-
quence exactly. Be careful of the moving belts and fan.
9. Reinstall the protective cover over the remote jump-
start positive battery post.
WARNING!
During cold weather when temperatures are below
freezing point, electrolyte in a discharged battery
may freeze. Do not attempt jump-starting because
the battery could rupture or explode. The battery
temperature must be brought up above the freezing
point before attempting a jump-start.
Jump-Starting Location
WHAT TO DO IN EMERGENCIES 363
6
Page 367 of 475

WARNING!
Fast spinning tires can be dangerous. Forces gener-
ated by excessive wheel speeds may cause axle and
tire damage or failure. A tire could explode and
injure someone. Do not spin your vehicle’s wheels
faster than 30 mph (48 km/h) or for longer than
30 seconds continuously without stopping when you
are stuck, and don’t let anyone near a spinning
wheel, no matter what the speed.
CAUTION!
Racing the engine or spinning the wheels too fast
may lead to transaxle overheating and failure. It can
also damage the tires. Do not spin the wheels above
30 mph (48 km/h). Do not spin the wheels continu-
ously for more than 30 seconds.
TOWING A DISABLED VEHICLE
With The Ignition Key
Your vehicle may be towed under the following condi-
tions: The shift lever must be in NEUTRAL, the distance
to be traveled must not exceed 15 miles (25 km), and the
towing speed must not exceed 25 mph (40 km/h).
Exceeding these towing limits may cause a transaxle
failure. If the transaxle is not operative, or if the vehicle is
to be towed more than 15 miles (25 km), the vehicle must
be transported either with a flatbed truck (all four wheels
off the ground) or with the front wheels off the ground.
CAUTION!
•If the vehicle being towed requires steering, the
ignition switch must be in the ON position, not in
the LOCK or ACC position.
(Continued)
WHAT TO DO IN EMERGENCIES 365
6
Page 368 of 475

•Do not attempt to tow this vehicle from the front
with sling type towing equipment. Damage to the
front fascia will result.
•Do not push or tow this vehicle with another
vehi")
CAUTION! (Continued)
•Do not attempt to tow this vehicle from the front
with sling type towing equipment. Damage to the
front fascia will result.
•Do not push or tow this vehicle with another
vehicle as damage to the bumper fascia and trans-
axle may result.
If you must use the accessories (wipers, defrosters, etc.)
while being towed, the key must be in the ON position,
not the ACC position. Make certain the transaxle remains
in NEUTRAL.
Without The Ignition Key
Special care must be taken when the vehicle is towed
with the ignition in the LOCK position. Flat bed towing
is the preferred towing method. However, if a flatbed
towing vehicle is not available, a wheel lift towing
vehicle may be used. Furthermore, rear towing is not
recommended with the front wheels on the ground, as
transaxle damage can result. If rear towing is the only
alternative, a front end dolly must be used. Proper
towing equipment is necessary to prevent damage to the
vehicle.
366 WHAT TO DO IN EMERGENCIES
Page 376 of 475

Your vehicle has a simple ignition key-actuated test,
which you can use prior to going to the test station. To
check if your vehicle’s OBD II system is ready, you must
do the following:
1. Insert your ignition key into the ignition switch.
2. Turn the ignition to the ON position, but do not crank
or start the engine.
3. If you crank or start the engine, you will have to start
this test over.
4. As soon as you turn your key to the ON position, you
will see the MIL symbol come on as part of a normal bulb
check.
5. Approximately 15 seconds later, one of two things will
happen:
a. The MIL will flash for about 10 seconds and then
return to being fully illuminated until you turn OFFthe ignition or start the engine. This means that your
vehicle’s OBD II system isnot readyand you should
notproceed to the I/M station.
b. The MIL will not flash at all and will remain fully
illuminated until you turn OFF the ignition or start the
engine. This means that your vehicle’s OBD II system
isreadyand you can proceed to the I/M station.
If your OBD II system isnot ready,you should see your
authorized dealer or repair facility. If your vehicle was
recently serviced or had a battery failure or replacement,
you may need to do nothing more than drive your
vehicle as you normally would in order for your OBD II
system to update. A recheck with the above test routine
may then indicate that the system is now ready.
374 MAINTAINING YOUR VEHICLE
Page 390 of 475

To minimize the possibility of catalyst damage:
•Do not shut off the engine or interrupt the ignition
when the transaxle is in gear and the vehicle is in
motion.
•Do not try to start the engine by pushing or towing the
vehicle.
•Do not idle the engine with any ignition coil connec-
tors disconnected for prolonged periods.
Cooling System
WARNING!
•When working near the radiator cooling fan, dis-
connect the fan motor lead or turn the ignition
switch to the LOCK position. The fan is tempera-
ture controlled and can start at anytime the igni-
tion switch is in the ON position.
(Continued)
WARNING! (Continued)
•You or others can be badly burned by hot engine
coolant (antifreeze) or steam from your radiator. If
you see or hear steam coming from under the
hood, do not open the hood until the radiator has
had time to cool. Never try to open a cooling
system pressure cap when the radiator is hot.
Coolant Checks
Check engine coolant (antifreeze) protection every
12 months (before the onset of freezing weather, where
applicable). If the engine coolant (antifreeze) is dirty or
rusty in appearance, the system should be drained,
flushed, and refilled with fresh engine coolant (anti-
freeze). Check the front of the A/C condenser for any
accumulation of bugs, leaves, etc. If dirty, clean by gently
spraying water from a garden hose vertically down the
face of the condenser.
388 MAINTAINING YOUR VEHICLE
Page 408 of 475
CavityCartridge
FuseMini
FuseDescription
140 Amp
Green—Power Top Mod-
ule (If Equipped)
2—20 Amp
YellowAWD Module
CavityCartridge
FuseMini
FuseDescription
3—10 Amp
RedBattery Feed —
Center High
Mounted Stop
Light (CHMSL)/
Brake Switch
4—10 Amp
RedBattery Feed —
Ignition Switch
5—20 Amp
YellowTrailer Tow — If
Equipped
6—10 Amp
RedIgnition Off
Draw (IOD) —
Power Mirror
Switch/Climate
Controls
7—30 Amp
GreenIgnition Off
Draw (IOD)
Sense 1
Totally Integrated Power Module (TIPM)
406 MAINTAINING YOUR VEHICLE

2—20 Amp
YellowAWD Module
CavityCartridge
FuseMini
FuseDescription
3—10 Amp
RedBattery Feed —
Center Hig")