Page 7 of 422

Front Seats
Manual Seats
{CAUTION
You can lose control of the
vehicle if you try to adjust a
manual driver’s seat while the
vehicle is moving. The sudden
movement could startle and
confuse you, or make you push a
pedal when you do not want to.
Adjust the driver’s seat only when
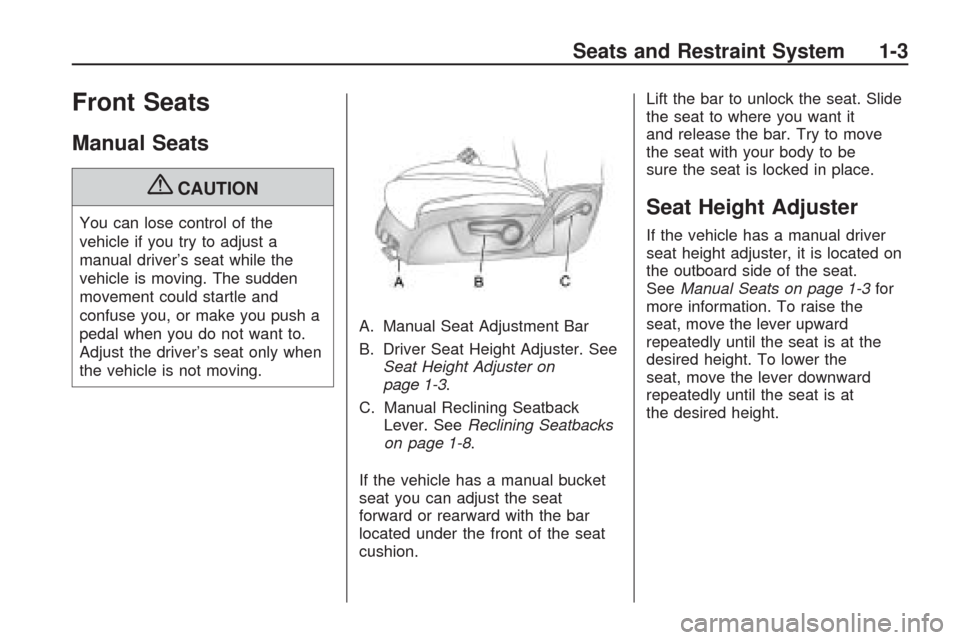
the vehicle is not moving.A. Manual Seat Adjustment Bar
B. Driver Seat Height Adjuster. See
Seat Height Adjuster on
page 1-3.
C. Manual Reclining Seatback
Lever. SeeReclining Seatbacks
on page 1-8.
If the vehicle has a manual bucket
seat you can adjust the seat
forward or rearward with the bar
located under the front of the seat
cushion.Lift the bar to unlock the seat. Slide
the seat to where you want it
and release the bar. Try to move
the seat with your body to be
sure the seat is locked in place.Seat Height Adjuster
If the vehicle has a manual driver
seat height adjuster, it is located on
the outboard side of the seat.
SeeManual Seats on page 1-3for
more information. To raise the
seat, move the lever upward
repeatedly until the seat is at the
desired height. To lower the
seat, move the lever downward
repeatedly until the seat is at
the desired height.
Seats and Restraint System 1-3
Page 8 of 422

Power Seats
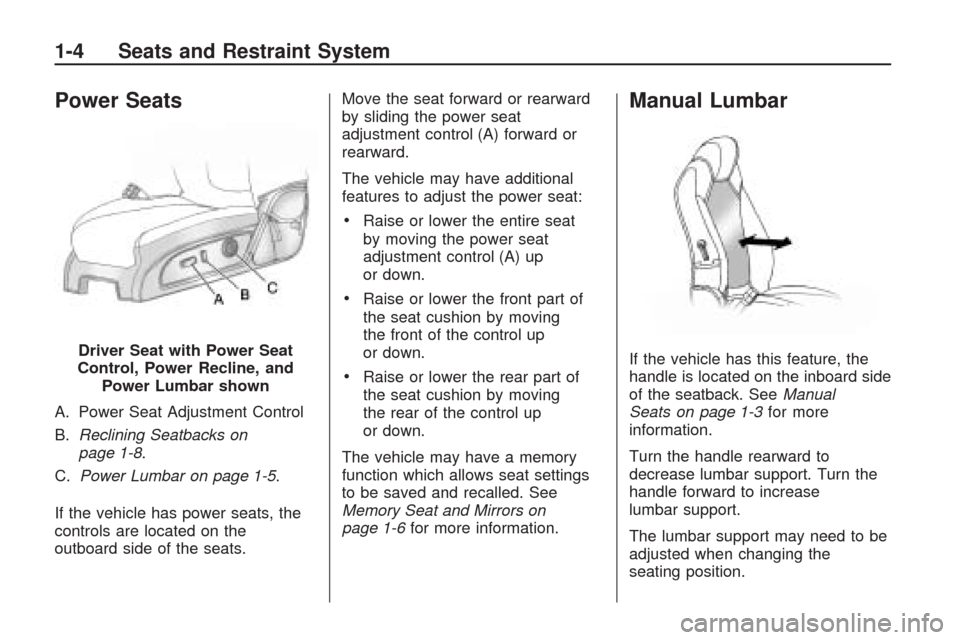
A. Power Seat Adjustment Control
B.Reclining Seatbacks on
page 1-8.
C.Power Lumbar on page 1-5.
If the vehicle has power seats, the
controls are located on the
outboard side of the seats.Move the seat forward or rearward
by sliding the power seat
adjustment control (A) forward or
rearward.
The vehicle may have additional
features to adjust the power seat:
Raise or lower the entire seat
by moving the power seat
adjustment control (A) up
or down.
Raise or lower the front part of
the seat cushion by moving
the front of the control up
or down.
Raise or lower the rear part of
the seat cushion by moving
the rear of the control up
or down.
The vehicle may have a memory
function which allows seat settings
to be saved and recalled. See
Memory Seat and Mirrors on
page 1-6for more information.
Manual Lumbar
If the vehicle has this feature, the
handle is located on the inboard side
of the seatback. SeeManual
Seats on page 1-3for more
information.
Turn the handle rearward to
decrease lumbar support. Turn the
handle forward to increase
lumbar support.
The lumbar support may need to be
adjusted when changing the
seating position. Driver Seat with Power Seat
Control, Power Recline, and
Power Lumbar shown
1-4 Seats and Restraint System
Page 10 of 422

z(Heated Seat and Seatback):To
heat the entire seat, press the
button with the heated seat and
seatback symbol.
This symbol will appear on the
climate control display to indicate
that the feature is on. Press the
button to cycle through the
temperature settings of high,
medium, and low and to turn the
heated seat off. Indicator bars next to
the symbol designate the level of
heat selected: three for high, two for
medium, and one for low.
The heated and cooled seats will
be canceled after the ignition is
turned off. To use the heated and
cooled seat feature after the vehicle
is started, you will need to press the
appropriate seat button again.Memory Seat and Mirrors
On vehicles with the memory
package, the controls for this feature
are located on the driver door
panel. The controls are used to
program and recall memory settings
for the driver seat and outside
mirrors.
To save positions in memory:
1. Adjust the driver seat, including
the seatback recliner and both
outside mirrors to a comfortable
position.
SeeOutside Power Mirrors on
page 2-32for more information.Not all mirrors will have the
ability to save and recall
the mirror positions.
2. Press and hold button 1 until
two beeps let you know that
the position has been stored.
A second seating and mirror position
can be programmed by repeating
the above steps and pressing
button 2.
To recall the memory positions, the
vehicle must be in P (Park). Press
and release either button 1 or
button 2 corresponding to the
desired driving position. The seat
and outside mirrors will move to the
position previously stored. You will
hear a single beep.
Using the RKE transmitter to
enter the vehicle, with the remote
recall memory feature on, causes
automatic seat and mirror
adjustment. There is no adjustment
when the position has not been
changed by another seating
position or the easy exit feature.
1-6 Seats and Restraint System
Page 27 of 422

See “Shoulder Belt Height
Adjustment” later in this section
for instructions on use and
important safety information.
6. To make the lap part tight, pull
up on the shoulder belt.
It may be necessary to pull the
stitching on the safety belt
through the latch plate to fully
tighten the lap belt on smaller
occupants.To unlatch the belt, push the button
on the buckle. The belt should
return to its stowed position. Slide
the latch plate up the safety
belt webbing when the safety belt is
not in use. The latch plate should
rest on the stitching on the
safety belt, near the guide loop on
the side wall.
Before a door is closed, be sure the
safety belt is out of the way. If a
door is slammed against a safety
belt, damage can occur to both the
safety belt and the vehicle.Shoulder Belt Height Adjuster
The vehicle has a shoulder belt
height adjuster for the driver and
right front passenger seating
positions.
Adjust the height so that the shoulder
portion of the belt is centered on the
shoulder. The belt should be away
from the face and neck, but not
falling off of the shoulder. Improper
shoulder belt height adjustment
could reduce the effectiveness of the
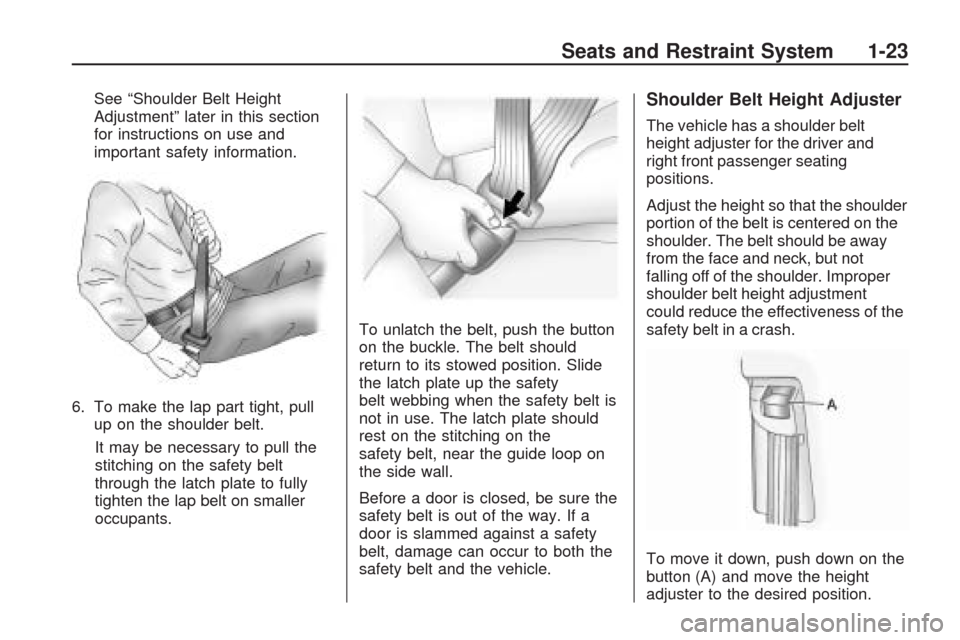
safety belt in a crash.
To move it down, push down on the
button (A) and move the height
adjuster to the desired position.
Seats and Restraint System 1-23
Page 125 of 422

The main components of the
instrument panel are listed here:
A.Turn Signal/Multifunction
Lever on page 3-6.Windshield
Wipers on page 3-7.
B.Instrument Panel Cluster on
page 3-31.
C.Audio Steering Wheel Controls
on page 3-125.
D.Instrument Panel Storage on
page 2-52.
E.Audio System(s) on page 3-73
orNavigation/Radio System on
page 3-103(If Equipped).
F.Outlet Adjustment on page 3-27.
G.Exterior Lamps on page 3-11.
Fog Lamps on page 3-13
(If Equipped).
H.Dome Lamp Override on
page 3-14.Instrument Panel
Brightness on page 3-13. Heated
Windshield Washer Button. See
Windshield Washer on page 3-8.
I.Cruise Control on page 3-9.
J.Tilt and Telescopic Steering
Wheel on page 3-6.K.Horn on page 3-5.
L.Driver Information Center (DIC)
on page 3-44.
M.Climate Control System on
page 3-19orDual Automatic
Climate Control System on
page 3-22.
N. Shift Lever. SeeShifting Into
Park on page 2-28.
O.Accessory Power Outlet(s) on
page 3-17.
P.Rear Window Wiper/Washer
on page 3-9. Traction Control
System (TCS) Disable Button.
SeeStabiliTrak
®System on
page 4-5.Tow/Haul Mode
on page 2-26(If Equipped).
Power Liftgate on page 2-11
(If Equipped).
Q.Heated Seats on page 1-5.
R.Hazard Warning Flashers on
page 3-5.
S. Passenger Air Bag Status
Indicator.
T.Glove Box on page 2-52.
Hazard Warning Flashers
|
Hazard Warning Flasher:Press
this button located on the instrument
panel below the audio system, to
make the front and rear turn signal
lamps �ash on and off. This warns
others that you are having trouble.
Press again to turn the �ashers off.
The turn signals do not work while
the hazard warning �ashers are on.
Horn
Press near or on the horn symbols
on the steering wheel pad to sound
the horn.
Instrument Panel 3-5