2009 CHEVROLET TRAVERSE window
[x] Cancel search: windowPage 260 of 422

Hydroplaning
Hydroplaning is dangerous. Water
can build up under your vehicle’s
tires so they actually ride on the
water. This can happen if the road
is wet enough and you are going
fast enough. When your vehicle is
hydroplaning, it has little or no
contact with the road.
There is no hard and fast rule
about hydroplaning. The best
advice is to slow down when the
road is wet.
Other Rainy Weather Tips
Besides slowing down, other wet
weather driving tips include:
Allow extra following distance.
Pass with caution.
Keep windshield wiping
equipment in good shape.
Keep the windshield washer �uid
reservoir �lled.
Have good tires with proper
tread depth. SeeTires on
page 5-36.
Turn off cruise control.
Before Leaving on a
Long Trip
To prepare your vehicle for a long
trip, consider having it serviced by
your dealer/retailer before departing.
Things to check on your own include:
Windshield Washer Fluid:
Reservoir full? Windows
clean — inside and outside?
Wiper Blades:In good shape?
Fuel, Engine Oil, Other Fluids:All
levels checked?
Lamps:Do they all work and are
lenses clean?
Tires:Are treads good? Are tires
in�ated to recommended
pressure?
Weather and Maps:Safe to
travel? Have up-to-date maps?
4-12 Driving Your Vehicle
Page 263 of 422

{CAUTION
Snow can trap engine exhaust
under the vehicle. This may cause
exhaust gases to get inside.
Engine exhaust contains carbon
monoxide (CO) which cannot be
seen or smelled. It can cause
unconsciousness and even death.
If the vehicle is stuck in the snow:
Clear away snow from
around the base of your
vehicle, especially any that is
blocking the exhaust pipe.
Check again from time to
time to be sure snow does
not collect there.
Open a window about
two inches (5 cm) on the side
of the vehicle that is away
from the wind to bring in
fresh air.
(Continued)
CAUTION (Continued)
Fully open the air outlets on
or under the instrument
panel.
Adjust the Climate Control
system to a setting that
circulates the air inside the
vehicle and set the fan speed
to the highest setting. See
Climate Control System in
the Index.
For more information about carbon
monoxide, seeEngine Exhaust on
page 2-30.
Snow can trap exhaust gases
under your vehicle. This can cause
deadly CO (carbon monoxide) gas
to get inside. CO could overcome
you and kill you. You cannot see it
or smell it, so you might not know it
is in your vehicle. Clear away snow
from around the base of your
vehicle, especially any that is
blocking the exhaust.Run the engine for short periods
only as needed to keep warm,
but be careful.
To save fuel, run the engine for
only short periods as needed
to warm the vehicle and then shut
the engine off and close the window
most of the way to save heat.
Repeat this until help arrives but
only when you feel really
uncomfortable from the cold. Moving
about to keep warm also helps.
If it takes some time for help
to arrive, now and then when you
run the engine, push the accelerator
pedal slightly so the engine runs
faster than the idle speed. This
keeps the battery charged to restart
the vehicle and to signal for help
with the headlamps. Do this as little
as possible to save fuel.
Driving Your Vehicle 4-15
Page 284 of 422

Different Size Tires and
Wheels.............................5-52
Uniform Tire Quality
Grading............................5-52
Wheel Alignment and Tire
Balance............................5-54
Wheel Replacement.............5-54
Tire Chains.........................5-55
If a Tire Goes Flat...............5-56
Tire Sealant and
Compressor Kit..................5-57
Tire Sealant and
Compressor Kit Storage......5-64
Changing a Flat Tire............5-65
Removing the Spare Tire
and Tools.........................5-66
Removing the Flat Tire
and Installing the
Spare Tire........................5-68
Secondary Latch System......5-72
Storing a Flat or Spare
Tire and Tools...................5-74
Compact Spare Tire.............5-77
Appearance CareInterior Cleaning..................5-78
Fabric/Carpet......................5-79
Leather..............................5-80Instrument Panel, Vinyl,
and Other Plastic
Surfaces...........................5-80
Care of Safety Belts............5-80
Weatherstrips......................5-81
Washing Your Vehicle..........5-81
Cleaning Exterior Lamps/
Lenses.............................5-81
Finish Care.........................5-81
Windshield, Backglass, and
Wiper Blades....................5-82
Aluminum or Chrome-Plated
Wheels and Trim................5-83
Tires..................................5-83
Sheet Metal Damage...........5-84
Finish Damage....................5-84
Underbody Maintenance.......5-84
Chemical Paint Spotting........5-84
Vehicle Identi�cationVehicle Identi�cation
Number (VIN)....................5-85
Service Parts Identi�cation
Label...............................5-85
Electrical SystemHigh Voltage Devices and
Wiring..............................5-85
Add-On Electrical
Equipment........................5-86
Windshield Wiper Fuses.......5-86
Power Windows and Other
Power Options...................5-86
Fuses and Circuit Breakers. . .5-86
Instrument Panel
Fuse Block.......................5-86
Underhood Fuse Block.........5-88
Capacities and Speci�cationsCapacities and
Speci�cations....................5-92
5-2 Service and Appearance Care
Page 305 of 422

If No Steam Is Coming From
The Engine Compartment
If an engine overheat warning is
displayed but no steam can be seen
or heard, the problem may not be
too serious. Sometimes the
engine can get a little too hot when
the vehicle:
Climbs a long hill on a hot day.
Stops after high-speed driving.
Idles for long periods in traffic.
Tows a trailer.
If the overheat warning is displayed
with no sign of steam:
1. Turn the air conditioning off.
2. Turn the heater on to the highest
temperature and to the highest
fan speed. Open the windows as
necessary.3. If in a traffic jam, shift to
N (Neutral), otherwise, shift
to the highest gear while
driving —D (Drive) or L (Low).
If the temperature overheat gage is
no longer in the overheat zone or an
overheat warning no longer displays,
the vehicle can be driven. Continue
to drive the vehicle slow for about
10 minutes. Keep a safe vehicle
distance from the car in front of you.
If the warning does not come back
on, continue to drive normally.
If the warning continues, pull over,
stop, and park the vehicle right away.
If there is no sign of steam, idle
the engine for three minutes while
parked. If the warning is still
displayed, turn off the engine until it
cools down. Also, see “Overheated
Engine Protection Operating Mode”
next in this section.
Overheated
Engine Protection
Operating Mode
This emergency operating mode lets
the vehicle be driven to a safe place
in an emergency situation. If an
overheated engine condition exists,
an overheat protection mode which
alternates �ring groups of cylinders
helps prevent engine damage. In this
mode, there is a signi�cant loss in
power and engine performance.
The temperature gage indicates an
overheat condition exists. Driving
extended distances and/or towing a
trailer in the overheat protection
mode should be avoided.
Notice:After driving in the
overheated engine protection
operating mode, to avoid engine
damage, allow the engine to cool
before attempting any repair.
The engine oil will be severely
degraded. Repair the cause of
coolant loss, change the oil and
reset the oil life system. See
Engine Oil on page 5-11.
Service and Appearance Care 5-23
Page 321 of 422

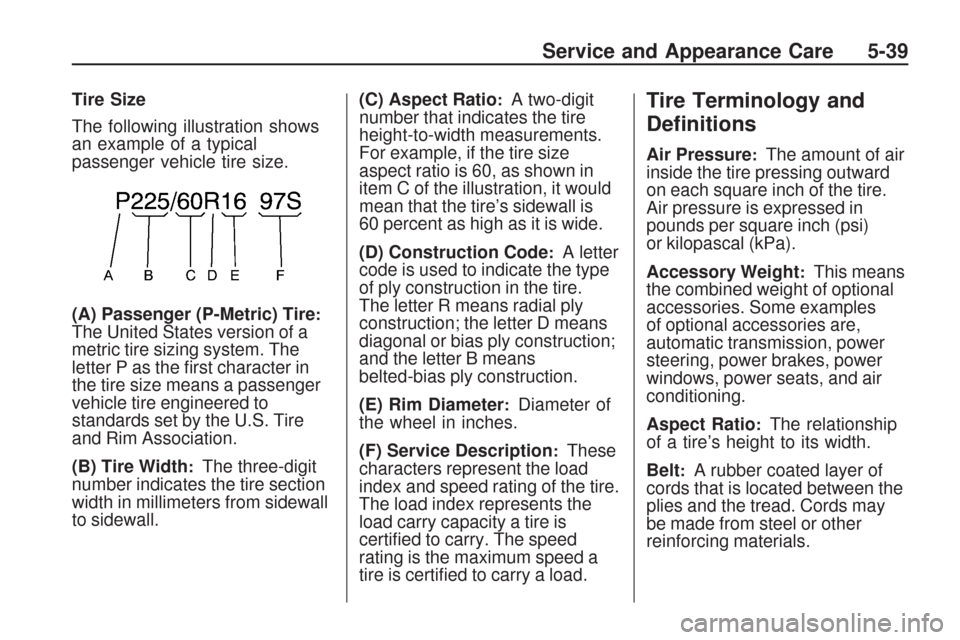
Tire Size
The following illustration shows
an example of a typical
passenger vehicle tire size.
(A) Passenger (P-Metric) Tire
:The United States version of a
metric tire sizing system. The
letter P as the �rst character in
the tire size means a passenger
vehicle tire engineered to
standards set by the U.S. Tire
and Rim Association.
(B) Tire Width
:The three-digit
number indicates the tire section
width in millimeters from sidewall
to sidewall.(C) Aspect Ratio
:A two-digit
number that indicates the tire
height-to-width measurements.
For example, if the tire size
aspect ratio is 60, as shown in
item C of the illustration, it would
mean that the tire’s sidewall is
60 percent as high as it is wide.
(D) Construction Code
:A letter
code is used to indicate the type
of ply construction in the tire.
The letter R means radial ply
construction; the letter D means
diagonal or bias ply construction;
and the letter B means
belted-bias ply construction.
(E) Rim Diameter
:Diameter of
the wheel in inches.
(F) Service Description
:These
characters represent the load
index and speed rating of the tire.
The load index represents the
load carry capacity a tire is
certi�ed to carry. The speed
rating is the maximum speed a
tire is certi�ed to carry a load.
Tire Terminology and
De�nitions
Air Pressure:The amount of air
inside the tire pressing outward
on each square inch of the tire.
Air pressure is expressed in
pounds per square inch (psi)
or kilopascal (kPa).
Accessory Weight
:This means
the combined weight of optional
accessories. Some examples
of optional accessories are,
automatic transmission, power
steering, power brakes, power
windows, power seats, and air
conditioning.
Aspect Ratio
:The relationship
of a tire’s height to its width.
Belt
:A rubber coated layer of
cords that is located between the
plies and the tread. Cords may
be made from steel or other
reinforcing materials.
Service and Appearance Care 5-39
Page 342 of 422

2. Unwrap the sealant/air hose (F)
and the power plug (H).
3. Place the kit on the ground.
Make sure the tire valve
stem is positioned close to the
ground so the hose will reach it.
4. Remove the valve stem cap from
the �at tire by turning it
counterclockwise.
5. Attach the sealant/air hose (F)
onto the tire valve stem. Turn
it clockwise until it is tight.
6. Plug the power plug (H) into the
accessory power outlet in the
vehicle. Unplug all items from
other accessory power outlets.
SeeAccessory Power Outlet(s)
on page 3-17.
If the vehicle has an accessory
power outlet, do not use the
cigarette lighter.
If the vehicle only has a cigarette
lighter, use the cigarette lighter.
Do not pinch the power plug
cord in the door or window.7. Start the vehicle. The vehicle
must be running while using
the air compressor.
8. Turn the selector switch (A)
counterclockwise to the
Sealant + Air position.
9. Press the on/off (B) button to
turn the tire sealant and
compressor kit on.
The compressor will inject
sealant and air into the tire.
The pressure gage (C) will initially
show a high pressure while the
compressor pushes the sealant
into the tire. Once the sealant is
completely dispersed into the tire,
the pressure will quickly drop and
start to rise again as the tire
in�ates with air only.10. In�ate the tire to the
recommended in�ation
pressure using the pressure
gage (C). The recommended
in�ation pressure can be
found on the Tire and Loading
Information label. See
Inflation - Tire Pressure on
page 5-42.
The pressure gage (C) may
read higher than the actual tire
pressure while the compressor
is on. Turn the compressor
off to get an accurate pressure
reading. The compressor
may be turned on/off until the
correct pressure is reached.
5-60 Service and Appearance Care
Page 345 of 422

4. Remove the tire valve stem cap
from the �at tire by turning it
counterclockwise.
5. Attach the air only hose (G) onto
the tire valve stem by turning it
clockwise until it is tight.
6. Plug the power plug (H) into the
accessory power outlet in the
vehicle. Unplug all items from
other accessory power outlets.
SeeAccessory Power Outlet(s)
on page 3-17.
If the vehicle has an accessory
power outlet, do not use the
cigarette lighter.
If the vehicle only has a cigarette
lighter, use the cigarette lighter.
Do not pinch the power plug
cord in the door or window.
7. Start the vehicle. The vehicle
must be running while using
the air compressor.8. Turn the selector switch (A)
clockwise to the Air Only position.
9. Press the on/off (B) button to turn
the compressor on.
The compressor will in�ate the
tire with air only.
10. In�ate the tire to the
recommended in�ation pressure
using the pressure gage (C).
The recommended in�ation
pressure can be found on the
Tire and Loading Information
label. SeeInflation - Tire
Pressure on page 5-42.
The pressure gage (C) may
read higher than the actual tire
pressure while the compressor
is on. Turn the compressor off
to get an accurate reading.
The compressor may be turned
on/off until the correct pressure
is reached.If you in�ate the tire higher
than the recommended pressure
you can adjust the excess
pressure by pressing the
pressure de�ation button (D),
if equipped, until the proper
pressure reading is reached.
This option is only functional
when using the air only hose (G).
11. Press the on/off button (B) to
turn the tire sealant and
compressor kit off.
Be careful while handling the tire
sealant and compressor kit as it
could be warm after usage.
12. Unplug the power plug (H) from
the accessory power outlet in
the vehicle.
13. Disconnect the air only hose (G)
from the tire valve stem, by
turning it counterclockwise, and
replace the tire valve stem cap.
Service and Appearance Care 5-63
Page 360 of 422

Appearance Care
Interior Cleaning
The vehicle’s interior will continue
to look its best if it is cleaned often.
Although not always visible, dust
and dirt can accumulate on the
upholstery. Dirt can damage carpet,
fabric, leather, and plastic surfaces.
Regular vacuuming is recommended
to remove particles from the
upholstery. It is important to keep
the upholstery from becoming and
remaining heavily soiled. Soils
should be removed as quickly as
possible. The vehicle’s interior may
experience extremes of heat that
could cause stains to set rapidly.
Lighter colored interiors may
require more frequent cleaning.
Use care because newspapers and
garments that transfer color to home
furnishings may also transfer color to
the vehicle’s interior.When cleaning the vehicle’s interior,
only use cleaners speci�cally
designed for the surfaces being
cleaned. Permanent damage may
result from using cleaners on
surfaces for which they were not
intended. Use glass cleaner only
on glass. Remove any accidental
over-spray from other surfaces
immediately. To prevent over-spray,
apply cleaner directly to the
cleaning cloth.
Notice:Using abrasive cleaners
when cleaning glass surfaces
on the vehicle, could scratch the
glass and/or cause damage to
the rear window defogger. When
cleaning the glass on the vehicle,
use only a soft cloth and glass
cleaner.Many cleaners contain solvents that
may become concentrated in the
vehicle’s breathing space. Before
using cleaners, read and adhere to
all safety instructions on the label.
While cleaning the vehicle’s interior,
maintain adequate ventilation by
opening the vehicle’s doors and
windows.
Dust may be removed from small
buttons and knobs using a small
brush with soft bristles.
Products that remove odors from
the vehicle’s upholstery and
clean the vehicle’s glass can be
obtained from your dealer/retailer.
5-78 Service and Appearance Care