2009 CHEVROLET TRAVERSE maintenance
[x] Cancel search: maintenancePage 274 of 422

Pulling A Trailer
Here are some important points:
There are many different laws,
including speed limit restrictions,
having to do with trailering. Make
sure the rig will be legal, not only
where you live but also where you
will be driving. A good source for
this information can be state or
provincial police.
Consider using a sway control.
See “Hitches” later in this section.
Do not tow a trailer at all during
the �rst 500 miles (800 km) the
new vehicle is driven. The engine,
axle or other parts could be
damaged.
Then, during the �rst 500 miles
(800 km) that a trailer is towed, do
not drive over 50 mph (80 km/h)
and do not make starts at full
throttle. This helps the engine and
other parts of the vehicle wear in
at the heavier loads.
Obey speed limit restrictions
when towing a trailer.
The vehicles can tow in D (Drive).
Shift the transmission to a lower
gear if the transmission shifts too
often under heavy loads and/or
hilly conditions. See “Tow/Haul
Mode” later in this section.
The vehicle is designed primarily
as a passenger and load carrying
vehicle. If a trailer is towed,
the vehicle will require more
frequent maintenance due to the
additional load.
Three important considerations have
to do with weight:
The weight of the trailer.
The weight of the trailer tongue.
And the weight on the vehicle’s
tires
Weight of the Trailer
How heavy can a trailer safely be?
It depends on how the rig is used.
For example, speed, altitude, road
grades, outside temperature and
how much the vehicle is used to pull
a trailer are all important. It can
depend on any special equipment on
the vehicle, and the amount of
tongue weight the vehicle can carry.
See “Weight of the Trailer Tongue”
later in this section for more
information.
Maximum trailer weight is calculated
assuming only the driver is in the tow
vehicle and it has all the required
trailering equipment. The weight of
additional optional equipment,
passengers and cargo in the tow
vehicle must be subtracted from the
maximum trailer weight.
Use the following chart to determine
how much the vehicle can weigh,
based upon the vehicle model and
options.
4-26 Driving Your Vehicle
Page 281 of 422

Parking on Hills
{CAUTION
Parking the vehicle on a hill with
the trailer attached can be
dangerous. If something goes
wrong, the rig could start to move.
People can be injured, and both
the vehicle and the trailer can be
damaged. When possible, always
park the rig on a �at surface.
If parking the rig on a hill:
1. Press the brake pedal, but do not
shift into P (Park) yet. Turn the
wheels into the curb if facing
downhill or into traffic if facing
uphill.
2. Have someone place chocks
under the trailer wheels.3. When the wheel chocks are in
place, release the brake pedal
until the chocks absorb the load.
4. Reapply the brake pedal. Then
apply the parking brake and shift
the transmission into P (Park).
5. Release the brake pedal.
Leaving After Parking on
a Hill
1. Apply and hold the brake pedal
while you:
start the engine,
shift into a gear, and
release the parking brake.
2. Let up on the brake pedal.
3. Drive slowly until the trailer is
clear of the chocks.
4. Stop and have someone pick up
and store the chocks.
Maintenance When Trailer
Towing
The vehicle needs service more
often when pulling a trailer. See
Scheduled Maintenance on page 6-3
for more information. Things that
are especially important in trailer
operation are automatic transmission
�uid, engine oil, axle lubricant, belts,
cooling system and brake system.
It is a good idea to inspect these
before and during the trip.
Check periodically to see that all
hitch nuts and bolts are tight.
Trailer Wiring Harness
The vehicle is equipped with the
following wiring harness for towing
a trailer.
Driving Your Vehicle 4-33
Page 284 of 422

Different Size Tires and
Wheels.............................5-52
Uniform Tire Quality
Grading............................5-52
Wheel Alignment and Tire
Balance............................5-54
Wheel Replacement.............5-54
Tire Chains.........................5-55
If a Tire Goes Flat...............5-56
Tire Sealant and
Compressor Kit..................5-57
Tire Sealant and
Compressor Kit Storage......5-64
Changing a Flat Tire............5-65
Removing the Spare Tire
and Tools.........................5-66
Removing the Flat Tire
and Installing the
Spare Tire........................5-68
Secondary Latch System......5-72
Storing a Flat or Spare
Tire and Tools...................5-74
Compact Spare Tire.............5-77
Appearance CareInterior Cleaning..................5-78
Fabric/Carpet......................5-79
Leather..............................5-80Instrument Panel, Vinyl,
and Other Plastic
Surfaces...........................5-80
Care of Safety Belts............5-80
Weatherstrips......................5-81
Washing Your Vehicle..........5-81
Cleaning Exterior Lamps/
Lenses.............................5-81
Finish Care.........................5-81
Windshield, Backglass, and
Wiper Blades....................5-82
Aluminum or Chrome-Plated
Wheels and Trim................5-83
Tires..................................5-83
Sheet Metal Damage...........5-84
Finish Damage....................5-84
Underbody Maintenance.......5-84
Chemical Paint Spotting........5-84
Vehicle Identi�cationVehicle Identi�cation
Number (VIN)....................5-85
Service Parts Identi�cation
Label...............................5-85
Electrical SystemHigh Voltage Devices and
Wiring..............................5-85
Add-On Electrical
Equipment........................5-86
Windshield Wiper Fuses.......5-86
Power Windows and Other
Power Options...................5-86
Fuses and Circuit Breakers. . .5-86
Instrument Panel
Fuse Block.......................5-86
Underhood Fuse Block.........5-88
Capacities and Speci�cationsCapacities and
Speci�cations....................5-92
5-2 Service and Appearance Care
Page 286 of 422

California Proposition 65
Warning
Most motor vehicles, including this
one, contain and/or emit chemicals
known to the State of California
to cause cancer and birth defects or
other reproductive harm. Engine
exhaust, many parts and systems
(including some inside the vehicle),
many �uids, and some component
wear by-products contain and/or
emit these chemicals.
California Perchlorate
Materials Requirements
Certain types of automotive
applications, such as airbag
initiators, seat belt pretensioners,
and lithium batteries contained in
remote keyless transmitters, may
contain perchlorate materials.
Special handling may be necessary.
For additional information, see
www.dtsc.ca.gov/hazardouswaste/
perchlorate.
Doing Your Own
Service Work
{CAUTION
You can be injured and the
vehicle could be damaged if you
try to do service work on a vehicle
without knowing enough about it.
Be sure you have sufficient
knowledge, experience, the
proper replacement parts, and
tools before attempting any
vehicle maintenance task.
Be sure to use the proper
nuts, bolts, and other
fasteners. English and metric
fasteners can be easily
confused. If the wrong
fasteners are used, parts
can later break or fall off.
You could be hurt.
If doing some of your own service
work, use the proper service
manual. It tells you much moreabout how to service the vehicle
than this manual can. To order the
proper service manual, see
Service Publications Ordering
Information on page 7-15.
This vehicle has an airbag system.
Before attempting to do your
own service work, seeServicing
Your Airbag-Equipped Vehicle
on page 1-57.
Keep a record with all parts receipts
and list the mileage and the date
of any service work performed. See
Maintenance Record on page 6-16.Adding Equipment to the
Outside of the Vehicle
Things added to the outside of
the vehicle can affect the air�ow
around it. This can cause wind noise
and can affect fuel economy and
windshield washer performance.
Check with your dealer/retailer
before adding equipment to
the outside of the vehicle.
5-4 Service and Appearance Care
Page 287 of 422

Fuel
Use of the recommended fuel
is an important part of the proper
maintenance of this vehicle. To help
keep the engine clean and maintain
optimum vehicle performance, we
recommend the use of gasoline
advertised as TOP TIER Detergent
Gasoline.
Gasoline Octane
Use regular unleaded gasoline with a
posted octane rating of 87 or higher.
If the octane rating is less than 87,
you might notice an audible knocking
noise when you drive, commonly
referred to as spark knock. If this
occurs, use a gasoline rated at
87 octane or higher as soon as
possible. If you are using gasoline
rated at 87 octane or higher and you
hear heavy knocking, the engine
needs service.
Gasoline Speci�cations
At a minimum, gasoline should
meet ASTM speci�cation D 4814
in the United States or CAN/
CGSB-3.5 or 3.511 in Canada.
Some gasolines contain an
octane-enhancing additive called
methylcyclopentadienyl manganese
tricarbonyl (MMT). We recommend
against the use of gasolines
containing MMT. SeeAdditives on
page 5-5for additional information.
California Fuel
If the vehicle is certi�ed to meet
California Emissions Standards,
it is designed to operate on fuels
that meet California speci�cations.
See the underhood emission control
label. If this fuel is not available in
states adopting California emissions
standards, the vehicle will operate
satisfactorily on fuels meeting federal
speci�cations, but emission control
system performance might be
affected. The malfunction indicator
lamp could turn on and the vehiclemight fail a smog-check test. See
Malfunction Indicator Lamp on
page 3-39. If this occurs, return to
your authorized dealer/retailer for
diagnosis. If it is determined that the
condition is caused by the type of
fuel used, repairs might not be
covered by the vehicle warranty.
Additives
To provide cleaner air, all gasolines
in the United States are now required
to contain additives that help prevent
engine and fuel system deposits
from forming, allowing the emission
control system to work properly.
In most cases, you should not have
to add anything to the fuel. However,
some gasolines contain only the
minimum amount of additive required
to meet U.S. Environmental
Protection Agency regulations.
To help keep fuel injectors and
intake valves clean, or if the vehicle
experiences problems due to dirty
injectors or valves, look for gasoline
that is advertised as TOP TIER
Detergent Gasoline.
Service and Appearance Care 5-5
Page 297 of 422

If the vehicle has Driver Information
Center (DIC) buttons:
1. Turn the ignition to ON/RUN,
with the engine off.
2. Press the vehicle information
button until OIL LIFE
REMAINING displays.
3. Press and hold the set/reset
button until 100% is displayed.
Three chimes sound and
the CHANGE ENGINE OIL
SOON message goes off.
4. Turn the key to LOCK/OFF.
If the CHANGE ENGINE OIL SOON
message comes back on when the
vehicle is started, the engine oil life
system has not reset. Repeat the
procedure.What to Do with Used Oil
Used engine oil contains certain
elements that can be unhealthy for
your skin and could even cause
cancer. Do not let used oil stay on
your skin for very long. Clean your
skin and nails with soap and water,
or a good hand cleaner. Wash or
properly dispose of clothing or rags
containing used engine oil. See the
manufacturer’s warnings about the
use and disposal of oil products.
Used oil can be a threat to the
environment. If you change your own
oil, be sure to drain all the oil from the
�lter before disposal. Never dispose
of oil by putting it in the trash, pouring
it on the ground, into sewers, or into
streams or bodies of water. Recycle
it by taking it to a place that collects
used oil.
Engine Air Cleaner/Filter
When to Inspect the Engine
Air Cleaner/Filter
Inspect the air cleaner/�lter at the
MaintenanceIIintervals and replace
it at the �rst oil change after each
50,000 mile (80 000 km) interval.
SeeScheduled Maintenance on
page 6-3for more information. If you
are driving in dusty/dirty conditions,
inspect the �lter at each engine oil
change.
SeeEngine Compartment Overview
on page 5-10for the location of
the engine air cleaner/�lter.
How to Inspect the Engine Air
Cleaner/Filter
To inspect the air cleaner/�lter,
remove the �lter from the vehicle and
lightly shake the �lter (away from
vehicle) to release loose dust and
dirt. If the �lter remains caked with
dirt, a new �lter is required.
Service and Appearance Care 5-15
Page 310 of 422

Brake Adjustment
Every time the brakes are applied,
with or without the vehicle moving,
the brakes adjust for wear.
Replacing Brake System Parts
The braking system on a vehicle is
complex. Its many parts have to be
of top quality and work well together
if the vehicle is to have really good
braking. The vehicle was designed
and tested with top-quality brake
parts. When parts of the braking
system are replaced — for example,
when the brake linings wear down
and new ones are installed — be
sure to get new approved
replacement parts. If this is not
done, the brakes might not work
properly. For example, if someone
puts in brake linings that are
wrong for the vehicle, the balance
between the front and rear brakes
can change — for the worse. The
braking performance expected can
change in many other ways if the
wrong replacement brake parts are
installed.
Battery
This vehicle has a maintenance free
battery. When it is time for a new
battery, see your dealer/retailer for
one that has the replacement
number shown on the original
battery’s label.
For battery replacement, see your
dealer/retailer or the service manual.
To purchase a service manual,
seeService Publications Ordering
Information on page 7-15.
Warning:Battery posts, terminals,
and related accessories contain
lead and lead compounds,
chemicals known to the State of
California to cause cancer and
reproductive harm. Wash hands
after handling.
Vehicle Storage
{CAUTION
Batteries have acid that can burn
you and gas that can explode.
You can be badly hurt if you are
not careful. SeeJump Starting
on page 5-29for tips on working
around a battery without
getting hurt.
Infrequent Usage: If the vehicle is
driven infrequently, remove the
black, negative (−) cable from the
battery. This helps keep the battery
from running down.
Extended Storage: For extended
storage of the vehicle, remove the
black, negative (−) cable from the
battery or use a battery trickle
charger. This helps maintain the
charge of the battery over an
extended period of time.
5-28 Service and Appearance Care
Page 317 of 422

Windshield Wiper
Blade Replacement
Windshield wiper blades should be
inspected for wear or cracking.
SeeScheduled Maintenance
on page 6-3for more information.
Replacement blades come in
different types and are removed in
different ways. To replace the
wiper blade assembly:
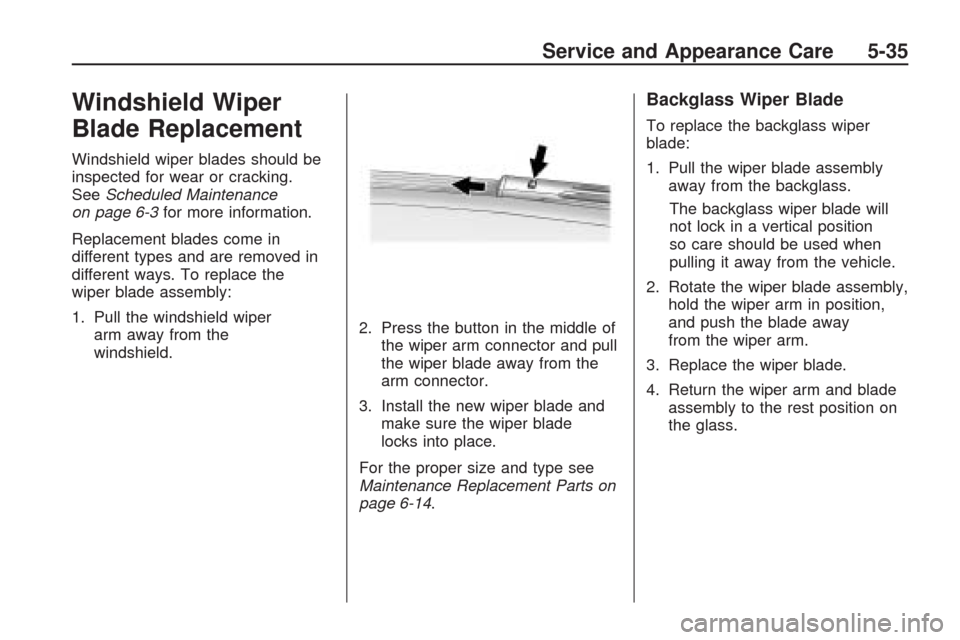
1. Pull the windshield wiper
arm away from the
windshield.2. Press the button in the middle of
the wiper arm connector and pull
the wiper blade away from the
arm connector.
3. Install the new wiper blade and
make sure the wiper blade
locks into place.
For the proper size and type see
Maintenance Replacement Parts on
page 6-14.
Backglass Wiper Blade
To replace the backglass wiper
blade:
1. Pull the wiper blade assembly
away from the backglass.
The backglass wiper blade will
not lock in a vertical position
so care should be used when
pulling it away from the vehicle.
2. Rotate the wiper blade assembly,
hold the wiper arm in position,
and push the blade away
from the wiper arm.
3. Replace the wiper blade.
4. Return the wiper arm and blade
assembly to the rest position on
the glass.
Service and Appearance Care 5-35